Male figure in full growth drawing. How to draw a person with a pencil in stages in full growth
Careful mastering of all the lessons of this course will help you take the first steps in studying human anatomy and proportions, teach draw people from life and from your imagination, in various poses and in motion, naked and in clothes.
The first lesson is a preparation for the actual study of the figure, and also lays the foundation for the structure of further work. Practical exercise at the end of the lesson will be of particular value to you as an artist when creating a model of a person and in preparing preliminary sketches, drafts, thinking of ideas, suggestions, actions, and poses where the figure is to be drawn without the use of models or copying. I highly recommend give him the utmost attention, and by no means skip it.
We draw a person from nature
In order to draw something well from memory or from your imagination, you must first build up a stock of basic knowledge on the subject. It is best to start drawing from nature. By constantly observing others, you can easily and quickly find out a large number of information about proportions, shape and structure, and in the process you will also develop your drawing skills. No amount of information gleaned from textbooks on drawing a person cannot serve as a substitute for this valuable exercise.
You must learn information not only about the shape and structure of the body, but also gain a deep knowledge of how people stand, sit, and move if you want them to be convincing on paper. For this reason, you must always use a sketchbook.
sketchbook
Just as a writer needs a notebook to jot down thoughts, and an athlete needs to exercise regularly to be in top shape, the artist needs an album or sketchbook to constantly hone your skills and visual memory. Your sketchbook should always be with you, so choose the optimal size for yourself and carry it in your bag or backpack with pencil. It is not necessary to buy an expensive sketchbook, because. you will have to do a lot of sketches and notes, and you will not even notice how quickly it will end. Buy something simpler so you don't have to worry about the cost. Sketchbook catalog from web-paint.
The best place to start probably at home. Your family members are ideal sitters because they are easily accessible and often don't do much. vigorous activity such as reading or watching TV.
 In order to keep your "models" ready to pose, it's best not to spend too much time on each drawing. Each sketch must be done no more than 10 minutes. It has great importance, because on the this stage quantity is important, not quality. You will quickly learn how to capture the essence of a pose or character in a few strokes and your work will be very realistic.
Having made several sketches in familiar environment, you'll soon feel confident enough to take your sketchbook outside. Find a suitable secluded place for yourself where no one will disturb you and try to make some sketches.
You should get into the habit of drawing all the time. Whenever you have a free moment, take out your sketchbook and sketch the people around you: standing at the bus stop, sitting in a cafe, or eating at work good opportunity make sketches of the people nearby. Pencil or ball pen perfect as a tool.
 Use only one side of the paper. There are three reasons for this. First, cheap paper shows through, so the lines you draw on one side can affect the quality of your work on the other. Secondly, even if you use paper good quality, pencil drawings on the reverse pages will erase the roughness, and spoil each other. The third reason for using only one side is that in due course you can take apart your sketchbook page by page and compare one work with another to check your progress.
At first, you will have no more than a tilt of the head or a turn of the shoulders before the subject starts to move. This is normal: everything you do contributes to the growth of your knowledge of the human figure. These details may not seem very valuable, but they are. If you are able to portray an untidy look young man hunched over opposite bus stop or a tired old woman burdened with shopping, your work will have authenticity, because the essence of character lies precisely in the subtlety of such details. You will be surprised how easy it is to notice and how it will be appreciated by everyone who sees your work.
 Your sketchbook should serve as your personal document. In fact, many artists also take notes in it and add comments to sketches, thereby increasing their usefulness later, especially if the sketch is to be used as the basis for a finished drawing.
Do not strive for neat, well-groomed drawings, artistically arranged on the page. Your album is not for that. Now your goal — capture character and the position of the selected object within a few minutes. Pick someone who is likely to stay in the same position for a while longer and get to work. Do not be shy. Do not try to make attractive lines, this exercise is to quickly capture the moment. Your sketches should be a real pleasure to see and sketch the life around you, as well as help you develop a sharp eye and a confident stroke.
If you've never tried sketching, you might think it's hard work, but it's not. This is the sweetest and most useful activity. It relaxes and invigorates, and is also a means of improving drawing skills.
 Always keep a sketchbook with you, wherever you are. This is so important that I won't get tired of repeating it. Draw people waiting on a train platform, or people sitting on a park bench, or your family members watching TV. In bars, restaurants, cafes and on the street you can see people of various sizes and builds. Tag them in your scrapbook and you will never regret it. Sketching is not only fun, it's also the best way expand your knowledge and abilities. If you want to create living realistic works, this should become a habit. Sometimes it is worth including the background and surrounding details in the sketch. It could be surrounding trees or buildings. When you start drawing from your head, this experience will be very valuable.
 As we progress through the course, we will periodically return to this topic, drawing sketches from life. Without this exercise, your powers of observation and your drawings from memory will gradually deteriorate until they are little more than a series of clichés.
Practical task
Make at least 20-30 sketches different people in different environments. I do not recommend going to next lesson until you complete this task. This exercise should become your regular daily workout.
The article used materials from the book Ron Tiner "Figure Drawing without a model".
Each of us in childhood made our first sketches. At drawing lessons, not everyone tried to do the work efficiently, did not think about acquiring skills. At an older age, many feel the need to create something beautiful, but how to learn to draw with a pencil? After all, any drawing techniques are based on the ability to properly hold the stylus, make elementary sketches, and create images. In this article you will find helpful tips for learning how to draw art school, as well as independently.
Pencil Drawing Basics
Experts say that anyone can learn how to learn how to draw correctly with a pencil, regardless of age. Learning to paint always begins with getting to know the materials that a novice artist needs:
- sheet of white paper, any format;
- eraser, aka rubber grater;
- simple pencils.
The first steps in drawing begin with a pencil sketch. With the help of mean lines are transmitted general outline sketched object, a variety of poses, moments of movement. Sketch is the most fast way fix on paper your first thoughts and impressions of what you draw. During the execution of the sketch, you do not need to pay attention to unnecessary details, it is recommended to draw it for no more than 10 minutes.
How to learn to draw from scratch
Scientific psychologists have proven that during the process of creating a drawing, both hemispheres of the brain are actively working in a person, imagination is turned on. No wonder there is a technique for calming the nerves called art therapy - this is drawing for adults and children. Many people want to be able, but do not know how to learn how to draw with a pencil. Learning to draw from scratch is not at all difficult, because the technique of drawing with a pencil is available to children and adults.
Art school
How to teach a child to draw with a pencil? The best solution is to send him to art school. It is designed to teach children school age from 6 to 17 years old. Upon admission to this institution, the level of knowledge and skills in fine arts. Depending on the skills of the child, they are assigned to the appropriate group of students.

Education at the art school is free and is funded by the state. This institution is visited after the main lessons at school three times a week. The course of study is from two to seven years. After graduation, the graduate receives a diploma that opens the door to an artistic future: admission to a college or a higher institution in the specialty.
Courses
How can adults learn to draw with a pencil? It is possible to learn the art of drawing with the help of art courses. They are paid. The course of study ranges from several weeks to four years. During this time, the art studio will teach you the following skills:

- How to draw correctly in a phased technique.
- Learn how to use a pencil and a brush. Teachers in the art studio teach not only the ability to properly hold tools, but also to choose, to distinguish high-quality from low-grade ones.
- Learn how to draw children with a pencil.
- Learn many drawing techniques.
- Learn how to learn how to draw various objects.
- Learn to draw from life, landscapes, still lifes, people, animals, etc.
- Learn to color - choose and combine colors correctly.
- Learn how to draw a cat with a pencil and other animals.
- You will be told how to learn how to draw portraits.
Lessons online
If you do not have free time, and you do not know how to learn how to draw with a pencil, then use online courses. They are suitable for those who do not have the opportunity to visit a stationary studio. Approximate plan passing classes of this format for beginner artists:

- The teacher gives basic knowledge in drawing in the form of examples of work, pictures.
- The chosen topic of the drawing lesson is analyzed in detail.
- The teacher at the end of the lesson gives homework, which you complete and mail to your teacher for review.
- At the next lesson, the student, together with the teacher, analyzes the homework in detail, together correcting the mistakes in the drawing, if any.
Online lessons, as an option, in order to learn how to draw professionally, are not the only way out. If you do not have financial and territorial opportunities, but there is a great and irresistible desire to learn how to draw cool, then this can be done independently with the help of:
- textbooks and manuals for drawing;
- tutorials;
- drawing instructions;
- instructional videos.
Step by step drawing technique
A beginner needs to practice drawing by creating sketches. In order for the drawing to be meaningful, the sketch must be created according to the rules that form the plan:
- First, choose an object to draw, such as a teapot or a vase.
- Examine it from all sides, determine the shape, its texture, how shadows fall on this object.
- Determine the composition of the drawing, i.e. how it will be placed on paper, in what format.
- After the contours are drawn, draw the details, apply shadows.
Human
In order to draw a person, you need to decide on the composition. This means that you need to analyze the boundaries of the location from head to toe. When you mentally imagine the figure, begin to compose the parts of the body. You need to draw a person from a sketch of the contours of the head, dropping lower. In the image of a person, it is very important to immediately find the image, you should determine the amount of detail needed for the finished drawing.
Face
In drawing a person, much attention is paid to the face. To draw it correctly, you need to follow the steps:

- Decide how the face will be located on paper. To do this, mentally draw an axis of symmetry, it should pass through the center of the sheet.
- Draw with a pencil on paper the outlines of the face in the form of an oval (shape chicken egg).
- Line up the shape of the face, starting from the chin line, moving to the most convex part - the zygomatic region, then to the narrowest - the temporal zone.
- Align the drawn lines with the help of an eraser, this will noticeably "lighten" the outlines of the oval.
- Divide the resulting oval into three equal parts with light, barely noticeable lines. The very first line, located closer to the chin, marks the tip of the nose.
- We draw the nose, starting from the tip. It always protrudes forward, therefore it has a round, square, or pointed shape. Then we draw the wings of the nose and the bridge of the nose.
- We draw a mouth, starting from the upper bend of the lip, which is located in the middle of the nostrils of the nose.
Eyes
In a portrait of a person, the eyes occupy the most important place, they attract attention to themselves, so they need to be given special attention. To draw them in a phased technique, you must adhere to this plan:

- Before drawing the eyes, it is necessary to designate the eyebrows, which are located at the level of the bridge of the nose. Their form depends on the character that the artist wants to convey in the portrait.
- Having outlined the approximate location of the eyes, we draw their shape in the form of an oval.
- Draw a pupil in the shape of a circle.
- We direct the eyelids and shape the eyelashes.
Anime and Manga
Many young artists start their art training with anime and manga, because portraying people in the style of bright Japanese cartoon characters is much easier than in the classic one. The greatest emphasis in such cartoon characters falls on the head, eyes and hair. Let's analyze step-by-step scheme drawing, with which an aspiring artist learns how to learn how to draw anime:

- We start drawing anime with an oval that will be the head.
- Divide the circle in half lengthwise with straight line.
- We divide the head across into three parts with light lines.
- Next, you need to note the location of the eyes, nose and mouth.
- Draw big eyes starting from the arch of the upper eyelid. The distance between them should be equal to one eye. Much attention in drawing pupils is paid to applying highlights. Eyebrows for these characters are drawn classic style: two straight arcs.
- Anime and manga noses are drawn small, expressed with a tick.
- The lips are drawn with two small lines.
- Anime and manga hair should be drawn in falling triangles that slightly cover the eyes.
- Anime girls are drawn in bright clothes, mostly in dresses.
3d drawings

Volumetric drawings fascinate with their realism, thanks to the correct construction of the form, applying shadows and highlights in the right places. Learning to depict such pictures should be simple geometric shapes: cylinder, rhombus, square. To recreate the 3D illusion of an object, it is necessary to draw in isometry, when the angles between the coordinate axes are 45 degrees. The volume of the picture is added by auxiliary lines that are drawn inside shapes easy pressing, and the outline is drawn in bold, more dark color.
portraits

Portraits can be drawn from nature or from photographs. Before drawing up an image, carefully consider what message it will carry. future drawing. Learn to draw a portrait of a person correctly, not only in terms of proportionality and symmetry, but also to display vivid emotions. Another task of drawing an image of a person is the maximum transfer of the similarity of what is drawn, for its implementation, before starting to draw, consider all the details, highlight those features, “highlights” that you will focus on.
Graffiti on paper

Now graffiti drawing is a fashionable movement that is gaining momentum. Many buildings are full of incomprehensible voluminous inscriptions, but often there are beautiful, professional drawings on the walls. So that your paintings do not disfigure city buildings, but expensive paints did not disappear in vain, it is necessary to train for a long time on paper. To get started, try drawing the letters of the alphabet with a simple pencil. To give them volume, use auxiliary lines.
House

The ability to draw buildings is useful not only for children, but also for people of any age. age groups to easily compose pictures, such as a house with a landscape. Buildings are very easy to draw with lines. You should start with a rectangle, adding a triangle, you will get the image of a house, as children draw it. With the help of simple tricks and additional lines, the house becomes voluminous.
Cars

To draw a car with a pencil, you must adhere to step by step plan:
- Mark the outer outlines of the machine by dividing it in half with a line.
- We draw the body with bolder lines.
- Then we draw wheels.
- We display the details of the front of the car: headlights, windshield, bumper.
- We draw windows, doors, mirrors.
Animals

It is much more difficult to draw animals than objects, especially from nature, because they constantly change their position and are in motion. To draw an animal, for example, a horse, you need to decide on its characteristic features: thick mane, elongated muzzle, slender muscular legs. See detailed instructions, . You may not be able to correctly depict your favorite cat or dog on the first try, but after a few trainings you will definitely succeed.
Video tutorials on drawing with a simple pencil for beginners
Video tutorials are a great way to learn how to draw on your own. Below is a selection of tutorial videos where experienced artists demonstrate how to create easy pencil drawings for beginners. After watching the video, you will learn how to draw heroes Japanese cartoons– anime girls, learn how to draw flowers. If you like landscapes, then watch the third video until the end, in which the artist draws nature, focusing on trees.
Draw girls
How to draw flowers
Beautiful landscapes
How to draw a human body
This method is by no means the best, much less the fastest, but from the point of view of most artists, it is correct. He slowly but surely helps to draw a person with a pencil in stages.
At the end of the article you can watch video About,
This method of drawing is aimed at stimulating the imagination and forming an idea of the human body in three-dimensional space, well suited for beginners and for people who are assiduous and patient.
Almost all novice draftsmen start drawing a human figure from the head, thereby making a gross mistake. And they are very surprised when, as a result, it turns out that there is absolutely no room left for the feet on paper - this method will save you from such unpleasant situation.
Consider ideal proportions human body:
So head in people tall fits along the length of the body 8 times, in people of average height - 7.5 times, in people of short stature - 6-7 times.
Head fits in body length 2.5 times, in the length of the legs - 3-4 times.
Stretched along the body hand should concern mid-thigh.
Shoulder width in an adult male is usually two head lengths and more hip width.
Thigh length corresponds leg length with foot, a shin - two lengths of the foot.
The female figure, unlike the male one, has a lower average height and shorter limbs.
hip width women usually have more shoulder width.
The head of a woman is relatively and absolutely smaller than that of a man.

Schematic representation of a person:
A song from the cartoon "Octopussy": "Stick, stick, cucumber, it turned out a little man ..." every child knows!
And do not underestimate this phrase.
Schematic little men display very important characteristic- proportions of body parts. And in order to avoid logical discord in our wand-shaped men, it is necessary to observe the so-called "artistic canon".
Now let's take a closer look at our sketchy little men:
Schematic Man #1
Everyone has drawn such a little man at least once in their life.
This is the so-called basic man.
But there isn't much you can do about it.
Unless you practice keeping the proportions of the head, torso, arms and legs.
Schematic Man #2
Here, the proportions of the forearm, thigh, lower leg and foot are additionally outlined.
Schematic man #3
The perfect wand man!
I'm sure you've hardly seen any child draw a little man in this way.
The shoulders and pelvis of this figure already have a certain width.
Exercise:
In order to understand how accurately you keep proportions in your work, draw a few schematic people.
Thus, simply and quickly, without being distracted by details (clothes, hair, etc.), you can evaluate how well you know the proportions. human body.
In addition, you can immediately determine whether the figure will fit on the sheet.
I think now you understand how important it is to master the proportions. And what an important role in future picture playing sketchy men.
Human posture:
It's time to revive and make our hero do something. So before you start working on a character, with the help of schematic drawings, you can try many poses and choose one.
Below are some examples of schematic people in action.
The picture shows a person walking.
Pay attention to the movement of the hip joints. As a rule, the shoulders move in the opposite direction.
The person lies on his side with support on one arm. Thus, the chest "hangs" on the shoulder and the spine, bending, draws a curved line.
In order to draw the human body, you need to know the features of its structure.
The skeleton is the basis
head
rib cage
spine
pelvis
joints
arms
brushes
legs
feet

Notice the curvature of the spine
(to make it better visible, we will not draw a hand).
The skeleton can be drawn in a simplified form:
Having an idea about the structural features of the skeleton, moving on to muscle and/or fat
, if we get lucky…).
To display body parts, we will use all kinds of shapes: cylinders, ellipses, etc.
Now you can clearly appreciate
The whole process from sketching (creating a schematic man) to volumetric drawing based on a schematic drawing:


Also this method will help you with the details. For example, in drawing the hands and feet:
That's all!
main idea of this lesson - for drawing it is important right foundation.
And to achieve this goal, it is necessary to discard all unnecessary and present it in a schematic form.
And schematic little men will help you with this!
The main advantage of this method is that you can easily and quickly try on many poses for your character.
Choose the most suitable pose and already at the first stage decide on the composition.
This article is suitable for those who want to learn how to draw a person in full height or in general how to draw with a pencil step by step
Thank you for your attention.
This article will help you master the basic principles of building a human figure. The proportions of the body are the point with which the beginning artist must be most careful in the early stages of his training. But most, including myself during my early creative years, ignore this knowledge. Now it seems to me that Proportions are one of the main points in drawing a person.. This material shows that you need to be more careful with the proportions of the human body (especially female figure) when you draw . There are many detailed books and websites on the subject and what you will read here is really just the old way I define proportions. own drawings. You have probably read about the eight heads rule in many illustrated books. In painting the ideal body is 8 heads high. However, the proportions of the body of each individual person are relative, and sometimes can reach from 7 to 9, depending on the physiological characteristics and the view of the artist. The same goes for cartoon characters. Since comic book art mostly celebrates the perfect human form, the eight-head rule applies to cartoon masterpieces as well. We suggest you start your study of proportions by drawing your characters in simple poses (standing or sitting).
When drawing a human figure, always start your drawing with axes and guides. This will make things easier and you can set the proportions and pose right away without going into too much detail. Once you have mastered the base of your figure, it will be very easy to complete the drawing. Artists often paint female bodies slightly curved with bulging hips and a thin waist. In the figure, you must immediately determine the size of the head, this will be your "centimeter" for the rest of the body, which you will use in further measurements. I tend to be as detailed as possible at this stage, but that's my whim, not the rule.
The proportions of the length of the head will be your basis for the rule of eight chapters.
- From the chin to the middle of the chest, the height of one head fits; in a woman, as a rule, this line can indicate the middle of the chest area around the nipples.
- The distance from the chin to the shoulder is usually equal to 1/4 of the length of the head.
- The distance from the chest down to the abdomen (navel area) is also proportional to the height of the head.
- If we postpone our “centimeter” from the navel in descending order, then we will get just to the bottom of the intimate zone.
- Height of one head to half of the hip area.
- A head lower - the upper part of the legs, setting aside one more size of the head, we will find ourselves just below the knees.
- Continuing to postpone the base size, we get more or less half of the lower leg.
- And the last of the eight heads down will hit just below the ankle.

If you notice, the foot is not an element of measurement, that is, an impromptu "centimeter". This is because the length of women's legs can actually vary depending on how high the shoe is. Also, I have noticed that some artists have various options lengths when it comes to legs, where sometimes different parts can be a little shorter or longer. It mostly depends on anatomical preference.
The width of the shoulders also varies depending on the physiological structure of a person. But usually it is equal to the size of two heads located side by side, one ear to the other. Do not make this size less than two widths, so as not to get a strange silhouette. The hips are also not the same in all people. Their width, like the shoulders, is approximately equal to two head sizes, maybe a little more, but in no way less than two heads together without ears. Contrary to some opinions, a woman's shoulders can indeed look wider, but only in rare cases when her entire body is muscular. Broad shoulders thin waist and relatively wide hips can contribute to the sexuality of the figure. Arm length is not usually a problem for beginners. The distance from the shoulder to the elbow is equal to one height of the head and another half of it. From the elbow to the wrist, you can also set aside the size of the head.

Human beings are made up of basic geometric shapes that ultimately together form one whole. As with, and other parts of the face, we rely not only on the knowledge of proportions, but also on our perception of the world around us, and when building a human figure, the image depends on how you interpret the various parts of the body. For every beginner at an early stage of training, extensive knowledge and understanding in the field of anatomy is required. Imagine a robot and how it is constructed. In him cylindrical shapes for arms and legs, elliptical shapes for shoulders and joints such as knees and wrists. The bust, as you remember, is located on a line removed from the chin down by the size of the head. This is where the middle of the bust will actually be.
Is always try to use loose curved lines especially when portraying a woman. There are no straight lines in man. All people are covered with soft muscles on top, and this should be visible in your drawings. At this stage, you can see very clearly if there are things you need to correct: posture, and body. It is important to make any necessary changes now before finishing the drawing. If everything is in order, you can go ahead and put the finishing touches.

To build the figure of the girl, I used an HB pencil because it is easier to scan onto a computer. In general, usually for drawing, I take one sheet of paper, an eraser, a 2H pencil to build my drawing and H or HB pencils for shading. When the figure is built, all that remains to be done is to draw the clothes. Then you should delete the old and unnecessary lines, but for this tutorial I left them to show how everything is done at the drawing stage.
For kids senior group kindergarten it is important to devote enough time not only to the intellectual and physical development but fine art.
In the drawing, the child manifests himself, fantasizes and at the same time develops his abilities. It is still quite difficult for children 5-6 years old to convey all the subtleties of a particular subject, so the help of parents is simply required here.
Trees and plants are not so difficult to draw, but with a human figure, things are more complicated if the task is to draw it in motion.
We will help you with this and show you how to teach a child to draw a person with a simple pencil in stages. For this purpose, you can choose several ways, any child of 5-6 years old will master them.
Before you start drawing a figure with a pencil, it is worth considering that you should not draw dashed lines, and then trace them. Drawing a person, even for beginners, will not be so difficult if you draw lines with just one movement, without being afraid to make a mistake.
When drawing a figure in motion, it is worth imagining its image mentally, and then transferring imaginary lines on a piece of paper. The main rule for beginners is not only to adhere to the accuracy of the outlined lines and observe the proportions of the body, but also to convey the essence and significance of the drawn image.
The main advantage of any artist is the ability to convey the character and inner mood of a person created on a sheet of paper.
Quite often, when drawing a person, it is not possible to maintain the proportions of the body, as a result of which the drawn figure does not look believable. The main problem is the incorrect length of the upper and lower limbs, too large or too small a head.
Such mistakes are very typical for children 5-6 years old, so it is recommended to draw a pencil drawing in stages, we learn to break the drawing into several separate parts.
Often, a human figure is conditionally divided into 7 identical parts, which can be equated to 7 head circumferences, including the neck.
Having learned theoretical basis, we learn to draw a person in motion with children.
Drawing process
Option 1
- First, you need to draw an oval together with the child, which will later be folded with the head of the drawn person.
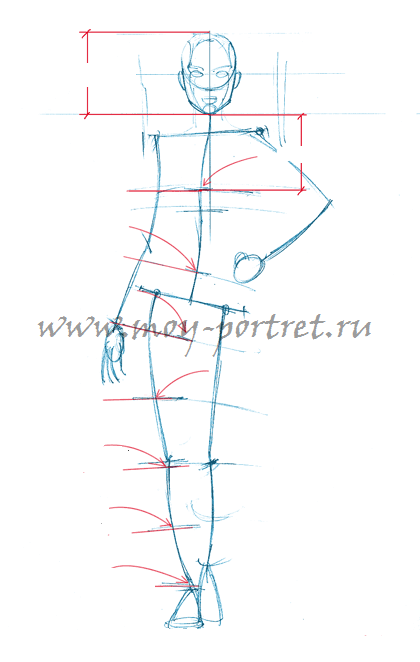
Just below the oval, draw the neck, this part of the body should not be too long, it must be placed strictly in the middle. Then we draw a rectangle, it will be a guideline for further drawing the body.
- Next, you need to draw the same rectangle, its width should be equal to the first one, but the length should be a little more. Divide the second rectangle in half, thus making a sketch for the lower limbs. The corners of the upper rectangle are slightly rounded, thus forming the shoulders.

- Now you need to remove the extra lines with an eraser, which are indicated in the figure with a red arrow, this procedure will be interesting for children.

- In order for the child to fully master the drawing lesson, it is worth telling him in detail how the details of the head are drawn. All unnecessary lines can be easily removed with an eraser.
In the middle of the previously prepared oval, draw the eyes, as well as the nose and mouth. Do not forget to draw eyebrows, sketch out the person's hairstyle.

- At the very end, make a few oblique lines that will depict the folds on the clothes, draw necessary elements shoes.

The drawing is completely ready, each parent will be able to teach their child to draw a person in stages.
Option 2
This simple way of depicting a figure in motion will appeal to fidgety children.

- First, sketch lines on paper, which will later be a guide for drawing the torso, upper and lower limbs.
In the upper part of the sheet we depict the head (draw an oval). The child will be able to complete this task independently under the guidance of the parent. Do not forget to mark lines inside the oval along which the eyes, nose, and mouth will be placed.
- Based on the guides, draw the human torso. Next, you can start drawing hairstyles. Do not exclude some details, let the kid finish drawing any object in the person’s hand on his own. Detail the face, carefully depict the eyes with a nose and mouth.
- Now it remains only to remove the remaining extra lines.
It's so easy to draw a person, such a procedure will please not only parents, but also children, thanks to this the child will master some skills in the fine arts.


, poultry farming")


- Burns, Robert - short biography
- The concept of common vocabulary and vocabulary of limited use
- Nancy Drew: The Captive Curse Walkthrough Nancy Drew Curse of Blackmoore Manor Walkthrough
- Deadpool - Troubleshooting
- Won't start How to Survive?
- What to do if bioshock infinite won't start
- Walkthrough Nancy Drew: Alibi in Ashes
- Spec Ops: The Line - game review, review Spec ops the line crashes on missions
- Room escape level 1 walkthrough
- Processing tomatoes with boric acid How much will 2 grams of boric acid
- Cucumber Grass (Borago)
- Bioinsecticide Lepidocid: purpose, properties and application procedure Lepidocide waiting period
- How to change the language to Russian in steam
- Dendrobium noble: room care
- Morphology of plants general concepts - document
- Planting, propagation and care of bamboo at home, photo Growing bamboo from seeds
- How to strengthen the cellular signal for the Internet in the country
- Sanskrit reveals the forgotten meaning of Russian words (2 photos)
- The oldest language Sanskrit programming language of the future Dead language Sanskrit
- Who has dominion over all the earth?