What are the benefits of such activities. Sand painting supplies
Sand painting on glass recent times has become a very popular activity. This method of drawing gained wide popularity in Russia after the famous and touching performance of Ksenia Simonova in the program "Minute of Glory".
Exists great amount unusual ways and painting technique, but sand painting is mesmerizing. Sand is a material that attracts to itself. Its flowability attracts both children and adults. Remember the hourglass, although they are designed to count time, but how difficult it is to take your eyes off the falling grains of sand.
You will never have a question if there is a sandbox in the yard. Cooking Easter cakes, digging tunnels, building castles - all these activities are loved by kids, only thanks to the sand and its properties.
Parapsychologists say that sand takes away negative mental energy, and the touch of sand stabilizes the emotional state.
Already developed and exist special programs children's "sand therapy". In many cities, studios for painting with sand on glass are opening, where visitors have the opportunity to tinker with sand on a special table with a glass surface and backlight for an hour or two. By attending classes, you can learn how to create not only sand paintings, but also animation options.
It is very useful for children to "communicate" with sand and any bulk materials. Playing with sand is not only entertainment for the child, it is the development of tactile sensations, fine motor skills hands, speech, figurative and spatial thinking, the creative potential of the child.
Sand painting is very useful for hyperactive children. Being engaged in this type of drawing, the child calms down, frees himself from "extra" energy, learns to better understand himself, his friends and parents. Sand painting gives the child the opportunity to immerse himself in the world of his notions, fantasies and imaginations.
Sand painting is especially indicated for children with developmental delays. This type creativity stimulates the accelerated development of both thinking and speech of the child. Psychologists explain this by the fact that when working with sand there is a colossal change in the figurative and figurative-logical thinking of the child.
The very texture of the sand makes it possible for children to develop coordination of hand and finger movements while drawing. Sprinkling sand from palm to palm, grabbing sand into a fist, leveling sand on glass - all these movements involuntarily affect the development of the child. Children develop dexterity of hands and fingers. And as you know, fine motor skills are directly related to the development of speech, so all speech therapists recommend games with bulk materials.
Sand painting on glass is available to children different ages.
 Toddlers can create the simplest drawings by drawing with their fingers on an evenly poured layer. In order to change the drawing, you do not need an eraser or a new sheet, just run your finger over the sand.
Older children will be able to create paintings using the sanding technique to create a sand painting.
Painting with sand on glass is very attractive to teenagers. Pencils and paints are no longer relevant at the age of 12-15, but a modern and creative activity is what you need.
Be sure to try this drawing method. Take your child to a sand painting studio. If there is none in your city, then try it at home. To paint with sand on glass, all you need is a backlit glass table and sand. The table can be made by yourself or bought in the online store.
There is a special video course by Alexander Milenin
"How to make a table for sand animation".
In this course, you will learn about manufacturing technology three types tables for sand animation!
Sand for the table can be collected on the beach, or purchased at the store. But this is not at all necessary. Instead of sand, you can use salt, semolina, ground coffee. Be sure to check out the course.
It is best to draw with sand to pleasant music in the twilight. Then an unforgettable atmosphere of magic and creation will appear.
There are many popular and world-famous personalities among sand artists. Perhaps your place is among them!
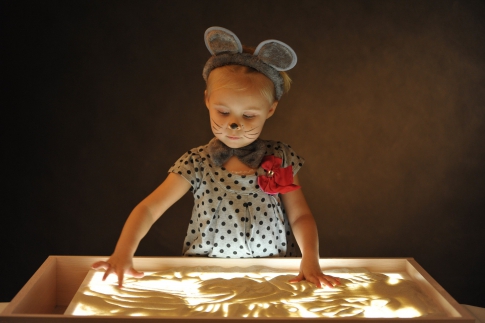
Sand drawing has not left in the last decade. Schools for children and adults are opened in cities and towns. Despite the diversity artistic techniques and the materials used for this - the method of painting with sand is unique. Sand graphics are made using bulk material, which is located on the glass illuminated from below. Depending on the sand layer, shadows of different tones are visible on the glass surface, the smaller the layer of sand grains, the lighter.
sand painting
What are the benefits of sand painting
Drawing pictures with sand calms, coordination of movements becomes better, motor skills of hands develop. The easiest way to confidently wield left and right right hand, this is exactly what sand painting is, because when drawing, both hands are involved at the same time.
For creative development this type of art is useful because it develops imaginative thinking. Drawing to music gives double pleasure - I specially select it, creating a meditating background.

What you need to buy: materials and tools
For classes, a special table for sand animation and sand are used. The sand for painting is different from what you see on the beach. This is quartz sand, all grains of sand are as close as possible to the same size. Although classic version for sand animation, it is usually called volcanic.

Sand for graphics
Over time, this material "works out", the grains of sand break against each other, the sand becomes soft, it is difficult for them to work. Therefore, it must be changed periodically.
Special materials for sand graphics can only be obtained in centers where this type of art is practiced. In large cities, there are always several sand animation studios. Most often, the main activity for them is sand drawing lessons for children.
A table for sand animation is not very expensive, but at home it can be replaced with a homemade one. The design is quite simple - glass, reflective film or a sheet of paper under it, a lamp with diffused light. But it is necessary to make bumpers so that the remains do not wake up on the floor.

Sand graphics table

Illuminated table
Sand graphics technique
The technique of sand drawing in different schools has its own characteristics, but the basic techniques of sand graphics remain the same. The traditional always uses pencils or brushes. But in sand animation, the only tool is the hands. The sand painting technique is quite simple, but on initial stage not without patience.
Sand is collected in a fist and the hand is turned so that it slowly pours, as if pouring from one half of the hourglass to the other. The amount of material is controlled by squeezing and unclenching the palm. On the sand scattered on the countertop with your fingers, different parts hand marks are neatly left. You can convey the texture, tone of the depicted objects and objects, the main rule is smoothness. It is important not to leave large and dense piles, as they will be too dark against the background of the illuminated glass.

Sand graphics technique
How to learn to paint with sand from scratch? Start with absolutely simple exercises- dots and lines. Putting dots, control the number of grains of sand that wakes up. So the points will be obtained different sizes. Exercises with different lines- wavy, dotted, curved, allows you to get used to the sand painting technique. You can not strain your hand and squeeze your fingers tightly. This unusual art relaxes and relaxes, therefore, excessive tension will interfere with the study of technology.
A very effective technique, which is often used in performances and master classes, is falling asleep with an even background. In this case, the action of the hands becomes a kind of strainer, and the sand, freely waking up through the fingers, crumbles in an even layer on the surface of the countertop. The only condition is that the background must not be touched, leveled with fingers, since unaesthetic prints remain. Only on an even layer of grains of sand can you draw. This painting with sand looks very impressive!

Table layout for sand graphics
Separately, it is worth mentioning the sand animation. This art is somewhat higher than sand graphics, because it is necessary to transform the image quickly and beautifully. The peculiarity of sand animation is to transform drawings with as few movements as possible. That is why the masters for creating videos and performances of sand animation carefully think through everything, rehearse.
At home, you can try to draw with other bulk materials. For example, semolina on a black baking sheet. However, in sand graphics there is a special magic with table lighting that cannot be replaced by the visual similarity of techniques.
We wish you the best in your new hobby. Be sure to check out other hobbies on our website.
Maya. Mayan. Bakulina. Bakulin.
Look at our palms
They have become wiser!
Thank you, our dear sand,
You helped us all draw!
Explanatory note.
Sand painting is one of the most important means of understanding the world and developing aesthetic perception, since it is closely connected with independent and creative activity. This is one of the ways to depict the surrounding world. As the technique of drawing with sand is mastered, it is enriched and developed inner world child.
Sand painting is a unique form of art that combines play, activities that are useful for the development of children, and educational moments. How earlier man will open in itself creativity, the easier and more interesting his life will be, because creativity is always a striving forward, for the better, for perfection!
painting with sand, the child is immersed in his own fantasy world. He begins to invent a completely different world, where there are castles, dragons, princes and princesses. He becomes a fantasy in the literal sense of the word.
This type of creativity is available to children of all ages. Very small ones can create simple drawings. At the same time, in order to change the picture or draw a new one, you do not need additional items such as an eraser or a sharpener, you just need to run your palm or finger over the sand.
During such activities, the sand, as it were, absorbs all the negative energy of the baby, thereby creating harmony between him and the world around him. Sand drawing classes help to improve the mental well-being of the child, relieve phobias and fear of the unknown.
You will see how on a small screen in a few moments are born sand paintings. Images seem to flow from each other to the musical accompaniment.
Drawing pictures with sand calms, coordination of movements becomes better, motor skills of hands develop. For child development this type of art is useful because it develops imaginative thinking. Drawing to music gives double pleasure - I specially select it, creating a meditating background.
Sand painting is especially indicated for children with developmental delays. This type of creativity stimulates the accelerated development of both thinking and speech of the child. Psychologists explain this by the fact that when working with sand there is a colossal change in the figurative and figurative-logical thinking of the child.
Be sure to try this drawing method. To paint with sand on glass, all you need is a backlit glass table and sand. Sand for the table can be purchased at the store. It is best to draw with sand to pleasant music in the twilight. Then an unforgettable atmosphere of magic and creation will appear.
Target:
Mastering the technique of sand painting, cultivating accuracy, thrift, as well as tactile sensitivity through sand painting on glass.
Tasks:
1. Develop mental activity, ingenuity, the ability to compare, put forward hypotheses, draw conclusions.
2. Develop cognitive processes: perception, attention, memory, imaginative thinking.
3. Develop fine motor skills.
4. The development of creativity, imagination in a child, the ability to use fingers to depict what was conceived in the sand.
Preliminary work:
1. A conversation about the properties and purpose of sand.
2. Watch the video "Why do we need sand?".
3. View a presentation on how to paint with sand on glass.
Sand painting techniques:
1. Drawing with a fist, palm, edge thumb, pinch, little fingers.
2. Multiple fingers at the same time.
3. Symmetrical with two hands.
4. Pouring sand from the cam and cutting off the excess.
5. Sliding your palms on the surface of the sand, perform zigzag and circular motions.
6. Perform zigzag and circular movements, placing the palm on the edge.
7. Create all sorts of patterns with palm prints, fists, knuckles, palm edges.
Lesson progress:
Educator:
Hello guys! Guess the riddles and find out what we will draw today.
Puzzles:
He emerged from the stones
Grains were born into the world:
Yellow, red, white
Or light grey.
That sea he, to-river.
Guess who is? (Children sand).
Something can be buried in it,
I like to walk on it
And sleep on it for an hour.
Guess what? (Children sand).
Educator:
Someone paints with gouache
And someone with a pencil.
I offer you children
Create a drawing with sand.
You fall asleep sand on the glass,
Which is illuminated from below.
And, including imagination,
You draw amazing pictures.
Smoothly draw a wave with your fingers,
And streams will float in the picture.
Big fingers lead towards
And depict a spruce in the picture.
To show the clouds in the sky
Squeeze your fingers into fists.
And circling the glass with fists,
You will draw clouds at the top.
I told you only a grain,
How fantasy can develop.
All you have to do is start drawing.
And the ideas can't be stopped.
Educator:
Guys, I suggest you become artists and draw your own drawing.
But first, let's remember the rules for handling sand.
1. You can draw with sand only on glass, you can’t scatter sand on the floor;
2. You can not wipe your hands on clothes;
3. Do not touch your face, eyes with your hands - the smallest grains of sand can get into your eyes;
4. It is necessary to shake off hands over the table;
5. Wash your hands with soap after work.
Educator:
Let's "say hello" to the sand. Touch it with the fingers of your right, and now your left hand. Now flatten the sand with your palms. And now let's remember the techniques of drawing in the sand. Tell me what you can draw on the sand. ( Children's answers.)
That's right, you can draw with one or more fingers, the edge of the palm, the fist, the back of the hand, this part (here and in the future I simultaneously show and explain to the children). If you don't like something or want to change something in your drawing, you can level the sand and continue drawing.

"Drawing with sand" for the development of fine motor skills of fingers.
1. Ask the child to put his hands on the sand and move them in different directions as if stroking him.
2. Show your child how he can create various patterns using fingerprints.
3. Together, use your finger to draw numbers, letters, various geometric figures, and indeed, draw whatever the baby wishes.

Draw "Flower"
We pour several handfuls of sand on the central part of the glass and begin to draw a flower. To do this, we run our fingers across the sand, creating lines free of sand - these are parts of the flower that should be of a light shade ( for example, the middle part of each petal). Next, we form the stem of the flower, outlining its contour with straight lines. As a result, the stem and part of the flower itself will light color, since the glass in these places will be without sand. The remaining areas will be covered with sand - these are the painted parts of the flower.
Draw "Sun"
Pour a thin layer of sand on the glass surface. Then, with a fist, we perform a rotational movement, slightly pressing the brush into the sand. We get an image of the solar disk. Then we draw the rays of the sun with our fingers. Clouds can be drawn nearby by creating closed wavy lines with the help of fingers.
Educator:
Guys, you got very beautiful sand drawings. But it is a pity that they are short-lived and from one breath of a breeze or even your breath, they can disappear, scatter, crumble. Let's take pictures of your sand drawings, and then show them to your parents and you yourself can once again admire your masterpieces.


In custody, I would like to know your opinion Dear Colleagues on the use of sand painting on glass with children. Thank you for your attention.
Sand painting is getting pretty lately popular view art. Artists create their paintings by adding or removing sand from a glass surface, using the contrast of light and dark areas of the work area. Now there are many schools and studios where you can learn how to paint with sand. However, it is quite possible to learn this type of drawing at home.
Sand painting supplies
Sand painting requires a certain set of accessories, the preparation of which must first be taken care of. You will need:
- sand;
- table with lighting;
- antistatic agent.
Experienced Artists the best option volcanic sand is recognized for drawing, but it is very expensive, and it is not so easy to find it. Therefore, it is recommended to use quartz sand. The advantage of this sand is that its particle size distribution is uniform and the grains of sand are fine and well sifted. You can buy such sand even at a pet store.
Of course, some, in order to save money, also use ordinary river or sea sand, but in order for it to become somehow suitable for drawing and not to dust, it must be carefully sieved, washed in water, and then thoroughly ignited.
If you can't find sand - don't be discouraged: instead of it, artists sometimes use semolina, salt and even ground coffee, although all these materials, of course, are inferior to sand in terms of ductility for drawing.
Illuminated tablet tables are bought in specialty stores. If you do not have the opportunity to purchase equipment, you can make such a table with your own hands. How to do this, see the following video:
Or you can go even simpler: take a wooden box, put a piece of organic glass on it and stretch a light bulb under it in such a way as to get a light source directed at the glass surface.
An antistatic agent is necessary so that the grains of sand do not become electrified, do not cling to each other, and nothing interferes with drawing, therefore, before each lesson, you need to treat the glass with this agent.
Sand painting can also be diversified additional tools, for example, various brushes or a stick for a tablet.
I got the idea to make such a box of sand for drawing in kindergarten.

Option 1.
Boxes for sale. You can see
Environmentally friendly wooden box, plexiglass on top, energy-saving light bulb on the bottom. For creative activities in drawing with sand on glass, it is also suitable for convenient copying of drawings by tracing the contour.
New, improved model, with sand compartment.
Drawer dimensions: 50 x 50 x 14 cm, light screen 48 x 36 cm, cord length 180 cm
.


As you know, children play sand with pleasure, because such games are saturated with different emotions: delight, surprise, excitement, joy ... This makes it possible to use sand games to develop, enrich the emotional experience of the child, to prevent and correct it. mental states for the development of fine motor skills.
Option 2
Information taken
To make a box you will need:
1. Boards
2. Plywood
3. Acrylic plexiglass
4. Wooden decks
Initially, take boards and plywood, and build such a box as shown in the figure. It should be deep (7-10 cm) so that the sand does not spill out, but at the same time it is easy to draw.

Then step back from the two edges, the same number of centimeters and nail the planks. You have a place to store the necessary attributes. Here you can store cereals, pebbles that you may need in order for your child to develop. The next step you need to make a slot at the bottom of the box - this is necessary in order to later insert plexiglass - a place for lighting with a lamp. The size can be made as you wish, such as A3 - A2 paper size.

In order for the light table to be stable, you need to take decks of solid wood as legs. You can also color them according to your desire, for example, in blue and red - it's more fun.

Now you need to lay acrylic plexiglass in the slot at the bottom of the box. It is necessary to make it matte, for this, put a sheet of A1 format on the glass and fix it along all edges with adhesive tape or electrical tape.

If you did everything correctly, then you should get a table, as shown in the photo below. Nothing complicated, but the springboard for creativity is almost ready.

Now put a lamp under the table, turn it on and that's it. You have created a sand painting light table with your own hands!

Now you can start creative pursuits. It remains only to buy sand in a building materials store or take it directly from the sandbox, sift it through a sieve, rinse and bake it in the oven. You can also advise you to create on the light table not only with sand, but also with various cereals (semolina, for example). And to make the drawing original, you can use colored pebbles.

In order to create sand paintings, it is not necessary to have an art education.
Children especially like to paint with sand. The pliability of sand, its natural magic attracts children from the first minutes.

Sand painting is an immersion in a fairy tale, in a world of fantasy, bizarre images, winding lines. Touching the sand, you will feel its warmth, its fluidity, its movement.

Sand painting is a great way to relax. Immersion in a pleasant fluid state of calm creativity, contact with natural matter relieves stress, any tension, fears.

Creating a sand painting - fascinating process, it touches all spheres of the senses, awakens creativity, relaxes and inspires at the same time. The soft color of natural shades, the contrast of sand and light, the smoothness of the contours and the powdered lines create Magic.

As a rule, purified sand is used, which is applied in thin layers to illuminated glass. You can draw anything with sand: landscapes and portraits, still lifes and abstractions. The main thing is to give free rein to the imagination and not be afraid to experiment.

Sand painting methods:
1. The first step is to invite the children to embody their ideas in the sand in the ways that they like best. And only after that, you can give specific tasks;
2. Sand can be leveled with both palms and fingers;
3. Hands can also work like a bulldozer, raking the sand around;
4. Fingers can make holes in the sand or draw on it;
5. Children relax very well by passing sand between their fingers;
6. At first, children can use forefinger, so it is more convenient and familiar;
7. For the image of the sun, you can suggest using a cam;
8. To depict a wave in a drawing, you can use your hand;
9. In subsequent lessons, you can master new way drawing with sand, by cutting off the excess.

All actions are performed with the fingers, however, stacks and brushes can be used as devices.
The technique helps to develop fine motor skills, which is especially useful for children (because the brain develops through the stimulation of the fingers)
This activity is especially recommended by experts for hyperactive and hyperexcitable children, because it helps to better understand their feelings and the feelings of other people, acquire the necessary social communication skills, and develop a positive attitude towards themselves and others.

When drawing with sand, a person, whether a child or an adult, uses both fingers and hands. Drawing develops subtle tactile perception, requires analysis and flexibility of thinking, develops imagination and reveals creativity. Absolutely everyone, both young and adults, will like this activity.
It's very interesting and exciting!!!
Option 3 - watch the video
And to show children's ability to draw with sand, watch the video: “How to use light table to create such masterpieces for sand painting”:


, poultry farming")


- Burns, Robert - short biography
- The concept of common vocabulary and vocabulary of limited use
- Nancy Drew: The Captive Curse Walkthrough Nancy Drew Curse of Blackmoore Manor Walkthrough
- Deadpool - Troubleshooting
- Won't start How to Survive?
- What to do if bioshock infinite won't start
- Walkthrough Nancy Drew: Alibi in Ashes
- Spec Ops: The Line - game review, review Spec ops the line crashes on missions
- Room escape level 1 walkthrough
- Processing tomatoes with boric acid How much will 2 grams of boric acid
- Cucumber Grass (Borago)
- Bioinsecticide Lepidocid: purpose, properties and application procedure Lepidocide waiting period
- How to change the language to Russian in steam
- Dendrobium noble: room care
- Morphology of plants general concepts - document
- Planting, propagation and care of bamboo at home, photo Growing bamboo from seeds
- How to strengthen the cellular signal for the Internet in the country
- Sanskrit reveals the forgotten meaning of Russian words (2 photos)
- The oldest language Sanskrit programming language of the future Dead language Sanskrit
- Who has dominion over all the earth?