How to draw a ladybug step by step Draw a ladybug
First, let's remember what kind of cow it is.
There are many types of ladybugs. Usually a ladybug is a small, oval-shaped bug with bright polka dots. Moreover, the combinations of colors on the elytra of ladybugs can be very different: yellow-black, blue red, Red Black, Red White... it looks very fly agaric. By the way, she is not so fast-running, but she is not afraid to attract the attention of predators. And the whole point is in the "milk" of this cow - if it is awkward to grab it, it releases a brown liquid. I have not tasted it, but it is a fact that predators do not try to grab bugs with such a warning color: fly agaric color is a sign of toxicity (as, for example, in salamanders).
Speaking of predators - ladybugs, for all their roundness and good looks, are very predators. Thunderstorm of aphids are not only the larvae of ladybugs, but also the adult beetles themselves. And not only aphids. They even eat the larvae of the Colorado potato beetle! As I found out about this, I decided to collect all the ladybugs I met and settle in our garden. But - to business! We were going to draw ladybug.
Draw a ladybug step by step
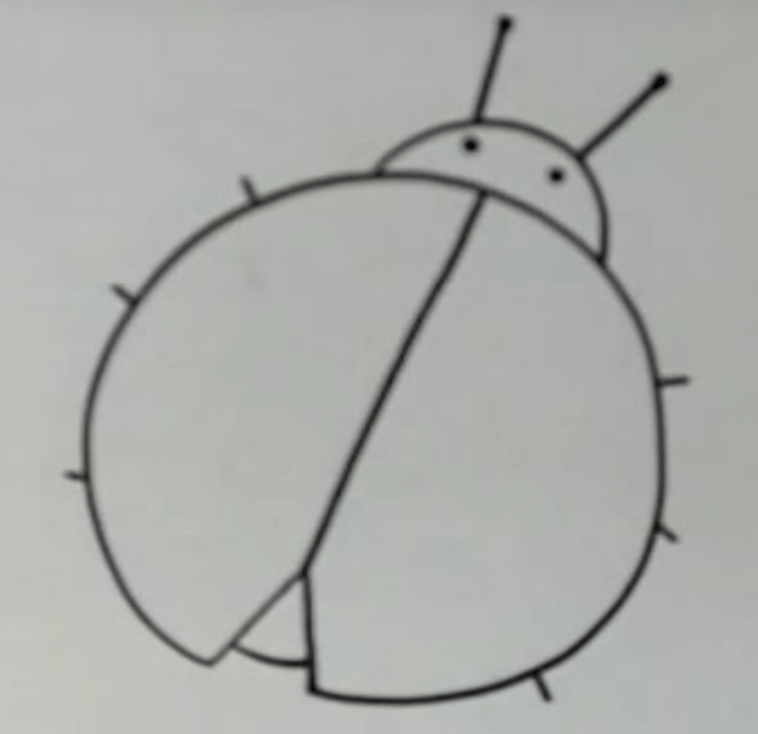
Specifically, we will draw a seven-point line. The body of the bug has a hemispherical shape, the chest and head stand out little. Wings are red. There are three dots on each and the seventh dot - in the middle - is common. We start drawing, as usual, from the largest - from the torso. It is divided along the axis of symmetry by a line of elytral opening.
Then we draw a chest and a small head.

The body is hemispherical, but the chest and head protrude slightly when moving.

And here we have a drawing - a ladybug:

The paws of a ladybug are unimpressive - thin and short, you can hardly see them from under the body. Well, she doesn’t run fast, I would say mince. However, the paws have the classic structure of the insect leg: thigh-shank-tarsus with tiny claws. So we draw truthfully and observe all the joints.

Drawing ladybug - top view
So. And now we will draw in stages in another spread - a top view:

And draw the paws and head:

In general, I had the idea that it would be necessary to draw a bug in life size, but I decided that we are all not Leskovian Left-handers, perhaps it’s not a sin to draw large.

We won’t depict a ladybug in flight: I found one photo - a beetle with spread wings and decided that it’s good for general educational purposes, but it’s better not to draw such a beast for a picture. Here, just enjoy.
This is a very cute and harmless insect. It pleases not only children, but also adults. Seeing it on his hand, everyone remembers the lines of the song: "Ladybug, fly away to heaven ..." and makes a wish. To depict this insect in the figure is quite simple and even a child can do it. In this master class, we will look at how to draw a ladybug in various ways.
step by step drawing
The creation of any image of this insect is carried out according to approximately the same scheme. Let's start with the simplest and consider how to draw a ladybug in stages. The acquired skill can be applied to a wide variety of creative ideas.
Stage 1
We'll start with a circle. More precisely, it will be almost a circle, since it has a small gap at the bottom. See the picture for what we mean.

Stage 2
Draw an inverted "V" inside the gap. Starting from its top, draw a straight line to the border of the circle. These will be the wings of the insect. Let's draw a small curved line at the bottom as shown in the figure in order to designate the body of the future insect.


Stage 4
To draw the head, draw an arc above the circle. Let's designate two eyes of the bug on it with bold dots. Add antennae on top with small dots on the tips.


Stage 5
Let's draw the legs on the sides of the body. Let's draw the spots on the wings so that they are located symmetrically.
If desired, you can colorize the resulting drawing: fill the wings with red color, bypassing the spots. We paint them with a dense black color.
Drawing with a pencil
For creating beautiful drawing You do not need to have any special equipment at home. Firstly, you will need a sheet of white paper, and secondly, a sharpened pencil and an eraser. We are sure that anyone can find these three components. Having created the base, you can turn on the fantasy and paint the details of the sketch in your own way. How to draw a ladybug with a pencil, read on.
So, with some changes, but we repeat everything that we did in the previous lesson. We draw a circle, draw an arc from above - the head.


To designate the wings, we draw diagonal lines, which we close with arcs extending beyond the body.

On the head we add eyes, made up of two circles: large and small diameter. From above we add antennas, also with circles at the ends. We have five spots on the wings.


For young artists

Most young children love to draw and spend hours on end doing this activity. How to draw a ladybug for a child? Teach your child simple tricks from our lesson once, and then colorful bugs will decorate many of his drawings.
Let's draw an arc convex upwards, close it at the bottom with a straight line.


To the right of the resulting figure, draw a small circle so that it looks like a head. On it we note two eyes - dots. Since the child will draw, let him come up with emotions for the insect. For this we will draw a smiling mouth. From the head up, draw long lines with curls at the ends - antennas.


Below we draw two paws on each side. The final step will be the application of spots on the abdomen. Let young artist will choose their size and quantity.

ladybug on a leaf

For older children and adults, drawing will be interesting small parts on the head, paws and adding additional elements, for example, a blade of grass or a leaf of a tree. Let's learn how to draw a ladybug on a piece of paper.
Let's draw an oval in perspective. Let's outline a straight line through its center, which will set the direction where the insect is crawling. On the front, select several sections, as shown in the figure.


Let's draw lines bounding the abdomen, continuing to observe the perspective. Let's mark up the head using rounded rectangles to give it volume. Smooth out the lines of the wings, give them curves.


Let's designate the eyes, mandibles and antennae on the head. Draw three legs on the sides of the body. Please note that the elements on the side closest to us should be larger in size than those on the far side. We note spots on the abdomen.


Take a black marker or gel pen and circle the desired sketch lines. Erase the rest of the pencil with an eraser.

With the help of colored pencils or felt-tip pens, color the resulting drawing. In green, paint over the surface below the bug to show as if it is sitting on a leaf. You can add veins and shadows on it.

This concludes our master class. We hope that it was useful for you. Happy drawing!
Many kids want to know how to draw a ladybug! Indeed, almost every child draws these lovely cute and small insects. But how to draw a ladybug correctly? In this article, we will talk about how to draw this little wonderful creature in stages that you, your child will like and decorate your home interior. Prepare an eraser, a sheet of paper and, of course, a pencil, as they need to draw the main strokes.
Draw a ladybug
- So, the first step is to draw the body of our cow. Place a sheet of paper exactly in front of you and try to draw an oval on a piece of paper with a gentle movement of your hand.
- Further on this oval, you need to draw another small roundness - the future head. It should not be very small and not very large, as long as it is in harmony with the body of your insect. So, when drawing the head, go a little on the big oval so that the head turns out to be attached to the body, and not floating separately from it.
- On a small neat head of our ladybug, draw two funny eyes, paint on their cilia. give your eyes funny expression to make the ladybug more interesting. The next step is the paws. Draw six identical legs for the cow, three legs on each side of the body. Now in the middle of the torso, find the line of separation and lightly draw it so that it becomes a little visible.
- Draw black dots on the ladybug - a clear difference from other insects. And when you have finished this business, draw a leaf under the butterfly on which she sat down nicely. Color everything with pencils or watercolors to make the drawing brighter and more fun. And now you can safely hang it on the wall!
This is how we answered the question of how to draw a ladybug with a pencil.
Nature has not endowed everyone with the ability to draw. And then the child went to school and daily asks mom or dad to help draw a house, landscape or still life. It's never too late to learn, so the basics visual arts learn with your child. In today's lesson we will learn how to draw a ladybug.
Basics of Fine Arts
Have you ever wondered why the ladybug is called that? And how many questions do children start asking when they first find out that a funny bug is exactly a ladybug. Pictures for children drawn - a real guide to why.
There are many versions of why this harmless bug is called that way. Let's start with the cow. There is an opinion that the spotted bug resembles the color of cows. That's where its name came from. And some people in Ancient Russia it was believed that the ladybug looked like a piece of bread, and at first they called this insect a loaf. This bug is considered to be God's, because it landed from the sky and was created by the Almighty.
You and your child already know why the ladybug is called one way and nothing else. It's time to draw it with a pencil.
Necessary materials:
- simple pencil;
- paper;
- compass;
- eraser;
- markers.
- Draw a circle on a sheet of paper with a simple pencil.
- Draw a diameter in the middle.
- If you can't do it by hand, use a compass or figure templates.
- At the top, draw half a circle. This will be the ladybug's head.
- Immediately we need to draw paws, there will be three pairs in total.
- We place them symmetrically and draw curved lines.

- We have already drawn the frame. In parallel, draw antennae in the form of antennae on the ladybug's head. We make them with curls.
- We thicken the paws a little, draw them in the form of irregular rectangles.
- On the surface of the back of the ladybug, you need to draw spots. This is where the compass will help us.
- The spots should be the same diameter. And on the line of the wings, you can draw halves of the spots.

- Eraser carefully wipe everything auxiliary lines.
- We just have to decorate the ladybug. Traditionally, felt-tip pens or colored pencils in black and red or dark orange are used for this.
The creation of your little Rembrandt
If you have already mastered the basics of fine art with your baby, it's time to learn how to draw a ladybug on a piece of paper. This drawing will be complete picture with completed story. For coloring, you can use watercolor, gouache or finger paints.

Necessary materials:
- paper;
- ruler;
- simple pencil.
- A little tip: in order to correctly position the image on a sheet of paper, you need to make a markup. To do this, we divide the rectangular sheet into four equal parts.
- Marking will be done with a dotted line. You do not need to press hard on the pencil, our efforts are useless here.

- We choose the location of our drawing and, without pressure, draw an oval at an angle with soft lines so that the ladybug sits on the leaf.
- In the middle of the oval, draw an arc that will delimit the wings of a funny insect.
- On the right side, draw another oval. This will be the ladybug's head.
- At the very bottom of the smaller oval, draw a rectangle, but only with rounded edges.

- Draw a good outline.
- In the previously drawn rectangle, draw three identical circles.
- Let's draw antennae of any shape and paws.
- There are spots on the body of the ladybug, let's draw them uneven. Curved lines will look more original and beautiful.

- And now we show imagination and fill the main field with leaf veins.
- If you want to leave a picture drawn with a pencil, then the field needs to be shaded and the edges shaded a little.
- And if you paint it, then the veins of the leaves should be drawn with thick lines and a contrasting color.
Let's not miss the beach
If you like to relax on the sea expanses of our Motherland, then you have probably visited pebble beaches more than once. How many beautiful smooth stones on them! We have already told you how to draw a ladybug step by step. Now imagine that you have arrived on vacation, there is no sheet of paper at hand, and your baby is bored. Offer him painting on pebbles. We will be happy to share the secret of how to draw a ladybug on a stone. This technique can be done at home, just stock up on pebbles in advance.

Necessary materials:
- PVA glue;
- simple pencil;
- acrylic paints;
- decorative varnish;
- brushes;
- water.
Step by step description of the creative process:
- First we need to prepare the surface of the stone for painting.
- We dilute PVA glue with water in a ratio of 1: 1.
- Apply the soil mixture to the pebble and wait until it dries completely.
- Now, using a brush, cover the visible part of the pebble with white acrylic paint.
- After drying, we need to paint the pebble with red paint.
- One layer will not be enough, so after the previous one has dried, we will apply another 1-2 layers of acrylic paint.
- As soon as the paint dries, proceed to the decor. Let's draw spots and a muzzle of a bug.
- You can turn on your imagination and draw eyes and a funny mouth.
- After the paint has dried, we need to cover the ladybug on the pebble with decorative varnish.
- This craft will decorate and protect your home, as it is considered a powerful amulet.
Ladybug can rightfully be attributed to one of the most harmless and cute insects. She likes both adults and children. That is why so many people want to depict this insect in their drawings. Firstly, it is very bright, and will undoubtedly decorate any image. Secondly, drawing it is quite simple. Even a small child can easily cope with this task. And for those who are older, you can choose a more detailed image of such an insect as a ladybug. How to draw it, we learn further. We will look at the two most popular options, one of which is very simple, and the second is characterized by drawing small details and is suitable for adults or older children.
Necessary materials
In order to make a beautiful drawing of a ladybug, you do not need to specifically run to the store and purchase the necessary materials. Most likely, all this is present in your house. Firstly, this is a sheet of paper, secondly, a pencil and an eraser, and thirdly, paints, pencils or felt-tip pens. Also, don't forget to get good mood and turn on the fantasy - they will definitely come in handy. And now let's learn how to draw a ladybug with a pencil. Having mastered it in a simple way, you can teach it to your kid, and then his drawings will be decorated with cute and beautiful bugs.
Simpler option
This method is suitable for a small child. It will be enough for you to show how to draw a ladybug with a pencil once, and in subsequent works your kid will already use this lesson on his own.
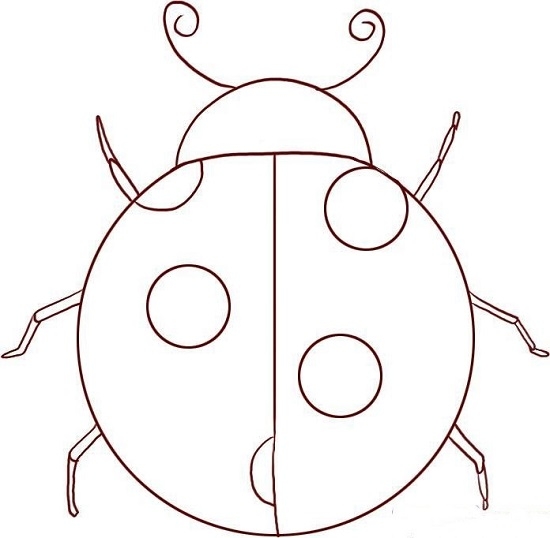
This option involves the implementation of only 3 stages. So, step one. It is necessary to draw a circle on the sheet. Its size should correspond to the desired size of the future insect. Agree that it is quite simple.
 At the second stage, we draw a line in the middle of the circle dividing it into two halves, and finish drawing the future head. It will be perpendicular to the line, and in its shape resembles the rising sun.
 Now the last step. On each of the halves of the circle, we draw small ovals. different size. We add antennae in the form of small curls to the head and highlight the outline of future eyes. That's it, your ladybug is almost ready. It remains only to color it.
Coloring the ladybug
The main color, of course, is red, all other details are black. But the child can color it in his own way, do not prevent him from doing this. You will see, he will definitely get an original and unique ladybug. How to draw it himself, he now knows and will be able to apply the acquired skills in practice. For example, he will show off his skills in kindergarten and surprise teachers and friends.
How to draw a ladybug step by step. Option for older kids
To draw a ladybug in this way will take a little more time and perseverance. For its image will need to perform six basic steps.
 Step one
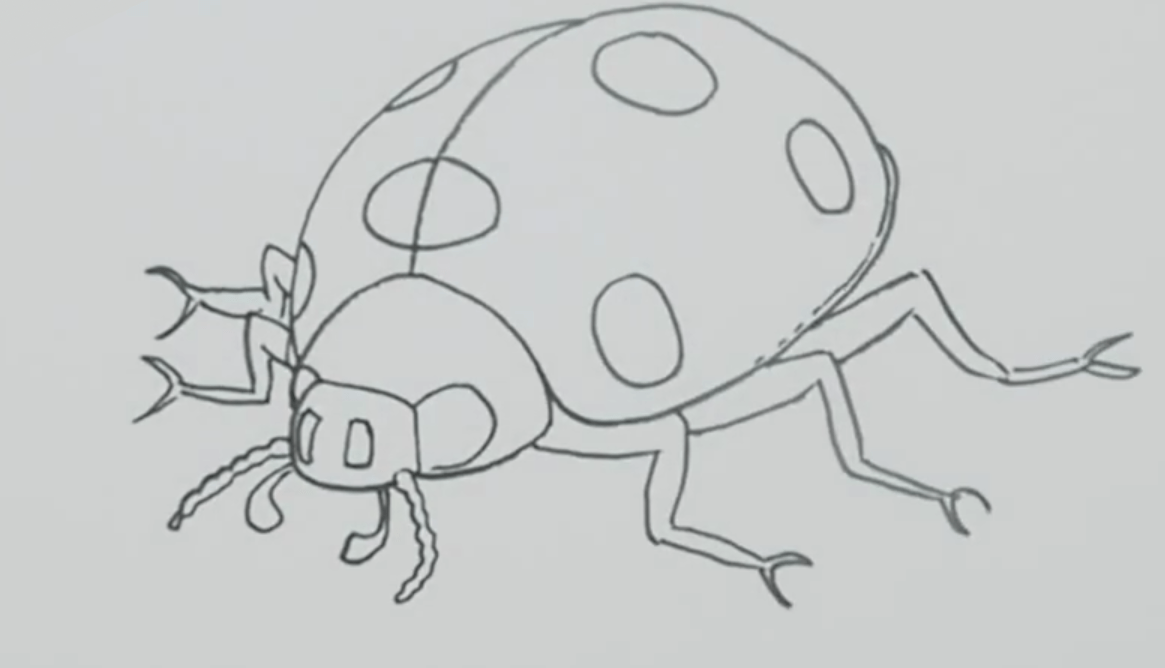
As in the previous version, we draw the outline of the future body of the ladybug. Only this time it will not be a circle, but rather an oval, resembling an egg in shape. This difference is due to the fact that in the previous lesson we drew a ladybug - a top view, and now we will depict how it looks from the side.
![]() step two
step two
It is necessary to divide our outline into three segments, one of which will be the head of the ladybug, the second will be the back, and the third will not be useful to us, later we will simply erase it. At the level of the third segment, it is necessary to designate future paws. There will be three of them, one of which is back and two are front.

We draw the head and paws of an insect. That segment of our oval, which serves as the head, needs to be slightly corrected by increasing its size, so to speak, to increase it. And according to the previously made markup, draw paws. Now it’s clear that you get a ladybug. How to draw and what to draw next, consider below.

Now we need to draw some details. First you will need to erase all the auxiliary lines mentioned above. We draw a dividing line on the back of the insect, indicating the junction of the wings. Since our ladybug will be shown on the side, the line divides the back into halves of different sizes. The one that is higher will be narrower, and the lower one is wider. Now you can mark the spots on the wings. They should be irregularly rounded, their size can also be different. Now the most difficult moment - drawing the head.

This stage involves the designation of all the remaining small details on the body, head and legs.

The final stage
And the last step, the sixth. The lightest and most pleasant of all. Insect coloring. The ladybug has a very bright and impressive color, so the best option is to use paints. Pencils can also be used, but in this case you will not get the desired effect of contrast and brightness. However, it's up to you. I would like to believe that you coped with the task and you got a beautiful and very similar to a real ladybug. You now know how to draw this insect, which means that you can easily depict any other beetle, since they are all depicted in approximately the same way.
Ladybugs are very beautiful insects. That is why their image can often be seen on greeting cards or on wrapping paper. Drawing a ladybug is not at all difficult, even a child can cope with this task.
Before starting work, you need to prepare everything you need:
A sheet of thick white paper;
- watercolor colored pencils;
- black gel pen;
- container with water;
- eraser;
- round synthetic brush No. 5;
- a simple pencil.

When everything you need is prepared, you can start drawing:
1. With a simple pencil draw the body of an insect. In shape, it resembles a heart, divided into two halves;

2. Draw the neck and base of the head to the body of the insect as shown in the figure;

3. Draw the ladybug's head. Try to keep the proportions so that in the end the image is realistic;

4. Draw antennae to the head, and then draw six paws - three on each side of the body;


6. thin lines draw the outline of a flower;

7. Carefully circle all the contours of the drawing with a pen;
The drawing of the ladybug is completely ready. It can be colored not only watercolor pencils, but also with any paints or felt-tip pens.
Ladybug can rightfully be attributed to one of the most harmless and cute insects. She likes both adults and children. That is why so many people want to depict this insect in their drawings. Firstly, it is very bright, and will undoubtedly decorate any image. Secondly, drawing it is quite simple. Even Small child easily cope with this task. And for those who are older, you can choose a more detailed image of such an insect as a ladybug. How to draw it, we learn further. We will look at the two most popular options, one of which is very simple, and the second is characterized by drawing small details and is suitable for adults or older children.
Necessary materials
In order to make a beautiful drawing of a ladybug, you do not need to specifically run to the store and purchase necessary materials. Most likely, all this is present in your house. Firstly, it is a sheet of paper, secondly, a pencil and an eraser, and thirdly, paints, pencils or felt-tip pens. And do not forget to get in a good mood and turn on your imagination - they will definitely come in handy. And now let's learn how to draw a ladybug with a pencil. Having mastered this simple method, you can teach it to your baby, and then his drawings will be decorated with cute and beautiful bugs.
Simpler option
This method is suitable for a small child. It will be enough for you to show how to draw a ladybug with a pencil once, and in subsequent works your kid will already use this lesson on his own.
This option involves the implementation of only 3 stages. So, step one. It is necessary to draw a circle on the sheet. Its size should correspond to the desired size of the future insect. Agree that it is quite simple.

At the second stage, we draw a line in the middle of the circle dividing it into two halves, and finish drawing the future head. It will be perpendicular to the line, and in its shape resembles the rising sun.

Now the last step. On each of the halves of the circle, we draw small ovals of different sizes. We add antennae in the form of small curls to the head and highlight the outline of future eyes. That's it, your ladybug is almost ready. It remains only to color it.
Coloring the ladybug
The main color, of course, is red, all other details are black. But the child can color it in his own way, do not prevent him from doing this. You will see, he will definitely get an original and unique ladybug. How to draw it himself, he now knows and will be able to apply the acquired skills in practice. For example, he will show off his skill in kindergarten and surprise teachers and friends.
How to draw a ladybug step by step. Option for older kids
To draw a ladybug in this way will take a little more time and perseverance. For its image will need to perform six basic steps.

As in the previous version, we draw the outline of the future body of the ladybug. Only this time it will not be a circle, but rather an oval, resembling an egg in shape. This difference is due to the fact that in the previous lesson we drew a ladybug - a top view, and now we will depict how it looks from the side.

It is necessary to divide our outline into three segments, one of which will be the head of the ladybug, the second will be the back, and the third will not be useful to us, later we will simply erase it. At the level of the third segment, it is necessary to designate future paws. There will be three of them, one of which is back and two are front.

We draw the head and paws of an insect. That segment of our oval, which serves as the head, needs to be slightly corrected by increasing its size, so to speak, to increase it. And according to the previously made markup, draw paws. Now it’s clear that you get a ladybug. How to draw and what to draw next, consider below.

Now we need to draw some details. First you will need to erase all the auxiliary lines mentioned above. We draw a dividing line on the back of the insect, indicating the junction of the wings. Since our ladybug will be shown on the side, the line divides the back into halves of different sizes. The one that is higher will be narrower, and the lower one is wider. Now you can mark the spots on the wings. They should be irregularly rounded, their size can also be different. Now the most difficult moment - drawing the head.

This stage involves the designation of all the remaining small details on the body, head and legs.

The final stage
And the last step, the sixth. The lightest and most pleasant of all. Insect coloring. The ladybug has a very bright and impressive color, so the best option is to use paints. Pencils can also be used, but in this case you will not get the desired effect of contrast and brightness. However, it's up to you. I would like to believe that you coped with the task and you got a beautiful and very similar to a real ladybug. You now know how to draw this insect, which means that you can easily depict any other beetle, since they are all depicted in approximately the same way.


Ladybug is a very cute and harmless insect. It pleases not only children, but also adults. Seeing it on his hand, everyone remembers the lines of the song: "Ladybug, fly away to heaven ..." and makes a wish. To depict this insect in the figure is quite simple and even a child can do it. In this master class, we will look at how to draw a ladybug in various ways.
step by step drawing

The creation of any image of this insect is carried out according to approximately the same scheme. Let's start with the simplest and consider how to draw a ladybug in stages. The acquired skill can be applied to a wide variety of creative ideas.
Stage 1
We'll start with a circle. More precisely, it will be almost a circle, since it has a small gap at the bottom. See the picture for what we mean.

Stage 2
Draw an inverted "V" inside the gap. Starting from its top, draw a straight line to the border of the circle. These will be the wings of the insect. Let's draw a small curved line at the bottom as shown in the figure in order to designate the body of the future insect.


Stage 4
To draw the head, draw an arc above the circle. Let's designate two eyes of the bug on it with bold dots. Add antennae on top with small dots on the tips.


Stage 5
Let's draw the legs on the sides of the body. Let's draw the spots on the wings so that they are located symmetrically.

If desired, you can colorize the resulting drawing: fill the wings with red color, bypassing the spots. We paint them with a dense black color.
Drawing with a pencil
To create a beautiful drawing, you do not need to have any special accessories at home. Firstly, you will need a sheet of white paper, and secondly, a sharpened pencil and an eraser. We are sure that anyone can find these three components. Having created the base, you can turn on the fantasy and paint the details of the sketch in your own way. How to draw a ladybug with a pencil, read on.
So, with some changes, but we repeat everything that we did in the previous lesson. We draw a circle, draw an arc from above - the head.


To designate the wings, we draw diagonal lines, which we close with arcs extending beyond the body.

On the head we add eyes, made up of two circles: large and small diameter. From above we add antennas, also with circles at the ends. We have five spots on the wings.


For young artists
Most young children love to draw and spend hours on end doing this activity. How to draw a ladybug for a child? Teach your child the simple techniques from our lesson once, and then colorful bugs will decorate many of his drawings.
Let's draw an arc convex upwards, close it at the bottom with a straight line.


To the right of the resulting figure, draw a small circle so that it looks like a head. On it we note two eyes - dots. Since the child will draw, let him come up with emotions for the insect. For this we will draw a smiling mouth. From the head up, draw long lines with curls at the ends - antennas.


Below we draw two paws on each side. The final step will be the application of spots on the abdomen. Let the young artist himself choose their size and quantity.

ladybug on a leaf
For older children and adults, it will be interesting to draw small details on the head, paws and add additional elements, such as a blade of grass or a leaf of a tree. Let's learn how to draw a ladybug on a piece of paper.
Let's draw an oval in perspective. Let's outline a straight line through its center, which will set the direction where the insect is crawling. On the front, select several sections, as shown in the figure.


Let's draw lines bounding the abdomen, continuing to observe the perspective. Let's mark up the head using rounded rectangles to give it volume. Smooth out the lines of the wings, give them curves.


Let's designate the eyes, mandibles and antennae on the head. Draw three legs on the sides of the body. Please note that the elements on the side closest to us should be larger in size than those on the far side. We note spots on the abdomen.


Take a black felt-tip pen or a gel pen and circle the desired lines of the sketch. Erase the rest of the pencil with an eraser.


With the help of colored pencils or felt-tip pens, color the resulting drawing. in green let's paint over the surface below the bug to show it as if it is sitting on a leaf. You can add veins and shadows on it.

This concludes our master class. We hope that it was useful for you. Happy drawing!
This lesson will tell you how to draw a ladybug beautifully. This will require six steps. Let us dwell on each of them, using step-by-step recommendations.
The lesson is simple, it is designed to suggest how to draw a ladybug to a child. It will be very easy for children to complete each step. For your convenience, we recommend that you print this page.
Before starting classes, let's talk about curious facts related to a funny insect:
- This bright bug lives in all countries with a temperate and tropical climate.
- These insects are red or orange, and their spots can be not only black, but also white, and even yellow.
- Ladybugs feed on insects that harm the crop.
- Most varieties of this beetle are completely harmless to humans.
- The size of the insect does not exceed 1.2 cm.
Step 1. We draw the body of the insect in the form of a circle.
Step 2. Adding the first pair of legs.
Step 3. We draw the middle pair of paws and the contours of the eyes of the bug.
Step 4. We finish drawing the hind legs, head and draw a strip along the body.
Step 5. Carefully decorate the bug with round spots.
Step 6. Adding finishing touch- insect antennae.
Now you know how to draw a ladybug step by step, and you will definitely get a cute bug. The main thing is to show diligence and not give up if the first attempt fails.
And you can also watch a wonderful video tutorial that will tell you in an interesting way how to draw a ladybug.
Try and you will succeed too
Tell us about your successes in the comments this lesson and share the lesson with your friends.


, poultry farming")


- Burns, Robert - short biography
- The concept of common vocabulary and vocabulary of limited use
- Nancy Drew: The Captive Curse Walkthrough Nancy Drew Curse of Blackmoore Manor Walkthrough
- Deadpool - Troubleshooting
- Won't start How to Survive?
- What to do if bioshock infinite won't start
- Walkthrough Nancy Drew: Alibi in Ashes
- Spec Ops: The Line - game review, review Spec ops the line crashes on missions
- Room escape level 1 walkthrough
- Processing tomatoes with boric acid How much will 2 grams of boric acid
- Cucumber Grass (Borago)
- Bioinsecticide Lepidocid: purpose, properties and application procedure Lepidocide waiting period
- How to change the language to Russian in steam
- Dendrobium noble: room care
- Morphology of plants general concepts - document
- Planting, propagation and care of bamboo at home, photo Growing bamboo from seeds
- How to strengthen the cellular signal for the Internet in the country
- Sanskrit reveals the forgotten meaning of Russian words (2 photos)
- The oldest language Sanskrit programming language of the future Dead language Sanskrit
- Who has dominion over all the earth?