Drawing lessons for beginners with a pencil in stages by yourself. How to learn to draw eyes well with a pencil? Basic drawing course for adults
Since you got here, it means that you believe at least a little that you can learn to draw. And indeed it is! Even if you drew just a little, didn’t draw at all, or doubt your abilities, find a simple pencil and 20 minutes a day- and in a month you will learn how to create amazing images.
The hardest part is getting started
To learn how to draw, a person first needs to just start. You need to push him so that he picks up a pencil and begins to draw lines on a blank sheet of paper. Many people think that Blank sheet paper is a problem that only a talented artist can handle. In fact, having mastered it, you will gain enough self-confidence to enjoy drawing.
After completing this course, in thirty days you will get first creative success, get an incentive to constantly practice, build confidence in yourself and keep your interest in drawing for life.
Guys, we put our soul into the site. Thanks for that
for discovering this beauty. Thanks for the inspiration and goosebumps.
Join us at Facebook and In contact with
David Revoie, illustrator and concept artist, shared with aspiring artists a list of knowledge that needs to be acquired in order to make their work realistic. It doesn't matter what you draw with - with a pencil, brush, crayons or on a tablet - these laws remain unshakable.
website I have in store for you an article that clearly and clearly outlines the action plan for an aspiring artist who decided to study on his own.
“It is difficult to choose what to study for those who are going to take up drawing ... I receive many letters on this subject; beginners usually feel lost, lost in the middle of it all. Therefore, I decided to make a kind of table of contents - a list of what you need to learn and what you need to practice in order to create quality work and learn to draw better. Each item is provided with my simple comments, answering the questions "what", "why", "how". This way it will be easier to find necessary material using your favorite search engine. Also, this material can be useful for those who want to improve the quality of their work. I will use these starting points in my exercises and when looking for errors in my work. If you are just starting to draw, here is my advice: be erudite, learn the basics and focus on individual elements in turn.
1. Perspective
What is it: The art of rendering three-dimensional space on a flat surface.
What is the purpose: Do not draw flat, depict depth on two-dimensional paper.
What you need to know about it: Perspective grid like simple shapes(cubes, balls, etc.) behave in perspective and how to maintain proportions.
Work based on two vanishing points (green and red).
2. Proportions
What is it: The ratio of the sizes of all objects in your drawing.
What is the purpose: Draw recognizable objects through stereotyped representations of proportions.
What you need to know about it: Learn to memorize proportions, find a way to easily memorize the ratio of parts of an object, make a "dictionary" of proportions.
The orange lines show the main proportions and relationships in the drawing (left) and sketch (right).
3. Anatomy
What is it: The study of the structure.
What is the purpose: Draw objects realistically (people, animals, plants, vehicles, etc.).
What you need to know about it: Joints, bones, muscles, how they work, how they behave, how parts connect, etc.
Exercise for drawing hands (left), drawing a skeleton (center), studying muscles (right).
4. Composition
Various sketches before starting work; composition search.
5. Lighting
What is it: Light and shadow rendered in color.
What is the purpose: Create the illusion of light, display the right shadows, achieve volume and convey mood.
What you need to know about it: Color values, shadow casting, influence of surface materials, light reflection, light characteristics (refraction, diffusing materials, etc.).
Left: The light shows the difference in material. Right: Using light to show a second character (cast shadow).
6. Edges
What is it: A way to highlight the silhouettes of objects in your drawing.
What is the purpose: Make work easier to read, separate objects and background, enhance depth effect.
What you need to know about it: Edge style (hard/soft/fading) in drawing, line styles (weight, speed, softness) for outlines.
Left and center: the edges in the figure, right: the thickness of the contours.
7. Colors
What is it: The art of choosing the right shades (midtones, shadows, highlights).
What is the purpose: Add more movement, mood and emotion to your work.
What you need to know about it: Color systems (monochromatic, complementary, etc.), features of the influence of colors on mood, stereotypes.
Top left: 3 color circle, reflecting the palettes for this work; three additional colors.
8. Poses
What is it: The art of capturing active movement on a static sheet.
What is the purpose: Add life, energy, movement and show dynamics.
What you need to know about it: Emotional strokes, sketches, quick drawings, the study of everything moving, frequent "warming up" exercises.
Left: penguin poses at the zoo, center: learning poses while moving, right: warm-up sketches of the figure.
9. Style
What is it: Aesthetics, sense of style. Often depends on fundamental standards (ethical, historical, social, symbolic), art of cultural groups, art market.
What is the purpose: Pave the way for the work to the audience.
What you need to know about it: Your own taste, culture, creative team as an audience and creators at the same time.
Left: classic black and white portrait, center: highly stylized (and weird) character and drawing style, right: my comic book style.
10. Idea
What is it: Drawing abstract concepts, ideological associations, invention and proposal of a new design. it for the most part development process.
What is the purpose: Suggest new images of objects, characters and creatures to entertain or inform the public.
What you need to know about it: How things work, how to create something new, associations of ideas, fun situations, the creative process.
A new type of vehicle (left), the new kind a dragon (center) and a medieval house that no one has seen before this drawing (right).
11. Communications
What is it A: An image can convey a large amount of complex information quickly. The proverb “A picture is worth a thousand words” explains this well.
What is the purpose: The artist can communicate (internationally or not) with the audience.
What you need to know about it: Reading images (deciphering sent messages, non-verbal signs), conveying meaning, history, information.
The drawing of the leaf does not convey much information (left), but the complex of details and facial expressions can already tell a story (center). A symbol like the vulture from newspapers (on the right) can make you think more deeply about the problem of unethical journalism.
Conclusion: Meaningful Illusion
If you can correctly combine all of the above, you will achieve a sense of volume, depth, texture, light, movement and life on a static surface. This will immerse your viewers in your world and you can easily convey your ideas, messages or story to them. And finally, how I see the result: the art of creating meaningful illusions . This whole palette of skills will serve your intellectual (memory, control, determination) as well as emotional development (feelings, emotions, subconscious). This is a complex exercise that requires knowledge, observation, imagination but first of all you need PRACTICE, PRACTICE and PRACTICE. Drawing is like a muscle (and you certainly won't get stronger just by reading a weight lifting book or watching a video), so good luck with your drawing and painting, build your unique experience".
The craft of a good draftsman is based on 2 basic things: the ability to control your hand and the right vision. If you want to create or design websites, then you can’t do without special training.
The following 6 sections of the article are, in fact, the first step in this direction- you will learn how to learn to draw and where to start. Immediately after that, proceed to the second part of the topic and go on.
This is a translation of a note from Medium by Ralph Ammer (all graphics are his own).
Advice. For the next 6 tasks, use one type of pen and one type of paper (for example, A5).
Hand dexterity - two workouts
The first two moves are about controlling your hand. You should fill your hand, and also learn to coordinate the vigilance of the eye and the movement of the brush. Mechanical practices are great for beginners. You can later use them to try out new tools. They also allow you to relax and take a break from mental or physical work. So, how to start drawing correctly.
1. Lots and lots of circles
Fill a sheet of paper with circles different size. Try not to overlap the circles.

Learning to draw circles is not as easy as you might think. Note that the more circles on the paper, the more difficult it is to add the next one. Draw them in two directions and as many as you can.
Advice. Shake your hand when it starts to cramp, do this after each set.

2. Hatching - creating a structure
Fill in a sheet of paper with parallel lines.

Diagonal lines are the easiest for us, as they correspond to the movement of our wrist. Note that the left-hander prefers the opposite direction of strokes than the right-hander. Take a look at your favorite artist (in my case, Leonardo da Vinci) and try to guess which hand he wrote with?

Try other stroke directions. Have fun with the hatching process. Combine different strokes and enjoy how the paper is covered with various shadow spots.
Advice. Do not rotate the paper. It is very important to train your hand in different directions.
So, after we have trained the hand, we need to do exercises on the eyes!
Perception - learning to see
Drawing is primarily about seeing and understanding what you see. People often assume that everyone sees the same thing, but that's actually not the case. You can always improve and develop the quality of vision. The more you draw, the more you see. The following four tricks will make you expand your view of familiar objects. This is exactly what they begin to learn to draw in different courses.
3. Contour - show me your hands!
Do you see these different fascinating contours of your hand? Draw them on a piece of paper. Do not try to recreate everything, choose only a few of the most interesting ones.

Whether you're drawing a person, a plant, or your favorite animal, you create the outline of what you see. Outlines define the body or object and make it possible to recognize the pattern. The task is not to immediately display all existing distinctive features but to learn to see them!
Even if you know the shape of an object, it's still worth taking a closer look and re-examining it.
4. Chiaroscuro - apply light and shadow
Draw a piece of fabric. Start with the outlines, and then use your hatching skills to find the chiaroscuro transitions.
This exercise will help you learn how to convey light and shadow on paper. I must admit that this is not the easiest way for beginners. Keep in mind that it is not necessary to make perfect chiaroscuro transitions. The fabric is a playing field to practice the skills learned in the previous lessons. Plus, you will also understand how to learn how to draw chiaroscuro using only your hand.
Advice. You can do curved hatching to create shape, and cross hatching to achieve deeper shadows that resemble the texture of fabric.

Advice. Close your eyes a little while looking at the fabric. You will see a blurry image of the fabric and increased contrast between light and shade.
5. Perspective - Cubes in 3D Space
Let's draw cubes! Follow simple steps.

A drawing in perspective is a projection of a 3D object into 2D space (your sheet of paper).

Building a perspective is a separate science, which is unrealistic to be fully considered within the framework of one article. However, we can have some fun with a simple technique that gives us an intuitive feel for the magic of drawing in perspective.
Step 1. Draw horizontal line. This will be the horizon.

Step 2. Put two points along the edges of the line - two invisible vanishing points.

Step 3. Draw a vertical line anywhere.

Step 4 Connect the ends of the vertical line to the vanishing points.

Step 5 Add two more vertical lines as shown below.

Step 6 Connect them to the vanishing points.

Step 7 Now use a black pencil or pen to trace the cube.
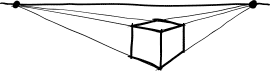
Repeat steps 3 to 7 for as long as you wish. Enjoy building! Have fun drawing, then you will succeed. You can shade the sides of the cube.

Advice. When you draw cross lines, it's best to overlap one line slightly over the other, so the shape is more visible.

Mastering perspective drawings will help you create the illusion of depth. And most importantly, you will teach your brain to see and recognize three-dimensional space. This is a great practice for how to start drawing from scratch without any skills.
Even if you decide to ignore the rules of perspective and make “flat drawings”, this knowledge will never be superfluous, but on the contrary will help expand your horizons and sharpen your visual receptor.
6. Building a composition - why here?
Do 5 different drawings one object. Position the item differently each time.
As you create various options positioning your subject on paper, try to trace how this changes its connotation - meaning.

The author Ralph Ammer has a few more interesting articles, but it is this one that you need to watch first in order to understand where to start drawing with a pencil and not only. In the comments, I would like to see your opinion about the pros and cons of the presented methodology. Which exercises really gave you pleasure, which did not? What else do you want to know on the topic or, perhaps, you have your own experience on how to learn to draw from scratch - write all this below.
P.S. Free and complete SEO analysis of the site page - sitechecker.pro. In promotion, not only are important external factors, but the web project itself must be good.
Many beginners do not know how to start learning to draw. The Internet is full of open materials that are confusing. Also, people, as a rule, have a fear of failure and doubts about their talent. Today, based on my own experience, I will tell you how to learn to draw from scratch.
First of all, I must say that it is never too late to start drawing, there are many successful and talented artists who first took the brush in their hands already in adulthood. Of course, it is easier to teach children anything, including drawing. But, if in your childhood acquaintance with painting was limited to art lessons in the third grade, then it does not matter! You can start in your 20s, 30s or 50s.
But where to start?
Drawing is a creative and rather time-consuming process, so do not expect masterpieces from yourself in the second lesson, but be patient.
First step- sketching from pictures, photos, video lessons. Yeah, that's not really what they do art schools, and yes, you will not study the basics of academic drawing, since it is almost impossible to do it yourself without the help of professional teachers, and it is not necessary. Your hand is completely unaccustomed to a pencil, you still do not know the proportions and shapes of objects. Drawing various objects from a photo will help you fill your hand and understand the construction of objects.
To successfully pass this stage, you need to forget what exactly you are drawing. If there is a chair in front of you in the picture, do not think that you are drawing a chair, but simply copy the lines, shadows. Thus, your right hemisphere, which you now need much more than the left, will turn on. And yet, do not try to finish the picture in "one sitting", take breaks in work. When your drawings have become more or less "edible", you can move on to drawing by, where you draw in parallel with the video.
Second phase- sketches from nature. You are not yet ready for large-scale work with nature, but start sketching, draw everything that you see around. Pay attention to the proportions of the object and its location in space. Yes, you are not doing very well yet, but look at your first works. You will definitely see progress! In parallel with the sketches, continue drawing from pictures, photos and video tutorials. In principle, here it is the beginning, nothing complicated, just work and patience.
Now let's analyze 6 major mistakes, which beginners often admit.
- Buying too expensive materials. This is how psychology works, that on paper for 3,000 rubles you are supposedly obliged to do something worthwhile and you have no right to make a mistake. Such a completely natural attitude gives rise to a fear of drawing, so we do not buy the entire assortment of an art store.
- Painful perception of criticism. Most likely, you will post your work on social media. network, where you will find a million angry critics, but do not take anyone's words to heart. Pay attention only to constructive criticism of the case, and ignore insults and unpleasant statements about your work.
- Desire to embrace the immensity. Yes, I understand that you already want to draw views of your native village or a portrait of your beloved brother, but take your time. Taking on things that are too difficult for you, you will only be upset and disappointed in your abilities. Everything has its time.
- Reading books on drawing. It seems that books can contain bad things? If you have just started learning to draw, then you do not yet have the knowledge base for all these books on color perception or anatomy to help you. These books are for students. art academies and not for beginners.
- Rare or irregular drawing. Here everything is the same as in sports, for 10 minutes a day you will not achieve anything, draw at least 1-2 hours a day. And if you give up drawing for a week or a month, you will lose shape and feel how naughty your fingers have become.
- Fear of new materials. On the early stages drawing, your main material will be a simple pencil, but do not be afraid to draw with pens, paints, markers, etc. If the opportunity to work with some new material is given, do not miss it.
Create, work hard, and everything will work out.
Every person in life needs to have an outlet. Even if a hobby is a job, it is still impossible to devote 24 hours a day to it. Drawing is a great way to relax. How to learn to draw from scratch? It will take a lot of patience, a good eye and, of course, a lot of practice.
Choosing a material
Of course, professional artist can draw a masterpiece with a simple pencil on an ordinary napkin, but people who are wondering how to learn to draw from scratch should not make such experiments. Otherwise, you can be disappointed in your abilities, never knowing what Mother Nature has actually put into you.
For the first lesson, you need to purchase an album with thick paper or buy a sheet of drawing paper. Of course, you can draw on the “Snow Maiden”, but the sheets intended for printing are so thin that the pencil will “stumble” on the substrate, which is a table or easel. By the way, about the substrate: you should not draw on the table, it is advisable to purchase (or make it yourself) an art tablet. Drawing at an angle is always more convenient, as the viewing angle becomes larger. And, of course, answering the question of how to learn how to draw from scratch at home, one cannot but say about pencils. The artist must have at least 5 of them. It is desirable to have 2 pencils of different hardness, 2 of different softness and one hard-soft.
There should also be 2 washers: one is standard soft, the other is nag.
The Basics: Learning the Stroke
How to learn to draw from scratch? First of all, you need to train your hand. There are many different exercises for this, for example, drawing eights, zigzags or straight lines. These simple exercises, if you do them 3-5 minutes before the start of the lesson, they will be able to liberate your hand, it will obey you better.
The next exercise is the study of hatching. It can be straight, oblique or crosswise. In the process of work, each artist develops his own unique style, but at the first stage it is too early to think about style, you need to fill your hand, which means trying different stylistic solutions.

After hatching has been studied, you can move on to the form. But you don't have to draw contour lines, namely strokes. So a person will better perceive the volume, and at the same time will bring his touch to perfection.
sketches
Today, sketchbooks are very popular. Moreover, they draw both novice artists and professional illustrators. Why do you need such a notebook? Everything ingenious is simple. The purpose of a sketchbook is to be always at hand. After all, you never know where you can meet interesting topics for sketches. Beginning artists who are tormented by the question of how to learn to draw from scratch just need to get a sketchbook. Here you can throw fantastic images or sketch the surroundings. It does not matter what will be depicted there, the main thing is daily drawing. And since in modern rhythm it is difficult to find a free minute, then if the sketchbook is always at hand, the task becomes much easier.

Geometric bodies
Everyone can learn to draw from scratch with a pencil. It is worth starting your creative attempts with the image of geometric objects. After all, everything that surrounds us can be divided into cubes, spheres or pyramids. And if there is experience in the image of the base, then drawing, for example, a portrait will be much easier.
The first step is to learn how to draw a cube.

It is advisable to draw from nature, and not from the monitor screen. After all, the image on the computer is two-dimensional, and it will not fully convey reality. It should be remembered that it is worth building the geometry, and not copying the outer shell, otherwise it will be simply impossible to achieve an understanding of the form. After the cube, you need to learn how to build a ball, then a cone, a pyramid and all the others should go. geometric bodies that exist.
Solids of revolution
How to learn to draw from scratch? Working step by step first on geometric objects, and then on a body of revolution, you can achieve significant results.
First of all, try to depict teapots and mugs. Most of these items have a simple shape that even a novice artist will not be difficult to depict.
The next step is drawing vases and glasses. But you need to choose not elegant crystal objects, but rough clay products. They have a well-read form, so drawing them in a graphical version is much easier.

Having mastered quite simple items, you can move on to more complex objects. For example, draw a still life. This task is given so that the novice artist understands how objects interact with each other. After staged still lifes, you can go directly to more lively drawings. For example, do sketches before or after breakfast.
landscapes
Having learned to draw well all the space in the house, you can go outside to draw. Drawing architecture and landscapes is a rather complex and time-consuming process. How to learn to draw landscapes for beginners from scratch? Spend preparatory work at home, look at similar drawings in textbooks. Many artists post on the Internet not only finished sketches, but also a step-by-step storyboard. Analyzing their work, it is quite easy to imagine what simple forms one or another bush can be broken into. As a workout, you can walk around the park from time to time and imagine how you can draw a tree, a pond or a bench. While the image has not left your head, immediately upon returning home, draw from memory the object that interests you.
Animals and people
We figured out how to learn how to draw with a pencil from scratch in stages, and now we need to understand where to start drawing a person or animal. Of course, the first step is to sit down for an anatomy textbook. Only by understanding the structure human face and body, the artist will be able to create a realistic figure or portrait.

Of course, you can draw the contours of the body, but in order to accurately depict the figure, you need to build. The first thing to do is to redraw as many sketches as possible from the anatomy textbook and, of course, carefully study and master the proportions. It is necessary to have an idea of how many times the head fits into the body, on which line the fingertips end, etc.
To learn how to draw portraits, you need to do preparatory work. Here stumping will help - a plaster cast of a human head, the face of which is laid out in planes. Any artist, when drawing a portrait, must keep in mind the chopping scheme.
And of course, the same goes for animals and birds. To draw any four-legged or feathered creature, you need to look at how it looks without wool and feathers. It is by knowing anatomy that the artist will be able to professionally draw any living creature.


, poultry farming")


- Burns, Robert - short biography
- The concept of common vocabulary and vocabulary of limited use
- Nancy Drew: The Captive Curse Walkthrough Nancy Drew Curse of Blackmoore Manor Walkthrough
- Deadpool - Troubleshooting
- Won't start How to Survive?
- What to do if bioshock infinite won't start
- Walkthrough Nancy Drew: Alibi in Ashes
- Spec Ops: The Line - game review, review Spec ops the line crashes on missions
- Room escape level 1 walkthrough
- Processing tomatoes with boric acid How much will 2 grams of boric acid
- Cucumber Grass (Borago)
- Bioinsecticide Lepidocid: purpose, properties and application procedure Lepidocide waiting period
- How to change the language to Russian in steam
- Dendrobium noble: room care
- Morphology of plants general concepts - document
- Planting, propagation and care of bamboo at home, photo Growing bamboo from seeds
- How to strengthen the cellular signal for the Internet in the country
- Sanskrit reveals the forgotten meaning of Russian words (2 photos)
- The oldest language Sanskrit programming language of the future Dead language Sanskrit
- Who has dominion over all the earth?