How to draw a real horse with a pencil in stages for beginners and children? How to draw beautifully a muzzle, a horse's mane, a running, standing horse, in a jump? How to draw a horse step by step.
Hello, draw the symbol of 2014 :)
1. How to draw a horse, the first drawing step

All drawing lessons of my site are built on the use of geometric shapes, as the initial contours of the drawing of any animal. The drawing of the horse is made in the same way.
Using three circles, draw the main parts of the horse's torso and connect them with lines, as in my drawing. Drawing these contours is not difficult, but it is important to accurately position them on a sheet of paper in relation to each other. Try to make this horse drawing step as accurate as possible.
2. Add the contours of the horse's legs in the drawing

In this step, you need to draw the outlines of the legs, neck and head of the horse. Start with the line of the horse's neck. To do this, you just need to add to the already drawn one more upper line of the horse's neck. With a small circle, mark in the picture where the horse's head will end. After that, you can start drawing the outlines of the horse's legs.
Start drawing the front legs first. To do this, draw two pairs of small circles and connect them with straight lines. Instead of hooves, draw triangles. The hind legs are the hardest to draw in drawings of horses, perhaps because they do not bend forward, but backward. And pay attention, the lines of the legs do not start from the center of the circle, but are slightly shifted to the left.
3. General contour of the body, legs and head of the horse

Check carefully whether all the proportions of the horse drawing are respected. Is the head too big short legs at the horse? Are the hind legs bent back? Check the distance between the hooves, the front legs are almost closed, and the hind legs are standing as if the horse is preparing to run. If you are sure that everything is drawn accurately, then move on to the next step of the horse drawing.
4. The drawing of the horse is almost ready

At this step, we will not draw anything, just remove the extra contours from the drawing now. Touch up the lines you accidentally deleted and see how easy it is to draw a horse. Already at the third step of drawing you have got a real beautiful horse, all that remains is to draw the tail and draw the head of the horse in detail.
5. It remains to draw the horse a few more details

The first steps of drawing a horse are very simple, but require attention to ensure that the initial contours are accurately positioned in relation to each other. The proportions of the horse's drawing depend on their location. The next steps require attention to small details. You need to carefully draw small details, such as the eyes, nostrils, ears of the horse. For drawing small parts the pencil must be sharp. Don't forget to draw the tail.
6. Finishing touches horse drawing


The most difficult thing will be to draw correctly proportions of the body, head and neck. It is the ratio between these parts that will make your horse proud and properly built. Second step-by-step lesson:  Now let's try to draw a horse that got scared of something. In the drawing, it is important to convey the emotions of a frightened horse. Pay attention to the jaw and nostrils, which convey the mood of the animal. And the jaw and bones of the skull, which appear in the picture, make the image more realistic. Third step-by-step lesson:
  Try to catch the correct proportions between body parts. This will help schematic representation head, neck, chest of a horse in the form of circles and ovals. Fourth step-by-step lesson:
The drawing requires the correct representation of the horse's legs. Pay attention to curves, joints and hooves animal. Knowing the anatomy of horses will help you draw a picture. Fifth step-by-step lesson: 
The perspective in the drawing requires a clearer image of the body parts that are as close as possible, and the definition of body parts that are hidden from the eye due to movement. Sixth step-by-step lesson: 
Having correctly drawn the horse's head, you can not worry about its appearance in other drawings. Try to see all the muscles and bulges on the animal's head once so that you can display them later. Seventh step-by-step lesson: 
An older horse has less muscle and adipose tissue. Accordingly, in order to convey the return, you should draw the edges well, and focus on the sad look. Tenth step-by-step lesson:  To draw a horse's face really beautifully, you should practice a lot, because even the slightest mismatch in proportions will make the drawing look different, and your horse will not look so bold and proud. Eleventh step-by-step lesson:
A horse that has just been running, but has moved to a walk, must be tired. Your task is to draw a wet mane, a full chest, dilated nostrils in order to convey enhanced breathing. Twelfth step-by-step lesson: 
The horse's jump while taking off from the ground is a very beautiful pose. The whole body of the horse moves in one line, and the legs are parallel to each other. Thirteenth step-by-step lesson: 
A stubborn horse behaves aggressively. This can be conveyed with the help of a lush flowing mane. All movements convey stubbornness and unwillingness to submit. Fourteenth step-by-step lesson: 
When a horse is rearing, its legs are bent. When drawing the angle of the bend correctly, remember to follow the length of the leg from hip to knee and from knee to hoof. Fifteenth step-by-step lesson: 
The main difficulty in this drawing is to depict the horse's belly and bent front legs. One part of the legs overlaps the other, so it will be difficult to convey it the first time. Sixteenth step-by-step lesson: 
It is worth remembering that the horse's neck is very mobile, therefore, in the case when the animal reaches for food, the muscles lengthen. Therefore, the neck during meals is a little longer than usual, which may look unnatural. Seventeenth step-by-step lesson: 
To draw a sad horse, it is enough to depict relaxed muscles of the muzzle, half-closed eyes and slightly lowered corners of the mouth. Nineteenth step-by-step lesson: 
Seeing a horse in a gallop is very difficult, let alone drawing it. Therefore, the drawing may seem slightly unrealistic, because it is difficult for the eye to catch such a speed. Last for today, the twentieth step-by-step lesson: 
STEP 1. The first thing you need to do to learn how to do this is to draw the main line of the horse's body. You can achieve this by doing three circles, one each for the head, chest and back end. Then add auxiliary lines, which will connect them all, starting with the neck, back, abdomen, tail and legs.
 STEP 2. Now you can start sketching out the shape of the horse's head, and nose like you see here. Also depict the mouth opening exactly, as in the drawing, so that your stallion would have a look of rage on his face. Begin sketching out the neck, and muscles for the front leg or shoulder.
  STEP 3. We continue our lesson, how to draw a horse with a pencil. Let's start drawing the horse's head by adding the ears and the beginning of the mane. Once that is done, you can do the back of the neck and then the curve of the back. Next, draw in more detail the eyes, nostrils and teeth. Perhaps our lesson on how to draw a mouth will help you.

STEP 4. It's time to start the real fun. It's time to draw the horse's mane. Since this stallion is in an aggressive stance, you will need to make a mane to make him look wild. A few sharp edges will give this effect. Next you should finish sketching out the front legs and then the hooves. You should also draw the belly, and the beginning of the hind legs.
 STEP 5. You're almost there guys, a few more steps to go. Start sketching out the back legs in full form, and then add another little thing that makes him a stallion (gee).
STEP 6. Lastly, draw the stallion's tail and then add some minor muscle features like in the picture. Erase the guide lines and shapes you added in the first step to clean up this drawing. 
When you're done, you should have a sketch that looks exactly like the one you see here. All you have to do now is add color. I hope you enjoyed this tutorial that taught you.

STEP 1. Let's start with the muzzle.

STEP 2. Draw the lower part of the neck and muzzle of the horse.

STEP 3. Draw the upper part of the neck and back.

STEP 4. Start drawing the front and back legs.

STEP 5. Add a couple of lines to the legs and don't forget to draw the horse's ear.

STEP 6. Finish the lower belly, two legs and hooves.

Step 7 Draw the remaining two legs.

Step 8. And at the very end, draw the horse's tail, mane, eyes and nostrils.

Learning how to draw a horse correctly is a rather difficult task, since exact proportions are required. But if you draw a horse in stages, then it is quite possible to draw it correctly even for children. In this lesson, we will learn how to draw a standing horse, step by step, outlining its outline. It is difficult even for an artist to draw a picture of a running horse, so first draw a picture of a horse that stands motionless. The most complex elements of a horse drawing are the hind legs and head, pay special attention to these details.
First, let's draw a simple rectangle, its size will set the size of the horse's body. It will help to draw the correct location of the legs and neck of the horse. Just draw it in the middle of your sheet to fit the rest of the details. If you want to draw a pony, then draw a rectangle a little wider.

Next, draw two ovals, as shown in the figure. The first oval is placed horizontally, for the front legs and chest of the horse. We draw the second oval in the upper right edge of the rectangle. Let's make it a little smaller than the first oval and place it at an angle. This oval will serve to draw the hind legs of the horse.

In the next step, we will draw the basic shapes of the neck, legs and head shapes of the horse drawing. This will help us draw the basic proportions, and will serve as a key point for drawing the outline. Draw a triangle for the horse's neck, a circle for the cheeks and a square for the horse's muzzle. That's all you need for now, we'll add the rest of the outlines later.
The next step is to draw two straight lines for the front legs, and two slanted lines for the back, with balls on the joints, as shown in my drawing. Draw short slanted lines for the horse's brush (ankle) and triangles for the hooves.

Now add a few lines with a pencil to the main contours, circle the torso and legs so that the drawing already looks like a horse.
How to draw the horse's legs: First, make dashed lines to draw the legs and draw a large inverted triangle on the top of the hind legs. Everything else is pretty easy to finish on your own, looking at my drawing of a horse.
Head and neck: join the square at the nose to the cheek - a circle to form the shape of the horse's head. Let's add the ears. Let's draw a line connecting the puffy cheeks to the neck, which will make the lower part of the triangle neck a little thicker. Draw a curved line above the neck.
Body: Equalize the chest of the horse at the top of the front leg. Attach to the chest and back from above with lines, which turned out to be a curve.
Well, now the drawing resembles a horse, although it is not finished yet.

Let's add a few more details to the drawing to finish drawing the horse or pony.
First, let's draw the horse's head. Draw the eyes - it's a circle with a triangular roof. Let's draw the mouth - it's a straight line with a slight bend at the end. The nostrils are a simple round line. Hooves draw in the form of a parallelogram, and then erase the upper right corner.
You can draw the mane and tail long and shaggy or neatly trimmed, like a thoroughbred horse.

A business using retro vehicles is a real gold mine for farmers who keep or breed horses. These stunning animals are no longer used for hard work in the field, but they can bring additional income by rolling tourists along the picturesque streets of the city. In this article we will tell you how to make a carriage with your own hands, the drawings are attached.
There are several types of horse carts popular in Russia that can be made at home:
- cart;
- sled;
- carriage or carriage.
Let's take a closer look at how to craft each of the above vehicles.

Use of horse carts
Let's start simple. The cart has long been used in villages as the main means of transportation for several passengers, as well as a device for transporting oversized cargo. During the youth of our grandfathers and grandmothers, they sometimes met in the city, most often near the markets, where peasants brought crops from the garden or cattle for sale.
Today, such a curiosity in cities can be found very rarely and only in the "smart" version. A simple vehicle of small size is often hitched to ponies in parks to give children a ride.

A horse carriage is perfect as a vehicle for a rustic wedding.
Any wagon, whether it be a sleigh, carriage or cart, will not budge without a horse. It is important to know how to properly harness the horse - after all, it depends on whether the animal will be comfortable in the harness, and, therefore, its performance. Let's figure out what the harness consists of and what harness rules exist.
Necessary tools and materials
In the process of making a cart, you will need the following tools and materials:

cart making
The design of a simple wagon is divided into several main elements:
- frame;
- hinged part.
Consider the manufacture of each of the components.

Making an axis
| Step | Description |
|---|---|
| As a material for the manufacture of the cart, a strong tree is usually used. So, first of all, prepare a meter-long wooden beam, the width and height of which are equal to each other and are 10 centimeters. Be sure to check that the wood used for the axle does not rot or crumble. Poor quality material can lead to an unexpected breakdown of the cart, and as a result, to injury to the passenger and the horse. |
| Determine how much of the wooden beam will be at the bottom of the wagon. Perform a groove milling along the entire lower part of the wooden workpiece, it is needed to install the metal axis inside. Then drill a hole exactly in the middle of the piece of wood, passing through. The hole diameter is 20 mm. During the assembly of the cart, a kingpin is installed in it - a special metal pin with parameters M20x200. |
| Now you need to make flat metal circles with a diameter of 30 centimeters. Use centimeter metal sheets as the starting material. Cut a hole in the middle of each "pancake", the diameter of which is 22 millimeters. The resulting parts will take on the role of a swivel device, in two of them it is necessary to make additional mounting holes. |
| Entering from the bottom of the beam, insert the king pin into the middle hole. We fix it on each side and install a metal axis and flat circles in the timber. Congratulations, you have just designed the front axle of the future wagon yourself. |


The axle for the rear of the cart is made similarly to the front, but without the use of a king pin and a metal "pancake" in the design.
Making a frame
| Step | Description |
|---|---|
| To construct the frame, use the second wooden beam, the length of which is 3 meters. The width and height of the part correspond to the previous parameters and are 10x10 centimeters. |
| From one end of the prepared part we fasten the previously assembled rotary mechanism, on the other we install another wooden beam, which is 10 centimeters wide, 10 centimeters high and 3 centimeters long. Then we attach the rear axial part to the frame. A small bar compensates for the level of distance between the axles and is necessary for proper functioning vehicle. |
| It is necessary to give the resulting wooden structure rigidity. For this purpose, use boards that are 5 centimeters wide, 13 high and 2.515 meters long. Giving products the desired shape and parameters, track the exact correspondence of the resulting and desired dimensions. |


hinged part
| Step | Description |
|---|---|
| The bottom of our wagon primarily belongs to the hinged part. It is assembled from a set of boards, with a width of 2.5 centimeters, a height of 10 centimeters and a length of 50 centimeters. They are superimposed on the frame of the frame and boards that give rigidity and are bolted to the middle beam. |
| We fix two long boards along the edges of the assembled bottom. The width of each of the boards is 2.5 centimeters, the height is 10 centimeters and the length is 2.8 meters. |
| We cut out the ends of the future wagon from a sheet of high-quality plywood, the thickness of which will be approximately 2-3 centimeters. We securely attach the parts to the assembled frame. Then we screw two polished, wide boards to both ends on each side. |


So, we got a real, strong cart. Decorate it with additional details and turn it into a fabulous wagon.
One of essential elements harness is a collar. It was he who at one time made it possible to increase the performance of horses and transport not only people, but also heavy loads. Read in what the clamp consists of, what types of clamps are and how to choose the right one for your horse.

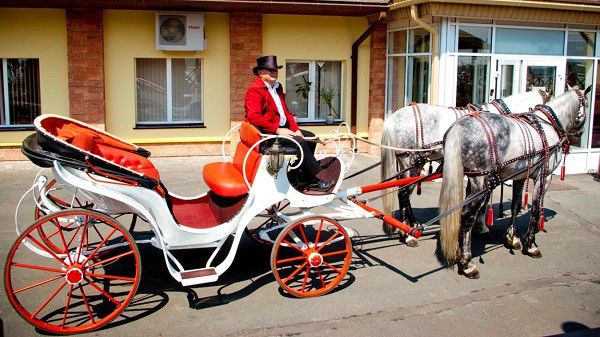
Using a carriage
Now let's move on to a more complex version of the horse cart - an elegant carriage or carriage. This type of retro transport is far from rural romance, as the emphasis is on its elegant appearance. A very popular transport not only for urban horse rides of couples in love, but also for weddings, where it can act as a key element of a thematic photo zone for newlyweds and guests.

Necessary materials
To make a strong and beautiful carriage, you need to prepare the following materials and tools:
- wooden bars;
- moisture resistant plywood;
- bolts and nuts;
- clamps;
- plastic;
- foam rubber;
- fabric for upholstery of crew elements;
- resistant paint and varnish liquids for building materials;
- glue;
- drill;
- jigsaw;
- sandpaper;
- circular saw;
- roulette;
- file.
We make the body of the carriage from plywood with our own hands
As a material for the body of the future carriage, choose moisture-resistant plywood for outdoor products. Mark the future elements of the carriage body on the plywood sheets with a black marker.
It should be said that the parameters of the carriage depend on the desired shape and size, however, even the smallest cabin for two people will be about 1200 millimeters long and wide and 1600 millimeters high.

Proceed to sawing out the figures according to the markings, using a circular electric saw. As a result of sawing, you should get four parts. Make two of them a little smaller than the rest. We will connect them with in large parts in order to further support the back and front walls of the carriage on something.
After you receive the blanks, use a jigsaw to carefully cut holes for windows and doors. To make the jigsaw easily enter the plywood, drill small holes with a drill at the site of the future entry of the blade.
We will connect the larger and smaller workpieces to each other using construction glue and bolts that are twisted from the outside. Allow the adhesive between the panels to dry and cure before tightening the bolts. To do this, squeeze them with clamps and leave for a while.

We proceed to sawing the floor and ceiling of the carriage. The plywood ceiling panel can also be 9 millimeters, but the bottom should be made of a strong and thick canvas.
The fastening of these elements to the side parts of the carriage is carried out using spacers - this is more even. The components of the wagon should be glued with building glue, and also twisted together with bolts.

If you decide to make a large carriage for several people, add additional stiffeners. They can be made from wood or metal.
Step 5
After the floor and ceiling of the carriage are attached, measure the resulting distance between the walls, as well as the distance from the floor to the ceiling. So you get the parameters of the rear and front walls of the vehicle. If desired, cut small windows into them or leave the canvas intact. It is preferable to make a window in the front wall so that during the use of the carriage, passengers do not have to pass directions to the driver along the route through the side window, raising their voice.

To make the attached edges of the carriage easily curved, make notches along the entire length of the edges at small intervals.
Video - How to make a carriage
Making a frame
Now that the body is ready, let's move on to making the frame.
The size of this element of the carriage is determined based on the dimensions of the body. The components of the frame should be cut out of a thick plywood sheet, which is at least 21 millimeters wide. Two parts of the frame are cut out of it, similarly to the shape shown in the figure.

After cutting is done, sand the surface of the parts with sandpaper to make them smooth.
Note! The body must fit snugly into the frame recess. Do your cutting carefully. If you accidentally cut off an extra centimeter, do not save money and make a new part.

Let's start making the luggage part of the crew. For each side part of the frame, we produce a drank lining according to the picture shown. Use the finished frame drawing as a shape guide. The material for the sidewalls is also thick plywood.

Once the sidewalls are done, secure them to the inside of the frame with bolts or glue. You can use these building devices in a complex.
The detail for the bottom of the back of the wagon is sawn from the remnants of plywood, one side of it should be beveled at an angle of 45 degrees, as shown in the figure.

Using a drill, we make holes in the side parts. You need to do this at an angle of 90 degrees. To make it even, use a special bracket.
Then put the bottom of the carriage back in place and push it onto the frame with equal amount screws for each side.
Do not forget to glue the joints of the parts to give the structure additional strength. To make the bonding as effective as possible, tighten the parts with clamps.
Now we are preparing the coachman's place. It is made by analogy with the floor of the luggage compartment. A piece is cut out of a sheet of plywood, on which parallel cuts are made about 6 millimeters deep. A second sheet is glued to it at an angle, ideally sized to fit inside the carriage frame. After the glue has dried, screw the sheets to each other with a few screws.
Then we make a step from the sawn plywood boards. We glue the boards side by side to each other and set in place.

Step 5
We are preparing the very seat for the cab driver. Here the flight of your imagination is not limited by anything. At the beginning, we make the “skeleton” of the future chair, focusing on the drawing, and then we put plywood planks on the frame. The lower part of the seat can be made wide so that it is comfortable to sit.
Making a coach seat is the easiest part of the process
To make the design look more spectacular, arrange carved armrests.

Step 6
Let's start creating windows and door curtains. Thin, transparent plastic acts as window plates. This material is sold in rolls.
Interesting advice. To straighten rolled plastic, dip it in boiling water and straighten it on a flat surface.
We cut out the frame for the window and glue the plastic on the inside. You can also fix it with screws.
After the windows are ready, we install them in the corresponding connectors of the body and glue the platbands. The result should be a design similar to that shown in the figure.

It is better to take the handle for the door and the hinges purchased, metal, since the carriage will be mercilessly operated.
Step 7
Upholstery fabric is made using a construction stapler. For a carriage in which people will ride, it is better to buy eco-leather, as its wear resistance is higher than other available materials. However, some details of the interior decoration can be sheathed with velvet fabric.


We present you a comparative table of the advantages and disadvantages of eco-leather.
As you can see, all the shortcomings of the material are mainly related to aesthetic characteristics. From a practical point of view, eco-leather is best suited for interior upholstery of a carriage.
Step 8
What you do at the stage of decorating the carriage is up to you. Most importantly, do not forget to equip the crew inside with a comfortable sofa, which you can also assemble yourself and upholstered with a suitable fabric.
Be sure to take care of the external decoration of the wagon. Add plywood carvings throughout the body, don't forget the roof and frame. If you make a lattice for the roof, you can put a real living flower bed on top. This will add charm to the carriage and attract a crowd of tourists to you.
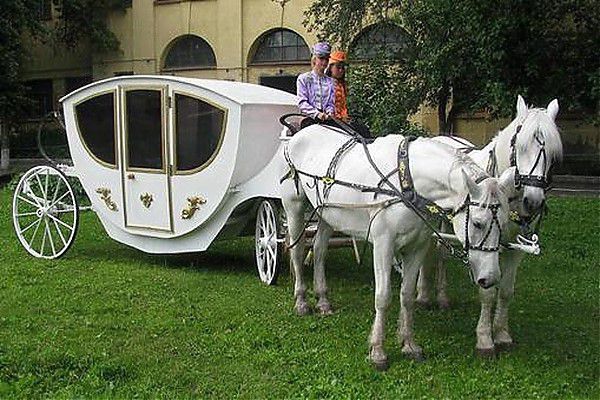
The carriage is a spectacular retro transport popular among tourists.
You can paint the body of the carriage with plywood paint, which is available on the market in absolutely any color. Here is a sample list of painting jobs:
- surface grinding;
- primer using an acrylic base;
- layer drying;
- puttying;
- drying putty;
- re-grinding;
- primer;
- soil drying;
- staining.
How to make carriage wheels
Wooden carriage wheels are also easy to make yourself. Them constituent parts are:
- a rim made of segments;
- sawn hubs;
- metal bandages;
- bearing bushings.
| Step | Description |
|---|---|
| The wheel rim is made and an even number of segments, absolutely identical. Usually there are only seven of them. A spike socket is made from the back of the rim, a spike is cut from the front. A groove must be cut across the base of each spike, which is needed so that air comes out of the groove. A recess is cut out in the middle of each segment, holes are drilled from the sides, passing through. The rim is assembled according to the "groove - socket" scheme. |
| We proceed to the manufacture of the hub. For such a part, you need a single piece good tree. The part is machined similarly to the drawing shown in the figure. Then we prepare a bandage for the received part. It is made from metal tubes cut into rings. The inner diameter of the ring corresponds to the outer diameter of the round part of the hub. After warming up the ring, put it on over the round part of the hub, press in the bushings and let cool. |
| Now let's start making needles. The shape of the products can be any, the main thing is to follow the basic principles. We cut grooves along the spikes of the knitting needle so that air can freely escape from the nests. |
| We collect the wheel and install the bandage over its rim. Such a bandage is prepared from strips of cut metal plates, at least 4 millimeters thick. The width of one strip is equal to the width of the wheel rim. Metal fasteners are carried out by drilling holes in the surfaces and tightening the screws. |


It should be noted that the advantages of old-style wooden wheels are not so many. Despite the metal bandages, their wear resistance leaves much to be desired.
Some craftsmen advise using rubber tires for carriages, for example, designed for a motorcycle. This will not only make the carriage ride softer, but also ensure a long service life for the carriage.
Video - Self-made wooden wheel for the crew
Use of the sled
The winter version of the carriage is the sled. Sleigh rides are a real curiosity and are especially popular in Russia because of the long winters of unprecedented beauty.
One, two or three horses are harnessed to the harness of such a sleigh, which will take you to the real winter fairy tale. But so that the fairy tale does not turn into a cold nightmare next to a broken carriage, it is necessary to correctly build the structure.
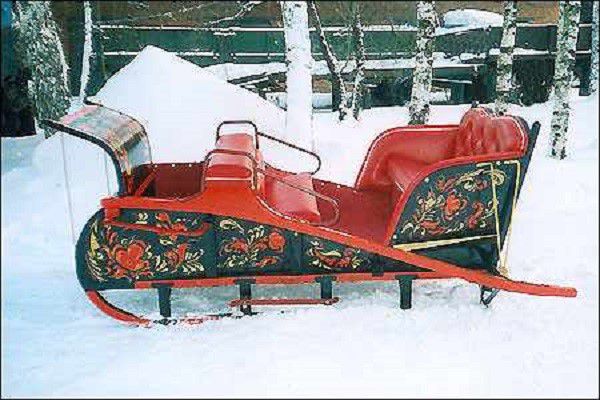
Sleigh - a spectacular winter vehicle
Materials for manufacturing
To make a sleigh with our own hands, we need the following materials and tools:
- steel pipes with a diameter of 2.5-5 centimeters;
- sheet metal;
- profiles for the manufacture of corners;
- wooden boards;
- plywood;
- paints for wood and metal;
- varnish for covering outdoor surfaces;
- welding machine;
- jigsaw and other metalwork tools.
Making skids
It is best to use stainless steel pipes, as the sled will be operated in the extreme conditions of the Russian winter with its weather changes.
The length of the pipes must be greater than the length of the intended sled, since we will bend them on both sides to turn them into skids. For bending use a special tool. In the absence of this in your construction arsenal, use the trick: fill the pipes with sand, heat it up and proceed to bend.

We make racks and crossbars. The first details are needed so that the sled does not sag under a serious load, the second - to make the structure a single frame structure.
For the manufacture of overstrength elements, thin steel pipes are used, at least 2.5 centimeters in diameter. Install racks on each side of the future sled and securely weld them together with the rungs and skids.
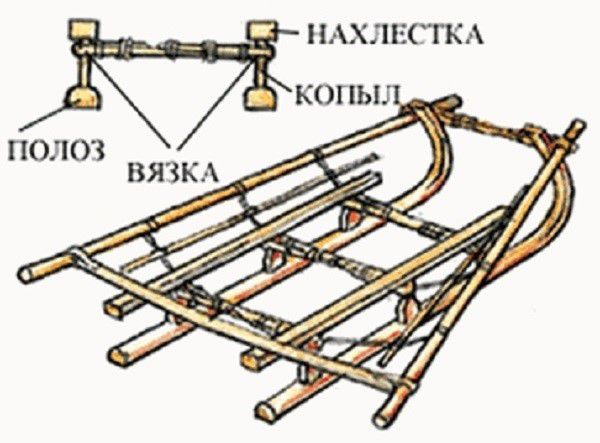
After the frame is welded, also make so-called fillies from small steel pipes, 10 centimeters long. Only 12 pieces. Weld them evenly on each side of the vehicle. After, cut out small plates from metal sheets and fix them on the sled. We use them to fasten shafts.
The body for the sleigh is made in the same way as the carriage body, but it is made open. Simply put, half of the carriage body is made and beautifully decorated with decor, then paint and varnish are applied.
Today it is popular to cast the body of a sled from metal, but this work is more painstaking and laborious. To make it easier, cut the frame out of plywood and reinforce it by sheathing it with metal sheets.

Summing up
The tourism business in our country has always flourished, because many guests from abroad dream of seeing its vast expanses and appreciating the beauty of cities. If animal husbandry is your calling, you can also profit from the tourist segment by making your own retro vehicles.
Tourists do not have to offer their services. As soon as they see a luxurious carriage or a romantic village cart with a horse and coachman, there will be no end to those who want to ride.
You can buy elements for building a carriage in construction stores any city or town. Remember, the key to success is persistence. Good luck to you!
Adults and children strive to develop their Creative skills and talents. Drawing is a great way to express yourself, develop your imagination and relieve stress. Animals - a favorite topic of drawings professional artists and reinforcements. Therefore, you will probably be interested in learning how to draw a horse.
Using the simple technique presented below, you can easily depict
- Horse in motion
- Horse with rider
- The animal is at rest.
Useful tips will help you and your child quickly learn how to draw today. Don't delay, get out your paper and pencil and get started.
How to draw a horse with a pencil step by step
How to draw a horse with a pencil in stages is the main question for beginner artists, because this is the easiest way to cope with the task.

- Before starting the process, take a piece of paper and think about the composition future picture. Then, mark the borders of the image. It is best to draw light lines in the form of a rectangle. The figure will be a field for work, this greatly simplifies the following steps.
- You need to start from the head. For its basis, a triangle is not too big size. A prerequisite is the rounded shape of the future head. It should be placed in the upper left corner of the outlined rectangle.
- In the next step, two ovals should be marked. They should be at a slight angle relative to.
- We form the stomach by connecting ovals. we draw lines smoothly, without kinks and sharp transitions.
- The hardest part is the legs. This stage is rather complicated and requires a special approach. You need to start by drawing points that indicate the bends of the limbs of the animal. After, they are connected by straight lines. Remember about the features of the proportions of the body so that the picture looks harmonious. Please note that the knees of the horses are high.
- Now you need to draw the legs, and finish the hooves. The image obtained above needs to be given volume. They should be full and muscular. In the form of a trapezoid with a slightly raised back to the top, depict hooves. Show your knees protruding forward.
- Start with the front legs, then move on to the back. Do not forget that the rear above the knee is much thicker than the front. Otherwise, the drawing will appear disproportionate and unrealistic.
- The field of how the limbs are finished, we proceed to drawing the neck. This stage also has its own peculiarities. To correctly depict the neck, stick to the golden mean. A thick or thin neck will spoil the drawing. It is important to convey the grace and grace of the animal. But at the same time, the drawn part of the body must be powerful enough. Lines and transitions should not be sharp. The transition from the head to the body is depicted very smoothly due to the gradual expansion. Achieve the effect of slight curvature.
- Now you need to draw a clear outline of the body, head and legs of the animal. Mark the main lines of the future drawing.
- Get rid of the auxiliary lines that were marked in the process. To do this, use an eraser. Be careful not to remove the main parts of the image, do not leave streaks. Once this stage is over, nothing will distract you.
- It's time to do the detailed drawing of the head. Try to make the face realistic. Don't neglect the details. draw big eyes, highlight the ears and large nostrils. This is an important part of the work, because the overall impression of the picture depends on the quality of its implementation.
- It is impossible to consider the drawing complete without drawing the tail. By own will, the artist can depict a ponytail cut off, braided, wrapped in an elastic band or freely developing tail. The latter option will give the drawing more dynamics, this option is especially relevant for an animal in motion. Thanks to this detail, the viewer will immediately understand that the animal does not stand still.
- We finally get rid of all unnecessary auxiliary lines.
- Another one important detail- image of muscles. They are indicated by light strokes in the area of the front and hind legs, on the neck. If you have any doubts about where the muscles are located, look at the photos and training videos on the Internet. Thus, it will turn out to give credibility and power to the depicted object.
- In the appropriate place, draw a lush mane that develops in the wind. There is no need to carefully draw each hair. After you mark the line of the mane, divide it into separate curls. This step allows you to make the mane voluminous.
- The bends of the joints on the limbs of the animal are indicated by light, neat strokes.
- We make the picture three-dimensional. Use plain or colored pencils. Strokes apply strokes using the shading technique. Designate light transitions on the body, the effect is achieved by darkening individual parts of the horse.
- The horse is ready. Creation complete picture, will require a background image.
Draw the horse's head
For those who want to perfectly master the technique of depicting a horse, it will be necessary to pay sufficient attention to working out the details.
Mainly, we are talking about the muzzle, since this part of the body contains a large number of small and difficult to master parts. At the same time, it is very important that the head of the animal looks organic, fits well into the composition and matches the proportions of the body.
Mastering the technique of depicting the head will allow in the future to create portrait paintings horses in any style and technique. Follow the algorithm below and master this step artistic work it will be very easy.
- First, take care of the front of the head. Schematically designate the nose, pay special attention to the protruding part. Don't forget to keep the correct proportions. Before starting work, it will be useful to study additional sources, view paintings by famous painters.
- Get to the eyes. They should be located at the top of the muzzle. Draw them in the form of small ovals.
- Draw lines denoting the neck, mark the folds on this part of the body with light strokes.
- Draw a soft half circle to mark where the ears will be drawn later. As in the previous case, the lines should be drawn with a slight movement without pressure.
- Now you should return to the study of the eyes and neck. draw eyeball. Draw the neck with clearer and more confident lines. In order not to spoil the picture, check with photographs of animals. Work well, did it, and if something didn’t work out, erase it and repeat again.
- Draw an eyebrow. It should be made in the form of a fold over the eye.
- It's time to get back to the ears. In a semicircle we depict auricles.
- Don't forget about the nostrils. After that, circle the lower part of the head with a clear line, and draw the upper lip.
- It's time to start working on the details of the portrait. First of all, it concerns the drawing of the lower lip. The folds in the neck, nose and eyes will add realism to the picture.
- Now take care of the inside of the ears.
- Equally important is the image of bangs and manes.
- Get rid of unnecessary auxiliary lines with an eraser. To avoid the effect of inaccurate dirty drawing do not leave streaks. Circle the main lines with a clear outline.
- Using the effect of light and shadow, we give the portrait volume. Shade the dark areas of the head: nostrils, ears, some parts of the neck, nose.
The main part of the work is done. If desired, color the picture with pencils, felt-tip pens or paints. As you can see, drawing a horse's head is very simple.
How to draw a horse with wings
How to draw a horse with wings will be, first of all, interesting for kids or adults with children. Winged Pegasus - the main characters famous legends, fairy tales and cartoons. This mythological beast is striking in its beauty, and looks very impressive. Since ancient times, it has been a symbol of love for travel, an endless flight of fantasy, as well as love and courage.
In this section, we will show you how to draw a flying horse without much effort.

Remember a simple algorithm for working on Pegasus.
- The basis for the future sternum, head and croup of your Pegasus will be three ovals. We propose to master the drawing when the horse is facing the viewer. In this case, the back of the body will be on the side, and the head will be located above the chest.
- We connect the oval of the head and torso. So we get a proportional powerful neck.
- Before proceeding to the stage of drawing wings, refer to additional sources. Carefully study how the artists depict the wings. Now, from the upper front of the horse's body, draw two arcuate lines. Draw two more shorter arcs a little lower.
- It's time to get back to working on the pegasus body. Connect the back oval to the body of the horse. Carefully work out the stomach and the curve of the back. These lines can be given a clearer outline.
- Go back to the wings and draw them carefully. Their upper part should have a rounded shape, and the lower part should be slightly wavy. In order for the schematic image to take on a real shape, detail the wings, outline the feathers.
- Return to the detailing of the horse's face. Designate lower lip, depict the nostrils and large eyes of the animal. In the corresponding part of the head, draw small ears.
- Now take care of your legs. Don't forget proportions. The hind limbs should be more massive than the front ones. Even if you want to portray a pegasus slender, the legs should still be muscular and not too thin. After all, Pegasus is a strong animal. If you want the picture to look dynamic, let one of the front legs be raised.
- The last step is to erase all unnecessary lines on the sheet, clearly outline the contours of the body with clear lines. It will not be superfluous to mark the lines of muscles on the body of a winged creature.
Pegasus - ready, you have fully mastered this technique. As in the previous cases, your mythical hero can become colored with pencils or felt-tip pens.
How to draw a horse with a rider
In this section, you will learn how to draw a horse with a rider. This lesson is a little more difficult than the previous ones, because it is necessary to observe the proportions of the animal and the person on it. However, the end result will not leave anyone indifferent. Don't be discouraged if it doesn't work the first time. Do not stop trying and hone your technique. But if you work carefully and check with similar samples, there will be no problems.

So, follow the following instructions:
- As in the previous cases, the most simple technique- start with rectangles and ovals. First, draw a large horizontal rectangle, which in the future will become the body of the horse, the future head is indicated by the same smaller figure. Note that the animal will have its head bowed, this is a more natural position for the horse. Therefore, the future muzzle should be at an angle relative to the body.
- We connect both rectangles. In this way, you will get a neck of the appropriate size and proportions.
- It's time for the legs. To make the legs look as realistic as possible, study the drawings and photographs of horses. These parts of the body do not have to be absolutely straight, besides, remember that their width is different. Above the knee, the legs are much wider. It will look good if one of the front legs is slightly raised and the other is slightly bent. But the hind limbs are drawn a little apart.
- Don't forget to draw the tail.
- Now, it's time to start drawing a person. To do this, draw a vertical rectangle. It should be located closer to the middle of the horse's body.
- Above the rectangle, draw a small oval, which will serve as the basis for the head in the helmet.
- Take care of your hands. Start with the right - as planned, it should stretch to the left. The opposite hand should be in a half-bent position with the palm gathered into a fist. Try to keep the fist located between the body and neck of the animal.
- It's time to depict the lower limbs of the rider. Since, according to our idea, a person sits in such a way that only one leg is visible, the task is greatly facilitated. But note that it should be slightly bent.
- Work out the details. Start with the person's face. Draw an oval-shaped eyes, border them with short but thick eyebrows from above. The nose is indicated wavy line. The mouth does not require special attention, a small slightly curved arch is enough. The mustache and beard of the rider will complete the image.
- Don't forget that our rider is a knight. An appropriate entourage will be given to him by a helmet and chain mail. The basis of the headdress is a triangle, the continuation of which reaches the beard, covering the side of the face.
- Armor must have a clear geometric shape. Draw the chain mail well. The armor covering the legs is drawn in steps. The knight's hands are protected by large gloves.
- One of the final stages is work on the horse's head. Clearly mark the lines of the eyes, lips and nostrils.
- Well depicted tail, mane and ears will make the picture even better.
- Draw the harness: a saddle, reins and stirrups, as well as a sword in the rider's hands.
The picture is ready. As you can see, drawing a horse with a man on horseback is pretty easy. If it seems to you that black and white picture looks dull - decorate it.
Draw a harnessed carriage
A complicated option is to draw a horse with a carriage. Beginners are not recommended to immediately take on difficult cases. Master the technique of drawing a carriage with one horse. Thus, you will learn the basic principles of the image.
After one harnessed horse is easy to get, you can finish the desired number of horses. Then only their individual parts will be visible: leg, head, tail. draw new drawing with several horses, too, will not be difficult.

So, let's start by mastering the simplest image technique:
- Draw the base of the carriage as a not too big square. Place a horizontal rectangle nearby, which will later turn into a horse.
- Draw a small horizontal rectangle to the square. This will become the place where the coachman sits.
- Get back to work on the horse. Draw an appropriately sized oval at an angle, as the head will be slightly lowered. Connect it with a rectangle. So we will teach the neck and head of the animal.
- The legs should correspond to the proportions of the body, not very thin, but not thick, widening towards the top. Length - average.
- The tail and mane are drawn, quite symbolically, without drawing individual hairs.
- Take care of the details of the head. Draw the ears, but for the sake of credibility, close the eyes with overlays. Mark other details of the harness. Shafts are depicted as one diagonal line running from the body of the horse to the carriage.
- Pay attention to the drawing of the hooves.
- Start working on the card. The front wall should be straight, and the back will look more natural if it is slightly rounded. To better understand how the vehicle should look, study the structure of the carriage well from other pictures.
- Try to draw beautiful wheels. Please note that the front and back circles are different in size. Outline the axles of the wheels.
- Try to pretend to be a driver. This will make the picture realistic, give it dynamism. The coachman sits in front, his body is drawn in profile. The figure does not require serious drawing, you can get by with a schematic image.
- Draw an oval (torso); above it is a smaller circle, and above it is an even smaller rectangle.
- With the help of two lines in the oval, we outline the hands of the driver. Draw a cylinder from a small rectangle. Now, draw the eye and hair of the person, using hatching.
- Engage in a schematic designation of the profile. Outline the nose, in the form of a protruding line and a rounded chin.
- Complete the picture with strokes, shadows and lines that will give it realism. Use the eraser to get rid of the auxiliary lines.
- A harnessed carriage does not have to be colored. It looks good in black and white too.
How to draw a horse in stages on its hind legs
When the question arises of how to draw a horse in stages, making the picture dynamic and lively, the first thing that comes to mind is to depict a horse on its hind legs. In such a position the best way will be able to convey the power and beauty of the animal.
Let's get to work:
- Before you start direct work, consider how to arrange the composition of the picture, mentally mark its boundaries, determine the horizon line.
- Please note that it is recommended to place the drawing sheet vertically. This is due to the position of the figure in space, it will stand on its hind legs, stretched out in length. Therefore, the recommended layout of the sheet will allow you to create a more spectacular view.
- Draw a large vertical oval. On the side above it, we draw a smaller oval. As in previous cases, these geometric shapes will serve as the body and head of the horse.
- The neck is obtained by connecting two ovals. Visually, it should look powerful and muscular.
- In this case, the hips require increased attention. The forelimbs and thighs are drawn downward in the picture. To understand the technique of drawing lines, study similar images and practice.
- The lower parts of the legs will be located differently. Since the horse stands on its hind legs, they will be elongated, with a practically straight shape. From the knee joints, the limbs are depicted vertically. The hooves are slightly lowered.
- Proceed to work on the transitions. Let them be smooth, slightly rounded. Outline the main lines of the torso, head and legs. Mark, in appropriate places, the joints.
- Clearly outline the details of the muzzle: eye, nostril, ear. The horse's head is in profile.
- Carefully traced mane and tail make the picture lively and realistic.
- With the help of hatching, we outline the muscles and light transitions of the animal. In the same way, folds are outlined on the back and abdomen.
- Erase reference lines. With the help of paints we add volume to the picture.

Jumping horse
Following the advice of experienced masters, you can easily master the technique of depicting a horse performing a jump. Consider the technique step by step.

- First, take a close look at images similar to what you want to draw.
- You already know that the process begins with two figures that schematically represent the torso and head.
- The head is tilted down, and is located vertically. With the help of slightly curved lines, we connect the head and torso. This will be the neck of the horse. Draw an ear on the head. In this case, it is only one, because the animal is depicted in profile.
- The work on the muzzle does not end there. Outline the nose and nostril of the animal, as well as the upper and lower lip, jaw, eyebrow and bulging lines of the eye.
- We pass to the main stage - work with the body. The main condition is the smoothness of the transitions of the lines. The front legs are drawn first. In a jump, they are in a bent position, in addition, the forelimbs are much thinner than the hind ones. The part below the knee and the hooves are pressed tightly against the body. It is very important to convey the grouped position of the animal in the process of imaging.
- The hind limbs, on the contrary, are extended. Keep the correct proportions when the thighs are much thicker than the shins.

- As you already know, detail is very important. Therefore, now, it's time to outline the hooves and outline the muscles with light lines.
- It is impossible to consider the drawing ready if the horse does not have a mane and tail. The effect of movement should be conveyed by depicting them as if developing in the wind.
- Get rid of unnecessary lines.
- You can decorate the horse.
running horse
Drawing a running horse is much easier than it seems. Please read the instructions below carefully.

Arm yourself with a pencil and get to work:
- We start, as usual, with two horizontal ovals. One, which will later become the body, is drawn in the center. The smaller oval is located a little higher, closer to the left edge of the sheet.
- Connect both ovals with smooth lines. This will become the neck of the horse. Don't forget proportions. The neck is depicted as strong enough, not too thin, so as not to disturb the natural proportions.
- If you want to make it easier, limit the drawing of the legs to only two: front and back. This allows for the angle in which the horse is depicted. The front leg should be fairly slender. It should be extended forward, the hind limb extended back. At the same time, it is much more powerful and muscular above the knee joint.

- Now let's turn a small oval with a head. The muzzle must be made narrowed to the bottom. Draw an ear, and outline the line of the cheeks.
- Don't forget the tail and mane. Make them lush, give liveliness with shading.
- Make smooth transitions. Then get rid of extra lines with an eraser.
- The picture is finished, it's time to decorate the galloping horse.
horse eye
When it comes to a large image of a horse's head, the drawing of the eyes requires increased attention. After all, this is the most important part of the muzzle, conveying the mood of the whole picture. Therefore, strive for maximum realism of the eyes.

Here is the drawing algorithm:
- Start by drawing the outlines of the eye first. Follow the lines exactly.
- The eyeball is shaded with dark strokes. Don't forget to leave a small bright spot representing a light flare.
- To mark the pupil, select the center of the eye. It is not necessary to outline the pupil with a clear line. It is enough just to highlight it with a darker color.
- The skin around the eye should also be darkened, but still it should be lighter than the pupil. To do this, apply light strokes. The folds will be darker in color.
- Check out what happened. Apply the shading technique to make the eye voluminous. You can darken the eyeball even more, however, make sure that a light glare remains.
Mane
An equally important part of the image of a horse is its mane. To make a horse look like a real one, you need to know some features and rules of the image. A well-drawn "hairstyle" makes the picture realistic and dynamic. They emphasize the beauty and power of the animal.
- It is not recommended to outline the outline of the mane with a clear bold line. This makes it unnatural. Strands, curls and individual hairs are depicted as light lines.

- The already familiar shading technique will add naturalness to your work. Apply it to the marked lines. Then, with more confident strokes, outline the location of the curls and the direction of hair growth.
- Consider the posture of the horse. If the horse is at rest, the mane hangs down calmly. In the case when the animal is in motion, for example, standing on its hind legs, jumping or running, the mane should look more dense. The complexity of the task lies in the need to convey how it develops in the wind and rises up.
- It takes skill and experience to draw a book well.

Use our tips, and drawing a horse will become an easy and enjoyable experience. Practice, hone the technique, and the result will not be long in coming.
Everyone who has an unhealthy attraction to horses, and lovers of the Middle Ages, is dedicated to a lesson on how to draw a carriage. The carriage is a four-wheel drive car, the purpose of which is to humiliate the rights of animals and raise the same human ones. The carriage does not use exhaust pipes and gasoline, but it does consume a lot of vegetation. Like any transport, in its structure it has a seat for the driver and a first aid kit with a fire extinguisher. The rest is fiction of science fiction writers and tourists.
Differs in small loading capacity. Glass shoes, rats and a fairy with a magic wand look good in the set for the carriage. In our time, tourists like to ride carriages, who consider it a luxury, and a few minutes of observing the back parts of animals and the corresponding smells only pleases them. By integrating a GPS navigator into your horse, you will be no different from the owner. Besides:
- It does not require technical inspection and driving license, but she must be fed and cleaned up after her;
- At first the carriage was conceived as spaceship, but Newton, as if to evil, discovered the law of universal gravitation;
- An ambulance is called a carriage, and the reason for this may be either its speed or the fact that its horses are driving;
- Usually horses are not replaced by people, but if this happens, then only in Asia. The main thing is to invent them good name- Rickshaw - and everything is in order, no one is offended.
Try to draw the most ordinary carriage:
How to draw a carriage with a pencil step by step
Step one. Let's outline the location of the objects with lines.  Step two. Now let's sketch. Enter the necessary elements in each of the segments
  Step three. Outline the contours more clearly, even add shadows.
  Step four. Delete unnecessary lines and add hatching. It worked out pretty well:
  We have lessons similar on the topic, so try to copy.
Horses are beauty, strength, grace ... Horses are unusually smart animals and faithful friends person.
Horses inspire artists and poets, horses heal people with hypotherapy, and besides, they are truly beautiful animals! They are admired by the vast majority of adults and children. And if your child loves art, then sooner or later he will want to draw a horse.
To do this is not as difficult as it seems. Today you will find out what are the most simple ways drawing a horse with a pencil. With their help, you can easily cope with the task assigned to you, to help the child in this matter. Start drawing today!
Instructions for kids how to draw a horse
To help kids draw a horse with a pencil, a sketchy image is usually enough. Such a horse is more like a character from a fairy tale or a cartoon, and not a real graceful animal. The following illustrative diagrams will tell you how to draw a horse easily and quickly for the youngest children.


How to draw a horse step by step with a pencil
1. First of all, to draw a horse with a pencil, mark the boundaries of your drawing. Of course, it is better to immediately determine the rectangle in which the animal will be located. This makes drawing much easier.

2. Now you need to draw the basis of the future horse's head. To do this, draw a medium-sized triangle in the upper left corner of the picture. The corners of your triangle should be rounded. Do exactly as shown in the picture.

3. Now you need to draw two ovals, placing them at an angle relative to each other. They will later become the basis of the croup and chest of the horse.

4. Connect your two ovals to make the horse's belly. Make the lines smooth, avoid sharp transitions, kinks.

5. Now you need to work on the image of the horse's legs. First, mark the points of their bends with dots, and then connect your points with straight lines. Try to make the proportions of the horse's body harmonious, pay attention to the drawing. Remember that the horse's knees are high enough.

6. Now you have to finish the legs, make them quite muscular, full, draw the hooves. The heels are slightly raised, the hooves should be depicted in the form of a trapezoid, the knees of the animal protrude slightly forward. For now, take care of your front legs.

7. You can begin to finish drawing the hind legs of the animal. Remember that the horse's hind legs are much fuller than the front legs above the knee. If the front and back legs are the same in your drawing, the proportions will be violated.

8. Draw the horse's neck. Here you have to remember the golden mean in order to draw the horse correctly. The fact is that a neck that is too thin will look bad in the picture, but an excessively thick, massive neck will also spoil the impression of your horse. The neck should be powerful enough, but it is important to convey the gracefulness of the horse. To do this, you need to draw with smooth lines, be sure to indicate the transition from the torso to the head, making the neck gradually thinner. Let it be slightly curved.

9. Once again draw the torso, legs, neck and head of your horse.
10. Take an eraser and delete all the lines you don't need left from building the horse. Don't let them distract you. Erase the lines carefully, leaving no streaks or marks.
11. Now comes the most interesting stage. You have to draw the horse's head. In this picture, the animal is facing the audience in profile. Try to make the muzzle more expressive. Draw ears, designate large nostrils. Be sure to make the horse's eyes big.

12. It's time to draw your horse's tail. Sometimes the tails are sheared, someone braids them into pigtails, intercepts with rubber bands. In our drawing, the magnificent long tail of the horse flutters freely in the wind, which gives the drawing dynamism. You can immediately see that your horse is moving.

13. Update your drawing again, removing all unnecessary lines, unnecessary strokes.
14. Draw the muscles of the horse. Mark them with strokes in the neck, back and front legs. If in doubt, completely repeat the lines drawn in the picture. A horse with such muscles will look more realistic and powerful.

15. Now decorate your horse with a fluffy mane that is lifted by the wind. Remember that trying to draw every hair, curl is not worth it. Just mark the line of the mane, give it volume, with a few strokes you can divide the mane into curls.

16. Add a few more neat strokes to indicate the folds of the joints on the horse's legs.
17. Now you can make your drawing more voluminous. Use pencils, blend them. Pay attention to where the horse is darker and where it is given lighter shades on the sample. Do the same.
Everything! Your horse is completely ready. You can color it, make a background.
How to draw a beautiful running horse step by step
To draw a running horse with a pencil, you will have to work a little, but with the help of the instructions below, you will surely succeed.
1. First draw the torso of the future animal, vaguely resembling a potato in shape.


3. Now - the outlines of the head.

4. thin lines outline the legs of a horse that is galloping.

5. Detail the horse's head and also draw the mane.

6. Now draw the muscular legs.
7. Draw a tail and make a few strokes at the bottom of the page to simulate grass.
8. Outline the drawing with a pen, and erase lines that are no longer needed with an eraser. Your horse is ready! If desired, you can color it with felt-tip pens, paints or colored pencils.

How to draw a rearing horse
To draw a horse with a pencil on its hind legs, use the following instructions.
1. Schematically depict the contours of the chest, pelvis and head of the future horse.
2. With thin lines draw the rest of the body.
3. Use simple geometric shapes to add volume to the image.
4. Draw the horse's hind legs in detail.
5. Draw the front legs, neck and head.
6. Finish the 3D sketch image.
7. Circle the outline of the horse's torso with a smooth pencil line.

8. Draw the legs and hooves in the same way, removing more unnecessary lines in parallel.
9. Finish drawing the contours of the body and detail the head.
10. Finally, depict the mane and tail, circle the drawing with a bright line and delete all auxiliary segments. Your horse is ready!

How to draw a horse head with a mane
Perhaps the greatest difficulty during drawing in most cases is the image of a horse's head. To carefully draw this element, use the following detailed diagram.
1. Draw a rhombus with thin and light pencil lines, and on its basis - a schematic representation of the horse's muzzle.
3. With one smooth line, add the cheekbone, and also depict the neck and a small section of the back.
4. Detail the front of the horse's head and draw one eye.
5. Lightly shade the image, as shown in the diagram, and add shadows.
6. Sketch out the approximate location of the hair and mane.
7. Gradually add more and more dark strokes, giving naturalness to the hair.
8. Make the mane even thicker and shade the image.
9. Finally, add some strokes to create the background and remove any unnecessary guide lines. Your drawing is ready!
How to draw a horse's eye
If you want to draw a horse's head in stages, it is important to pay special attention to the image of the eye. You should remember all the nuances so that your horse's eyes are as realistic as possible, reminiscent of real ones.
1. First, just guide the contours of the eye. Repeat exactly the lines shown in the figure.

2. Now you need to cover the eyeball with dark tones. Be sure to leave a bright spot. It will be a glare from the incident light.
3. Highlight the central area of the eye. This will be the pupil. Remember to make the pupil too clear, you don't need to circle it. You should designate it only in a darker tone.

4. Lightly blend the skin around the eye. It should be lighter than the eyeball.
5. Gently tone your skin. Try to designate more shadows, folds.
6. Make the transitions of tones smooth with the help of feathering. You can darken the eyeball a bit, but don't forget to lighten the highlight.

Consider all the nuances. If you don’t know exactly how to draw the details of the eye, you should just focus on the presented sample. With such eyes, the muzzle will be amazingly realistic!
Now you know how to draw a horse with a pencil step by step. Therefore, feel free to take a pencil and paper and learn this interesting business with your child. And if something doesn’t work out, then watch the video too!


, poultry farming")


- Burns, Robert - short biography
- The concept of common vocabulary and vocabulary of limited use
- Nancy Drew: The Captive Curse Walkthrough Nancy Drew Curse of Blackmoore Manor Walkthrough
- Deadpool - Troubleshooting
- Won't start How to Survive?
- What to do if bioshock infinite won't start
- Walkthrough Nancy Drew: Alibi in Ashes
- Spec Ops: The Line - game review, review Spec ops the line crashes on missions
- Room escape level 1 walkthrough
- Processing tomatoes with boric acid How much will 2 grams of boric acid
- Cucumber Grass (Borago)
- Bioinsecticide Lepidocid: purpose, properties and application procedure Lepidocide waiting period
- How to change the language to Russian in steam
- Dendrobium noble: room care
- Morphology of plants general concepts - document
- Planting, propagation and care of bamboo at home, photo Growing bamboo from seeds
- How to strengthen the cellular signal for the Internet in the country
- Sanskrit reveals the forgotten meaning of Russian words (2 photos)
- The oldest language Sanskrit programming language of the future Dead language Sanskrit
- Who has dominion over all the earth?