Where are the shapes in Photoshop? How to Draw Vector Shapes in Photoshop, Fill and Stroke Options
Hello dear readers of my blog. The easier the task, the more difficult it is to solve in Photoshop. There are a thousand articles about or creating the effect of black eyes, but how to draw a circle, a square or a rhombus - go figure it out! Today I will address this injustice.
You will find a comprehensive article about geometric figures for Photoshop - how to draw them yourself, what additional tools you can download for a more spectacular result, as well as many other equally interesting and useful information.
We draw ourselves
AT Adobe Photoshop There are several tools that allow you to draw shapes. Here are just some of them hide some secrets. Now I will tell you about them. So, I If you want to learn how to do as in my picture, then I recommend the article, there is nothing easier than doing the same.
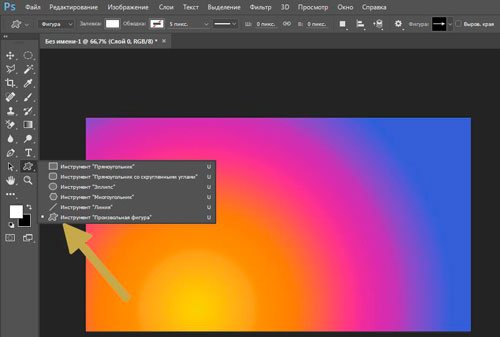
So, in the toolbar on the left, you can find a rectangle, an ellipse, a polygon, a line, or an arbitrary shape. Maybe you don't see additional tools, but found one of them, just hold down the left mouse button for a split second or click the right mouse button once. A menu with additional shapes will immediately appear.

First, I'll select a rectangle. As soon as I finish drawing, an additional menu will pop up on the left. Here you can choose the size in width and height, if you need to keep the exact dimensions. A little lower is the menu with the fill of the shape itself - you can choose no fill, solid color, gradient or pattern.

A little to the right is the stroke menu - you need to determine its width and whether it will be present at all, if you want it and make it solid, fill it with a gradient or, again, with a pattern.

To turn a rectangle into a square, you need to hold down the Shift key while drawing the shape.

An ellipse held down by the Shift button turns into a circle.

Also in the list there is such a figure as a polygon. You determine the number of sides yourself. You can enter any value - 3 to make a triangle, 7, 10 and so on.

I will not pay much attention to the lines, this thing is not difficult to figure out on your own. The only thing to warn you is that holding down Shift makes the line strictly vertical or horizontal.
Arbitrary figure
We have an arbitrary figure. What it is?
On the very right side of the top menu, you can see the finished shapes. A variety of arrows, squares, lightning and so on.

To use the keyboard shortcut Ctrl+T.

How to add new
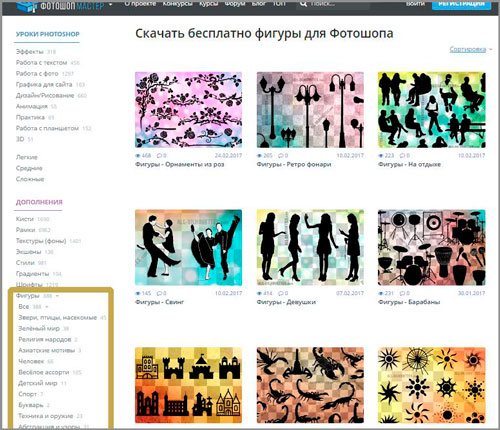
Adding new figures is not difficult. A lot of free figures can be downloaded from the site photoshop-master.ru . There are about 400 sets with figures - people, patterns, spiders, abstraction, cars, chairs, fire, flowers and much more.
I'll show you how to install them using the example of "Media", they will be useful to me in the future. So I'm downloading the file.

Just wait 15 seconds. No pre-registration is required.

Now open the archive and drop the CSH file somewhere where it can be easily found.

Now open the shapes in Photoshop and click on the nut on the right side. In the list that opens, select "Load Shapes".

Now find the file that was unzipped not so long ago. By the way, after you finish, the file can be deleted from the computer. You won't need it anymore. Everything was copied to the right folder.

You can use shapes. Do not forget about the fill, thanks to which you can change the color of the shapes, as well as the stroke.
In addition to shapes, brushes can also come in handy. They can also be downloaded from the website. Photoshop-master .

You can download the required set in the same way as when working with shapes. Open brushes.

Click on the nut and select "Download".

Work with them yourself. There is nothing complicated here. They are slightly different from the figures.
Google to the rescue
Another way to draw a figure is to use other people's work. You will need Google and its Pictures section. Why exactly you will find out very soon. In order for the figure to have a transparent background and fit harmoniously into your composition, it is required. This is how you need to look: png triangle, circle, oval, and so on.

If you are doing work for yourself, then, in principle, you could use Yandex, but if the project is being created for commercial purposes, then Google will be very useful. Open "Tools", then "Use rights" and select the desired type - use or use and change.

Next, open the picture after you have found something suitable. This is an important condition. The drawing should be located on such a square-checkered background. If it's just white, then it's not a png. You will understand the difference when you download. In principle, there is nothing wrong with learning from your mistakes.

This is what the PNG will look like. The checkerboard was filled with my background.

If you want to learn more about the program, I can recommend a course « Photoshop from scratch in video format » . It is suitable for complete beginners. There is a lot of useful information about the tools and in what cases each of them is suitable.

The Internet is full of lessons that you can learn from, but it’s one thing to blindly repeat after the author and it’s quite another to meaningfully achieve the goal, knowing what you have to use for this. This is a completely different level.
In the last lesson, we learned how to work with shapes and shape layers in Photoshop. We looked at how to use the five tools of the Shapes group (Rectangle, Rounded Rectangle, Ellipse, Polygon and Line) to add simple rectangles and ellipses to a document, as well as draw stars, lines and direction arrows.
It's good to have tools in the program that allow you to draw circles and squares, but what if we need to draw a figure of a more complex shape? What if we want to add a heart to a wedding photo or invitation, draw a dog or a cat for a pet store logo? How about an image in your drawings of flowers, leaves, snowflakes, musical notes or a copyright icon?
In fact, Photoshop works with all of these shapes and more and allows us to add them to an image with the same ease as we added circles and squares. In the program, all these more complex shapes are called custom shapes, and we can draw them using the Custom Shape Tool, which we will learn in this lesson.
Freeform Shape Tool
The Custom Shape tool is located on the toolbar in the same section as the other tools in the Shapes group. By default, the Rectangle Tool is displayed on the screen, but if you click on it and hold the mouse button down for a few seconds, a pop-up menu will appear with a list of other tools that are also available in this section. The Custom Shape tool is at the very bottom of the list:
Click on the icon of the Rectangle tool and hold down the mouse button, then from the menu that appears, select the Freeform Shape tool
If you already have one of the Shapes tools selected, you can quickly switch to the Custom Shape tool in the Options Bar, where there are six icons representing the Shapes tools. The Freeform Shape tool icon is the last one on the right (it looks like a blob):
If you already have another tool in the "Shapes" group active, then you can select the "Custom Shape" tool in the Options Bar
Choosing the shape of an arbitrary figure
After selecting the Freeform Shape tool, we need to decide on the shape of the shape we want to draw. A preview window will appear in the Options Bar to the right of the Freeform Shape tool icon, displaying a thumbnail of the shape that you this moment selected:
The preview window displays the arbitrary shape we have chosen.
To select a different shape, click on the preview box. This action will open the Custom Shapes palette, which will display all the shapes currently available for selection. In fact, Photoshop works with a lot more custom shapes than the limited number that comes with the palette. How to load others into the palette arbitrary figures, we will consider next:

To open the Custom Shapes palette, click on the preview window
To select a shape, simply click on its thumbnail, then on the key Enter(Win) / return(Mac) to close the palette. Or, double-click on the shape's thumbnail, which will select the shape and close the palette on its own. I'll choose a heart-shaped shape:

Selecting a heart-shaped shape from the Custom Shapes palette
Choosing a Color for a Shape
After choosing the shape of the shape, you need to choose a color for it. This can be done by clicking on the color swatch icon located to the right of the word "Color" (Color) in the settings panel:
Click on the color swatch icon to select for a custom shape desired color
The program will immediately open a color palette where we can select the desired color. Since I decided to draw a heart-shaped figure, I will choose red. To close the color palette, click OK when you have selected the desired color:

Choose a color for the heart shape from the color palette
Selecting the Shape Layer option
As I mentioned in the last tutorial, Photoshop allows us to draw three types of shapes using the Shapes tools. We can draw vector shapes, which are resolution independent and can be scaled without loss of quality (the kind of shapes we would draw in Illustrator). We can also draw paths, which are just outlines of shapes, or we can draw pixelated shapes that the program fills with colored pixels. In most cases, we draw vector shapes, and in order to be able to do this, we need to select the “Shape Layers” option in the settings panel. This is the first icon in a group of three icons towards the left in the settings panel:

To draw vector shapes, select the "Shape Layer" option in the settings panel
To draw a shape, click in the document window to define the starting point, and then, holding the mouse button down, drag the mouse pointer away from the starting point. As you move the cursor, the program will show you a thin outline of the future shape:

Click the mouse button to define the starting point and then drag the cursor to draw the shape
Release the mouse button to finish drawing the shape, and the program will immediately fill the shape with the color you chose in the settings panel:

Photoshop will fill the shape with color when you lower the mouse button.
Drawing a figure with correct proportions
Notice how my heart shape looks a bit distorted. It is wider and shorter than I expected. This is due to the fact that, by default, Photoshop does not try to maintain the correct proportions (or otherwise aspect ratio) of the shape in the process of drawing it. I'll press Ctrl+Z (Win) / Command+Z (Mac) to undo the action and try to draw the shape again.
In order to draw a shape with the correct proportions, place the cursor in the document window and, with the mouse button held down, start dragging the cursor and drawing the shape as usual. While doing so, press the Shift key and keep it pressed as you move the cursor. As soon as you press (and hold) the Shift key, you will see that the outline of the shape has acquired the correct proportions:

To draw a shape with the correct proportions, hold down the Shift key while moving the cursor
When the size of the drawn shape suits you, release the mouse button, and then release the Shift key (make sure you release the Shift key last). The program will again fill the shape with the selected color:

Release the Shift key only after you release the mouse button
I'll press Ctrl+Z (Win) / Command+Z (Mac) again to undo the action, and then I'll select a different shaped shape by clicking on the shape preview box in the Options Bar to open the Shapes palette. This time I will focus on the image of musical notes:

Click on the thumbnail of musical notes to select a shape
In order to draw musical notes, I'll position the cursor in the document window to define the starting point, and then, with the mouse button held down, I'll drag the mouse cursor away from the starting point. Once I start dragging the cursor, I'll press and hold the Shift key to lock the shape to the correct proportions and continue drawing the image:

As the cursor moves, I'll hold down the Shift keyto keep the correct proportions of the figure
I'll then release my mouse button to finish the drawing process, and Photoshop will fill the shape with the same color I chose for the previous shape:

The new shape will be filled with the same color as the previous one.
Change the fill color of a drawn shape
What if I want my new shape to be a different color than the previous one? I could just choose a different color in the options bar before drawing the new shape. However, we can also easily change the color of an already drawn shape. Each newly drawn custom shape is placed on a separate shape layer in the Layers panel, and each shape layer has its own color swatch icon that displays the shape's current fill color. In order to change the color, you just need to double-click on the color swatch icon:

To change the current color of the shape, double-click on the color swatch icon of the shape layer.
Photoshop will re-open the color palette where we can choose new color. I'll choose purple:

Select a new color from the color palette
Click OK when you're ready to close out of the Color Palette, and this is how Photoshop will change the shape's color for us:

We can change the color of the vector shape at any time.
Downloading Additional Shape Sets
As I already mentioned, Photoshop works with a lot more arbitrary shapes than the limited number that was provided to us initially. We just need to load additional shapes into the palette. We can do this by opening the Shapes palette in the Options bar and clicking on the little arrow in the top right corner of the palette:

Click on the small arrow in the upper right corner of the Shapes palette
This action will open a menu with various options, at the very bottom of which there will be a list additional sets shapes installed in Photoshop. Each of these sets is a collection of figures united common theme, such as Animals, Music, Nature, etc. Some of the sets only appeared in Photoshop CS5 (which is the version I use), but most of the sets are available in all recent versions of the program:

All these additional sets of shapes are installed in the program, but they need to be loaded into the palette manually
If you know which set of figures you need, you can select it by clicking on the corresponding set name in the list. However, it's easier to load all sets of shapes at once. We can do this by selecting the name "All" at the top of the list of sets:

Select the name "All" (All) to load all additional sets of forms
After that, a dialog box will appear, and you will need to decide whether to replace the current custom shapes with new ones or add shapes to existing ones. Select the "Append" item in the window, which will allow you to save the original shapes and add new ones to them:

To load new shapes while saving the original shapes in the palette, select "Add" (Append)
And now if we open the Shapes palette by clicking on the Preview box in the Settings panel, we will see a variety of new shapes from which we can choose the ones we want. I've expanded the Shapes palette a bit so that more thumbnails can be seen. To view all thumbnails of shapes, use the scroll bar on the right side of the palette:

The Shapes palette is now loaded with all the additional shapes available in Photoshop
Below are some examples of shapes that we can now draw in the program:

The Shapes palette now reflects all the additional shapes available in Photoshop
Despite all the variety of ready-made arbitrary shapes provided in the program, it may happen that even after downloading all the sets, we cannot find the image we need for the particular design we are working on. And in this case, Photoshop will be an indispensable assistant for us, because it allows us to create any shape ourselves. To learn how to create your own collection of custom shapes, save and use it later, check out our tutorial "Creating your own custom shapes"!
And here we are! We've seen how you can use the Custom Shape tool to add complex shapes to your document. AT next lesson we'll learn the difference between vector shapes, paths, and pixel shapes!
Translation: Ksenia Rudenko
Photoshop is a raster image editor, but its functionality also includes the ability to create vector shapes. Vector shapes consist of primitives (points and lines) and fills. In fact, this is a vector path filled with some color.
Saving such images is possible only in raster formats, but, if required, the working document can be exported to a vector editor, for example, .
The tools for creating vector shapes are located in the same place as all the other devices - on the toolbar. If you want to become a real professional, then hot key calling any of these tools - U.

This includes Rectangle, Rounded Rectangle, Ellipse, Polygon, Custom Shape, and Line. All these tools perform the same function: they create a work path consisting of anchor points and fill it with the main color.
As you can see, there are quite a few tools. Let's talk about all of them briefly.
- Rectangle.
With this tool we can draw a rectangle or a square (with the SHIFT).
- Rectangle with rounded corners.
This tool, as the name suggests, helps to draw the same figure, but with rounded corners.
The rounding radius is preconfigured on the Options Bar.

- Ellipse.
With a tool "Ellipse" circles and ovals are created.
- Polygon.
Tool "Polygon" allows us to draw polygons with given quantity corners.
The number of corners is also configurable in the options bar. Please note that the setting contains the parameter "Parties". Don't let this fact fool you.

- Line.
With this tool, we can draw a straight line in any direction. Key SHIFT in this case, it allows you to draw lines at 90 or 45 degrees relative to the canvas.
The thickness of the line is configured all in the same place - on the options panel.

- Arbitrary figure.
Tool "Arbitrary figure" gives us the ability to create free-form shapes contained in a shape set.
Photoshop's standard set containing arbitrary shapes can also be found on the top tool options bar.

You can add figures downloaded from the Internet to this set.
General tool settings
As we already know, most of the shape settings are in the top options bar. The settings below apply equally to all instruments in the group.

The following settings allow you to perform various, rather complex, manipulations with shapes, so let's talk about them in more detail.
Shape manipulation
These manipulations are possible only if at least one figure is already present on the canvas (layer). Below it will become clear why this happens.

This item allows, after performing one or more previous operations, to combine all the contours into one solid figure.
Practice
The practical part of today's lesson will be a set of chaotic actions aimed only at seeing how tool settings work in action. This will already be enough to understand the principles of working with shapes.
So, practice.
1. First, let's create a regular square. To do this, choose the tool "Rectangle", press the key SHIFT and drag from the center of the canvas. You can use guides for ease of use.

2. Then choose a tool "Ellipse" and settings item "Subtract front figure". We will now cut out a circle in our square.

3. Click once on any place on the canvas and, in the dialog box that opens, write down the dimensions of the future "hole", and also put a checkmark in front of the item "From the center". The circle will be created exactly in the center of the canvas.

4. Click OK and see the following:

The hole is ready.
5. Next, we need to combine all the components, creating a solid figure. To do this, select the appropriate item in the settings. In this case, it is not necessary to do this, but if the circle went beyond the boundaries of the square, our figure consisted of two working contours.
6. Change the color of the shape. From the lesson, we know which setting is responsible for the fill. There is another, faster and more practical way to change colors. You must double-click on the thumbnail of the layer with the shape and, in the color settings window, select the desired shade. In this way, you can fill the shape with any solid color.

Accordingly, if a gradient fill or pattern is required, then we use the Options Bar.
7. Let's set the stroke. To do this, take a look at the block "Hatch" on the options panel. Here we choose the type of stroke "Dotted line" and use the slider to resize it.

8. Set the color of the dotted line by clicking on the adjacent color box.

9. Now, if you completely turn off the fill of the shape,

You can see the following picture:

Thus, we went over almost all the settings of the instruments from the group "Figure". Be sure to practice modeling various situations to understand what laws raster objects obey in Photoshop.
The figures are notable for the fact that, unlike their raster counterparts, they do not lose quality and do not acquire torn edges when scaled. However, they have the same properties and are subject to processing. You can apply styles to shapes, fill them in any way, create new shapes by combining and subtracting.
Shape skills are indispensable when creating logos, various elements for websites and printing. Using these tools, you can convert raster elements into vector elements with subsequent export to the appropriate editor.
Figures can be downloaded from the Internet, as well as create your own. With the help of figures, you can draw huge posters and signs. In general, the usefulness of these tools is very difficult to overestimate, so pay special attention to learning this Photoshop functionality, and they will help you with this.
Hello everyone, dear readers of the koskomp blog and my Dear friends. Today I will tell you how to add shapes to Photoshop, how to use them and what they are for. And also at the end of the article we will draw a cute glass in vector style. Many people think that this tool is of no use, but I assure you that in web design this is almost the main function. Look at the design in my public. It is literally built on figures. Therefore, you need to know this. However, the matter will not be limited simple drawing squares. Everything is much more interesting here.
Let's start with a simple one, namely drawing. The group of tools itself consists of six types:
- Rectangle
- Rectangle with rounded corners
- Ellipse
- Polygon
- Line (details)
- Arbitrary figure
Each of these species has its own some chips that differ from each other. So let's start with general principles styles.
To add a shape, you need to select it in the tool group, and holding down the left mouse button, we begin to draw it, or rather, select the area and size. The shape itself can be of any size, and by default it will be drawn out of proportion. But if you hold down the key SHIFT, then it will turn out to be even on all sides, and thus the rectangle will be a square, and the ellipse will be a circle.
In the top menu we will see the properties panel, where we can set the fill of the shape itself, as well as the stroke color. If you do not want any colors, but only a line, then select the color "No Fill" and "No Stroke". We can also set the thickness of this very stroke, if we still decide on a color choice.

In order to change the color of the drawn object, you can simply select the “Shape” tool again and replace it in the properties above, or double-click on the icon in the layers panel.

Using custom shapes in Photoshop
If everything is clear with all the above figures (take it and draw), then I would like to linger a little on the arbitrary version. To get started, select this tool.
There is no clear form here (hence the name), but there are many ready-made options. In order to consider them all, in the properties of the element "Shape", or rather, open it. As you can see, we have different outlines here, with which we can draw an arrow, a heart, a prohibition sign, and much more.

Let's try to add an arbitrary checkmark shape to Photoshop. I will give it a color, stroke and draw it in the standard way, that is, by holding down the left mouse button and dragging it a little to the other side. Don't forget to press the key Shift to keep all proportions. Thus, you can draw cool non-standard objects. It is also noteworthy that no matter how large an object we draw, it will always be even and smooth. All this is because the figure is initially a vector object. And vector objects do not consist of pixels, like a regular image, but are formed based on formulas.

How to set shapes in Photoshop
But the beauty is that this set can be replenished, that is, arbitrary figures can be downloaded additionally, replenishing your collection. It is completely easy to do this. To do this, you just need to download these sets from any site, for example pixelbox. There is very big collection with different sets. Let's say I download this awesome skateboarder pack.

Now go to the "Downloads" folder or wherever your files are downloaded by default. Next, run the file that we downloaded. It is not even necessary to unpack it, you can run it directly in the archive.

After that, Photoshop will open and new arbitrary elements will already appear in your collection. Take and use.

Shape capabilities
The figures themselves have a very great opportunities. Initially, I thought that with the help of them you can only draw squares and buttons, but I was very wrong. Let's take a closer look.
Properties
It is worth considering that each figure has its own properties that can be changed in order to achieve the most interesting result. They are located in a separate window and are usually located somewhere in the layers panel, but this is not necessary. If they are not activated for you, then do this by entering the main menu in "Window" - "Properties". After that, you can draw any element and see what can be changed in it.

A rectangle and a rounded rectangle have the same set of properties. Basically it concerns the radius of the corners. And if in the first case it is zero on all fronts, then in the second it is already pre-set. You can change this very radius, making the corners more rounded or vice versa, both all at once and individually.
Let's draw a rectangle just for fun and set a radius of 35 in only two corners (upper right and lower left). Just before that, be sure to turn off the connection of the corners by clicking on the paperclip icon between them, otherwise the values will change for everyone.

In case you are using a stroke, you can change its location. That is, it can be outside the figure, inside it, or go along the center of the contour. You can select this by clicking on the corresponding icon.

Also, pay attention to the gear icon. It gives additional properties to your shapes. For example, if you have a rectangle or ellipse activated, then you can immediately set it to draw in equal proportions in order to get a square or circle, and you no longer have to hold down the key SHIFT.

If you are using a polygon, then you can set the number of sides, anti-aliasing, or drawing a star. And in the case of drawing a line, you can specify that . Therefore, do not forget to refer to this function.

Cutting and adding
But it’s not enough just to add shapes to Photoshop, you need to learn how to use all their charms. By default, when adding a new object, it is created on a new layer. But if you don't want that, then "operations with contours" select item "Merge Shapes". Now you will be able to create entire objects from multiple elements.

Many will ask, how then to select them if they are all on the same layer? The answer is simple: on the toolbar we have two cursors, one of which is responsible for selecting the path, and the other for selecting the node. It's just with the help of the outline selection (black cursor) that we can select only a certain shape on the layer.

In addition, we can cut out, or rather subtract a figure from another, without touching the original one. To do this, draw another object inside the original one (do not forget to set the mode "Merge Shapes", as we did just above, so that they are on the same layer). As you can see, nothing much has changed so far. But that's the way it should be.

Now, select a tool "Outline selection" and click on the shape we just drew. After that we go back to "Operations with contours", but this time we choose "Subtract front figure". You will see for yourself how cleverly they sawed it out and now instead of it there is a piece of the background. But actually it is not. The element remains as it was, it just became invisible, but you can still move it, transform it and make it visible again.

This feature is often used when creating logos, banners and other web design elements.

How to align shapes with other elements
Another important property when drawing figures is their alignment. For example, we need to make several shapes with the same distance from each other, and also on the same line. Let's say I take the Ellipse tool and with the help of a clamped Shift I'll draw some circles.

Now, let's take the already familiar black cursor, which is called "Outline selection" and with the mouse button pressed, select all four circles, provided that they are still on the same layer. If each circle you have is on a different layer, then you will need to select the layers. To do this, you can use the pressed SHIFT or CTRL in the layers panel. Then right click and click "Merge Shapes".
But you can not combine. If, for example, each element requires its own color, then simply select the layers and take the Move tool, otherwise nothing will come of it, that is, the alignment functions will not be available.
When we have selected everything, go to the menu "Contour Alignment" and select the options that we need. In my case I have to choose "Vertical Centers" and "Spread to Width". In this case, the shapes will be aligned in the center, and the distance between them will be the same. Similarly, this function works in the case of a vertical arrangement.

Now everything will be aligned with their centers, but nothing will stop you from centering the figures on the bottom edge.

Shape deformation
Well, it remains to disassemble one more interesting property, namely deformation. No, this is not exactly what we studied in this article, but we will change appearance figures.

In the same way, I can make some kind of crown out of a star. To do this, I select a polygon, set the star mode in the properties, and then draw it. After that I choose the tool "Select Node" and start moving all available points. Like this before and after.

Drawing objects with shapes (practice)
Now, let's see in practice how to add shapes in Photoshop so that you can draw cool vector objects with their help. For example, let's draw a vector cup with fast food coffee.
- Choose "Rounded Rectangle" and draw the blank of our glass. Immediately select the appropriate color for the glass, such as brown. To do this, change it in the properties above. You can not put a stroke.

- Now let's choose a tool. "Select Node" and select the left corner of the blank completely (you should have two points involved, not one).

- Now pinch SHIFT and press the left arrow on the keyboard, after which a window will pop up where it will say what this operation will turn the shape into a path. Agree. After that, press the left arrow again while holding the shift key. There will be no more inscription. After this manipulation, the left corner should bulge.

- Now we do the same with the right corner, that is, select it with the white cursor and do a couple of clicks on the right arrow to protrude the other side. If the inscription appears again, agree.

- Next, let's create the cover. To do this, again take a polygon with rounded edges, only this time select the item "Merge Shapes" It won't work, because you can't change the fill color of different contours on the same layer.
- Next, draw a rectangle on top of our resulting trapezoid. And if yours is not black, then put it in the properties.

- Now I see that the lid sticks out strongly on both sides. It would be necessary to slightly reduce it on the sides. To do this, press the key combination CTRL+T to activate "Free Transform", then press the key ALT and pull a little bit for the side area. This will reduce us the cover on the sides proportionally.

- Next, we take again "Select Node" and just as in the previous case, we bend the corners a little, in turn selecting first one and then the second. It should end up like this.

- It remains only to level the whole thing. To do this, select both layers in the layers panel using the key pressed CTRL, and then take the "Move" tool and in the properties under the main menu we set "Align Centers Horizontally".

You can still edit some elements, for example, highlight the nodes and reduce the size of the bottom to make the cup look more natural. Or you can add details, for example, some arbitrary shape. But in general, we got the simplest and at the same time stylish glass in vector design.

I hope that now you understand how to add shapes to Photoshop, what they are for and how to use them in web design and more. By the way, if you want to draw cool designs for social networks, banners, covers and even website layouts, then I recommend that you get professional training in online school of web design. There are a whole bunch of different directions here. You just need to choose and do everything under the guidance of a professional.
Well, if you want to know Photoshop with a bang and learn how to use it for five plus, then I recommend that you look and study these awesome videos. This is by far one of the best and most detailed photoshop tutorials I have ever seen. And most importantly, everything is told in a simple way. human language. therefore, you will not need to stick into the topic, you will understand everything, even if you complete newbie. Highly recommend.
Well, with this I will end my article. Do not forget to subscribe to my blog updates, as well as to public in in social networks not to miss the exit new article and interesting news. I'm waiting for you again. Good luck to you. Bye Bye!
Sincerely, Dmitry Kostin
In this tutorial, we will look at everything related to creating arbitrary shapes in Photoshop and then working with them. Since there is a lot of material, we will break it into two parts. In the first part, we will learn how to create a shape, define it as an arbitrary shape, and then display it on the screen and use it as needed. In the second part, we will look at how to combine various shapes into separate sets of shapes and save them in the program.
The idea for this tutorial came to me when I was looking through a scrapbooking magazine with numerous pages containing ready-made templates. simple figures. These figures were grouped around various themes and were absurdly expensive. I then thought: “Hey, you can create all these shapes in Photoshop yourself and for free!” Plus, you don't have to be into scrapbooking to benefit from creating your own custom shapes.
Firstly, when creating figures, you can just have fun! And if you create a lot various figures and combine them into a separate set, it will be even more interesting. Secondly, you can use arbitrary shapes as a decorative element in the design of drawings or even in design work. Thirdly, you can combine an arbitrary shape with a vector mask and get a funny photo frame. But before we start using custom shapes, let's learn how to create them!
Before starting to master the material, I will allow myself one more digression. Creating arbitrary shapes requires the use of the Pen Tool. You can create shapes with basic Shapes tools like the Rectangle or Ellipse, but if you don't want to limit yourself to creating specific shapes that look like boxes or bicycle tires, you'll need to use the Pen tool. We explored the Pen Tool in more detail in our How to Make Selections with the Pen Tool tutorial, so in this lesson We will touch on this topic only briefly. If you're unfamiliar with the basic properties of the Pen Tool, read our lesson on using this tool first.
In this tutorial, we will create arbitrary shapes by first tracing an object in the image. If you can draw, great - then you can easily draw a freehand shape without tracing the subject, because when creating a freehand shape, it doesn't matter how you draw it - with a stroke or freehand. As for me, I prefer to trace the object (since I do not have artistic abilities), so in this tutorial we will do just that.
I'm going to make a custom shape out of this cute Gingerbread Man:
Gingerbread Man
Let's start!
Step 1: Select the Pen Tool
As I mentioned, you can create arbitrary shapes using the basic Shapes tools such as Rectangle or Ellipse, but if you try to trace our Gingerbread Man with these tools, it will most likely stay in headless at best (sorry for the slight irony). What we really need is the Pen Tool, so let's select it from the Tools panel:
Selecting the pen tool
You can also select the pen tool by pressing the P key.
Step 2: Selecting the "Shape Layer" Option in the Options Bar
With the Pen Tool selected, let's take a look at the Options Bar at the top of the screen. On the left side of the panel, you will see a group of three icons:
Three icons in the Options Bar that allow us to choose how we want to use the Pen Tool
These icons show us what we can do with the pen tool. The icon on the right currently looks shaded. It is available to us only when we work with the main tools of the "Shapes" group (the "Pen" tool and the tools of the "Shapes" group have almost the same options in the settings panel). As you and I went through in the tutorial How to make selections with the pen tool, the icon in the middle is used when we want to draw paths, but at the moment we do not need it. We want to use the pen tool to draw a shape, and for this we need to select the icon on the left, which is responsible for the Shape Layers parameter:
To draw shapes with the Pen tool, select the Shape Layer option
The Shape Layer option is selected by default whenever you access the Pen tool, so you may not need to set it yourself. But it's still a good idea to check and make sure this option is selected before you start drawing the shape.
I should point out that there is no difference between drawing paths and drawing shapes with the pen tool. In both cases, you click in the document window to set anchor points, then move the guide lines as needed to create straight or curved sections (again, if you're not familiar with these concepts, check out our How to Make Selections with the Pen Tool lesson). In fact, whether you are "officially" drawing shapes or paths, you are drawing paths anyway. The difference is that when drawing shapes, Photoshop fills the path with color as we draw, allowing us to see the shape.
Oddly enough, but this property will make our work a little more difficult. Why - we will consider further.
Step 3: Starting to Draw the Shape
Once we've selected the Pen Tool and the Shape Layer option in the Options Bar, we can start tracing the image. I want to start tracing with the Gingerbread Man's head. To do this, I'll click to set anchor points and start dragging guide lines to create a curved stroke around the Man's head. In the image below, you can see anchor points and guide lines, but there is a problem. Photoshop fills the shape's outline with the background color (black in my case) during the stroke, preventing us from seeing the Man's head:

The program fills the outline with the background color while drawing, preventing us from seeing the image
In order for the program not to hide the image itself during the stroke, we just need to go to the layers panel and reduce the opacity of the shape layer. At the moment, in the layers panel, you can see that we have two layers - the bottom background layer (Background), on which the image of the Gingerbread Man is placed, and upper layer shapes called "Figure 1" (Shape 1). I can tell for sure that the shape layer is currently selected because it's highlighted in blue, so to decrease its opacity, we just need to select the Opacity option in the upper right corner of the Layers panel and reduce its value. In my case, I'll lower the opacity to 50%:

Lower the opacity of the shape layer using the Opacity option in the top right corner of the Layers panel
After lowering the opacity of the shape layer, the Man's head is visible through the background fill color, as a result of which it will be much easier for us to make further strokes:

After lowering the opacity of the shape layer, the image is visible through the background fill color
Step 5: Continue tracing the image
Now that the Gingerbread Man is visible through the fill color of the shape I'm drawing, I can continue tracing the image with the Pen Tool until I'm back at the start of the stroke:

The outline of the figure is completely finished.
If we look at the Shape layer in the Layers panel, we can see that a distinct Gingerbread Man shape has appeared on it:

On the layers panel, the figure of our Little Man is now clearly visible.
So far, we've been fine. We have outlined the shape of the Gingerbread Man, and in some cases this would be enough. In my case, however, the outlined figure needs some work. At the very least, I think we need to include the eyes and mouth in the outlined silhouette, and perhaps also a bow tie and two large buttons underneath. How do we add these details to the outlined shape? Very simple! We will not add them - we will remove (or subtract) these details from the figure!
Step 6: Select The Ellipse Tool
Let's start with the eyes. Optionally, we could select the eyes with the pen tool, but since they are round on the Little Man, we will select them more the easy way using the Ellipse Tool. Select the Ellipse tool from the toolbar. By default, this tool is hidden behind the Rectangle Tool, so click on the Rectangle Tool and hold the mouse button down for a few seconds, which will bring up a pop-up menu on the screen where you can select the Ellipse Tool:

Click on the Rectangle tool in the toolbar, then keep the mouse button pressed until a pop-up menu appears on the screen, where we select the Ellipse tool
Step 7: Select The Subtract From Shape Area Option
With the Ellipse Tool selected, look in the Options Bar where you'll see several icons grouped together that look like little squares that are connected to each other. in various ways. These icons allow us to perform various actions with shapes, such as adding a shape to an area, subtracting a separate area from it, and intersecting areas of several shapes. Click on the third icon from the left, which is responsible for the option "Subtract from shape area" (Subtract from shape area):
On the settings panel, click on the option icon "Subtract from shape area":
Step 8: Draw Separate Shapes To Extract From Outlined Silhouette
Now, with the Subtract from Shape Area option selected, we can start adding detail to our shape by deleting individual areas. I'll start transforming the shape by drawing an oval around the left eye:

Draw an oval around the left eye while holding down the mouse button
When I release the mouse button, the oval area around the eye will immediately disappear or "cut out" from the stroke of the main shape, leaving behind a hole through which the left eye of the Little Man will be visible in the original image, placed on the bottom "Background" layer:

The left eye is now "cut out" from the shape's original stroke, leaving the eye visible in the original image below the outlined silhouette.
I will do the same with the right eye. First, I'll draw an oval around the eye:

Draw an oval around the right eye
As soon as I release the mouse button, a second round hole will appear, through which the Man's eye will also be visible in the original image:

A second hole appeared on the figure, through which the Man's eye is visible.
Since the two buttons under the bow tie are also round, I'll use the Ellipse Tool again to remove them from the outlined shape. First, I'll draw an oval around the top button:

Draw an oval around the top button
When I release my mouse button, the oval area around the button will immediately disappear from the outlined shape, leaving behind a hole through which the button will be visible in the image below:

The figure has a hole through which the top button is visible.
And now I'll do the same for the bottom button, starting by drawing an oval around it:

Draw an oval around the bottom button
When I release the mouse button, a fourth hole will appear on the outlined silhouette:

Both buttons are now cut out of the outlined figure.
If I'm currently looking at the shape's layer thumbnail in the Layers panel, I can see two eye holes and two button holes that I've cut out of the outlined shape:

The shape layer thumbnail shows us the eye and button holes cut from the outlined shape.
Step 9: Extract The Remaining Details From The Outlined Silhouette Using The Pen Tool
I'm going to switch back to the Pen Tool because I need to add a few details to the outlined shape that I can't pick out with the Ellipse Tool.
I want to add a mouth to the outlined silhouette, as well as a bow tie. Since the Subtract From Shape Area option is already checked after reselecting the Pen Tool in the Options Bar, I'll just start tracing the mouth and bow tie to "cut" them out of the outlined Gingerbread Man silhouette.
The image below shows the stroke lines along with the original image of the Gingerbread Man showing through the holes I created:

Both the mouth and bow tie are now cut out of the outlined Gingerbread Man shape with the Pen Tool
Let's finish drawing the shape of the Gingerbread Man by cutting out wavy lines of powdered sugar on his legs and arms. Again, I'll be using the pen tool to create the tracks. First, I'll trace a path of icing sugar on Man's left arm, causing it to be cut out of the shape's original stroke:

Using the pen tool, cut out a path of icing sugar on the left hand of the Little Man
After outlining the first path, I'll move on to the remaining three and start tracing them until all four tracks of powdered sugar are cut out of the Man figure:

The icing sugar trails on the legs and arms are now cut out of the outlined silhouette
If we look again at the shape's layer thumbnail in the Layers panel, we can clearly see the lines of powdered sugar, eyes, mouth, bow tie, and buttons cut out of the shape:

The shape layer thumbnail in the Layers panel reflects all the details that are cut from the original stroke of the Gingerbread Man shape.
So, the figure of the Gingerbread Man is ready! We used the Pen tool to make the initial stroke of the shape, and then we used the Pen and Ellipse tools along with the Subtract from Shape Area option to add fine details to the shape.
Step 10: Increase The Opacity Of The Shape Layer To 100%
After we have stroked certain areas of our shape, we no longer need to see the original image under the stroked silhouette, so we again select the Opacity option (Opacity) in the upper right corner of the layers panel and increase the value to 100%:

Raise the opacity of the shape layer to 100%
I'm also going to temporarily hide the Background layer from view by clicking on the layer's visibility icon (the icon in the eyeball) so that we can only see the outlined shape on transparent background. If you don't want to, you can choose not to hide the background layer. I do this only for the convenience of viewing the figure:

Click on the layer visibility icon to temporarily hide the background layer from view
And here's what the Gingerbread Man shape I created looks like after hiding the background layer from view and increasing the opacity of the shape layer to 100%:

Finished figure of the Gingerbread Man placed on a transparent background
After numerous actions, we have finally created our figure! But this is not the end. Now we need to make an arbitrary figure out of it, and this is what we will do next.
Step 11: Define the Shape as a Custom Shape
To make a custom shape out of a shape, first make sure the Shape layer is selected in the Layers panel. You also need to make sure that the preview thumbnail of the shape layer is selected. If it is selected, then it will be framed by a white highlighted frame and you can see the outlined outline around the shape in the document. If the layer thumbnail doesn't have a highlighted border and you can't see the outline around the shape, just click on the layer thumbnail to select it:

If necessary, click on the thumbnail of the shape layer to select it.
Note: if you ever need to hide the outline of your shape, just click on the layer thumbnail again to deselect it
With the shape layer selected and the layer thumbnail selected, go to the Edit menu at the top of the screen and select Define Custom Shape:

Choose Edit > Define Custom Shape
As a result of this action, the Shape Name dialog box will open, where you will need to enter a name for your shape. I'll name my shape Gingerbread Man:

Enter a name for your shape in the appropriate section of the Shape Name dialog box
Click OK to exit the dialog when the name is entered, and that's it - your custom shape is ready to use! On the this stage you can close the document in Photoshop since we created and saved our shape. Now let's see where it can be found and how it can be applied!
Step 12: Create a New Document in Photoshop
Create a new blank document in Photoshop by going to the File menu section at the top of the screen and selecting New. This action will open the New Document dialog box, where you can specify any image size for your document. In the "Settings" (Preset) line, I will choose a size of 640 × 480 pixels:

Create a new blank document in Photoshop
Step 13: Select The Custom Shape Tool
After creating a new empty document, select the Freeform Shape tool from the toolbar. By default, the Rectangle Tool is displayed on the screen, so click on it and hold the mouse button down for a few seconds until a pop-up menu appears with a list of other tools, where you can select the Custom Shape Tool (Custom shape tool):

Click on the icon of the Rectangle tool and hold down the mouse button, then from the menu that appears, select the Freeform Shape tool
Step 14: Selecting Our Custom Shape
With the Freeform Shape tool selected, right-click in the document window, which will bring up a shape selection box where you can select any of the currently available freeform shapes. The shape you just created will be the last one in the list of shapes. To select it, simply click on the corresponding figure thumbnail:

Right-click in the document window to open the shape selection box, then click on the custom shape thumbnail to select it
Step 15: Draw Our Shape
After selecting a custom shape, simply click in the document window and, holding the mouse button down, draw the shape. To maintain the shape's proportions as you move the cursor and not accidentally distort them, press and hold the Shift key. You can also press and hold the Alt (Win) / Option (Mac) key to draw the shape from the center. If you want to change the location of a shape while drawing it, press and hold the spacebar, then move the shape to a new location, then release the spacebar and continue drawing the shape.
In the process of drawing, you will see only a thin outline of the future figure:

As you draw the figure, its thin outline will appear.
When you are satisfied with the location and size of the shape, simply release the mouse button and the program will immediately fill the shape with the color that is currently the background (in my case, it is black):

Release the mouse button and Photoshop will fill the shape with color.
Step 16: Double Click The Shape Layer Thumbnail To Change The Color Of The Shape
You don't have to worry about the color of your shape as you draw it and add it to your document. The program will automatically fill the shape with the color that is currently selected as the background color. If you want to change the color of the shape after that, just double-click on the thumbnail of the shape layer. Namely, by the layer thumbnail, and not by the shape preview thumbnail located on the right side (which is formally called the vector mask thumbnail). You want the thumbnail on the left side, which looks like a color swatch icon with a little slider at the bottom. Double-click on it with the mouse button to change the color of the shape:

Double-click the shape layer thumbnail (color swatch icon) on the left to change the color of the shape
This action will open the Color Picker where you can choose a new color for your shape. For my Gingerbread Man, I want to choose brown:

Use the color picker to select a new color
Click OK to exit the Color Picker when you choose a color, and your shape will immediately be filled with the new color:

Shape color has now changed
You can change the color of your shape as many times as you want, whenever you need!
Step 17: Resize The Shape If Needed With The Free Transform Command
When working with shapes, you can change more than just the color. The big advantage is that shapes are drawn using vectors instead of pixels, so you can safely resize shapes whenever you want without losing image quality! If you decide you need to make your shape bigger or smaller, simply select the shape layer in the Layers panel and then press Ctrl+T (Win) / Command+T (Mac) to open the transform box. Resize the shape by dragging any of the corner handles. Press and hold the Shift key while moving the handle to keep the proportions of the shape. You can also press and hold the Alt (Win) / Option (Mac) key as you move the handle to resize the shape from its center:

Resize a Shape with a Free Transform Box
To rotate a shape, simply click outside the free transform box and move the cursor in the desired direction:

Click outside the transformation frame and move the cursor to rotate the shape
Press the Enter (Win) / Return (Mac) key when you're done resizing the shape to confirm the final transformation.
You can add as many copies of your custom shape to your document as you wish, each time changing the color, size, and location of the shape as desired. Each copy of the custom shape will be placed on a separate shape layer in the Layers panel. In my case, I added several Gingerbread Man shapes to the document, each with a different color, size, and angle of rotation. Please note that regardless of their size, all shapes retain sharp, clear angles:

Add as many copies of your custom shape to your document as you wish, changing the color, size and angle of rotation of each of them
And here we are! We first created the shape by tracing the original drawing with the pen tool. We cut out the little details on our shape by using the Pen and Ellipse tools with the Subtract from Shape Area option set. Next, we saved our shape as a custom shape using the Define Custom Shape option under the Edit menu section. After that we created new document, selected the Freeform Shape tool, and drew a freeform shape on our document. And finally, we looked at how you can change the color, size and angle of an arbitrary shape at any time!
So, we have learned the basics of creating and using arbitrary shapes in Photoshop, i.e. learned the first part of our lesson. In the second part, we will look at how to combine the arbitrary shapes we have created into separate sets and save them in the program.
Translation: Ksenia Rudenko


, poultry farming")


- Burns, Robert - short biography
- The concept of common vocabulary and vocabulary of limited use
- Nancy Drew: The Captive Curse Walkthrough Nancy Drew Curse of Blackmoore Manor Walkthrough
- Deadpool - Troubleshooting
- Won't start How to Survive?
- What to do if bioshock infinite won't start
- Walkthrough Nancy Drew: Alibi in Ashes
- Spec Ops: The Line - game review, review Spec ops the line crashes on missions
- Room escape level 1 walkthrough
- Processing tomatoes with boric acid How much will 2 grams of boric acid
- Cucumber Grass (Borago)
- Bioinsecticide Lepidocid: purpose, properties and application procedure Lepidocide waiting period
- How to change the language to Russian in steam
- Dendrobium noble: room care
- Morphology of plants general concepts - document
- Planting, propagation and care of bamboo at home, photo Growing bamboo from seeds
- How to strengthen the cellular signal for the Internet in the country
- Sanskrit reveals the forgotten meaning of Russian words (2 photos)
- The oldest language Sanskrit programming language of the future Dead language Sanskrit
- Who has dominion over all the earth?