How to draw a kitten with cute eyes in stages with a pencil for children and beginners? How to draw an anime kitten, lop-eared, Siamese, sleeping? We draw a cat in stages.
Drawing master class for children from 5 years old "Cats of our yard"
The master class is designed for older children preschool age, students, teachers and parents.
Drawing- one of the favorite activities of children. Most children boldly take on any pictorial material. But unfortunately, not everyone manages to transfer their plans to a piece of paper. In this master class, a method for teaching drawing according to algorithmic schemes is proposed.
The proposed algorithms are simple and rational.
Target: To teach children to draw animals using algorithmic schemes.
Tasks:
- to educate children's interest and desire to engage in artistic creativity.
- cultivate patience and perseverance,
- develop creative thinking
-to consolidate the ability to draw round and oval shapes.
For work you will need:
-paper,
- paints or pencils (in this master class we used watercolor)
- simple pencil
-brush,
-water.
Lesson progress:
"Cats of our yard"
It was raining outside the window. Fedka went to the window, sighed heavily, from that that today he will not be able to go for a walk. Probably the same way Fedka thought and his cat sitting on the window and looking at the falling raindrops. The cat's name was Vaska, he was red-haired and loved to walk on warm sunny days. Vaska did not walk alone, he had friends from our yard.
The cat from the second floor was called Tihan, he was black in color, and a white wooly path ran from the pink nose to the tip of the tail. Tikhan was the master in the yard, that even the dogs were afraid of him, and once again preferred not to meet him. Tihan loved to fight very much.
In the summer, grandchildren came to Baba Shura from the first floor and brought their kitty Murka. Murka had a smoky color, her fur was soft like plush. Murka loved to sleep on the windowsill and look at people passing by.
And not so long ago, another red cat Murzik appeared in our yard, he was presented as a birthday present to a girl named Olya. Murzik is still quite small and restless, he loves to hide everywhere, run around in bags, and sometimes he climbs to the very top of the carpet hanging on the wall. All cats, like people, are very different, each has its own character and appearance. These are the cats of our yard.
-Guys, let's try to draw cats, which are described in the text.
Step work.
"Cat Tihan"
1. We draw a large circle - the torso. photo 1

2. In the lower part of the large circle - the body, draw a smaller circle - the head. photo 2

3. Draw ears. photo 3

4. In order to symmetrically draw a muzzle, you need to divide the small circle into 4 parts. photo 4

5. Now draw the eyes, nose, mouth. photo 5

Remove dividing lines.
6. We draw the antennae, paws and tail. photo 6

7. Coloring. Meet the cat Tihan. photo 7

Murka cat.
8. We place three identical circles on the sheet - the head, the front of the body, the back of the body. photo 8

9. We draw paws, ears, a tail. photo 9

10. Draw eyes, mouth, nose, mustache. photo 4.5.

11. Coloring.
Murka kitty.

Cat Murzik.
12. We draw a circle-head, an oval-torso. photo 12

13. We draw paws, a tail, a muzzle (photo 4.5). photo 13.

14. Coloring.
Cat Murzik

Cat Vaska.(Back view)
15. We draw a large circle-torso, add a small semicircle-crown of the head. photo 15.


16. We finish the ears, tail, mustache and color it.
Cat Vaska

Here are the cats we got.

The kitten is fiddling with a ball:
That creeps up to him secretly,
Then he will start throwing himself at the ball,
Push him, jump to the side ...
Can't guess at all
That this is not a mouse. And a ball.
(author A. Barto.)
You can draw a cat using paints, crayons, a pencil and others. visual means. However, if you are a beginner, it is better to start with the simplest, gradually moving on to more complex ones. Having mastered the technique of drawing with a pencil, in the future it will be easier for you to draw with paints and other materials. It is also worth considering that when using the same drawing technique, the result, due to individual abilities, each artist always gets his own.
Learning to draw a cat in stages
First you need to remember what the body of a cat consists of - this is the body, head, tail, ears and paws. The listed body parts are simple figures: the body is an oval, the head is a slightly flattened circle, the ears are triangles with rounded corners, and the paws and tail are elongated ovals.
Putting together the drawn shapes
This should be done smoothly, as if adding parts of the body to each other, as in the process of modeling from plasticine. If the muzzle of the future cat is conceived in half a turn, then the far ear should be shown turned, and its outline in the figure should be made thinner so that its inner side is almost invisible. To make the cat more believable, you should not draw only straight lines, any part of the body has irregular shape with bulges and smooth bends.

We draw a muzzle
The eyes and nose of the future cat should be drawn in the lower part of the head, after delimiting the areas on the muzzle: first, mentally divide it in half, determining where the upper border of the eyes will be, and then divide the lower part into three lobes. Thus, in the middle part of the lower lobe, the nose will be outlined, and under it - the mouth of the future cat. The inner corners of the eyes should form a triangle with the lower corner of the nose.

Draw wool
How to draw a fluffy cat? In place of the old contour, we apply small dashes - wool. No need to rush to draw a broom in place of the tail, the result will be much neater and more natural if you draw individual hairs along the contour of the tail.

Shading the body
On the this stage we shade the cat's body, completely covering it with small hairs, observing the direction and length. The breast and the inner side of the ear closest to us can be left unshaded.

Adding Volume
We do this by drawing the paws, torso and head with brighter bold strokes. The strokes should go in an arcuate manner from the edges to the middle. We make the far paws darker than the near ones. We lay shadows over the nose, eyebrows and on the paws.

Finishing touches
Strengthen the shadows, add a mustache and some messy dashes on the ears, tail and paws. Voila, the cat is ready!

Draw a cat with a pencil (a method for beginners)
A simpler version of a cat drawing using a pencil is clearly displayed by the following diagram:
- We depict a circle and an oval, which will later become the head and body of the animal.
- We add 4 small ovals to the large oval - these will be the limbs of the future cat, and in the circle we outline a smaller circle - the muzzle.
- We draw triangular ears, paws in the form of two small ovals and outline the places for the eyes.
- We finish the tail with an arc, supplement the forelimbs with oblong oval details - paws, draw eyes.
- We complete the marking of body parts.
- We draw a mustache in detail, add a little wool on the muzzle, give the drawing a finished look.

Cartoon cat coloring for child
draw funny cartoon cat in anime style, which will give a lot of joy to your child, is not difficult at all. Follow the visual instructions and repeat.
- We draw a large circle, divided into 4 parts, and under it an oval.
- We slightly stretch the muzzle of the future cat to the sides and decorate the ears.

- We designate the nose, eyes and eyebrows.
- We finish the paws.

- We complete the drawing of the animal with the image of the body (in place of the previously outlined oval) and tail.
- We remove auxiliary lines, we outline the outline of the coloring cat and let our baby color the resulting cute kitten with paints or felt-tip pens.

Another option for creating a simple but very cute cartoon cat coloring book can be seen in the video below.
Let's take a few more simple ways portray a cat that is suitable even for beginners.

And, using the step by step diagrams below, you can easily and quickly draw cats of various breeds.


Master class on drawing cats in sitting and sleeping poses step by step with a photo.
Gorbova Nadezhda Yuryevna, teacher of MBOU DOD "Children's School of Arts" of the Yaransky district of the Kirov region, the city of Yaransk.
Description: This tutorial shows step by step drawing ginger cat sitting and sleeping watercolor. It also shows the step-by-step drawing of a Siamese cat using the raw technique.
Purpose: the master class is intended for teachers of fine arts, educators additional education, parents and children from 7 years old who wish to perform beautiful work for an exhibition, interior decoration or just for a gift.
Target: making a drawing of a ginger cat in a sitting and sleeping poses, making a drawing in the technique of a raw Siamese cat.
Tasks:
- consolidation of knowledge, skills and abilities of drawing an animal with the help of simple geometric shapes;
- further improvement of watercolor skills;
- fixing the skills of arranging an animal on a sheet of paper;
- consolidation of skills in color science;
- fostering love for animals;
- development of attention and accuracy.
Materials: pencil, eraser, watercolor, sheet watercolor paper A4 format, squirrel brushes No. 2,6,8, white gouache, cloth, jar of water.

Hello dear guests!
This master class is dedicated to drawing one of your favorite pets - a cat.
Cats - children of the universe -
Poems are dedicated.
Cats are cute creatures
Graceful and light!
Egyptians and beyond
They could be deified
So many years have passed since then
Do not return the centuries of those back.
But centuries are not a burden to them,
Cats don't care about years
After all, they have in our time
The tail is a pipe, but life is the key!
Cats just have a mass:
Bring coziness and comfort into the house.
Yet the cat is a princess,
Well, the cat, no doubt, lord!
Cats and cats are varied in color. Today I propose to draw a red tabby and Siamese cat.
The watercolor technique is not simple, it does not tolerate fading and it is not always possible to correct a mistake. But we will not be afraid, and if the drawing does not work out, we will take new leaf and try again.
Progress:
1. Let's imagine the cat's body as an oval, and the head as a ball. The body is placed at an angle and shifted relative to the center of the sheet to the right. There should be margins on the sides. We leave a little more space at the bottom than at the top.

2. Draw the front, hind legs and tail.

3. We begin to draw a muzzle. The nose is similar to the letter "T", the eyes are slightly oval and are located at an angle. Let's increase the breast a little and bend the back.

4. Paint over the muzzle with the color of golden ocher. Cold pink nose. Leave white spots around the eyes.

5. We outline the dark areas with red ocher.

6. Paint over the ears with dark pink. Draw stripes (pattern) on the muzzle in brown.

7. We paint over the entire body with shades of yellow ocher and red ocher and, until this layer is dry, immediately draw a striped pattern.

8. Then we will depict the texture of the wool, drawing with small strokes in the direction of hair growth.

9. Let's start drawing the muzzle. We emphasize the nostrils and the contour of the mouth with a pink-lilac color. Let's draw dots from where the mustache grows. Then draw yellow eyeball, then a black pupil in the form of an elongated oval in a dry way, leaving a white highlight. Circle the eye around the contour with a pink-lilac color.

10. Then draw a mustache in pink-lilac color, and repeat on top of them with white gouache. With white gouache we will paint on the hairs on the ears of our cat.

11. You can also emphasize the fur on the cat's chest with white, so it will look even more voluminous.

Now I propose to draw a sleeping ginger cat, curled up in a ball, using the raw technique.
1. Draw an oval

2. Outline the tail, right hind leg and round muzzle.

3. Wet the sheet well cold water. The sheet should absorb water well. Before you start writing, make sure that there are no puddles on the sheet of paper. Daylight is cold, so we will go through the bright places in blue and pink.

4. We paint over the remaining places with shades of yellow ocher, red ocher. When dry, the color in watercolor is very lightened, so take a thicker paint on a wet brush.

5. Strengthen the shadows on the body, muzzle and under the tail.

6. Draw a striped pattern.

7. As the paint dries, the tone brightens, so I will strengthen the shadow parts. If you drip from a brush clean water next to fresh paint, you will get interesting stains.

How to draw in the technique of raw Siamese cat.
1. On the right side of the sheet, draw an inverted drop. This will be the head and front legs. On the left side of the sheet, draw a semi-oval (the back of a cat).

2. Then we will draw a muzzle in more detail, outline a fluffy tail and paws.

3. The Siamese cat has a very interesting coat color. She casts blue, lilac and different shades blue and brown. We begin to write from light to dark, after the sheet is well saturated with water. Puddles should not be on the surface of the sheet. We paint the chest with cold shades, interspersing warm ocher. Then brown shades back and paws.

4. We begin to write a muzzle. First, light shades of brown, then a richer tone, and at the end we emphasize the center of the muzzle with dark blue.
Attention: we try so that the paint does not flood the eyes of the cat, we will write them in a dry, beautiful cornflower blue color!

5. Let's draw the wool on the breast and make the tail darker.

6. Select the central part of the muzzle even darker (the paint dries and brightens). With a dry brush, remove the paint on the cheeks a little so that they are lighter. Let's draw a nose more clearly. Lastly, we write the eyes: first in blue, and when it dries, we put narrow vertical pupils. At the end, we put highlights in the eyes and draw a mustache.

Taika is made of fur
Taika is made of fur
From wishes and riddles.
A cat is not a dog
She has her own habits!
Someone's secret cannot be
Appreciates kindness and care.
It was very hard
She is without a home in bad weather.
Taiko was invented by people
To come home from work,
Ironing sitting on the couch
Forgetting worries.
Taika comes to the house at night
Through the window on the first
She knows a lot of windows
Just be able to be true.
Taika is a matter of mood:
Suitable when you want
If he gives a look
Also somehow by the way.
Taika wants to go to the roof
To fall in love under the moon
Remember, you can't replace Thai
Will only by yourself!
Taika sees everything in the dark
Bright blue eyes.
Thai soft paws
Only the truth with claws.
Taika is a complex creature,
It’s not easy with her, it’s not funny,
I need this cat...
Taika is made of fur.
I wish you creative success!
Here are some drawings made by my first graders.
I know that every family has a pet, it is a cat or a dog. Don't we sometimes want to tell everyone what a miracle we have? And I am no exception, and therefore, to show how to draw a cat with a pencil, I will use the example of our Lyalya, the most beautiful and dear girl to us. She will be my current model.
How will our lesson go?
- Before I start drawing a cat, I want to tell a little story about Lyalya;
- Preparation for drawing;
- Work step by step with a pencil.
History of Lyalya
The cat Lyalya appeared with us 9 years ago. She is even older than my child, who is only 7 years old. It turns out that they grew up together, and it was Lyalya who was often the object for drawing. She is happy to try, as if she chooses the right poses on purpose. And my baby, still a 5-year-old toddler, is trying to copy from nature. And now, by the age of 7, the pictures have become very similar. You will be convinced of this now.Of course, you can learn to draw a cat in another way, but now we will show an easier way for us, how to draw a cat for children correctly.
Preparation for work
How to draw a cat step by step First, you should find a suitable photo that will show the feline character and its features. Found.
The photo was taken a year ago, here Lyalya is 8 years old. She probably imagined that she was a flower, that's why she sits on my favorite chlorophytum.
Further, we will consider the instructions, where everything is easily explained step by step for beginners. If the child is very small, you can practice coloring and talk about how it is right for beginner animals.
It is quite another matter when the child is 7, 8 or even 9 years old. Here you can already do without coloring, and start drawing cats the way they see them, step by step decomposing the whole process into eight stages.
Painting execution
8 basic steps to get a drawing of your cat.Step 1
Before you draw a cat with a pencil step by step, you need to prepare everything necessary tools and materials: a sheet of paper, a simple pencil, an eraser and colored pencils for coloring.
Step 2
We marked the main auxiliary lines in the figure: head; body, given its slope; curtain and window behind the cat, they will be a guide for the correct proportions.
Step 3
We draw the cat's paws and pay attention to its muzzle. We depict ears, eyes, nose and mouth (mouth) Lyali.How to learn to draw a nose? The rule is this - the animal's nose is in the middle of the muzzle, starts in its middle, and ends in a triangle at the bottom. Just below it is the mouth.

Step 4
Our Lyalka is a Turkish Angora, which means that she is very fluffy and seems much larger than her painted portrait. But this is the beauty of drawing a cat with a pencil, there is an opportunity to show your vision of the image.For children 7-9 years old, this moment should be explained separately. We depict the fluffiness of the muzzle, body, tail and paws of our pet.

Step 5
We erase all unnecessary details with an eraser, draw a portrait of a cat with a pencil.
Returning to the abilities of children 7-9 years old, they need to be explained how important it is to follow the model exactly. If it's a simple sketching pencil image, it's one thing, but it's quite another when it's based on a photograph. Here, every line and detail, such as the curve of the animal's body, plays a role.
Step 6
Our photo has other elements, such as a curtain, a flower, a window. And they also need to be portrayed.
Step 7
Now it's time to color the picture, favourite hobby kids 7-9 years old. First, draw all the details with colored pencils.
Step 8
For coloring the flower, my son used a few green crayons to "revive" the plant, to give it natural look. Lyalya, the window and the curtain are white, so the child decides to make them in gentle blue tones. He pays special attention to the drawing on Lyalya's face. There is a pink nose and ears, and eyebrows and mustaches also gleam, which the baby draws with a simple pencil, as if they gleam with silver.Cats and cats are incredibly graceful and beautiful animals, so drawing them is a real pleasure. For novice artists who have recently begun to master graphics, master classes on how to draw a cat with a pencil in stages are suitable.
The creation of such cats does not require skill, talent or artistic taste. If a child asks to draw a cat, and time is running out, then you can limit yourself to funny images.
sleeping kitten
Anyone can easily draw such a sleeping miracle. All that is needed for this is an A4 sheet, soft and hard pencils, an eraser, a little patience and perseverance.
Stage 1: We start drawing a sleeping cat from the head. For this hard pencil draw a circle and mark thin auxiliary lines. The vertical divides the muzzle clearly in half, and the horizontal passes so that the upper part accounts for more than half of the circle.
Stage 2: Focusing on the auxiliary lines marked in the first stage, we outline the kitten's eyes, nose and mouth.
Stage 3: Mark the contour of the head with a soft pencil. We draw ears, protruding fur, and a funny “whirlwind”.

Stage 4: draw the body of the animal and draw the tail. Please note that the kitten is curled up, so the tail covers part of the muzzle.
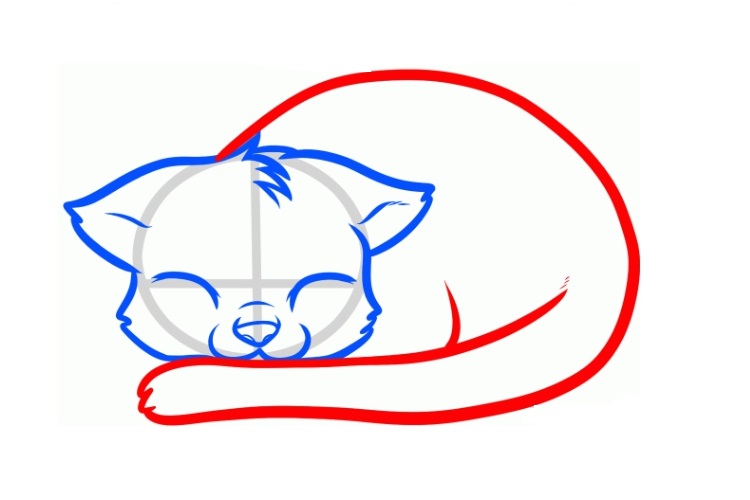
Stage 5: On last step paws and mustaches are drawn. Gently erase the extra lines and markings with an eraser. The kitten is ready. If desired, it can be painted with paints or colored pencils, or left as is.

naughty kitten

This naughty baby will appeal to any child. You need to start drawing a mischievous kitten from the head. We draw a circle, we add triangular ears and we draw a muzzle. Then follows the drawing of the torso and paws. Play with the emotions of a kitten and show your child that from small parts depends on the mood of the cat shown in the picture. Surprise can be conveyed with wide eyes; a protruding tongue will add mischief, and by slightly shifting the pupils to the side, you can make a thoughtful or sad cat.
Kitten from circles

Such a drawing of a cat from circles with a pencil can be done even by a child, since this is one of the easiest ways for beginners. The animal is drawn from the back, so there is no need to draw features and keep proportions.
First, two circles are drawn on the sheet so that they intersect slightly with each other. In this case, the diameter of the lower one should be approximately twice as large as the upper one. Then the ears are drawn to the top, and the tail to the bottom. Then the mustache is drawn and the wool is arbitrarily marked.
One circle, two circles
Another good example of how you can easily and quickly draw a cat with a pencil.

A larger circle is drawn first, and then another smaller circle is drawn inside it. Add ears, facial features and tail. A funny sleeping kitten will appeal to children and will be able to quickly distract the child and cheer him up.
Such a sketch is a cross between simple schematic representations and realistic drawings animals.
We mark the contour of the animal with thin auxiliary lines made with a hard lead. The sketch of the head looks like an octagon, the ears are triangles, the torso is a rectangle or cylinder. After that, we make markings for the paws.
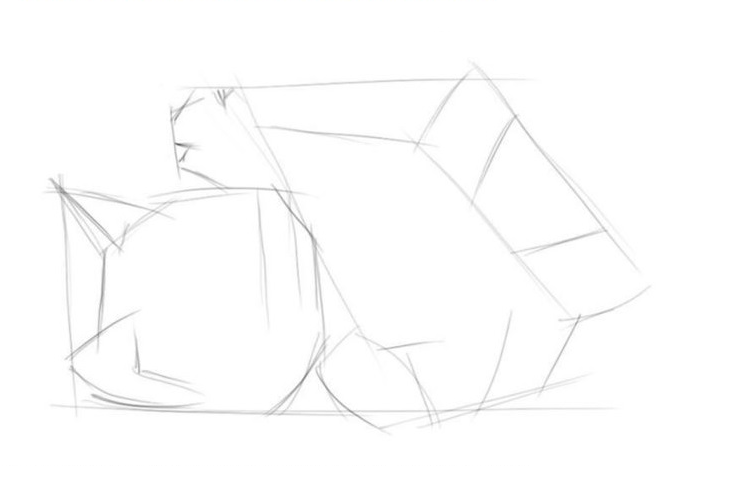
We spend horizontal line in the center of the head, thus indicating the level of the eyes. We draw outlines of the mouth and nose, round eyes. We draw a chin, mustache.

We clearly denote the muzzle. We draw in detail the eyes, nose, mustache and cheeks. soft pencil draw villi on the ears, on the head and muzzle. Then we draw the front paws with claws and pads, detailing the back.


On the final stage all auxiliary lines are carefully erased. It's the turn to draw fur. For these purposes, a 2M (or 2B) lead is best suited, but in principle any soft lead can be used.

Realistic
It seems to many that realistic portraits pets - not the most simple task for beginners, however, not all sketches are really difficult. You can verify this with an example step by step instructions to the portrait of the Scottish fold.
Draw a Scottish Fold cat with a pencil
Scottish Folds are loved by many breeders for their temperament and charming appearance. Thanks to distinguishing feature breeds - ears bent forward and down, these cats look so cute that it is impossible to resist squeezing such a mustache. We offer a simple step by step lesson for beginners how to draw british cat pencil step by step.
At the first stage, auxiliary lines are outlined with a hard pencil: 1 vertical and 2 horizontal. The vertical one shows the center of the muzzle, so it needs to be moved slightly to the right from the center of the page, since the cat sits slightly turned.
The horizontal ones should be parallel to each other as they indicate the size of the animal's eyes. After that, you need to start drawing the contour of the muzzle and eyes.
Important! For a cat to be proportional, the distance between the eyes must match the size of the eye.
When drawing the nose, remember that its size should be less (narrower) than the distance between the eyes.

Then with a lead M or TM we darken the eyes and nose. For more experienced artists who are confident in their movements, a black pen can be used for this purpose.
To make the look of the cat "alive", do not forget to leave unpainted, white places, as in the picture.

In the third step, you will need a 2M (or B2) pencil. Gently, with smooth lines, shading the strokes, darken the places around the pupils. Notice how the color transitions from the darkest (around the pupils) to the lightest. Then, arrows are marked with a hard lead, in the direction from the nose. They show directions for drawing wool.

With the softest lead (it is better to use B4 or 4M), focusing on the arrows, draw the darkest wool. The crown and under the ears should be the darkest.

To complete the picture, draw the rest of the wool. The cat is ready
Attention! The color of the villi depends on the force of pressing.


, poultry farming")


- Burns, Robert - short biography
- The concept of common vocabulary and vocabulary of limited use
- Nancy Drew: The Captive Curse Walkthrough Nancy Drew Curse of Blackmoore Manor Walkthrough
- Deadpool - Troubleshooting
- Won't start How to Survive?
- What to do if bioshock infinite won't start
- Walkthrough Nancy Drew: Alibi in Ashes
- Spec Ops: The Line - game review, review Spec ops the line crashes on missions
- Room escape level 1 walkthrough
- Processing tomatoes with boric acid How much will 2 grams of boric acid
- Cucumber Grass (Borago)
- Bioinsecticide Lepidocid: purpose, properties and application procedure Lepidocide waiting period
- How to change the language to Russian in steam
- Dendrobium noble: room care
- Morphology of plants general concepts - document
- Planting, propagation and care of bamboo at home, photo Growing bamboo from seeds
- How to strengthen the cellular signal for the Internet in the country
- Sanskrit reveals the forgotten meaning of Russian words (2 photos)
- The oldest language Sanskrit programming language of the future Dead language Sanskrit
- Who has dominion over all the earth?