A simple lens microscope. How to make a microscope at home. Lens microscope design
Over its almost 300-year history of development, the microscope has probably become one of the most popular optical instruments, widely used in all areas. human activity. It is especially difficult to overestimate its role in teaching schoolchildren who learn the surrounding microcosm with their own eyes.
A distinctive feature of the proposed microscope is the "non-standard" use of a conventional Web-camera. The principle of operation consists in direct registration of the projection of the objects under study onto the surface of the CCD matrix when illuminated by a parallel beam of light. The resulting image is displayed on a PC monitor.

Compared to a conventional microscope, the proposed design lacks optical system, consisting of lenses, and the resolution is determined by the pixel size of the CCD matrix and can reach a few microns. Appearance microscope is shown in fig. 1 and fig. 2. The model "Wcam 300A" by Mustek was used as a Web-camera. It has a color CCD matrix with a resolution of 640x480 pixels. The electronic board with a CCD matrix (Fig. 3) was dismantled from the housing and, after a slight modification, installed in the center of the opaque housing with an opening lid. The finalization of the board consisted in resoldering the USB connector in order to provide the possibility of installing an additional protective glass on the surface of the CCD array and sealing the board surface.

A through hole is made in the housing cover, in the center of which there is a block of three LEDs of different glow colors (red, green, blue), which is a light source. The block of light-emitting diodes, in turn, is closed by an opaque casing. The remote location of the LEDs from the surface of the matrix allows you to form an approximately parallel beam of light on the measurement object.
The CCD matrix is connected to the PC with a USB cable. Software - regular, included in the delivery of the Web-camera.
The microscope provides an image magnification of 50 ... 100 times, with an optical resolution of about 10 microns with an image refresh rate of 15 Hz.
The design of the microscope is shown in fig. 4 (not to scale).
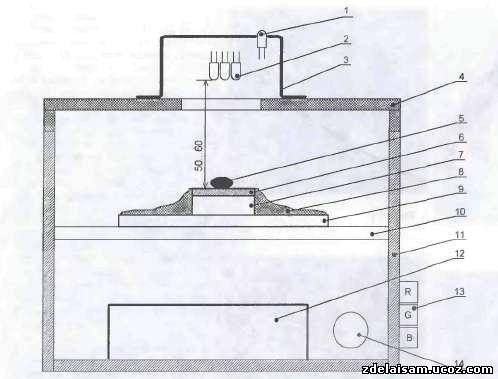
To protect it from mechanical damage, a quartz protective glass 6 with dimensions of 1x15x15 mm is installed on the input window of the CCD matrix 7. The protection of the electronic board from liquids and mechanical damage is ensured by sealing its surface with silicone sealant 8. The object under test 5 is placed on the surface of the protective glass 6. The lighting LEDs 2 are installed in the center of the hole in the cover 4 and are covered from the outside with an opaque plastic casing 3. The distance between the object under test and the block of LEDs is approximately 50 ... 60 mm.
The lighting LEDs (Fig. 5) are powered by a battery 12 of three connected in series galvanic cells voltage of 4.5 V. The power is turned on by the SA1 switch, the HL1 LED (1 in Fig. 4) is an indicator LED, located on the protective cover and signals the presence of the supply voltage. Switching on the lighting LEDs EL1-EL3 and thus selecting the lighting color is carried out by switches SA2-SA4 (13) located on the side wall of the housing 11.

Resistors R1, R3-R5 - current limiting. Resistor R2 (14) is designed to adjust the brightness of the LEDs EL1-EL3, it is installed on the rear wall of the case. The device uses fixed resistors C2-23, MLT, variable - SPO, SP4-1. Power switch SA1 - MT1, switches SA2-SA4 - push-buttons SPA-101, SPA-102, LED AL307BM can be replaced with KIPD24A-K
Since the visible dimensions of the displayed images depend on the characteristics of the video card used and the size of the monitor, the microscope requires calibration. It consists in registering a test object (a transparent school ruler), the dimensions of which are known (Fig. 6). By measuring the distance between the strokes of the ruler on the monitor screen and correlating them with the true size, you can determine the scale of the image (magnification). In this case, 1 mm of the monitor screen corresponds to 20 µm of the measured object.
A microscope is a fairly sophisticated optical instrument that can be used to observe invisible or poorly visible objects. naked eye objects. It allows inquisitive people to penetrate the secrets of the “microcosm”. You can try to make a microscope yourself. There are quite a few designs of homemade microscopes, and in this article we will consider one of them.
One of the most successful designs was proposed by L. Pomerantsev. To make a microscope, you need to purchase two identical lenses of +10 diopters each, preferably about 20 millimeters in diameter, at a pharmacy or optical store. One lens is needed for the eyepiece of the microscope, the other for the objective. But first, let's look at the units of measurement of lenses.
What is lens diopter
Diopter - unit optical power(refraction) of a lens, reciprocal of the focal length. One diopter corresponds to a focal length of 1 meter, two diopters to 0.5 meters, and so on. To determine the number of diopters, you need to divide 1 meter by the focal length of this lens in meters. Conversely, the focal length can be determined by dividing 1 meter by the number of diopters. Focal length lenses +10 diopters is equal to 0.1 meters or 10 centimeters. The plus sign denotes a converging lens, the minus sign denotes a divergent one.
How to make a homemade microscope
Ten centimeters long in lens diameter. Then cut it in half to make two tubes five centimeters long. Insert lenses into them.
At one end of each tube, glue a cardboard ring or a ring glued from a narrow strip of paper with a hole with a diameter of ten millimeters. Place a lens on this ring from the inside and press it with a cardboard cylinder smeared with glue. Inside the tube and cylinder should be painted with black ink. (This must be done in advance)
Insert both tubes into the tube - the third tube is 20 centimeters long and has such a diameter that the tubes of the eyepiece and the objective enter into it tightly, but can move. The inside of the tube must also be painted black.
On draw two concentric circles: one with a radius of 10 centimeters, the other with a radius of 6 centimeters. Saw out the resulting circle, and cut the diameter into two parts. From these semicircles, make a C-shaped microscope body. The semicircles are connected with three wooden blocks, each 3 centimeters thick.
The upper and lower blocks should be 6 cm long and 4 cm wide. They protrude 2 centimeters beyond the inner edge of the plywood semicircles. Fasten the tubing tube and the adjusting screw on the upper block. For the tube in the block, cut a groove, and for the adjusting screw, drill a through hole and gouge a square recess.

A - tube with lenses; B - tube; B - microscope body; G - connecting blocks; D - adjusting screw; E - subject table; F - diaphragm; Z - mirror; And - stand.
An adjusting screw is a wooden rod on which a cylinder cut from a pencil eraser or wound insulating tape is tightly fitted. It is best to use a small piece of a suitable rubber tube for this purpose.
The assembly of the screw is as follows. Cut the stem in half lengthwise. We thread the screw rod into the hole of one half, put a rubber cylinder on it, then thread the other end into the hole of the second half of the block and glue both halves. The rubber cylinder should fit in the square recess and rotate freely in it. We glue the block with the screw to the plywood semicircles, making cutouts for the screw rod at their ends. We put handles on the ends of the rod - halves of the spool of thread.
Now attach to the block with a bracket curved from tin. First, make cutouts for the screw in the bracket and nail it or screw it to the block with screws.
The rubber barrel of the adjusting screw should be pressed tightly against the tube while turning the screw, the tube will slowly and smoothly move up and down.
The microscope can be made without the adjusting screw. In this case, it is enough to glue the tube to the upper block, and aim the device at the object only by moving the tubes with lenses in the tube.
Nail or glue an object table to the bottom block from above - with a hole with a diameter of about 10 millimeters in the middle. On the sides of the hole, nail two curved strips of tin - clamps that will hold the glass with the preparation in question.
From below, attach a diaphragm to the object table - a wooden or plywood circle, in which drill four holes of different diameters around the circumference: for example, 10, 7, 5 and 2 mm. Fix the diaphragm with a nail so that it can be rotated and that its holes coincide with the hole of the stage. With the help of the diaphragm, the illumination of the preparation is changed, the thickness of the light beam is adjusted.
The dimensions of the object table can be, for example, 50x40 mm, the diaphragm size is 30 mm. But these dimensions can be either increased or decreased.
Attach a mirror measuring 50x40 or 40x40 millimeters to the same block below the object table. The mirror is glued to the board, on the sides two carnations without hats (gramophone needles) are hammered into it. With these nails, the board is inserted into the hole of a tin bracket screwed to the block with a screw. Thanks to this fastening, the mirror can be rotated - installed with a different inclination, on the opening of the object table.
Attach the microscope body to the stand with the third connecting block. It can be cut from a thick board of any size. It is important that the microscope stays stable on it, does not stagger. Cut a straight spike from below on the block, and hollow out a nest for it in the stand. Lubricate the spike with glue and insert into the socket.
The microscope is adjusted by turning the mirror, moving the tube and tubes with lenses in the tube with a screw, magnifying the image by 100 times or more.
In the list of good birthday gifts for a six or seven-year-old "why" microscopes are at the forefront. How to choose the first children's microscope? What to do with him next? Let's try to answer these and other difficult questions together.
If you look into any real or virtual store of developing toys, then among the many products you will certainly find children's microscopes. It seems that the fashion for them arose quite recently, in the era of the total "development" of children almost from the cradle. But it is not so. Similar toys were known as early as the 18th century. Then they were called "flea glasses". On one side, a biconvex lens was inserted into a bright cardboard tube about 2 cm long, and on the other side, a flat glass with an object attached to it. For example, a flea (hence the "flea glass"). These toys were inexpensive and very popular. Modern children's microscopes are also very popular.
Why does a child need a microscope?
Among preschoolers, it is not easy to find those who are not interested in the structure of all life on Earth. Every day children ask dozens the toughest questions to their moms and dads. Curious kids are definitely interested in everything: what animals and plants are made of, what nettles burn, why some leaves are smooth and others are fluffy, like a grasshopper chirps, why the tomato is red, and the cucumber is green. And it is the microscope that will provide an opportunity to find answers to many children's "why". Much more interesting than just listening mother's story about some cells there, but to look at these cells with my own eyes. It is hard to even imagine how breathtaking pictures can be seen through the eyepiece of a microscope, what amazing discoveries your little naturalist will make.
Classes with a microscope will help the baby expand knowledge about the world around him, create the necessary conditions for cognitive activity, experimentation, systematic observation of all kinds of living and non-living objects. The baby will develop curiosity, interest in the phenomena taking place around him. He will ask questions and look for answers on his own. A little researcher will be able to take a completely different look at the simplest things, see their beauty and uniqueness. All this will become a solid basis for further development and learning.
It should be noted that the interest of one of the adults is very important: mom, dad, older brother or sister. Then they will be able to convey their passion to the baby. The baby himself, unless, of course, he is a born biologist, is unlikely to be fiddling with a microscope for a long time without your active help and participation.
What are microscopes
A children's microscope is fundamentally no different from a biological microscope. This is not a model and not a toy, but a valid one. optical instrument. And, often, such microscopes have very decent optics and high magnification. Let's look at the types of microscopes and try to determine their main pros and cons.
So, most often in the store you will find the so-called direct biological microscope (monocular, i.e. having one eyepiece). Any of us came across a similar device in school biology lessons. it classic version microscope, only it is decorated in an unusual and fun way to please its little owner (can be painted in bright colors or have an unusual shape). It can be used to view both transparent objects (on glass slides in transmitted light) and opaque objects (in reflected light). Important characteristic any microscope - its magnification. Microscopes usually have three interchangeable lenses. But it's not just the lens that magnifies. The eyepiece also has its own magnification (usually 10x or 20x). In order to calculate the total magnification of the microscope, you need to multiply the magnification of the eyepiece (always written on the eyepiece) by the magnification of the objective. So, if the microscope has an eyepiece with a 20x magnification and objectives of 4, 10 and 40, when changing lenses, we get magnifications of 80, 200 and 800x. Modern light microscopes can create a magnification of 1500-3000 times. Is it worth it to buy a device with such an increase as the first microscope for a preschooler? Probably not worth it. Even for very serious experiments, the baby is unlikely to need an increase of more than 400-600 times. Microbes, however, cannot be considered. But if one of the parents does not have special education, you probably won't see them even with a "cool" microscope. To prepare a microbial preparation, it is necessary to use special smear staining methods, very powerful lighting and immersion lenses (a lens with a high magnification is immersed in a special immersion oil, usually cedar, to eliminate light scattering). But there is no reason to be upset. And without microbes, a little biologist will have enough objects to study with his head.
Highly good choice for the baby will be a stereo microscope (binocular). It has two eyepieces at an angle to each other, which creates a stereo image. And although such microscopes give relatively small magnifications (up to 100), they allow us to examine almost any objects that surround us. This will help the baby to see many ordinary things in a completely different light. Such a microscope does not require powerful illumination. And, among other things, a binocular microscope evenly loads both eyes, which is more suitable for fragile children's vision than monoculars. Many modern microscopes have their own built-in illumination. Pay attention to this when choosing a device. An additional light source allows you to better illuminate the object, and, therefore, it is better to consider it.
There are very small, "pocket" microscopes with low magnification. You can carry them with you for a walk and look at plants and insects right in the meadow or in the forest.
If you have a computer at home, you can get a digital microscope. This expensive modern toy also has its advantages and disadvantages. The main advantage is the ability to display the image on the monitor screen. This turns the microscope into a kind of fascinating computer game. The child can save the resulting image, edit, colorize, sign using a simple graphics editor. You can also record a video image and even make your own video about the microworld. The microscope is removed from the stand, you can walk around the room with it, bringing it to any objects and getting their enlarged image on the screen. In a sense, such a microscope turns from a research instrument into a creative tool. Is it good? Yes and no. If your kid is a creative nature, he will surely like the digital microscope. If the baby is more likely a naturalist, striving to comprehend the secrets of the universe, it is better to purchase an ordinary microscope for him. The whole fascinating essence of the microscope is that you look into the eyepiece. As if looking with one eye into the unknown and wonderful world, another universe...
We equip the laboratory
In order for the child not to get bored with the microscope, organize it as an exciting game, adding a certain amount of mystery. Let the child pretend to be a real research scientist. And for this he will need a mini-laboratory. Allocate a shelf for the baby where the microscope will stand, samples will be stored and necessary tools for children's research. An ordinary desk can turn into a work area in a matter of minutes. Just make sure you have good lighting. This will reduce the inevitable strain on children's eyes: the better the object is lit, the easier it is to see it. So that the best place for a microscope - near the window. And add to this a bright table lamp. Immediately teach your baby to maintain order in the workplace (there should always be order in the laboratory!), And after class, clean up after yourself. Give the child all kinds of jars and boxes in which he can store his objects for research and the necessary equipment.
In addition to the microscope itself, you will need slides, coverslips, pipettes, tweezers, and a needle. And also some substances: distilled water, alcohol, an aqueous solution of iodine (for coloring). Explain the safety rules to your child and strictly enforce them. Still, a microscope (even for children) is not a toy, but a complex optical device. And they shouldn't crack nuts. Also, it is not necessary to thoughtlessly twist all the screws in a row. This must be done consciously and with a specific purpose. Immediately tell the baby what and why the microscope is intended and teach the baby to call everything by its proper name, and not by “things” and “wheels”. It has been noticed that even five-year-old kids quickly get used to the microscope: they select the desired magnification and sharpen, examining everything that comes to hand.
At first, do not leave the baby alone with the microscope. To view objects in reflected light at low magnification, your little microscope will learn quickly. But work with glass slides is better not to trust him yet, but to do it together. Firstly, the preparation of the drug involves the manipulation of sharp objects (blade, needle) and chemicals. Secondly, glass slides are extremely fragile. Clumsy fingers can easily crush and injure them. Teach your baby to use tweezers: separate pieces of the objects under study, put them on the subject table. This will develop the accuracy and precision of the little explorer's movements.
Scientific expedition
Since the kid has turned into a natural scientist, then it's time to go on a scientific expedition for all kinds of samples. For such an unusual walk, you should stock up on several jars with lids and boxes where you will put your finds. A candy box with plastic cells or a plastic egg tray is very convenient for these purposes. You will also need a marker to sign the sample boxes, tweezers and a penknife.
Each time you can organize "expeditions" to different places. Today, look for samples in the yard, tomorrow go to the meadow, the day after tomorrow - to the reservoir. Let your child decide for himself what he wants to take home to learn. And, of course, tell him some of your ideas.
What can be collected? Everything! Leaves, flowers, petals, thorns of plants, seeds of trees and flowers. All kinds of soils: black soil, sand, clay. It is very interesting to consider with the baby the composition of the black soil (the remains of plants and even living insects are clearly visible), grains of sand (beautiful round crystals) and viscous clay. It will immediately become clear where it is better for plants to grow and why. Collect several types of lichens. They are amazingly beautiful under the microscope. It is interesting to consider the moss. Often you can find tiny insects in it that are practically invisible to the naked eye. Break off a piece of the bark of different trees. Bird feathers will come in handy. Scoop up a little water from a puddle and an overgrown pond, grab some algae and mud. Sort all this booty and sign it. Now your little biologist will have enough work for a long time.
Setting up the microscope
First of all, you need to set up the lighting. To do this, turn the mirror under the stage so that the light of the table lamp is reflected from it and passes through the diaphragm hole. While observing through the eyepiece, rotate the mirror until the entire field of view (i.e. what you see through the eyepiece) is evenly illuminated. Now put your preparation on the object table and fix it with special holders. Install the lens with the smallest magnification. While looking into the eyepiece, use the adjustment screws to slowly raise or lower the microscope tube until the specimen image appears in the field of view. During focusing, you can carefully move the preparation. This will make it easier for you to position it correctly. Once you have found the image, turn the screws even more slowly so that the object under study becomes as sharp as possible. Then, if necessary, set a higher magnification. Everything can be considered!
If the microscope comes with a built-in illuminator, then you do not need a mirror. There is also no need to adjust it if you are going to view objects in reflected light. In this case, simply place the object on the stage, which should be as bright as possible, and adjust the focus.

How to prepare the drug
In order to consider any object in transmitted light, it must be very thin and transparent (otherwise the rays of light will not be able to pass through it). Wash coverslips thoroughly, rinse in alcohol (so that they do not stain) and dry. If you are going to examine any liquid (such as milk, juice or water), just put a couple of drops on a glass slide and cover the top with a coverslip. If the object of study is a piece of a plant, then use a sharp blade to cut off a thin, transparent film from it, take it with tweezers and place it in the center of the coverslip. Drop one drop of water on top. Even a baby can drip water, but, of course, you will have to work with a blade. If your object is transparent, it should be colored by adding one drop of an aqueous solution of methylene blue (popularly known as "blue"). Now we cover it all with a coverslip, making sure that there are no air bubbles under it, we blot the excess liquid and study it under a microscope. Such a drug is called temporary. After studying it, the glasses are washed and used for subsequent experiments. If you want to keep the preparation for a long time, before putting a cover slip, apply transparent glue along its edge with a thin needle, gently press down (glasses are very fragile and crack easily!) and leave to dry for a day. Now it is already a permanent drug that can be considered many times.
By the way, most microscopes come with ready-made slides and slides for viewing. These sets can also be purchased separately.
What can be seen under a microscope?
Literally everything is suitable for viewing under a microscope. Start with a small increase. Examine the leaves of the collected plants with the baby. Many of them have hairs that are very interesting to look at under a microscope. The leaf structure and veins are clearly visible. Look at the coltsfoot sheet from one side and the other. They are completely different: one side is pubescent, the other is not. First, let the baby determine it by touch, and then see the hairs in the microscope. On a nettle leaf, you can see the very burning hairs that cause so much trouble to bare children's legs and arms. Pick a leaf from each houseplant. Each one is interesting and unique in its own way. If cacti grow on the windowsill, let a few thorns be sacrificed for the sake of science.
The flower petals are very beautiful. You can see the pollen. To do this, transfer it with a soft brush from the flower to the glass slide. If your child is interested, try to draw what the pollen of different plants looks like. Some microscopes are equipped with a special projector that projects an image onto paper. This will make it easier to draw it. Examine the skin and pulp of all kinds of vegetables and fruits. How are they similar and how are they different?
It is interesting to look at the hair and compare it by color and thickness. It turns out that cat hair is thinner than human hair, and daddy's hair is thicker than children's hair. And putting your own finger under a microscope can make a splash. Especially impressive is the dirt under the nails. Microbes, of course, you will not see there. But even without them, it looks terrifying. You may immediately be asked to cut your nails. It is no less interesting to see what house dust consists of, what paper, cotton wool, threads, shreds of doll hair and fur look like. soft toys, fish scales and bones, eggs, honey, drops of milk, crystals of salt, sugar, citric acid, soda, ice, all kinds of seeds and cereals, pieces of mushrooms, pebbles and shells brought from the sea, cones, paper money (they can be found different signs which are not visible without magnification).
If you have an aquarium, scrape off some of the build-up from the walls, place it on a glass slide, cover it with a coverslip and examine at medium magnification. Believe me, this is an amazing picture! From the swamp water, which the kid collected on the "expedition", an interesting micropreparation is also obtained. Though not microbes, but living, moving creatures. Fiction! In addition to zooplankton, unicellular algae with flagella can also be seen. Sometimes frog eggs, tiny tadpoles and larvae of aquatic insects can get into the water. And then consider tap water. Is there something living there and why?
Grow mold on bread with your baby. To do this, put a piece of bread in a glass jar with a lid (if there is a special Petri dish, then in it), moisten with water and put in a warm place for several days (but not in the sun). Put a little grown mold in a drop of water on a glass slide, cover with a cover slip, and your preparation is ready. You can consider ordinary baker's yeast. To do this, pinch off a small piece from the briquette and dilute it in a drop of water. And you can also germinate a grain of wheat and observe daily what changes take place with it ...
Great and terrible
Well, the most beautiful objects for children's research are, no doubt, insects. Where to take samples for examination is up to you. But, I think, you should not catch and kill insects on purpose. Even for science. There is no need to make this approach the norm for the baby. Exceptions may be "harmful" insects: fly, mosquito, cockroach, Colorado potato beetle. These "annoyers" can always be found in abundance. It is very interesting to examine a fly under a microscope (especially binocular). Pay attention to the baby on the device of her eyes, legs, wings. Look at the wing on both sides. From above, its structure is clearly visible, and from below you will have a very Nice picture: iridescent brocade overflows. In a mosquito, pay attention to the "biting" device - the proboscis.
Look for a butterfly wing in the meadow. Under a microscope, pollen is visible on it. Explore the web. There you can always find dead small insects. It is simply amazing how complex such tiny, inconspicuous creatures are. Read the book by J. Larry "The Extraordinary Adventures of Karik and Vali" with the baby. Probably Karik and Valya saw insects almost the same - huge and terrifying.
Learning Cipollino
The microscope will help the baby learn that all living things are made up of cells. Under a microscope, you can see not only the cell, but also consider its structure. To do this, together with your child, prepare a simple and visual preparation from the usual onion. Why an onion? This plant has very large cells, and they are clearly visible at a relatively low magnification. So, cut the onion into several pieces and separate one juicy layer. Cut off a small piece from it, and then separate a thin film from the concave side of the piece with tweezers. Drop distilled water on a glass slide, put a film in it and gently straighten it with a needle. Then add a couple of drops of an aqueous solution of methylene blue or an aqueous solution of iodine. This should be done so that the colorless cells become stained and become more visible. If you can find a red-purple onion, the dye can be omitted. Cover the resulting "beauty" with a cover slip and blot the liquid that has come out. Try looking at the specimen first at low magnification and then at high magnification. Tell your child that both plants and animals are made up of tiny cells. So they are visible under a microscope, like small bricks. Why are they called cells? This name was invented by the English botanist R. Hooke. Examining a section of cork under a microscope, he noticed that it consisted of "many boxes." And he also called these "boxes" cameras and ... cells. Indeed, it seems that someone has drawn the onion film into cells.
At high magnification, the cell wall, nucleus, and vacuole are clearly visible. Explain to the baby that the cell wall is a partition, a wall between cells. It protects the cage and helps keep the desired shape. Thanks to the nucleus, the cell grows and multiplies. And inside the vacuole is cell sap. The one that splashes different sides and brings tears when we cut onions.
Red? Green?
Ask your child why vegetables and fruits are different colors. He will try to answer the question, inventing fantastic versions. Listen carefully to his assumptions, and then offer to find out for sure. For the experiment, you will need several glass slides, the pulp of various fruits (watermelon, grated carrots, tomatoes, red and green peppers, rowan berries, etc.), green leaves of plants. Put a few drops of water on a glass slide, place some ripe tomato pulp there and split it with a needle. Cover with a cover slip and examine with the baby under a microscope. You can see special inclusions of red color inside the cells - plastids. It is they who give ripe vegetables and fruits red, yellow or Orange color. Green leaves and fruits also contain plastids, but green. And the onions or potatoes already familiar to us are white because their plastids are colorless. Experiment with a variety of vegetables and fruits so that the baby can be convinced of this. And then tell him that plastids of one species can turn into another. That's why green tomato ripens and turns red. And what happens to green leaves in autumn, why do they turn yellow and red? I think that now the young biologist himself will be able to find the answer to this question. Well, isn't that wonderful?
So let's sum it up. The microscope is a very interesting thing. Once I got sick little man can carry his love of research throughout his life. And no matter what activity your grown-up son or daughter devotes himself to in the future, these children's experiments will certainly serve them well. Interesting observations and amazing discoveries!
It is unlikely that the pharmacist Leeuwenhoek would have invented a microscope if he had not had at his disposal a wide variety of lenses. Nowadays, for those who want to make their own microscope, it is more difficult: long-focus lenses that magnify only two or three times are enough in a pharmacy, but short-focus lenses are much more difficult to find. And don't do it yourself.
However, there is a way - and even complex grinding work is not required. You just need to take a strip of tin with a size of 10X60 mm, drill a hole d 3 mm at one of its ends and introduce ... a drop of water into it. Yes, it is she who is that almost ideal short-focus lens - the lens of the future microscope. Please note only that the hole must be absolutely round, and its edges must not have burrs. After processing, the tin strip in the hole area is lubricated with any oil and slightly blotted with a napkin.

1 - tube. 2 - vertical stand, 3 - brackets. 4 - object table. 5 - base, c - holder with hydrolens. 7 - glass.
Now you can take up the manufacture of the device itself. Let's start from the foundation. It requires a piece of chipboard or plywood with a thickness of 20 mm and a size of 100x100 mm. The vertical stand, on which the object table and the microscope tube are fixed, is wooden (oak or beech) with a section of 15X50 mm. How all these parts are connected is shown in the figures. Assembly is carried out on any glue - casein, polyvinyl acetate, synthetic or even bone.
One of the main parts of a microscope is the stage. You can make it from ten-millimeter plywood by cutting a square with a side of 50 mm from it with a hole of 30 × 30 mm in the middle. The table is attached to the vertical stand with two plywood (3 mm thick) scarves, and on them - the axis of the mirror, with which you can direct the beam of light onto the glass slide of the table. The mirror itself is fixed on the axis with pieces of fabric or paper smeared with BF-2 glue.

1.3-sidewalls. 2-table, 4 - axis of the mirror (steel, 0 3 mm), 5-mirror 40X40 mm.
The tube of the microscope consists of two tubes glued from cardboard or from several sheets of thick paper. Determine the diameter of the smaller one using the long focal length lens. In accordance with it, select a suitable wooden or plastic mandrel and glue the inner tube of the tube over it. It is best to use polyvinyl acetate glue. After it dries, wrap another tube over the resulting one. To prevent the second from being firmly connected to the first, lay several turns of paper between them.
Now we need to roughly determine the interlens distance. Fix a ruler on a vertical stand, put, for example, a hair or a thin wire on an object table, prepare a hydrolens - pipette a drop of water into the hole of a tin strip and, taking two lenses in your hands, move until a clear image of the object appears in the lens . Having fixed this position, mark the length of the future tube along the ruler.
Having cut the tubes, attach the eyepiece lens to the smaller one, and cut a hole in the larger one designed to accommodate the hydrolens in it. To exclude backlight, cover the inner surface of the tube with black paper.
All of us in childhood dreamed of owning a microscope. I confess and was among these dreamers. A microscope is a very useful thing and will always come in handy, especially if you are a radio amateur, because you can study micro-details with it. mobile phone and computer. And then one day they gave me old binoculars, which has been sitting idle on a shelf for several years. Therefore, it was decided to collect something useful from it. There are lenses - so you can make a good microscope out of them. To do this, you just need to disassemble and remove the two lenses that are on it. See photos below. The black tube has a length of 15 centimeters and needs to be pasted over with aluminum foil from the inside, and we do this to obtain maximum illumination inside the tube, since our microscope does not have a backlight as in factory models. The pipe in this case is plastic, but you can also use a piece of water pipe with a diameter of 0.5 inches.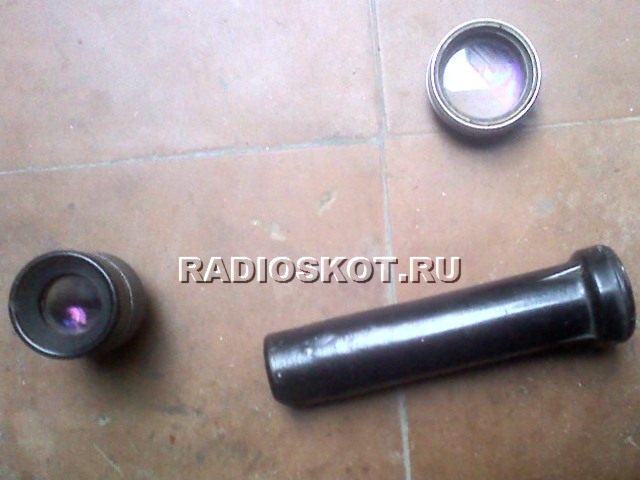
We attach the lenses to the pipe with moment glue and silicone, if you have metal pipe I strongly advise you to use cold welding. The microscope is ready, now you can look at things that are too small for the ordinary human eye.


I compared the manufactured microscope with an ordinary magnifying glass, the result - a magnifying glass magnifies 5 times, and a microscope about 20 times, you can easily look into the eyes of an ant or look at mollusks that are hiding under the leaves of trees.


A microscope stand can be made for more professional use and it is better to have several matchbox-sized glasses on hand, glasses are very useful for viewing leaves, insects and various liquids. The stand can be made as follows - we take a CD disk and an aluminum wire with a diameter of 3 mm. We twist one end of the wire in the form of a hoop, into which the microscope should freely enter and exit. The second end is also twisted in this way and with the help of silicone we attach it to the center of the disk, so if we look through a microscope we will see the disk!

It is at this point that the disc must be glued with superglue Blank sheet paper so that the multi-colored rays of the disk do not interfere with viewing, and on paper you can glue a rectangular piece of glass tightly for a moment with glue. Thus, from binoculars we have created an almost semi-professional microscope, which is indispensable in many cases. Create a device and learn everything you can. Good luck - AKA.
Discuss the article MICROSCOPE FROM BINOCULARS


, poultry farming")


- Burns, Robert - short biography
- The concept of common vocabulary and vocabulary of limited use
- Nancy Drew: The Captive Curse Walkthrough Nancy Drew Curse of Blackmoore Manor Walkthrough
- Deadpool - Troubleshooting
- Won't start How to Survive?
- What to do if bioshock infinite won't start
- Walkthrough Nancy Drew: Alibi in Ashes
- Spec Ops: The Line - game review, review Spec ops the line crashes on missions
- Room escape level 1 walkthrough
- Processing tomatoes with boric acid How much will 2 grams of boric acid
- Cucumber Grass (Borago)
- Bioinsecticide Lepidocid: purpose, properties and application procedure Lepidocide waiting period
- How to change the language to Russian in steam
- Dendrobium noble: room care
- Morphology of plants general concepts - document
- Planting, propagation and care of bamboo at home, photo Growing bamboo from seeds
- How to strengthen the cellular signal for the Internet in the country
- Sanskrit reveals the forgotten meaning of Russian words (2 photos)
- The oldest language Sanskrit programming language of the future Dead language Sanskrit
- Who has dominion over all the earth?