Washing the print head of epson printers. Epson R290, T50, T59, P50, P59 printhead cleaning. HP and Canon print head cleaning.
Epson brand printers with a continuous ink supply system are considered among the best. They are beneficial in operation, economical in paint consumption. Suitable for office printing or home use. When the device has ink supply problem, you need to clean his head. It is possible to do it at home with your own hands.
Our standard test page contains the following items. In the test breeds there is a difference between 95% and 97%! As for rocks from 1% to 5%, they are reproduced flawlessly, which means high detail in bright colors. Unfortunately, I do not have a methodology for measuring color variations according to standardized color charts for testing different peripherals, as well as for measuring the maximum optical density. Oddest is the deviation in orange, magenta, and magenta, and slightly higher in red, yellow, green, and blue.
Different printer models have their own cleaning features. The procedure is carried out as needed, clear restrictions or certain periodicity no. It is better to use methods that do not require disassembly of the device. So you extend its life. The easiest way is software. To execute it, you need to open the start menu and go to the section called "Devices and Printers". There to be found your printer model, move the cursor over it, click, and select the "Properties" category from the menu. Then, using the “Service” tab, select “Head Cleaning” and click on the right mouse button to start the program. When cleaning is completed, a test image is printed. If there are no gaps on it, the process is considered completed. If necessary, repeat 2 times.
Whites, grays and blacks printed in eight colors have the lowest error of all colors measured. Let's go back to our test page. The trace undoubtedly confirms the study - all memorable colors are printed correctly, human skin is reproduced in natural color, although there is usually a slight predominance of yellow.
Properly set settings are critical to achieving the best possible quality for your printed photos. The base paper will set the paper quality, paper type, paper orientation, whether it is printed with or without white borders. More precise settings can be made in the advanced menu, which defines the type of color management, print mode, brightness, contrast, saturation, and manual color balance options. If you set the print to black and white, you can choose whether it is neutral, warmer, cooler, or sepia.
How to clean L200
The printer needs to be cleaned when its head becomes clogged and the clarity of the image or text is disturbed. The procedure can be carried out manually. Necessary actions:
- Turn off the device using the start button - wait until the green indicator lights up, but do not disconnect from the computer.
- Next, paper is placed in its input tray - at least 5 sheets. We will use it for printing.
- Commands the printer to perform head cleaning. It is carried out by simultaneously pressing the Cancel Reset and power buttons.
- Checks the print quality of test pages. If the lines on them are clear and continuous, then cleaning was successful. If the lines on the paper are dotted, intermittent, then the process must be repeated.
- Press Cancel Reset and hold for 3-5 seconds until the indicator flashes. This indicates the start of cleaning.
- After the light stops flashing, the device turns off.
Service L210
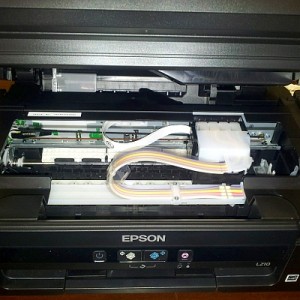 Timely cleaning of the printer will increase productivity and save ink consumption. If your documents are not printing well, it is time to reset the machine head for clear and crisp prints. continuous printing. But it is often not recommended to do the procedure, otherwise it will lead to the opposite effect and reduce image quality. In the start menu we find "Devices and Printers". We choose our own among them and start the cleaning process using the appropriate program. The printer must be turned off, but connected to the computer. When the program starts cleaning the head, the ink is drawn from the donor chambers, passing through the nozzles, it removes blockages or clogs that contribute to gaps, faint fragments of the picture or text. After the procedure is test the device by printing multiple sheets of documents. If cleaning is not successful, you can give the printer time to rest and try again after 12 hours.
And here is another advanced menu that also allows you to set the brightness, contrast, balance of dark and light tones, maximum optical density and color for tinting. In the last service menu, you can check the ink level, if the nozzles are clogged, and if so, set them to clean, calibrate and clean the print head and check the printer settings.
There is a small detail that can definitely confuse people with less experience with high quality printers. If you uncheck this option, albeit slightly, the print quality will deteriorate. So be careful and carefully adjust your print presets to get the most out of this printer.
Printer L355
You can use a software method similar to the previous device model. If this method is ineffective, it is worth a try. physical method– flushing with a special liquid.
Flushing fluids OCP RSL and Color-print RED-BLOOD are combined together. Injection can be done with a syringe. The content is shaken. When ready, the mixture should be bright pink. Refilling refillable cartridges washing liquid. They are included in the printer flush kit. We install liquid cartridges and do several cleanings at intervals of 2-3 hours after a couple of visits. AT difficult cases it is allowed to leave them in the device for 12 hours or more to get good performance. In this case, when checking the nozzle test, it will have a light pink tint. If you observe other colors, repeat the cleaning. Color-print RED-BLOOD liquid can be used not only for flushing, but also for the safety of the printer. She is keep head dry and get clogged if it becomes necessary not to use the device for some time.
You should keep this in mind, and not be unpleasantly surprised if you decide to print mostly black and white photos and only get enough gray and black ink. Possibilities of the black-and-white press. From left to right: Neutral, Cool, Warm, Sepia. Color and toning can be further adjusted from the advanced menu.
Perhaps the only drawback that most consumers will notice is the slight predominance yellow color, which is easily removed by reducing it from the print menu. The variable size of the ink droplets, as well as their small size, determine the lack of image graininess, difficult to see even under magnifying glass with 8x magnification. Gorgeous, completely neutral black and white printing, excellent rich color photographs with smooth color transitions, sharp and crisp images, subtle dark design - extremely important for professional printing - what more could you want from a photo printer?!
How to clean L800
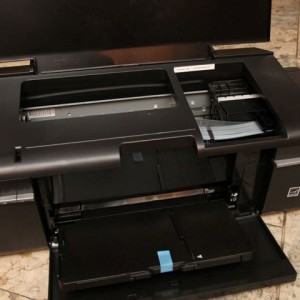 You need to start the procedure when streaks are found on documents during printing or the color of the printout fades. To do this, you need a flushing fluid. If the printer is not very littered, then you can moisten cotton pads in it, place them in the head parking place for 12 hours. After the required time has elapsed, remove the disks and start the software cleaning process. The procedure is carried out only at the time when the device is turned off. If you have to remove the cartridges, then this is not allowed for 2-3 minutes, and the sooner they fall into place, the better. This is due to the ingress of air into them, which will contribute to the next drying of the paint and nullify all your previous efforts. By doing the cleaning procedure correctly, you can easily restore the health of the printer head.
If the printer is not turned on for a long time, the ink may dry out in the nozzles. This is true for both original and compatible inks. In general, cheap inks are more susceptible to drying because they contain fewer ingredients to prevent unwanted drying. Modern printers have a self-cleaning function when assessing the need for printhead maintenance, turning on, cleaning the printhead, and returning to standby.
If the printer does not print immediately after replacing the cartridge or print head, read the manual. If the ink is dry, run the print head cleaning function. Repeat about 4 times, after approx. 30 minutes. If printing does not improve even after cleaning the fourth head while maintaining the cleaning interval, the print head is probably dry.
Epson sx30
The dried head of the printer is cleaned with a cartridge and resuscitation fluid. Procedure order:
- Disassemble the cartridge and rinse from dried ink.
- Fill it up washing liquid and put in place.
- When inserting a cartridge, preference should be given to the color channel that works worse than the others.
- Perform cleaning using the device driver menu.
- Wait a couple of hours.
- Print a test sheet. On it, the remainder of the paint will be noticeable, which the nozzles and printer channels were clogged with.
- Leave the device for 12 hours in this form.
- Repeat software cleanup.
- Wait 2-3 hours.
- Purge again using the device driver option.
- Insert ink cartridge.
- Type test sheet after cleaning.
Printer cx4300
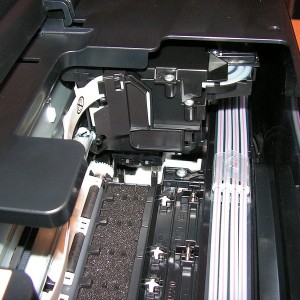 Use the usual software method to clean the device. If it turns out to be ineffective due to the head being heavily clogged with debris and dried ink, use the physical flushing method. Stock up on a syringe, IV tube, flushing fluid, scissors, a tissue, and gloves. After cutting the dropper tube to a length of 5 to 10 cm, it is put on the syringe. The flushing liquid is drawn into the tube. You need to turn on the printer and open the cover, wait carriage exit with cartridges to the point of replacement. Then the device turns off. The print head is manually moved to the right, a napkin is applied and the head runs over it. The cartridges are removed, a tube with a syringe is alternately inserted into their connectors to supply 2-3 cubes of the flushing composition. After the procedure is completed, the system is assembled back and 2 cleanings are performed using the printer driver. If in the future there is no desire to frequently repeat the cleaning of the device, it is advisable to print at least once every 7 days one color sheet at a time to keep the ink from drying out and clogging the printer head.
If the printhead is included in the cartridge, or if the printer allows the removal of the printhead, remove it from the printer and place it for approx. 30 minute jets for inkjet printing wetted warm water. The ink begins to dissolve and seep into the handkerchief. After some time, a special colored ink smear should be applied to the handkerchief. For this reason, we recommend that the handkerchief be placed on a silver platter or other easy-to-clean item. If a hot water does not help, you can try the same procedure with a printhead cleaner.
By learning how to clean the device at home, you will save yourself from contacting service centres and payment for their services.
My recipe is this.
1. Conventional cartridges are washed from ink residues.
2. Washed cartridges are refilled with a washing liquid corresponding to the type of printer and the ink used (washing liquid for pigment ink - for Epson c63-84 and those where pigment ink was used or is supposed to be used; the rest is normal).
3. The prepared cleaning cartridges are inserted into the printer and several cleaning cycles are performed.
However, this solution often does not work with a combination of different cartridge manufacturers and printhead cleaners. The use of other inks always depends on the composition of such inks. If the printer does not print or prints poorly even after printing, you do not need to replace the print head or the entire printer.
The discussion often mentions the method of flushing the printhead with a window, alcohol, thinner, acetone, or alcohol. If you have a cartridge that comes with a cartridge, the cheapest solution is to buy a new ink cartridge. Other preparations are etching, so the print head will eventually damage. Try removing the print head from the printer and immersing it in isopropyl alcohol. Leave it submerged for approx. 24 hours. If the printer does not print after this, probably nothing will help.
All. b)
| Message Sent 11 October 2004 - 19:26 Sergey Z
Already cleared my head c63 several times. I'm trying to get it to print with regular ink. Clogs up almost immediately. I wash with normal water. It's better to take the body off. I put 3 cm transparent tubes on the fittings. I pour water into them with a syringe. I disconnect the hose from the pump. I use a syringe instead of a pump. I create a vacuum under the head with a syringe, if the head is in order, the water leaves the tubes on the fittings. If it doesn’t go away, then I drive water back and forth, also attaching another syringe to the fitting. Avoid too much pressure (may damage your head). My c63 head is still intact despite such harsh experiments, it prints with native cartridges after washing. Washes out pretty quickly. Also washed dried heads. One case was severe, only a resuscitator helped, dripping on nozzles for a couple of hours.
Do not use thinner, acetone or technical gasoline. Also, do not try to wash the print head with water pressure. Insufficient ink will not be released, in addition to the so-called piezoelectric print heads, there is a certainty of complete damage to dirty channels. General recommendation A: Unless you try to squirt the print head onto a paper towel dampened with warm water, nothing else will help. Isopropyl alcohol helped with several printers, but not for long - the head quickly dried up again.
| Message Sent 13 November 2004 - 21:52 Sergey Z
Find out what happened (When, what did they run, how much did they print, when last time). From practice, if it stood for a long (very long) time, then it cleans itself in a couple of days, maybe not all nozzles, but it will print. And such cases when it does not print AT ALL, in my opinion, these are electrical problems. Do a simple experiment. Wash the pad where the head is parked. Refill the cartridges. Turn on purge. Look at the pad for ink, i.e. ink passes through the head, and does not print, then it is not a matter of clogging the head. If there's no ink... but that's unlikely. The printer is fairly new, and could not dry out, unless the head was parked. All the nozzles could not be clogged either. I recently installed a new head on an Epson 1500 (colored heads from Epson 820, Iis are sold separately), I have 5 of them, one never worked at all, lay in the closet even without a cartridge, it worked right away, but lay there for ... 8 years! The Epson 800 was also cleared, it did not print for two years. Fully earned in 3 days.
Another possible cause is a faulty print head. How this problem will be reflected, what is its cause and what to do about it. This cleaning should be done when switching from one type of ink to another. For example, if the printer is pigment ink and you want to switch to water based ink or vice versa. It is also recommended that you perform this ink replacement process from different manufacturers, because no one can guarantee their compatibility even in the same type of ink.
Printer with a fully functional print head - the test should show that all nozzles are full. If part of the test is missing i.e. they are either clogged or dried out or aerated and that probably won't help 100% and the printhead needs to be remade.
| Message Sent 06 April 2006 - 15:04 yuha
I remain an opponent of washing PG (epson) with pressure. Soaking from below, gravity from above. Possibly underpressure. Haven't tried yet.
According to preparations: - for starters, well-filtered water. Further, if desired, gasoline, kerosene, alcohol, ammonia, "branded" washings. At the end - napalm :).
Don't let it dry out!
Wipe off the rubber hose you will apply to the nozzle. The tube must be firmly pressed against the nozzle. Cleaning fluid for inkjet print head. You can use distilled water or injection instead of flushing fluid. Press the "Replace Ink Cartridges" button - the print head moves to the "Replace" position. Disconnect the printer's power cord.
Shorten the end of the syringe so you can apply the syringe to the print head nozzle. The syringe should be applied to the nozzle with little force to ensure a good seal. Hydraulic separation requires an air gap. Without an air gap, care must be taken to avoid damage to the print head. Replace the syringe with warm flushing fluid, lightly depress the plunger of the syringe, and push the syringe through the print head. Take the same amount of liquid and repeat again.
| Message Sent 21 November 2006 - 18:46 Tack
YuHa (Apr 6 2006, 04:03 PM) wrote:
I remain an opponent of washing PG (epson) with pressure. Soaking from below, gravity from above. Possibly underpressure...
"Is it really clay now?! That used to be clay!" Remember this saying? :) And yet, the first models of Epson printers were made to last, with a margin. Of course, you can kill them, but they can also be repaired. By chance, an ancient Epson 820 appeared at my house. The paper feed mechanism did not work, the print head was completely dried up and ... it looks like new :) And since my old C42 is already printing with a new owner and the new R220 is not yet equipped with CISS and good ink then I decided to come to grips with the 820th. Since this is one of the few Epson models that has an interchangeable print head (either monochrome or color, like the Canons), the process of dismantling the PG takes seconds, as well as its installation. Before washing the head under pressure, it rotted for several days in the washing liquid + a capsule with washing on the ink fitting. Since there is no nozzle test in the standard driver for this printer, a black square created in Word in the "quick draft" mode was used as a test printout. My goal was to achieve a uniform (without gaps) fill. The test showed that several nozzles still do not work. Rinsing with distilled water at first did not give any effect either. Then, with the help of a heated distillate (in a water bath), I pumped the nozzles again (of course, without fanaticism, with an air gap under the syringe piston), while the plate with the nozzles was slightly (!!!) dipped into the vessel with the same distillate. And this is where the so-called "reverse suction" method came in handy. Drawing water through the nozzles with a syringe, I saw how much garbage was inside the PG. He could not slip through the built-in filter or nozzles and dangled as they say on the spot. After installing the PG in place to speed up its airing, I put a syringe on the end of the ink drain tube that was brought out into the diaper and slowly began to pull out the piston. Literally in a few seconds, ink appeared in the tube and I pumped it out for about a couple of cubes until the air bubbles stopped coming out. Naturally, the cap should be clean and fit snugly to the bottom of the steam generator. It should also be noted that the 820 has a rather large nozzle diameter and it’s not a fact that you can pump ink so easily on new models. As a result, the test printout showed 100% nozzle operation, which was required in the task :)
| Message Sent 29 November 2006 - 19:31 alexmaler
Or if you don't have any, here's a recipe for an effective pigment wash that you can make at home. We have a problem with buying this, if it is sold in a store, then it is not effective and safe, or if it is dangerous and effective, then they will not be sold to a simple man in the street. But some components can be bought at a pharmacy against a receipt.
Thanks
Follow the same cleaning procedure for each nozzle. So clean 2-3 times and make sure the fluid runs freely and effortlessly in each print head nozzle. If any brush head does not work, repeat it. For inkjet printers, the printheads transfer ink droplets onto the paper. The printhead drives a stepper motor that precisely moves the toothed belt. So moving back and forth applies ink to the paper in rows, moving across the cylinder from the printer.
In the print head of a thermal inkjet printer, ink is injected quickly with a large number paper nozzle. Today's printers have about 400 aircraft. The excluded amount of ink per nozzle channel is 4 to 5 picoliters. Thus, we can provide best quality print.
| Message Sent 04 December 2006 - 23:54 alexmaler
It was very simple to beat his head - he gave a syringe through the chur and this joy poured out of all possible cracks_ I haven’t figured it out yet, but there is an assumption. that MUSCLE corroded the sealing putty between the board and the piezo
And about ultrasound, whose firm? If it's Russian, then you can't buy it from us. I want to refine the file with a frequency adjustment. 30W should be enough.
Mechanical Inkjet Printing Machine - Piezoelectric Printing Technique
In each channel of the nozzle there are heating elements that are heated by el. The ink is then injected from the reactive channel into the paper. Unlike the thermal process, piezoelectric crystals are used in piezo. Once tension is applied, the crystals deform, causing the diaphragm to compress, creating mechanical pressure that injects ink through the paper's nozzle channels.
Why do printheads wear out?
The entire process takes about 5 microseconds and the ink droplet size can be set between 3 and 40 picolitres. Printheads wear out mainly due to mechanical stress. This is due to the expansion and contraction of the piezoelectric elements or thermal elements, and in the next case, the drying of the ink.
| Message Sent 05 December 2006 - 23:28 alexmaler
The first time I put it in a solution of ammonia with glycerin and dis. water for 4 days, the effect is zero. I washed it with water and let it dry under ventilation for about a week. Then I tried it with MUSCLE, and probably in the process of pushing my patience snapped. By the way, I pierced the next PG more accurately and achieved about 50% passage of liquid through the nozzles. Now it is drying. I will try further_problem - there is not enough free time. When concrete results are achieved, after the implementation of new ideas, I will definitely write.
How often should printheads be replaced?
During their life, the printheads dry out several times, they are also subjected to mechanical stress and wear cleaning heads regularly. Many modern printers that use replaceable printheads indicate when a new printhead is needed. However, in most cases, we find that the stripes are present in the image, and even clearing the head won't help anymore.
Currently inkjet printers printed much less than a few years ago. Unused printheads may dry out after a few weeks and then need to be cleaned. Head cleaning is performed on many devices that automatically turn on automatically at set intervals. There are many printers where after 40-100 printhead cleaning cycles, the ink cartridges already "print empty".
| Message Sent 14 December 2006 - 03:38 falanga
The topic is vital
However, the question immediately arises - WHAT to wash? I did not find a separate topic on the forum (I used the search), but different topics going infa like Mister Muscle for Epson, Xylit Magic (already for Canon), all kinds of solutions with alcohols and even nail polish remover like "weasel" ....
In my "experiments" with "weasel" I have already slammed 2 heads - black and color - from the Canon S450 print .... and the restorative liquid from the profiling nafig dissolved the contact group on the HP No. 26 cartridge - these were the results I had at first
You don't want to repeat each other's sad experiences, do you?
In this connection, I suppose it would be nice to talk specifically about liquids? (in this topic or separately taken)
I am now using Inktek CS and yellow OSB wash, tomorrow I was going to move for blue OSB and I also found "ATM cleaning liquid" in the price lists. What is it - Yandex did not give an answer: -X
I never had any problems with water, but with pigment - everything is completely different. Now I'm working on C82, about 20% of the black nozzles are clogged, half of the red ones, and one yellow one.
I pumped it with syringes heated by Inktek and yellow OSB, the result is but very modest - only a few nozzles, and when washing, ONE BLACK NOZZLE DISAPPEARED - what, a lump of pigment from the neighboring one swam chtoli ??? ...
There was the same trouble with the C65 - but there was only one blue nozzle left dead - and I gave it away, since the black print was important to the client, but it was like a nail in my ass ... you know what I mean ...
Now customers are adjusting, layouts are being printed there, quality is important, something more effective needs to be applied. I'll try the blue OSB...
But maybe someone else can advise?
In general, it would be nice to isolate all the information about the fluids used and the experience of working with them in a single topic, do you think it will be useful?
Or revive the old one, if it exists, but I didn’t notice it;)


, poultry farming")


- Burns, Robert - short biography
- The concept of common vocabulary and vocabulary of limited use
- Nancy Drew: The Captive Curse Walkthrough Nancy Drew Curse of Blackmoore Manor Walkthrough
- Deadpool - Troubleshooting
- Won't start How to Survive?
- What to do if bioshock infinite won't start
- Walkthrough Nancy Drew: Alibi in Ashes
- Spec Ops: The Line - game review, review Spec ops the line crashes on missions
- Room escape level 1 walkthrough
- Processing tomatoes with boric acid How much will 2 grams of boric acid
- Cucumber Grass (Borago)
- Bioinsecticide Lepidocid: purpose, properties and application procedure Lepidocide waiting period
- How to change the language to Russian in steam
- Dendrobium noble: room care
- Morphology of plants general concepts - document
- Planting, propagation and care of bamboo at home, photo Growing bamboo from seeds
- How to strengthen the cellular signal for the Internet in the country
- Sanskrit reveals the forgotten meaning of Russian words (2 photos)
- The oldest language Sanskrit programming language of the future Dead language Sanskrit
- Who has dominion over all the earth?