Photoshop magic: four ways to turn a photo into a painting.
AT this lesson we will make a pencil drawing from the photo. For work, I took a photo of a girl, which you can also download in the "Materials" panel on the right.
1) So, open the photo of the girl with the Photoshop program and proceed. First of all, we make a copy of the photo layer and make the top layer "Base Dodge" overlay, instead of "Normal".
2) Next, apply "Invert" to the same top layer. To do this, with the top layer selected in the layers panel, select "Image" - "Correction" - "Invert" in the top menu, or press the key combination "Ctrl" + "i".
3) Now we will apply the "Gaussian Blur" filter to the same layer, for this, with the layer selected, select "Filter" - "Blur" - "Gaussian Blur" in the top menu and in the filter window that appears, set the blur radius to "26.3" . Given value selected specifically for the size of the photo we are editing, if the size is larger or smaller, then the blur value will also have to be selected differently. The main thing is to get the same result.

4) Now you need to discolor the processed layer. To do this, with the layer selected, in the layers panel below, select the adjustment layer "Hue / Saturation".


5) The next step is to set up the "Levels" of the layer. To do this, as in the previous case, with the layer selected, select the "Levels" adjustment layer in the bottom menu of the layers panel and adjust the levels in the settings window that appears to make the picture more contrast.

6) Now select the bottom layer with the photo, which is in its original form and convert this layer into a "Smart Object". To do this, right-click on it and select "Convert to Smart Object".

Now apply the "Cross Strokes" filter to this layer, which will simulate the effect of pencil strokes. To do this, with the layer selected in the top menu, select "Filter" - "Filter Gallery" - "Cross Strokes" in the filters tab "Strokes". Now we set up a filter by values as in the screenshot.

After these manipulations, we will get what we wanted - the effect of a pencil drawing from a regular photo.
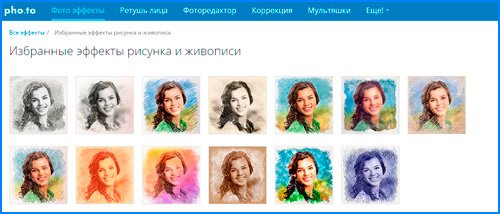
11 votesGood day, dear readers of my blog. Handmade drawing. About 15 years ago, no one would have thought of such a phrase, but now - please. Modern technologies reached such a level that anyone in just a few seconds can get their portrait in any artistic style whichever one wishes.
Today I will do small review services that allow you to make a photo as drawn in pencil online. Great amount techniques: animation, stylization, collage, insertion. More than 3,000 effects: impressionism, Van Gogh style, automatic retouching, watercolors, pastels, oil paint, chalk.

The result will not be long in coming. You will learn about better ways photo editing.
Benefits for the webmaster
To many, it may seem strange to have such an article on a blog about creating websites. Very in vain. Well, firstly, a picture processed in a similar way can be used as a design element: a header, background, or even a thumbnail of an article or a picture in the body of a publication.
However, I must tell you right away that if you like one of the tricks and want to process all the photos in this way and post them on your blog, then the idea will be great. However, do not forget about copyright.
Do not think that after that it will become yours. No matter how many manipulations you make with the picture, it belongs to the photographer or artist who created it.
Read the article about. Although search engines define such content as unique.
So, if you take a photo from a free source, process it in a photo editor, and post it on your blog, then it will seem to Yandex and Google that you are doing great and using your unique materials. At the same time, you are not afraid of any persecution. Everyone is happy and satisfied. These actions will take you no more than a couple of minutes.
But these are not all the benefits. Developers are people too. We all have friends and sometimes they celebrate birthdays, weddings, new years and so on. The portrait can be printed in large format and inserted into a frame. You will spend many times less money rather than ordering a drawing from an artist. So the result in any case will exceed all expectations.
Well, now I think everything is clear. Let's move on to the overview of services.
Services overview
To write this article, I analyzed many resources. Most of them were uncomfortable. Somewhere the download constantly lags or the result is below average. I left only three resources on the list. Moreover, I will say right away that I recognize only one truly worthwhile.
I will not waste any more of your time and proceed to a detailed review.
Photofacefun
Website en.photofacefun.com quite nice and completely free. Here you will find over 1,400 options for your photography.
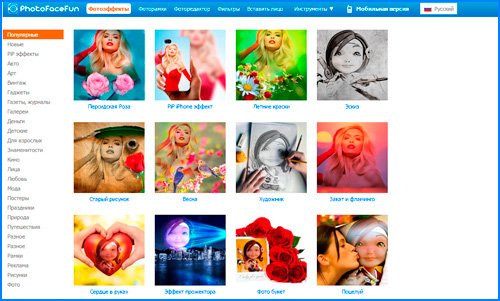
If you want to turn a picture into a drawing, then go straight to the section of the same name and look at the options. For example, the third, pencil drawing. We click on it.

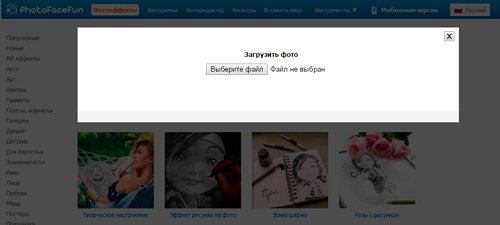
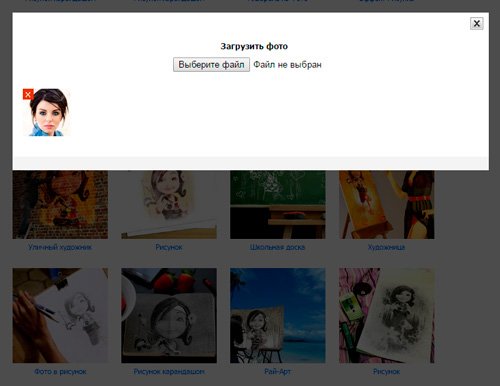
Uploading a file. By the way, it is not necessary to upload the same photo every time. It will be saved on the server and you will have quick access to it until you leave the portal.
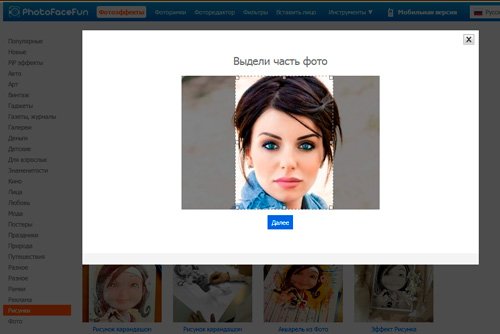
You need to crop the picture so that it fits into the collage.
Ready. I got this result.
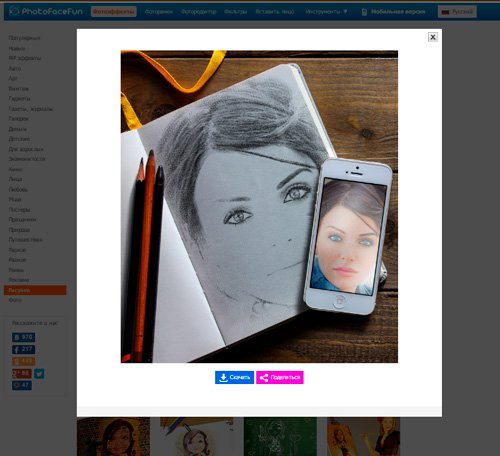
As you can see, basically your portrait is offered to be inserted into some beautiful picture, to make a collage. It's great, of course. There are a bunch here interesting examples The result is almost always pleasing. But this is not quite what we would like.
If you just insert your photo and get exactly the same, but in a different style, then this resource will not suit you. And yet, let's try another option: a pencil drawing on the same page.

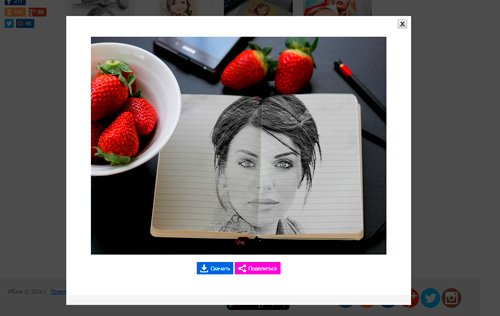
As promised, you have quick access to the latest download.
It's hard not to agree that the picture is cool. No logos, watermarks, etc. The service is completely free.
But let me tell you, there are better ones out there. About him now and will be discussed.
Pho.to
Portal funny.pho.to/en/ can really be fun. I've been here twice already and every time I can't help laughing and smiling. This resource is awesome. Over 600 frames, effects and filters. In addition, fast automatic portrait retouching, creating gif animation based on your photo and quick correction.

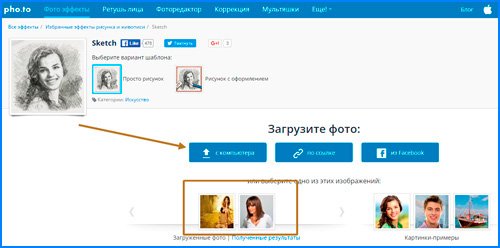
Go to "Drawings and Painting" or "Selected Drawing Effects". I advise you to try both categories, as there is a huge selection of pencil drawings.
Here you will be offered pencil sketches or ballpoint pen, pastel, oil paints, Van Gogh drawing effect, impressionism and much more. Try and enjoy.
Upload photos from your computer and for a while you have quick access to them at the bottom of the panel.
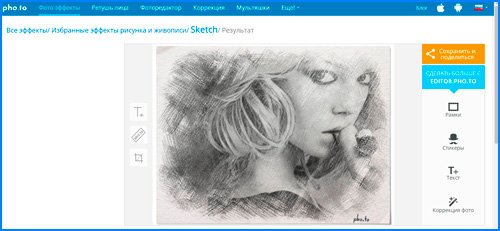
Here is the result I got. The only drawback is the link at the bottom of the photo.
I was immediately interested in cartoons. It's really fun! Upload a photo from the disk and start changing emotions on the right side.

I think it's realistic and funny.

You can remove the cartoon effect and send to friends in in social networks instead of smilies.

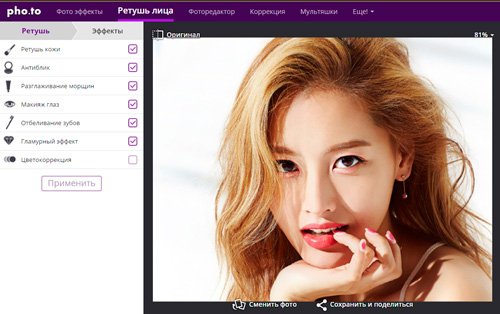
I will also call face retouching a useful feature. You simply insert a photo and wait for the processing to complete.
If you go to effects, you can replace the background, add color effects or lighting, and also stylize the picture.
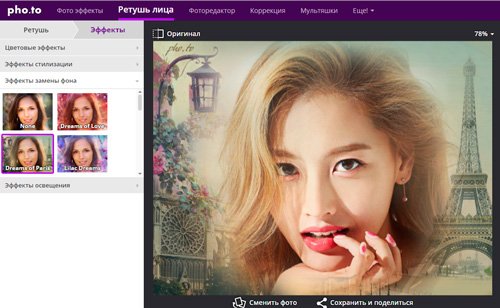
In my opinion, this is the best resource on the Internet, but you have another way to make a photo a pencil portrait.
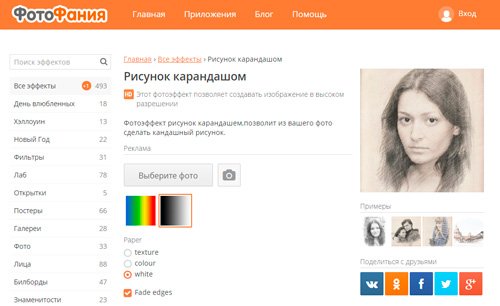
photofania
The service is good because you will not add any additional logos. The portal is free. But nevertheless, it has a lot of shortcomings. For example, for a couple of days now I can’t access the main page, some effects don’t work, categories don’t open. In general, the site still needs work.
It is likely that these are temporary difficulties and by the time you want to create your portrait, the situation will change. However, I will leave you a direct link to pencil drawing page . I have had no problems with this filter.
Upload a photo from your computer.
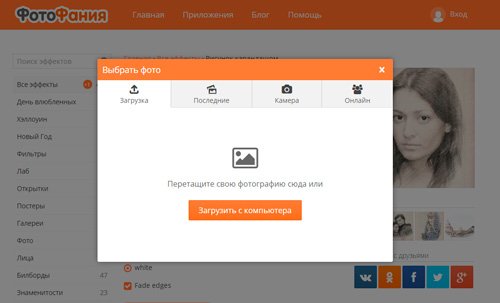
Cut it off.


Here is the result I got. You can download.

Photoshop in three steps
In fact, pencil drawing is not like that. difficult task even for photoshop. Watch this video. Here's how to create your masterpiece in just three minutes. By the way, the video is very cool. I cannot but mention the work of the author.
Online services are, of course, simple and fast, but they limit you. It's good to sit for a couple of minutes, neighing at the funny results, but thanks to them you will not get far.
Working on your own in Photoshop is much more interesting. Projects are much better. You see what you are doing. You can adjust based on the specifics of a particular photo and you will probably go further. Photoshop will not captivate you for just a couple of minutes. You will want to work with him, develop, improve skills.
See how easy and simple you can or. And all this will not go to waste. Download free course « Profession web designer in 10 days ". This introductory course can be your first step towards a profitable hobby.

Well, if you are more interested in creating beautiful pictures, but you don't know anything about photoshop, I can recommend " Photoshop from scratch ". Thanks to this course, you will learn everything about this program within a few days. You will understand how to work in it, what functions it has and what you are really capable of.

Open up to change. If you have a passion for design, don't limit yourself to excuses. Start new life where you can do what you love. Subscribe to my blog and VKontakte group and learn more about working online.
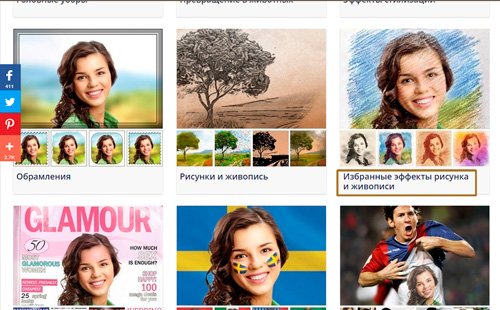
Today we will talk about artistic filters in Photoshop. With the help of these filters it is possible to stylize as a painting (oil, pastel, pencil), imitate surfaces and structures. With these filters, you can create works of art from your photos.

Filter - a tool for changing an image. This can be blurring, sharpening, styling, embossing, changing colors and much more.
You can find all filters in the "Filter" tab, which is located at the top. When you click on this tab, a menu appears in front of us.

Watercolor (Watercolor) . Watercolor painting effect.
Simulates a drawing watercolor paints. But not very good. With a couple of tricks, you can achieve wonderful results. Do two copy the photo with Ctrl + J, then select the “Watercolor” filter.
We see the settings
- Brush Size (Brush size).
- Brush Detail (Brush details). Determines how accurately details will be saved.
- Texture (Texture). Determines the severity of the paper texture.

Adjust the settings to taste. On the left we see the texture, on the right - the result.

Marine watercolor / luceluceluce
Change the blend mode of the first layer toScreen(Lightening or Screen), and the second onMultiply(Multiplication). Add masks to both layers. Hold down the Alt key to create a black mask. With a brush white color and watercolor brush, options of which you will find on the Internet, draw on masks. This way you will simulate typical color transitions. Photoshop did the preliminary work and prepared the sketch. With the help of brushes and textures, you can get the desired effect.

Colored Pencil (Colored pencil). Imitates a colored pencil drawing.
The Colored Pencil filter uses the current background color as the color of the paper on which the drawing will be created. That is, even before applying the filter, you need to make a small decision. The colors of the picture will change to the colors of the pencils. Between the pencil strokes, the color of the paper will be visible.
- Pencil Width (Pencil thickness). Adjusts the thickness of strokes.
- Stroke Width (Dash pressure). Simulates strong or weak pressure on a pencil.
- Paper Brightness.

Because small parts are rarely well worked out, it is better to work with large photographs. With a one-time filter application, it is difficult to get a good result. Therefore, I recommend making several copies of the image, applying different settings on different copies and using layer masks to draw those areas that best fit this part of the photo. The texture of the paper makes the image look more realistic. In this case the texture is on a layer above all the other layers and I used the layer blend modeMultiply(Multiplication) with little transparency.

sexy woman / stryjek
Smudge Stick. Smooth, soft image effect.
The filter softens the image by adding diagonal strokes, making light areas brighter and less detailed. This filter uses the colors of the image to simulate feathering. In this case, you can set the length of the stroke, which naturally affects the details and sharpness / blur. You can change the brightness different zones image and brightness intensity.
- Highlight Area (Brightness zone).
- Intensity (Intensity).

Since the content of the image does not change, it is possible to create a “photo-realistic” picture. To do this, make two copies of the original and go to the filter. On the bottom layer, set stroke length, brightness zone and intensity to 0. On the top layer stroke length - 10 , brightness zone - 10 and intensity - 3. Change the blend mode of this layer to overlay (Overlay) and set the Opacity to 50%.
This will ensure that the strokes are not too uniform. Of course, it is important to choose the right motive here. Fantastic collages are more suitable here than, for example, a portrait.

The Temple / Zuboff
Cutout (Application) . Turns a photo into a colored paper application.
The filter combines similar colors and imitates an appliqué made from glued pieces of paper. The number of levels determines the number of colors in the collage. Edge simplification - how accurately and evenly the pieces of paper were cut. Edge precision is only responsive when the abstraction level is not set to 0. The lower the scale value edge Simplicity (Edge Simplification) and more scale value Edge Fidelity, the less distortion. Image brightness does not change
- No of Levels determines the number of color levels
- Edge Simplicity (Edge Simplification).
- Edge Fidelity (Edge Accuracy).

That is, using this filter, you can achieve the effect of illustration. To determine the content of the image, even simple contour. Here, too, it is very important to choose the right image. Here, too, it makes sense to use different layer blending modes, for example, Overlay (Overlay).

Green forest with fog / andreiuc88
Fresco (Fresco) . Fresco painting:
This filter simulates the application of paint to still fresh plaster, at least in theory. The choice of motive is very important here as well.
- Brush Size (Brush size).
- Texture (Texture). Adjusts the sharpness of the edges.

To make the photo look like a fresco, I applied a filter with the settings r brush size - 1, brush details - 10, texture - 1, overlaid the texture with the appearance of plaster and usingImage - Adjustment - Hue/Saturationreduced the saturation of the image. Then I changed the layer blend mode toMultiply(Multiplication).

Saint Mary Magdalene / zatletic
Dry Brush (Dry brush). Imitation of drawing with a dry brush.
The result of applying this filter is a drawing that is very reminiscent of the dry brush technique (painting with a large amount of paint with a small amount of water).
- Brush Size (Brush size).
- Brush Detail (Brush details). Determines how much detail to keep.
- Texture (Texture). Adjusts the severity of the paper texture.

Here you can apply a filter with settings brush size - 1, brush details - 10, texture - 2. The picture is starting to look like a painting. Make a copy of the layer and apply the filter again with the settings brush size - 10, brush details - 10, texture - 1 and change the layer opacity to 50%. Paper texture can enhance the effect.

Mediterrane Impression / pk200258
Rough Pastels (Pastel). Pastel drawing effect.
Using this filter gives the effect of a pastel drawing. The upper part of the dialog box sets the stroke length and the level of detail. In the lower part, the properties of the material on which the pattern is applied, the size of the texture, the relief and the direction of the light are determined.
- Stroke Length (Dash length).
- Stroke Detail. Determines how strong the strokes will be.
- Texture (Texture). Allows you to select the texture: brick (brick), burlap (burlap), canvas (canvas), sandstone (sandstone).
- Scaling (Scale).
- Relief (Relief).

Settings depend on the motive. After the filter settings, it is necessary to remove (or partially remove) the filter action on some parts of the image using a mask.

meditation / pepe
Film Grain. Superimposes grain on the image, imitating shooting on a film camera:
On contrasting shots it gives quite an interesting effect. Grain scale(Grain) controls the grain size,Highlight Area (Lighting) - the percentage of lightened areas, and Intensity (Intensity) - exposure (illuminance).
- Grain (Grain). The amount of grain in the image.
- Highlight Area (Brightness zone). Increases the brightness of the final image.
- Intensity (Intensity). Adjusts the brightness and sets the intensity of the bright areas.

Make two copies of the picture and apply on upper layer filter with settings grain - 8, brightness zone - 14, intensity - 2. Change the blend mode of the top layer toMultiply(Multiplication), and the layer below it onScreen (Lightening). This will give you a contrast shot with grain.

Fine art image / konradbak
Plastic Wrap (Polyethylene wrap). It gives the impression that the picture was placed inside a plastic bag or film.
- Highlight strength (Strength of highlights). Determines how strong the polyethylene highlights will be.
- Detail (Details). The level of detail of the outline.
- Smoothness (Smoothing). Glare smoothness.

Fashion Couple Dramatic / Gabi Moisa
Underpainting (Drawing under the surface). Creates the effect of drawing under different surfaces.
- Stroke Length (Dash length).
- Texture Coverage
- Texture (Texture).
- Scaling (Scale).
- Relief (Relief).
- Light (Light). Allows you to select from which side the relief will be illuminated.

In this case, I took the texture of the canvas scale 50% and relief height - 5. Light - bottom right, stroke length 0 to get the outline. Here is the result:

Grand Cru Rotwein/Wilm Ihlenfeld
Palette knife (Spatula). Imitation of the image applied by a tool such as a wide knife.
Allows you to simulate technology oil painting performed with a special tool such as a wide knife (spatula or palette knife). The image becomes emphatically rough.
- Stroke Size (Stroke size). Adjusts the size of the stroke around the edges of the path.
- Stroke Detail (Stroke detail).
- Softness (Softness). Smoothes the picture.

Unfortunately, the filter only affects small areas of color. Color transitions are not affected. This can be fixed by choosing the right texture and overlaying it with the blend modeMultiply(Multiplication). Then merge the layers (original and texture) and make two copies. Apply a filter with settings on the top layer stroke size - 50, stroke detail - 3, softness - 0. Set the layer opacity to 80% and change the top layer's blend mode toScreen(Lightening).

dutch mills 3 / dzain
Neon Glow (Neon glow). Creates a neon glow along the contours of the object in the picture.
Turns an image into a monochrome negative and adds a light stroke, "glow", to the outline of objects.
- Glow Size
- Glow Brightness

Feuerwehrschlauch / 77SimonGruber
Paint Daubs. Creates the look of an oil painting.
Makes the picture look like an oil painting.
- Brush Size (Brush size). Already familiar to us parameter.
- Sharpness (Sharpness).

Filter with settings applied here brush size - 25 and sharpness - 20. Brush type - wide and medium hardness. Texture overlaid on top with blend modeMultiply(Multiplication) and transparency 25%. Then a copy of the layer was made and the blending mode was selected.soft light
(Soft light) and transparency 50%
 rotes Italien / Grischa Georgew
Sponge (Sponge). Sponge effect.
- Brush Size (Brush size).
- Definition (image clarity).
- Smoothness (Smoothing).
 Luneburger Heide / Thorsten Schier
Poster Edges. Enhances the outlines of an image.
- Edge thickness
- Edge intensity (Edge intensity).
- Poserization (Posterization).

Superhero businessman / Nomad_Soul
We will talk about other filters and their application in the next article.
Many users want to somehow edit their photo, make it more beautiful or noticeable. For editing photos and applying effects, there are many programs that have long been known to everyone, as well as the effects from them. In order not to repeat each time laying out pictures similar in processing, you can convert the photo into a pencil drawing. This will undoubtedly draw attention to the image immediately.
to do this operation can several ways. For starters, you can use serious graphic editors, which are installed on the user's computer, and carry out all actions through them. If the user does not like this method, then you can use applications for mobile devices or go to online services and do everything with their help. This article will tell you exactly how and with what applications you can make a photo from your picture with a pencil.
How to make a pencil drawing from a photo online
To begin with, it is worth disassembling the work online services, which allow you to convert a photo to a pencil drawing, because they do not require additional software to be installed on the user's computer, which can be an important factor if the only photo conversion or if it is not done so often. This section will list several services on which you can perform the required operation.
Photo Phunia
The user can find the service itself at the link photofunia.com. A page with a pencil effect will open immediately. It is quite easy to use and does not require any special skills, there is also no need for long and precise adjustment of various parameters. You just need to go to the specified site, after which you should upload a photo to it, you can do this both from a computer, and from a laptop or mobile device. To select a photo, click on Browse.
After that, it remains only to choose a color drawing the user wants to get himself or black and white. Now follows click on create, then wait for the processing to complete, look at the result and, if it suits the user, save the pencil drawing back to your device.

cropper
This service is located at the link croper.ru. To make a photo with a pencil in this online Photoshop, the user will need to hover over the item Files menu, then select the desired source download option from the list and specify the path to the photo. Now it remains to find the section of the menu that will carry out the desired transformation, in our case it is worth going through the following items "Operations" - "Effects" - " Pencil". Several new parameters will appear on top, which will be responsible for the rendering methods, you can “play around” with them and decide which image will suit you best.

Now all you have to do is click on Apply, then wait for the conversion to finish. In the final picture, you can slightly change the contrast, after which you can upload to your device a photo converted into a pencil drawing.

Programs for creating a picture from a photo
Now that the most simple and quick ways described, you can proceed to the description of specialized software that you want to install on your computer.
How to make a drawing from a photo in Photoshop
It is quite easy to make a pencil drawing from a photo in Photoshop. Unfortunately, there is no single filter that turns a photo into a drawing, so you need to follow the following procedure.
After the user installs Adobe Photoshop on his computer, you will need to run it and open the image there, on which work will be done. After that, you should find the tab " Adjustments" (Correction), which will be located on the style display panel, after that you should click on the tool " Hue» (Tint). 
After the actions taken, in the list that contains all the layers, another one will appear, allowing you to change the palette of shades. It's called Hue/Saturation.
You need to go into it and move the slider Saturation(Saturation) to the far left. 
This action will bring the image to black and white. Now again you need to go to the layers and select the background there. 
Now follows copy it. To do this, find the item in the main menu Layer (Layers), click on it, and then click on “New Layer” – “Layer via Copy” (New layer – Copy). 
Now again you have to use the main menu, in it you need to find Image (Image), then click on "Adjustments" - " Invert» (Correction - Inversion). These steps will display the photo as a negative. Now in the list you need to select a copy of the background layer and click on the item color dodge
Now you need to go to the layer menu. 
In this menu, you need to convert to " smart object» (Smart Object). It is now a smart object and has a label. 
Now we need to apply a few more menu items. To start, click on filter(Filters), then go to the item "Blur" (Blur) and click on " Gaussian Blur" (Gaussian blur). Set the radius to 12. 
On this, everything will be finished, you can save the result. 
If you need a color picture, you should activate the color item in layers. 
GIMP
it free editor images, which will help to make a portrait from a photo with a pencil. You can learn more about it on the official website. After installing a program that makes a picture out of a photo, you will need to open the image that will be manipulated.
To make a thumbnail from a photo, you need to click on "Color", then click on " discolor". Next, you should go to the layers and make a copy of the background layer, and then work with this copy.
Now you should click on "Filter", and then click on " Edge Selection- "Edge". A window with settings will open, you need to set the same as in the picture. That is, Lightness, Laplace Algorithm, Magnitude 2.0, Blur. 
It remains to perform the last action, you should click on "Color", and then select the item " Invert». 
You can also watch the whole process in the video:
Paint.NET
The main advantage of Paint.NET is its ease of use. Pictures before and after processing are shown in the figure. 
First you need open image, then select it, go to effects and click on " oil painting". A window with options will appear. Here it is worth experimenting and choosing the values at which the picture will be most liked by the user.
After that, you can go to effects, select styling and specify Bas-relief.
Now you should go to the layers, select the one in which the work took place, and then select the option blending mode and click on the cover. This will remove grey colour from the final outline drawing.
Programs for Android
For those who mainly use mobile devices, programs have also been invented. This section will identify applications that can apply the desired effect, as well as provide instructions on how to use them.
Prisma
Prisma learns with every use, so no two images or effects are the same. All the user needs is to download it from the store and install it. After that, you can add photos and images to it. 
Once added, the user will be able to select below desired filters, you can select the drawing method of one of the famous artists as the style.
pencil drawing
In the case of the Pencil Drawing, everything is also quite simple. You need to download and install the program, after which you can add saved files to the application, or take a new photo. 
At the top you can set image type. For a color drawing, you should choose a colored pencil, and for a monochrome image, you should choose a black and white one.
Sketch Camera
You need to install Sketch Camera, upload a photo, and at the bottom select color scheme
. It can also be configured in the parameters, which are located a little higher. The painted photo effect is applied automatically. 
After completing the work, you can click on share and send the photo to social networks.
Often users want to learn how to make a drawing out of a photo in order to print the photo later and store it as a drawing. Consider the most effective ways.
To begin with, let's look at several popular services with which you can quickly create a picture effect on a photo without installing additional software on your computer.
Photo Phunia Service
On this site, users can take advantage of the automatic effect by which an ordinary picture is converted into a drawing. You can also choose the background texture of the source file: color, white or "special".
To get started, select a file on your PC. To do this, click the Browse button on the site.
Then determine the color scheme of the image (black and white or color).
Click on the texture shape you want to output and click on the "Create" button to start the file conversion process.
In a few seconds, a direct link to download the image from the site will be generated.
Service Croper
The next popular site for creating a picture from a regular picture is Croper. This online photo editor Allows you to apply additional effects to your photo.
With it, you can create a unique image without losing quality.
One of the most popular features of this site is the pencil drawing feature.
The file is converted by creating darker tones of the image, then strokes are gradually superimposed on the layers of the image, which, in turn, make a sketch out of the image.
The editor interface is very simple. Upload the file to the site by clicking on the appropriate button.
The image will open in a new window on the site. After that, find the main menu tabs - they are located at the top of the site. Click in turn on "Operations" - "Effects" - "Pencil".
At the top of the page, select the stroke length settings and slant level.
Then click on the apply button to start the image conversion process.
This will take no more than one minute. If necessary, you can adjust the contrast of the final image.
The result of Croper's work is shown in the figure below.
Creating a drawing in Adobe Photoshop
Using Photoshop, you can also create a pencil drawing from an ordinary picture.
Using the built-in functions of the program, you can achieve a better display of all the strokes and the final picture will look natural.
The effect of the picture will be very visible if you print it on a printer. For greater effect, you can use white or craft paper.
All the steps below are done in Photoshop CS6. Used features are available in older and all newer versions of the app.
We will use a normal scanned photo; We recommend that you do not use small pictures while working in Photoshop, because after applying the “drawing” effect, some of the pixels may be blurred, which will degrade the quality of the final small image.
First we need to copy the original image.
To do this, open the picture in the program, wait for the toolbar to load and press the F7 button. Then click on the combination of buttons Ctrl - J. This way you will create a duplicate of the layer.
To do this, click on the Image item (main menu of the program). Click on "Correction" - "Invert". Also, to apply desaturation to a layer, just press the Ctrl and I keys simultaneously.
As a result of discoloration, we will get the negative of the image, and not its black and white version. All light areas of the photo will become dark, and dark areas will become light.
On the layers panel, the resulting negative will be displayed as a second copy of the original layer. Next, change the display mode of the layer. Click on layer 2 and in the line "Mode" open the drop-down list. Click on Color Dodge.
After changing the mode, the canvas of the project will turn completely or partially white. On the main menu bar, click "Filter" - "Blur".
From the proposed list, select Gaussian Blur. In the window that opens, adjust the slider to create the blur level.
The higher the value of this indicator, the brighter the picture becomes, acquiring the outlines of the drawn one.
Important! Don't overdo it with the blur filter, otherwise the photo may become too light and the pencil effect will be lost. Optimal value blur - 12.5 - 13 pixels.
This bleaching method allows you to achieve maximum clarity of the strokes of the image, pixels are not lost, and the resolution of the image is preserved. As you can see, the picture has taken on the shape of a pencil, but has not become too light.
Go to the layer window and select the very first layer as shown in the picture below. Then drag the pointer to the name of the layer and wait until context menu. In it, click on the "Merge Visible Layers" item. Hold the Alt button and select all three layers you want to merge with the pointer.
Select the topmost layer (Layer 1). You need to change its display mode to "Multiply". This allows you to darken each line of the sketch, making the sketch more natural.
The lines should not be too dark. If this happens, adjust the Opacity parameter to 50%. It is necessary that the color of the "simple" pencil be preserved.
On this you can finish the job. As a result, we get a black and white sketch of the original photo. If you want to add some color to the sketch, create a copy of the background layer by pressing Ctrl - J.
Now we only need to change the display color options of the duplicated layer. Select the "Color" mode and in the line Transparency set the value to 65%, as shown in the figure above.
The end result of converting an image to a thumbnail will look like this:
Create a drawing from regular photo in Photoshop will take you no more than 10 minutes, even if you are not an advanced user.


, poultry farming")


- Burns, Robert - short biography
- The concept of common vocabulary and vocabulary of limited use
- Nancy Drew: The Captive Curse Walkthrough Nancy Drew Curse of Blackmoore Manor Walkthrough
- Deadpool - Troubleshooting
- Won't start How to Survive?
- What to do if bioshock infinite won't start
- Walkthrough Nancy Drew: Alibi in Ashes
- Spec Ops: The Line - game review, review Spec ops the line crashes on missions
- Room escape level 1 walkthrough
- Processing tomatoes with boric acid How much will 2 grams of boric acid
- Cucumber Grass (Borago)
- Bioinsecticide Lepidocid: purpose, properties and application procedure Lepidocide waiting period
- How to change the language to Russian in steam
- Dendrobium noble: room care
- Morphology of plants general concepts - document
- Planting, propagation and care of bamboo at home, photo Growing bamboo from seeds
- How to strengthen the cellular signal for the Internet in the country
- Sanskrit reveals the forgotten meaning of Russian words (2 photos)
- The oldest language Sanskrit programming language of the future Dead language Sanskrit
- Who has dominion over all the earth?