Connecting the printer to WiFi. Setting up a PIXMA MG3540 wireless connection.
Wireless printing on the printer will help you get rid of unnecessary wires and install the printer in a convenient place. This article will discuss the current ways to connect a printer via wi-fi. with step by step instructions.The easiest way to connect your printer to a Wi-Fi network is to use a router. It must have a set of specific functions that will allow you to create a connection.
First you need to connect the router to the network and configure it so that a wireless network appears in the room. Now you can proceed to the direct configuration of the printer.

Method 1: Connect the printer to a Wi-Fi wireless network using the built-in setup wizard.
The setup wizard will help you connect the printer to a prepared wireless network.
! Things to know before you start setting up:
WPA password or WEP encryption key, which will be the password to the Wi-Fi network itself;
Network name (SSID).
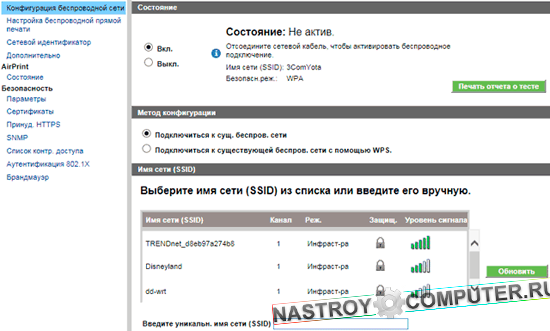
Having previously created a wireless configured network using a router, you need to proceed to work on the printer settings. To do this, go to the menu " Setting” and select the option “ Net". Next, the setup wizard will display information about available networks for connection. Next, you need to choose the name of your created network. If the printer cannot find the required network, then its name must be entered manually, taking into account the case of letters. After selecting the desired network, the printer will ask for a WEP encryption key or WPA password. They are also entered in a case sensitive manner. The print device is connected to the wireless network and you can now send various tasks to print.
Thus, connecting the printer to Wi-Fi will not take long. The connection process takes only a few minutes. The main thing is to prepare for work, having previously found out whether the equipment supports the required technologies and, of course, to have a working and configured wifi network with a pre-known password and name.
Here we give a universal instruction for connecting the printer via a wireless WiFi network.
Considerations for connecting the printer wirelessly
There is a difference in connecting the MFP laser printer with WiFi support and inkjet without support. Also, the connection process will depend on how the wireless network itself is configured.
The easiest way to connect is through a router. Here it is enough to install the software and configure the printer through it. However, not every router is suitable for connecting a printer. In order for a printer to be connected to your router, the router must be designed for WiFi with certain characteristics. So, set up the router to distribute WiFi and connect any device to the router, including the printer.
If there is no router, you can set up a local network and distribution of wifi on a computer or laptop. Only in this case, your printer must have a WiFi connection function.
So, there are 2 ways to connect a printer:
- via WiFi Protected Setup (WPS) -
- using the installation wizard.
Connecting the printer via WiFi Protected Setup (WPS)
You do not need to know the network name and network password to configure in this way. It is necessary that the printer supports connection with a router using WPS technology (look at the instructions). Network encryption - WPA or WPA2 (WPS encryption is not suitable), any modern WiFi router supports this encryption. Make sure that MAC address filtering is disabled on the router.
To connect the printer via WiFi wireless connection using WPS, you need to know the PIN (indicated on the bottom panel of the router, on the bottom). If the printer also has a WPS button, then it must be enabled. Some printers have a "Wireless Network" button, it must also be active.
WPS can be enabled through the printer's control panel. To do this, go to Printer Settings, then "Network", "Wireless". Here we find Wi-Fi Protected Setup. Once we have enabled WPS on the printer, within 2 minutes we need to have time to enable WPS on the router. The connection is established automatically - the corresponding indicator lights up.
Connecting the Printer Using the Setup Wizard
We check that the printer must support WEP and WPA, which means it will be able to connect using this method, that is, using the wireless network setup wizard.
Connection step by step:
- Open the printer control panel, find the "Settings" tab, then "Network". In the list we are looking for our wireless network(at this point it should already be created).
- Next, enter the WEP encryption key or WPA password (important, case is supported). The connection has been made.
Without a doubt, the printer is a very convenient and useful device in the household. But this device is rather bulky, especially in comparison with a miniature netbook or tablet. And tying a mobile PC to a heavy stationary device using a “standard” cable connection is at least irrational.
Therefore, in this article we will take a closer look at how to connect a printer to a laptop via wifi, and also what to do if the printer does not see Wi-Fi.
And first of all, let's focus on the "classics of the genre": how to make wifi out of a regular printer?
After all, you must agree that in order to set up a wireless connection between the printer and a laptop, both devices must support this function.
How to connect a regular printer to a laptop via wifi?
Unfortunately, developers of budget models rarely provide devices with a built-in wifi transmitter, so for ordinary printers, the following methods of remote connection to a computer are used:
1. Installing additional network equipment– a print server that can be used to make the printer a wireless host local network;
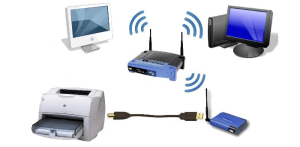
2. Cable connection of the printer to the computer, which has access to a local Wi-Fi network: thus, any Wi-Fi device can communicate with the printer through an "intermediary".
The advantage of this method lies in its cost-effectiveness: you do not have to spend money on additional expensive equipment. However, one cannot do without a second computer, which must constantly work throughout the entire “communication session”.
To set up a printer connection via wifi in this way, you need to:
Connect the printer to the "intermediate" computer using a cable and install the necessary software (driver);
Go to "Start" -> "Control Panel" -> "Printers and Faxes" and share this printer;
Connect printer to laptop via wifi. To do this, on the local network, go to the computer "serving" the printer (see link at the end of the article) , find the shortcut for the shared printer, right-click on it once, and select "Set as default" from the menu.
Now, at the “Print” command, your laptop will automatically print to a printer connected via Wi-Fi.
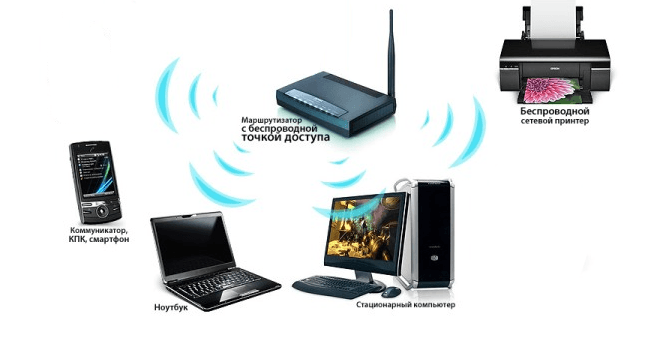
3. Usage wifi router with built-in Print Server function and USB port for external network devices on the hull. To set up such a connection:
Connect the printer to the router with a cable;
Connect to a printer from a laptop via a local wifi network (see link at the end of the article).

However, such difficulties are justified only when the Wi-Fi setup is required on a good old printer, which has long been “accustomed” and almost native. In other cases, it is more logical to immediately purchase a modern wifi printer with a built-in network module and not have to worry about setting up all kinds of additional equipment.
Among the most popular time-tested vendors here are: HP, Canon, Epson, Konica, Panasonic, Samsung, Xerox, Brother and Minolta: such a printer can be easily connected to a laptop, router, tablet, etc.
At the same time, depending on the specific situation, you can create a wireless connection with a laptop in different ways: consider the main options for connecting a printer via wifi in more detail.
How to connect a wifi printer to a computer and laptop?
Of the "classic" ways to connect a wifi printer, we can note:
1. Using an internal LAN between the printer and laptop.
This is possible when a computer connected to a wireless network is capable of distributing wifi on its own.
Here to set up wifi connection printer, you should:
Through the built-in printer interface, connect to the local network of your laptop (see link at the end of the article) .
2. Connecting the printer via wifi router:
- in automatic mode(using WPS technology).
To do this, first, and then using the WPS (QSS) button, connect your printer to home network wifi.
To print via Wi-Fi, it is enough to connect from your laptop to the installed printer via the local network (see link at the end of the article).
- in manual mode: Through the "Setup Wizard" of your printer.
To do this, run "Search for available networks" in the printer's control panel and select the network of your router by SSID. Here you will need to enter a password for Wi-Fi and confirm the connection to the network, after which the corresponding wifi indicator should light up on the printer.
Run the driver installation and select the wifi connection with manual settings, after which the printer will be available for wireless connection over the local network.
The procedure for connecting a printer to a computer is constantly being improved. Previously, printing devices required an LPT port, then they switched to a universal USB interface. Today you can connect your printer via Wi-Fi and not worry about extra wires.
At the same time, the quality or speed of printing will not deteriorate - a wireless connection provides exactly the same capabilities as a standard connection using a cable.
Using the WPS protocol
The easiest way to connect a printer via Wi-Fi is to use the WPS method, which, although not very secure, provides a fairly stable connection. When setting up the printer in this case, neither the network name nor its access code is required.
Terms of Use:
- The printer and router must support WPS technology.
- The wireless network must be secured using WPA or WPA2 (WEP will not work). Since these two encryption standards are recommended and most used, there will be no problems with choosing them.
- Turn off MAC address filtering on your router.
How can I tell if my printing device supports a WPS connection? The most logical way is to look in the specification or on the official website of the manufacturer.
If you have determined that the WPS connection is not an unknown technology for your printing device, then you can proceed with the process of establishing a connection over a wireless network.
To connect via WPS, you will need a PIN code, which can be found on a sticker located on the bottom of the printer. The PIN must be eight digits and be located next to the WPS icon.
The next step is to enable WPS on the router. You can find an item that allows you to carry out this operation in the router interface on the “Wireless” or “Wi-Fi” tab. Use the built-in search to quickly find the item you need. Enable WPS and save the new router configuration.

Some router models have a hardware key, pressing which activates the WPS function. If you have such a router, be sure to click on this button before trying to pair devices. A similar button may be on the printer - you also need to press it. 
If your printing device does not have a hardware WPS enable button, enable this feature using the keypad. An example path looks like this:
Network - Wireless - Wi-Fi Protected Setup.
If the connection is successful, the indicator light on both devices will turn on.
Connection setup wizard
If WPS technology does not suit you, you can use another method, which is to work with the built-in wireless connection setup wizard.
The main condition is that the device for printing must be able to work with the connection setup wizard.
How to define it? If the printer supports WEP or WPA authentication mode, then it will definitely have a built-in tool for quick creation wireless network connections.
What information do you need:
- The encryption key, which is the access code for the wireless network.
- Wireless network name "SSID".
So, you managed to connect the router and set up a wireless network. Now you need to connect the printer to the computer using WiFi connections. To perform this operation, you will have to work a little with the settings of the device for printing.

After completing these simple steps, the printer will be connected to your computer wirelessly. Make sure the connection is correct by sending a document to the printer.
Sometimes the owner of the computer needs to print some papers. Often there are situations in which a person does not have a desktop computer. Therefore, the question of how to connect a printer to a Windows 8 laptop is once asked by every owner of this technology. Depending on the brand n: HP, Canon or other, to connect to a laptop, you need a disk, a USB cable, or wireless connections bluetooth or wifi. In addition to having resources, it is useful for the user to know how to properly install.
How to install a printer on a laptop
For example, the question often arises of how the printer is connected to a laptop based on Windows 7, 8, XP. The operating system for installation is very convenient, you only need a USB cable and included printing equipment. The OS independently starts the process after detecting the device, it takes no more than a few seconds. Another thing is if the laptop does not see the printer. In this case, changes in Windows settings will be required. How to connect a wireless printer to a laptop? Study the instructions and follow them clearly, because many modern devices operate in this mode.
A special disk may be provided for manual installation. The procedure in this case is:
- First, the user opens the start menu.
- Finds the printers and faxes section.
- Enters the installation (top line on the left side of the screen).
- The OS searches for the device and prompts the user to download the correct driver.
- Next, the disk is inserted.
- The menu selects the search for a program on external media.
- Installation takes place automatically.
- After the reboot, the user can start printing.
Via WiFi
There are a few known methods, how to connect wifi printer to laptop:
- manually;
- by installing special program;
- via WPS.

Before you start installing your printer over WiFi, you should find out if it supports the Smart Install feature (usually available on all HP branded devices). First you need a USB adapter to detect printing equipment. Next, in the installation menu, the user selects the connection via WiFi network following the recommendations of the system assistant. After Smart Install automatically completes the process, the cable is disconnected and work continues without it.
How to connect a device via WPS? This is the easiest method, but for its implementation, the printing equipment and router must support the WiFi Protected Setup function. It is launched through the interface of any of the devices, or by pressing the corresponding button. detailed information, as a rule, is in the attached instructions.
Manual installation is more secure than WPS. This will require the name of the network and knowledge of the security password:
- Connect printing equipment.
- Go to device settings.
- Start searching for available networks.
- Choose the one you want and register in it.
Via USB

Upon purchase, you will find a USB cable included with the device. After connecting the printing equipment to the laptop with a cable, operating system will automatically detect it and offer to install the necessary drivers. This function is provided for all types of Windows except the oldest ones, so problems should not arise, and if they do, the OS will offer a solution.
Without disc
Some are concerned about the question, is it possible to connect a printer without a program disk? There are two ways to do this:

- Windows Update - installation of basic programs for copying and printing. Unfortunately, additional options will not be available to you.
- If you want to not just print, but work with color and adjust the design, then it is recommended to download the drivers yourself.
Video: connecting a printer to a laptop
It is much easier to understand the principles of installing printing equipment, what details are needed for this, how to print from a laptop to a printer, after seeing a visual video instruction below. This will help to avoid common mistakes during setup. After viewing, users will not have any questions, and they will be able to get to work.


, poultry farming")


- Burns, Robert - short biography
- The concept of common vocabulary and vocabulary of limited use
- Nancy Drew: The Captive Curse Walkthrough Nancy Drew Curse of Blackmoore Manor Walkthrough
- Deadpool - Troubleshooting
- Won't start How to Survive?
- What to do if bioshock infinite won't start
- Walkthrough Nancy Drew: Alibi in Ashes
- Spec Ops: The Line - game review, review Spec ops the line crashes on missions
- Room escape level 1 walkthrough
- Processing tomatoes with boric acid How much will 2 grams of boric acid
- Cucumber Grass (Borago)
- Bioinsecticide Lepidocid: purpose, properties and application procedure Lepidocide waiting period
- How to change the language to Russian in steam
- Dendrobium noble: room care
- Morphology of plants general concepts - document
- Planting, propagation and care of bamboo at home, photo Growing bamboo from seeds
- How to strengthen the cellular signal for the Internet in the country
- Sanskrit reveals the forgotten meaning of Russian words (2 photos)
- The oldest language Sanskrit programming language of the future Dead language Sanskrit
- Who has dominion over all the earth?