How to create a local network between computers. Setting up a home LAN in Windows 7
This article will help you quickly answer your questions. Also, you can study the material in full to get a complete understanding of the network setup in Windows 7.
Introduction.
Purchasing an operating system Windows 7, the user must be prepared for the fact that sooner or later he will face the task of setting up the network in the operating system. For some, this task is not difficult. Typically, installing and configuring a network in Windows 7 is the next step immediately after installing Windows 7 ( If you haven't installed Windows 7 yet and aren't quite sure what steps to take, then you should read this section: Installing Windows 7).
The network setup step is required for the following post-installation steps:
- downloading actual distributions of anti-virus programs from the Internet;
- downloading the latest versions of the video player, web browser;
- if necessary, downloading from the network drivers for some devices on your computer (if they were not downloaded and installed automatically, or if there are no installation disks);
- use of the XBOX console;
- document exchange and quick access to shared resources of multiple computers or laptops. In this case, you need to set up a wired or wireless network in order to use the Internet. As a rule, one computer or laptop serves as a kind of Internet distributor for all other pieces of computer equipment..
The same is true for MAC addresses and subnet masks. All these settings remain the same, they are familiar to users for a long time. Some changes have only affected the interface of the Control Panel and its items, with the help of which the network settings are accessed. Everything else without significant changes. This is another undoubted plus of Windows 7. Users who have previously used Windows XP will be able to understand the new operating system quite easily. As a rule, setting up a local network in such popular operating systems as Windows Vista, Windows 7, Windows Server 2008/2008 R2 begins with such a component for configuring network properties as "".
This property configuration tool allows the user to select a network location, set up printer and file sharing, and view a network map. You can also monitor the status of all your network connections. It is very convenient and practical.
How and where to open the Network and Sharing Center component.
Before you can use the full functionality to create network settings, you need to find and open it. One of the following actions of your choice will correctly open the active window " Network and Sharing Center»:
As you can see, if you are careful and read everything, then with the search for the “Network and Sharing Center” component, there should not be any problems. It should be noted that in order to expand the ranges of IP addresses used in Windows 7, in addition to the pre-existing IPv4 protocol, a new one was added - IPv6. True, providers have not yet activated it, and when this will happen is currently unknown. Most likely, the creators of Windows 7 played ahead of the curve.  Figure 1. The illustration shows the Network and Sharing Center window.
What is the network location of the computer.
Understand what is network location”, you need even before you start working with this important component. For all computers, this setting is set automatically the first time they connect to the selected network. This also applies to the firewall and security settings of the network selected for connection. All of them are also configured automatically during the first connection of a computer or laptop to the network.
The Windows 7 operating system supports multiple active profiles at the same time. This allows for the most secure use of multiple network adapters that can be connected to different networks.
By the way, Windows Vista uses the most restrictive firewall profile for all network connections. Perhaps that's why Vista isn't as popular as Windows 7.
There are four main types of network location:
| The first type is the home network. From the very name it becomes clear that this network location is intended for a computer that is used at home. It is also used in networks where all users know each other well. Such computers can not only create, but also join home groups. As a rule, for the convenience of users when using home networks, network discovery is turned on automatically. Home networks provide all computers with quality network access. | |
| The second type is a network of an enterprise or organization. This type of network location also allows you to find the network automatically. The difference from a home network is that in an enterprise network, you cannot join or create a computer to a homegroup. The network is intended exclusively for professional activities in an enterprise, organization or office. This type is called abbreviated (SOHO), that is, it is used in a small office network. | |
| The third type is the public network. Cafes, airports, train stations and other public places - this is where computers use the third type of network location. By default, the ability to join homegroups is disabled in this location. Network discovery is also disabled. Without exaggeration, we can say that this is the most strict arrangement. | |
| The fourth type is a domain network. The domain type of the network location is almost no different from the working network. Except that in the domain type, the network discovery and Windows firewall configuration is determined by group policy. This also applies to the network card. In order for an existing network to automatically receive a network location type of "Domain", the computer only needs to be joined to an Active Directory domain. Only in this case the network can become a domain network. |
 Figure 2. Selecting the network location of the computer.
Network map.
In order to see the location of all devices included in a particular local network, a network map is used. This is a graphical representation of the devices included in the network and the scheme by which they are connected to each other.
You can see the network map all in the same "Network and Sharing Center" window. True, only the local part of the network card is displayed here. Its layout is directly dependent on the available network connections. In the upper left corner, you can see the display of the computer on which the map is being created. On the left you can see the display of the remaining computers included in the subnet.
 Figure 3. An example of a network map.
You can view the network map at any time. True, only for locations such as "Home Network" and "Company Network". If the user is curious to view the maps for the "Domain Network" or "Public Network" locations, they will see a message that the network message has been disabled by default by the administrator. A network administrator can enable mapping through Group Policy.
In Windows 7, not one, but two components are responsible for the operation of the network map. it Link layer(Link Layer Topology Discover Mapper - LLTD Mapper). It is this important component that queries the network for devices to be included in the map.
Network connections.
In the window " Network connections"You can see the entire set of data that the user needs to connect the computer to the Internet, local network or any other computer from the home network.
This data is available for viewing only after installing all the necessary drivers for each network adapter on Windows 7 and after automatically configuring all network connections on a specific local computer or laptop.
There are several simple and affordable ways with which you can easily and quickly open the " Network connections»:
- Opening the window " Network and Sharing Center"and follow the link" Change adapter settings» (see figure 4);
 Network and Sharing Center""." href="/upload/nastroika-windows-7/windows-7-nastroika-seti-img-7.png">
Figure 4. Opening the window " Network connections" through " Network and Sharing Center».
Network and Sharing Center""." href="/upload/nastroika-windows-7/windows-7-nastroika-seti-img-7.png">
Figure 4. Opening the window " Network connections" through " Network and Sharing Center».
- Click the "Start" button and when the menu opens, enter "View Network Connections" in the search field. In the results found, select the application "View Network Connections" ( very convenient way);
- You can also use the classic keyboard shortcut Win+R. This will open the Run dialog. In the "Open" field, which is located in the "Run" dialog box, you must enter the following command: ncpa.cpl or control network connection. Having done this, you need to click the "OK" button.
 Figure 5. Network Connections window
Window " Network and Sharing Center” similar to the Windows XP window. All detailed information about the network connection can be obtained by selecting the "Properties" option for a specific network adapter (see Figure 6). In Windows 7, to configure the network connection in the "Properties" window, you need to select "Internet Protocol Version 4". In the same window, you can also make the necessary settings for gateways, subnet masks, DNS servers, IP addresses, etc. All this information can be obtained from the provider that provides the Internet access service.
 Figure 6. Network connection details.
Rename the network adapter.
The developers of Windows 7 made sure that by default the operating system itself names all network connections "Local Area Connection" or another option - "Wireless Network Connection". If a user's computer has more than one network connection, the system also assigns a number to the connection. There are three ways to rename the name of any of the connections you have created.
- First way. Select a network connection and click on the "Rename connection" button located on the toolbar. After entering a new name, press the key Enter;
- The second way. With key F2: press, enter a new name and save using the same key Enter;
- The third way. To rename the network connection selected from the list, right-click on it, select the “Rename” command from the context menu that appears, rename and save the changes using the already familiar key Enter;
Network status.
In addition to the ability to rename the connection, you can also check the status of the network in this window. Using this window, which is called “Network Status”, at any time you can not only view any data about the connection network, but also find out details such as MAC address, IP address and many other useful and interesting information.
There are providers that allow users to access the Internet using the MAC address of the network card. If for some reason the network card has been changed or the entire computer has been replaced, the MAC address will also change, and Internet access will stop. For a new Internet connection, you must set the required physical address (MAC address).
How to see the MAC address of a network card in windows 7?
To view the current MAC address, as well as complete information about the connection, you need to right-click on the local network connection, and then select the “Status” item in the context menu that opens (see Figure 7). Figure 8. How to change the MAC address of the network card (network adapter).
Network diagnostics.
If you encounter a situation where unexpected errors or failures occur in the operation of your network connection, you can resolve them using connection diagnostics. The diagnostic tool can be found in the Network Connections window.
Select window " Troubleshooting”, which, by analyzing the connection status, offers a choice of possible malfunctions and troubleshooting methods. To start diagnostics, you need to right-click on the network connection and select the "Diagnostics" command in the context menu.
 Figure 9. Opening the Local Area Connection Troubleshooter.
The second way to start checking the network connection parameters is to select the desired network and click on the "Connection Diagnostics" button. The button can be seen on the toolbar.
In the dialog box that opens, to diagnose the connection, just follow the steps of the troubleshooting wizard. Nothing complicated.
Disabling the network device (network adapter).
Sometimes there are situations when network connection problems are not solved using the troubleshooting wizard, but by simply disconnecting the network adapter from the computer. This can easily be done by doing one of the following:
- Select a network connection and click on the "Disconnect network device" button located on the toolbar;
- Right-click on the network connection and select the "Disable" command in the context menu that appears;
Conclusion.
The article details how to configure, connect and diagnose network connections.
If you have any doubts about your own ability to configure and connect the network, then it is better to seek help from specialists, or read the article carefully again.
Today, there is an Internet connection in almost every home. Some people are limited to one computer. Others buy routers and create a home local area network for several devices (including smartphones). In any case, in order to do everything right, you need to know how to properly configure a local network in Windows 7. This is the topic that is discussed in this article.
Network and Sharing Center
This menu is the heart of all network connection settings in Windows. Set up a local network, change the IP address, find out the MAC address of your network card, create a new PPPoE connection - all this can be done here. Of course, all actions can be performed through the Windows command line, but for most users this method will be very inconvenient.
To bring up the "Control Center" in Windows 7, you can go several ways:

Connecting to new network equipment
Let's say you've connected to an ISP and bought yourself a new router. The configuration of the router itself is not considered in this article - there is too much variety. When the device is fully configured and ready to work, you need to connect your personal computer to it.
You connect the router and PC with a patch cord, and the network connection icon in the Windows tray changes its appearance. This means that everything is fine with the network card and cable. If your router is in DHCP mode, i.e. independently assigns IP addresses to new devices - most likely, you will not need any additional settings.
The operating system will ask you to select the connection type: "Public", "Home" or "Work" networks. For the average Windows user, this step does not matter. Select, for example, home and click "Ok". Try to go online - if everything worked, you don't need to do anything else. 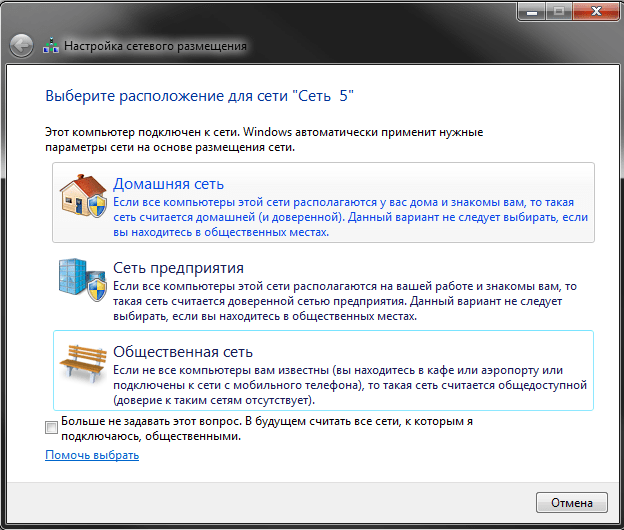
If not, you need to configure the adapter, which is discussed below.
Note! If you don't have a router and you connect a cable from your ISP to your computer, it probably won't work for you. Modern providers rarely use DHCP technology, preferring PPPoE or Static IP. In this case, follow the further instructions.
Configuring adapter options
This section of the manual is intended for those users who need to configure the properties of the adapter (network card). If, according to the agreement with the provider, you need to assign a specific IP or mask, specify a specific gateway, follow the instructions. If the contract specifies a login and password for connection, skip this step and go to the section on PPPoE.

New home connection
If you are connecting directly to the ISP with a cable, bypassing the router, you will most likely need to do the following.
A local area network is a collection of computers connected to the same network (subnet). First of all, members of the local network can exchange data (often movies, games, music, books, and other textual information, computer programs, etc.) at a fairly high speed, which is much more convenient than downloading all of the above directly from the Internet.
1. Wired network
2. Wireless network (wi-fi)
3. Wi-fi network through a router
4. Network Bridge
5. Share Resources
wired network
Let's connect two computers together. To do this, we need a twisted-pair cable of 4 or 8-core (differ in speed), which must be crimped with 8p8c connectors (erroneously called rj-45). There are two crimp types for this cable: Type A and B:
Which one to use is up to you. But this is nonsense in principle, you can connect everything in series and it will work.
We connect different ends to the network cards of computers. Next, we determine in which subnet we will work. It just so happened that for local networks it is customary to use networks: 10.0.0.0 or 192.168.0.0, and also 127.0.0.0
Let's choose the subnet 192.168.0.0
The range is 192.168.0.0 - 192.168.0.255 (that is, computers can be assigned any of the 254 addresses).
192.168.0.0 is the subnet and 192.168.0.255 is the broadcast address of that network.
In properties LAN connections we assign addresses, for example, to the first computer: 192.168.0.1, and to the second 192.168.0.2. Subnet mask for both computers 255.255.255.0 Path to settings: Control Panel\Network and Internet\Network and Sharing Center, Change adapter settings.

Everything, computers are connected, they should be displayed in a network environment. If you just want to play with each other over the network, then this will probably be enough.
Wireless LAN (wi-fi)
In this case, you will need to create an access point on any computer and connect all computers to this access point. If in Windows 7 it was possible to create an access point from under the system, then in Windows 8, through the command line or third-party programs.
Press Win+X and open command prompt as administrator and enter the command: netsh wlan show drivers

If there is an entry Hosted network support: yes, so let's continue.
The following command creates a wi-fi access point: netsh wlan set hostednetwork mode=allow ssid=NETWORK key=PASSWORD Replace NETWORK and PASSWORD with your data (in Latin letters). The following command starts the network: netsh wlan start hostednetwork

Next, a virtual adapter is created in network connections, in properties tab access tick Allow other users to use this connection. And select from the list the connection through which you have Internet access.

But it’s better not to be foolish and download the Connectify-me program with an easy step-by-step creation of an access point and network connection.
Local network via wi-fi router
Everything is simple here. Connect to the router's wireless network. But so that computers can interact with each other, read paragraph 5.
And now, when you are already online, it is sometimes useful to know which addresses the router has allocated to you. You can look in the router settings, but it shows the MAC address of the network card and what ip address it gave it. Or look in the connection details which address is allocated to you. Right-click on the wireless connection and select State. And then as in the picture.

The physical address is the MAC address of the network card.
So why should he know. The fact is that some games force you to explicitly indicate the ip-address of the opponent's computer, you need to register it in order to connect. And if you have several gamers, how will everyone know who to connect to. I repeat this for those games where just addresses are used. In other cases, rather the letter name will be used and there will be no problems.
Network Bridge
A network bridge is a repeater through which you can connect another computer, thereby giving it access to this network or the Internet. A network bridge requires two network cards or a wi-fi adapter and a network card.
For example, I often use the second scheme. My flatmate and I use one Internet for two. He has a cable, we chip off and pay once a month for the Internet. He has a Wi-Fi router. Naturally, I can only connect via wi-fi. And when they bring me a computer for repair or install some programs, I almost always use the Internet. To do this, I combine a wireless connection with a LAN connection into a network bridge. We go into the parameters of the adapters, select our connections, press the right mouse button and select the item network bridge.

We are creating a new connection network bridge. With one cable I connect my network port with the port of the brought computer. Internet works automatically.

Opening shared access to resources
Remembering the communal times when there was no mass Internet yet and everything that was mined (music, films, software) turned out to be the property of our local network. Everyone rushed to download everything from each other and enjoy watching movies or new music. Well, in order to be able to share files, you need to enable sharing of folders that you want to make public on the network.
First, change the advanced sharing options.

Then select the folder you want to share, select Properties, tab General access, in the drop-down list of the new window, select the option All and press the button Add.

In today's world, local area networks have become more than just necessary - they are actually necessary to achieve a good level of productivity. However, before you start using such a network, you should create and configure it. Both of these processes are quite difficult and require maximum concentration, especially the first of them. A poorly designed and configured LAN will not work at all, or it will not function at all as it should, so creating a local network should be the focus of the person doing it.
What is a local network
As a rule, the creation of such communication systems is caused by the need to share data by users who work on remote computers. A LAN not only enables near-instantaneous exchange of information and simultaneous file sharing, but also allows remote use of network printers and other devices.
A local network is a complete set of software and hardware resources aimed at creating a single information space. In fact, this is a number of computers located at a distance from each other and connected by a communication line - a cable. The main difference between a LAN and other types of networks is the short distance at which workstations are located.
Pre-project preparation and design
Before you create a local network, you must first design it, that is, plan the process of its creation. This stage is one of the most significant, since the LAN includes a huge number of components and nodes.
Initially, the terms of reference are drawn up on the basis of primary data, defining several points:
- Functions and tasks of the LAN.
- Selected topology.
- List of available equipment.
Once you have these points in mind, you can start designing. The project itself should contain LAN schemes, network equipment placement points, a list of required software and hardware.

A local area network is a complex mechanism, but if it is designed correctly and the equipment is selected in accordance with the requirements, then the likelihood of problems in the operation of the communication mechanism becomes minimal.
Required Hardware
There is a list of equipment without which no LAN can function. It includes:
- Data lines. The most commonly used coaxial cable and optical fiber. In this case, the length of the coaxial cannot exceed several hundred meters, however, if it is necessary to extend the network over long distances, special repeaters are used - signal repeaters that do not allow it to fade.
- Communication equipment: network cards (devices that perform duplex exchange of information between a computer and a data transmission medium), hubs (break the network into separate segments, structuring the network physically), routers (take on the choice of the packet transmission route), switches (logically divide the LAN into segments, combining several physical circuits), repeaters (provide signal recovery, allowing you to increase the length of the transmission medium), transceivers (amplify the signal and convert it to other forms, allowing you to use different data transmission media).
List of software
No LAN is complete without software. Required LAN programs include:
- Operating systems of work nodes. The most commonly used operating system remains Windows 7, although Windows XP is also not losing ground.
- Network operating systems installed on servers are the basis of the LAN, since it is impossible to set up a local network without them. It is these software tools that take control of all data flows between the main and secondary nodes, providing the possibility of collective access to network resources. As a rule, the operating systems of Microsoft Corporation are used: Windows Server 2003 or 2008.

- Network services and applications that allow users to access remote files, print documents to a network printer, view networked work sites, and send email messages. The implementation of such services is carried out using software.
Creation and installation of a LAN
Installation and commissioning work takes the most time, since it is necessary to create a local network in several stages:
- Before starting the installation of communication lines and switching devices, you must first prepare the room.
- Next, you can lay the cable, as well as install the necessary equipment.
- Devices of the server and workstations should be connected to the cable communication line.
- After that, the software is installed and configured.
Installation of cable and equipment has a number of features, therefore, if there are difficulties with how to connect a local network, it is better to entrust this issue to specialists.
Joining two computers in a LAN
In some cases, it may be necessary to combine two computers into one network, for example, to create a common information space. This is not very difficult to do if you follow a certain algorithm of actions:
- If necessary, install network adapters in both computers, not forgetting the drivers.

- Purchase a crimped network cable for connection. If you have the necessary knowledge and skills, crimping can be done on your own - the local network of two computers will not become worse quality from this.
- Connect both workstations with a communication line.
- Set up the LAN in a specific order.
Algorithm for setting up a local network between two computers for Windows 7
- Select the "Start" menu, then, by right-clicking on the "Computer" icon, enter the "Properties" submenu.
- You need to find in the list "Computer name and domain", and then select the item with the settings change.
- The working name of the computer must be changed by clicking on the appropriate icons.
- The group name should remain unchanged - "Workgroup", but the computer names are changed to "pc1" and "pc2" for the first and second subscriber, respectively.
- You can now click OK and restart your computer.

In most cases, you may want to give each host a unique IP address:
- From the Start menu, select Settings and then Network Connections.
- Right-click to open the "Properties" submenu next to the "Local Area Connection" icon.
- In the "General" tab, select "Properties" of the item "Internet Protocol".
- Make the line "Use the following IP address" active and enter the value 192.168.0.100. After that, save the changes made.
Local network and Internet
Work nodes connected in a LAN can be connected to the Internet. A local network, to which the Internet can be connected in two ways, will work at a speed divided in two.
The first way to connect is to use a router, which is assigned an identifying IP address. And in the second case, you can use a wireless connection.
In this case, the local network is the interaction of two computers, master and slave, so the IP address is written in the gateway of the main one, previously connected to the worldwide network.

If the LAN is based on the use of a server, each workstation must have an individual IP address, and a proxy server is specified in the browser settings through which the Internet is accessed.
Wireless LAN
A wireless local area network is a type of LAN that uses high-frequency radio waves to transmit information. WLAN is an excellent alternative to the conventional cable communication system, having a number of advantages:
- Improving labor productivity. WLAN makes it possible to use the Internet without being tied to one room. You can freely change your location without losing your internet connection.
- Easy installation and configuration, financial savings and reliability - all these factors are due to the absence of a cable communication line.
- Flexibility. Installing a wireless network is real where there is no way to stretch the cable.
- Possibility of expansion. Network scalability is greatly simplified with wireless network adapters that can be installed on any work node.
WLAN has a certain range, which depends on the characteristics of the network devices and the noise immunity of the building. As a rule, the range of radio waves reaches 160 m.
Necessary equipment for creating a wireless LAN
An access point is used to connect other workstations to the network. This device is equipped with a special antenna that controls duplex data transmission (sending and transmitting) using radio signals. Such a point can transmit a signal at a distance of up to 100 m indoors and up to 50 km in an open area.

Access points significantly expand the computing power of the entire communication system, allowing users to freely move between each of them without losing connection to the LAN or the Internet. In fact, these radio points act as hubs, providing a connection to the network.
Using access points allows you to scale up your entire wireless LAN by simply adding new devices. The number of subscribers that one radio point can withstand generally depends on the network load, since the traffic is divided equally between each of the users.
Wireless LAN: Windows 7 Setup Flow
First, you need to prepare an ADSL modem with WiFi technology, as well as client points with wireless adapters connected to them. After that, you can start building a wireless LAN:
- Connect the modem to the electrical network.
- Run the WLAN setup wizard on the client device.
- Select the SSID from the list of found wireless networks.
Access point setup:
- The first step is to configure the TCP/IP protocol properties by specifying the IP address and subnet mask.
- After that, specify the value of the DNS server, since it is not possible to fully configure the local network without this parameter. In most cases, it is enough to make the automatic assignment of the DNS address active.
- It is also mandatory to configure the parameters of the wireless network itself, in which security is important.
- At this stage, you need to configure the Internet connection and filtering for the Windows 7 firewall.
- And lastly, the wires are connected and the WLAN network is tested.
To create an optimal information space, you can combine types of networks - cable and wireless, allowing you to use the advantages of each of them for the benefit of the enterprise. However, it is important to remember that in our time, it is WLANs that are increasingly being used, which have all the advantages of cable networks and are devoid of their disadvantages.
After completing the creation and configuration of the local network, it is important to provide for its administration and the possibility of maintenance. Even if the LAN installation is perfect, during its operation various hardware or software malfunctions are almost inevitable, which is why maintenance should be regular.


, poultry farming")


- Burns, Robert - short biography
- The concept of common vocabulary and vocabulary of limited use
- Nancy Drew: The Captive Curse Walkthrough Nancy Drew Curse of Blackmoore Manor Walkthrough
- Deadpool - Troubleshooting
- Won't start How to Survive?
- What to do if bioshock infinite won't start
- Walkthrough Nancy Drew: Alibi in Ashes
- Spec Ops: The Line - game review, review Spec ops the line crashes on missions
- Room escape level 1 walkthrough
- Processing tomatoes with boric acid How much will 2 grams of boric acid
- Cucumber Grass (Borago)
- Bioinsecticide Lepidocid: purpose, properties and application procedure Lepidocide waiting period
- How to change the language to Russian in steam
- Dendrobium noble: room care
- Morphology of plants general concepts - document
- Planting, propagation and care of bamboo at home, photo Growing bamboo from seeds
- How to strengthen the cellular signal for the Internet in the country
- Sanskrit reveals the forgotten meaning of Russian words (2 photos)
- The oldest language Sanskrit programming language of the future Dead language Sanskrit
- Who has dominion over all the earth?