LAN connection only. Network settings
If you are faced with the need creating a home LAN or network for a small office, but do not have sufficient skills and knowledge for this, then this material is for you. You will need to follow only 5 steps, after which you will learn how to set up a local network for home and small office.
This material is compiled in the form of step-by-step instructions with illustrations. All you have to do is follow these instructions.
We will look at 5 steps to build a local network in the office or at home.
Step 1. Network equipment needed to build a local network.
To build a local network between computers, we need to have:
- Switch(switch) or router(router);
- twisted pair cable(patch cord);
- The presence of a network card on each computer(now each computer is equipped with a built-in network card);
Switch (switch) D-Link DES-1008A
 |  |
| Front view | Back view |
twisted pair cable

network card(On the right side of the figure, the built-in NIC is shown)
 |  |
Now it remains to connect all the computers to the switch or router using a twisted pair cable.
We connect one end of the cable (twisted pair) to the computer's network card, and the other to the switch (switch) or router (router).
And so with all computers that will be connected to the local network.

Scheme of connecting computers in a local network

Step 2Setting up the IP address, Computer name and Workgroup
We go to the menu Start > Control Panel > Network Connections, right click on the icon LAN connection, then press Properties. In the list of components select Internet Protocol (TCP/IP) and click the button below Properties.
 |  |
In the window Properties: Internet Protocol (TCP/IP) put a tick Use the following IP address and enter the following data:
IP address: 192.168.1.2
Subnet mask: 255.255.255.0
It is advisable not to use IP addresses 192.168.1.1 and 192.168.0.1, as it is used by network devices
For those who use a router (router) to access the Internet in building a local network, you need to specify "Main gate" and "DNS Server Addresses"(usually this is the IP address of the router itself). To ensure the operation of the Internet.
Who uses a router (router) with enabled DHCP server may not register IP addresses, you need to check the box "Obtain an IP address automatically". The IP addresses will be assigned by the DHCP server.
After entering the "IP address" and "Subnet mask", click on the button OK, then close.
NOTE: The IP address of each computer must be different from the other computer! If the first computer has an IP address 192.168.1.2 , then the second must have 192.168.1.3 etc., but no more 254 .
Computer Name and Workgroup
Now we need to specify Computer name and working group. To do this, double-click on the icon in the Control Panel. System, go to the tab Computer name and press the button Change.
In line Computer name change the computer name if necessary. Each computer on the local network must have a unique name, i.e. should not be repeated. In my case, the name of the first computer comp-1, the next computer will be comp-2, comp-3, comp-4 etc. You also need to specify the Working Group, in my case HOME.
All computers in your local network must have the same Workgroup!

After you have specified the computer name and workgroup, click OK. You will be prompted to restart your computer for the changes to take effect. We agree and restart the computer. This procedure must be done with all computers on the local network.
The settings of the local network of computers should look like this:
| First computer | Second computer | Third computer |
| IP address: 192.168.1.2
Subnet mask: 255.255.255.0 Computer name: comp-1 Working group: HOME | IP address: 192.168.1.3
Subnet mask: 255.255.255.0 Computer name: comp-2 Working group: HOME | IP address: 192.168.1.4
Subnet mask: 255.255.255.0 Computer name: comp-3 Working group: HOME |
Now you can view the computers on your local network. To do this, double click on the icon. network environment on the Desktop, then on the left in the navigation bar, click Show workgroup computers. The computers on the local network that are members of your workgroup will be displayed on the right.

Step 3. Setting permissions and security
Computers on the local network are visible, but there is no access to them yet. If you double-click on any of the computers on the local network, a window will open Connecting to comp-n (n- computer number) with a prompt to enter Username and password.

This is because the account is disabled on the computers Guest and permissions are not configured. It remains to configure access rights and enable the guest account.
To enable the guest account, go to Start - Control Panel - User Accounts. Click on account below Guest, then press Enable "Guest" account.


It remains to configure the access rights to the computer from the local network.
We go Start > Control Panel > Administrative Tools > Local Security Policy. In the left menu open Local Policies > User Rights Assignment

Then in the right window, double click on the policy Denied access to a computer from the network and delete account Guest. That's all. If now open network environment and double click on any computer, you can view the shares of that computer.
Step 4: Set up folder and file sharing
Our local network is working, it remains to share the necessary files and folders for general use from the local network.
To do this, right-click on the desired folder (in my case, the Agreement folder) and select Sharing and security


After that, the current folder and its contents will become available to everyone on the local network. The figure below shows that the folder "Contracts" on the computer comp-1 became available.

Thus, you can share folders on any computer.
Step 5: Share a local printer
We have come to the last step. It remains to provide Printer Sharing connected to one of the computers (in my case comp-1).
Sharing a Printer will give you the opportunity to print from all computers on the local network to one printer.
In order to open Shared access to a local printer, go to the menu Start - Control Panel - Printers and Faxes, right-click on our printer, select from the context menu General access.

In the window that opens, check the box Sharing this printer and click OK. You can also enter printer network name, or leave the default.

Now this printer can be connected to any computer on the local network. Which we will do.
We go to network environment, double-click on the computer to which the printer is connected (in my case comp-1), then right-click on the printer and select To plug.

In the next window, where we are warned that drivers will be automatically installed on our computer, click Yes.
The same must be done with all computers on the local network to which you want to connect the printer.
Our printer is ready to go and you can print from the local network.
On this basic LAN setup finished. Now you can exchange files on the local network, use one shared printer.
Creating a local network at home is not a whim, but a necessity if you use two or more computers. The main task of such a network is to connect PCs and create an opportunity for the user to conveniently use the resources of each of them, and not switch between computers. In this article, we will look at how to set up a LAN connection between computers.
For example, two devices will be used: a desktop computer based on Windows 7 and a laptop based on Windows 10. The list of instructions that will be in the article can also be used on other Windows operating systems (8, 8.1).
Methods for connecting computers over a local network
Today, you can connect via a local network through a router or directly. The first method is gaining popularity, and the second is already a relic of the past, although the time period has not passed so much. Consider schematically how the connection takes place.
To begin with, consider the first scheme "directly". It only works when computers are connected to each other. Data transfer occurs only in one direction, i.e. either from the first PC to the second, or vice versa. At the same time, if the Internet is supplied to one computer, then it can be configured to be supplied to the second one, but this is already inconvenient, because. routers appeared.
Desktop computers are connected to the router, and mobile devices can receive data from the router or transfer them to it using a wireless network. Thus, using a router (usually they are immediately with a Wi-Fi access point), you can connect all devices in the house to one network and use the Internet from one access point, without interfering with each other at all.
We will now configure the local network according to the principle “through a router”, because it is more convenient, more practical and more modern, and also not very difficult even for a novice user. How to set up your router? Use the instructions from the manufacturer's website, now they are written very clearly and accessible. When you have configured the router, proceed to configure the local network.
Please note that if you have been using the Internet via a modem for a long time, your desktop computer is connected to it, and the router is connected to the modem, you do not need to make additional settings. It is only important that a laptop or other PC is connected to the router using a Wi-Fi wireless network. Let's start setting up the network.
Setting up a local network on a desktop computer (#1)
To start using the local network, you must follow the instructions below:
- We go "Start" - Control Panel - Network and Sharing Center ";
- Next, on the left side of the screen, select "Change advanced options...";

- In this window, you need to check the boxes next to the items:
"Turn on network discovery"
"Turn on file and printer sharing"
"Turn on sharing so network users can..."
"Use 128-bit encryption..."
"Turn on password protected sharing"
"Let Windows manage homegroup connections"

- Click "Save Changes"(it is important that you are logged in with "Administrator" rights);
- At this step, you need to join a homegroup, but we will create it on a laptop, so scroll through the article to the point, and then return here;
- When the password is received, you need to enter it in the required window. To do this, go to "Conductor", and then "Home group";
- Click "Join", put a checkmark in front of all the components for which shared access is provided and enter the password that was generated earlier (you should have written it down on a sheet);

- The password will be checked and the connection will begin. Here you need to wait until everything is set up as it should;

- When the join is completed, you will receive a message as in the window below, and if you repeat step 6, you will see the message "This computer is joined to a homegroup."


Setting up a local network on a laptop (#2)
First of all, you need to do the same steps as on computer No. 1, namely points 1-4. Since we have Windows 10, in order to enter the "Control Panel", you must enter the "Search" and enter this request. After that, everything is done in the same way as with the first PC.
Now let's move on to creating a "Homegroup" and further setting up the network:
Now, in order to make sure that everything works as it should, it is necessary to check the performance of the local network we created, which we will now do in the next part of the article.
Network health check
The main task of the local network, as we have already said, is the sharing of resources. Most often, such resources are faxes, scanners, printers, etc., as well as the files themselves on different PCs. We will not test the operation of the printer from different PCs, but this function should definitely become available after the above conditions are met.
Let's check the health of the network using file transfer. To do this, let's create a shared folder on the laptop. Go to "Conductor" and then in "Net":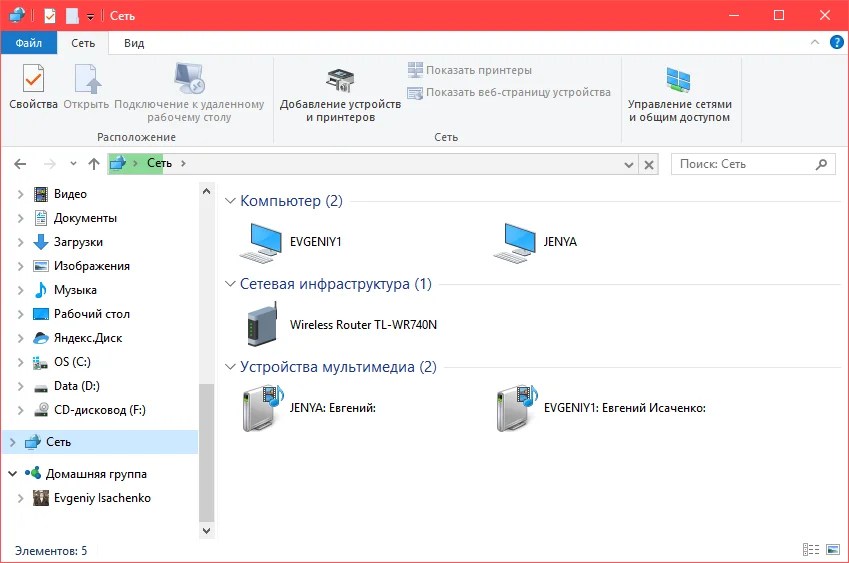
The computer named "Jenya" is our laptop, and the second computer "Evgeniy1" is a stationary one. With this we checked that the computers are really on the same network. Now go to the Local Disk D and select a folder for public access, let it be, for example, "Synopsis". Select it, press RMB, and then "Properties":
Therefore, you need to press "Access", and then "General access". In the list of users, select the one who logs in to the system on computer No. 1 under such and such a login. After that, you will receive a message that the folder is shared: 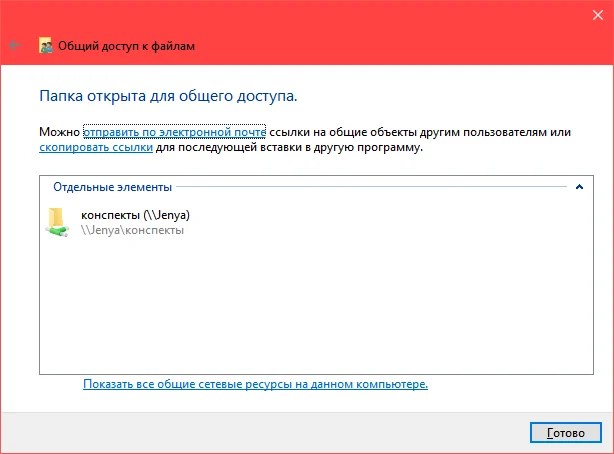
Now we press again "Ready". On computer number 1, enter "My Computer" - "Network", and then select our computer "Jenya". Now in the list of folders our "Abstract" folder has become available. It is important not to immediately go into this folder and check if everything has been transferred - you need to wait about a minute after you closed the "Properties" window for the changes to take effect.
Windows 10 users sometimes get error 651 and the like when connecting. They are called "internet connection errors". This is due to the appearance of a software or hardware network failure.
Despite the growing popularity of mobile-optimized Windows 8 and Windows 10, the good old “xspice” still enjoys the trust of users. Accordingly, the question “how to create a local network connection on Windows XP” is still relevant for lovers of simple and understandable “classics”. Therefore, here we will look at how to set up a local network between windows xp and windows xp when connecting computers via cable.
How to connect a local network on windows xp?
To set up a local network on windows xp, you first need to connect the computers using a network cable.

connecting a network cable to a PC network card
A direct connection over a Windows XP local area network is created in the settings of each networked computer.
The cornerstone of most do-it-yourself local area networks is the incorrect connection of computers over twisted pair. Check that the cable is not “crushed” by the sofa or broken by the interior door, otherwise, or may occur.
How to set up a network connection in windows xp?
To create a LAN connection:
1. Go to your Windows XP section "Network Neighborhood";

2. In the left part of the menu, from the list of possible tasks, select the "Show network connections" sub-item.
 This will allow you to determine the networks that are currently in use or simply disabled.
3. Select the local area connection shortcut here, right-click on it and select the "Properties" menu item.

4. In the "General" tab at the end of the list is the column "Internet Protocol TCP / IP" - double-click on this line to enter the menu for adjusting the IP address parameters.
Enter the following parameters here: 
If the LAN connection shortcut is inactive, then right-click on it and enable the network connection.
This completes the windows xp windows xp local network setup on the first computer.
5. On the second and subsequent computers (when creating a network connection through a switch), the network card is configured in the same way.

Please note that the IP address of each network computer must be unique. So, if you set 192.168.1.1 on the first PC, then on the second one you can enter, for example, 192.168.1.2.
The correctness of the windows xp network connection settings can be checked using the Ping utility launched on the command line, as we described in the article: ""

This parameter is adjusted through the "Control Panel" in the "System" tab. Next, go to the "Computer Name" column and set the desired value. Each computer must have a serial name: for example, comp 1, comp 2, comp 3, etc. Do not forget to title the name of the entire functioning working group - this will be required for the smooth exchange of information between the functional nodes.
By networking two computers, users can exchange information without the use of external devices. Transferring data over a local network is more convenient and faster than exchanging via e-mail or, for example, a flash drive. The network between two computers or between a computer and a laptop is created in the same way.
Consider the hardware part of creating the simplest peer-to-peer local network. Two computers equipped with a network card (network adapter, Ethernet adapter, network card) are enough for it. This device is necessary for communication - signal transmission between devices on the network. The desired controller may be built into the motherboard. You will find its output above one of the USB ports. Check for an updated driver. Communication lines for connecting computers in a network can be: wired, cable, radio channels. The most common and easiest way is to use a copper conductor. A more expensive conductor is fiber optic cable. Copper network cables come in various degrees of protection. To increase noise immunity, the wires are wrapped with foil, which serves as a reflective screen. You can find a suitable network cable at an office supply store. To create a local area network between two home computers, an unshielded twisted pair cable is sufficient. Four-pair CAT5 cable is the most commonly used. Take a cable no longer than 100 m, crimping its ends with an RJ45 connector with special pliers - crimpers. Now it connects to the device without soldering and welding. If the LED on the controller is on or blinking, then the cable is connected properly. You can buy a ready-made, already “compressed” cable. Now it remains to configure computers to exchange information over a local network, register their IP addresses, and open access to certain files and folders. In the "Control Panel" go to the "Network Connections" section. There may be several of them, look for "Local Area Connection". In the context menu of the connection (right-click on the icon), click "Properties". A window will open, select the line "Internet Protocol (TCP / IP)", click the "Properties" button. Check the radio button "Use the following IP address:", write down the IP address of the computer. It must be in the range 192.168.0.1 - 192.168.0.254. If there are two computers on the network, then their addresses can be "192.168.0.1" and "192.168.0.2". Do not forget to click "OK" in each window. Make the same settings on the other computer.


It is not necessary to set a permanent IP address, you can skip this step, but the connection will be established faster with it. Computers equipped with wireless network cards can be networked without cable connectors through a Wi-Fi router. No other equipment is required to create a network.
Often a situation arises when, when the router or modem is correctly connected to the PC, there is no “windows 7 wireless network connection” icon in the lower corner of the computer monitor. And no matter how much the user switches wires, stubborn "network connections" never appear. In this case, it is necessary to postpone the “cable work” for a while and check (and possibly reinstall) the LAN connection settings.
Windows 7 network connection setup
- 1. Click the left mouse button (then all the time with the left, unless otherwise indicated) the Start menu button.
- 2. Select the "Control Panel" icon.
- 3. In the "Control Panel" click "Network and Internet" - "View network status and tasks" (if you do not see it, switch the view mode to the "Category" view).
4. Go to the "Change adapter settings" menu.

5. Right-click on the "Local Area Network Connection" icon, select "Properties" from the context menu.
6. Double-click to expand the properties of "Internet Protocol version 4 (TCP / IPv4)".
7. We switch the first checkbox to the position: “Obtain an IP address automatically”, the second to “Obtain a DNS address of the north automatically”.

8. If the checkboxes were already in the specified position, then change the first one to the position: “Use the following IP address”.
Set the following values: "IP address": 192.168.1.2, "Subnet mask" 255.255.255.0, "Default gateway": 192.168.1.1; "Preferred DNS Server": 192.168.1.1.

Do not forget to click the "OK" button in all open windows after the settings are completed to save the settings.
Setting up a network connection in windows 8:
In general, setting the connection parameters here is carried out similarly to the previous version of the OS. The only caveat: many users do not know how to open network connections in windows 8. Therefore, at this stage, we will dwell in more detail:
1. Right-click on the "Start" menu and in the menu that appears, select "All applications"

2. In the "Applications" menu, click the "Control Panel" icon.

3. Click on the "Network and Internet" icon.
5. Find and click "Change adapter settings" (top left).
Further configuration is carried out similarly to the "seven": follow steps 5 to 8 and check the network connection - the corresponding icon should appear in the lower corner of the monitor.


, poultry farming")


- Burns, Robert - short biography
- The concept of common vocabulary and vocabulary of limited use
- Nancy Drew: The Captive Curse Walkthrough Nancy Drew Curse of Blackmoore Manor Walkthrough
- Deadpool - Troubleshooting
- Won't start How to Survive?
- What to do if bioshock infinite won't start
- Walkthrough Nancy Drew: Alibi in Ashes
- Spec Ops: The Line - game review, review Spec ops the line crashes on missions
- Room escape level 1 walkthrough
- Processing tomatoes with boric acid How much will 2 grams of boric acid
- Cucumber Grass (Borago)
- Bioinsecticide Lepidocid: purpose, properties and application procedure Lepidocide waiting period
- How to change the language to Russian in steam
- Dendrobium noble: room care
- Morphology of plants general concepts - document
- Planting, propagation and care of bamboo at home, photo Growing bamboo from seeds
- How to strengthen the cellular signal for the Internet in the country
- Sanskrit reveals the forgotten meaning of Russian words (2 photos)
- The oldest language Sanskrit programming language of the future Dead language Sanskrit
- Who has dominion over all the earth?