How beautiful to make art. Collection of the best computer programs for drawing art
It was in the climate of experimentation and consumerism in the late 1950s in England and America that pop art emerged, a movement of a new generation of artists who sought inspiration in Everyday life, creating art from household goods, consumer goods and the media.
Pop art: art of the 20th century
pop art artists, or popular artists, created in a straightforward manner, using bold bright colors, used screen printing, silk-screen printing to quickly and mass-produce paintings, while downplaying the value and exclusivity of the artist's work, depersonalizing his work. The direction in art was called " pop Art" (short for "popular art" - "popular art").
This trend appeared as a response to the work of abstract expressionists, whose creations dominated the American art in the post-war period, and subsequently as a whole as a counterbalance " high art". Pop artists preferred to see in the works a return to reality, daily images, wit and irony.
Popular artists sought to combine fine art traditions with elements of pop culture from television, film, cartoons, printed gloss and advertising.
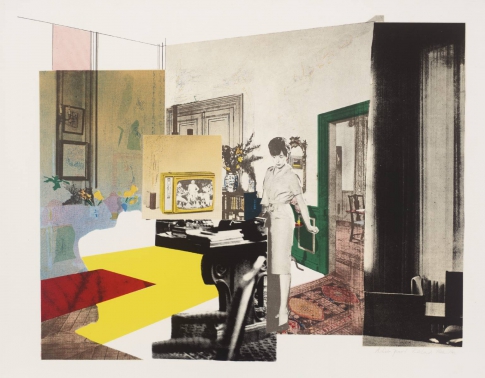
At the same time, their work challenged the traditional boundaries between different media, combining elements of painting and drawing with photography and print, elements of handmade and mass production, as well as combining different objects, images and sometimes text to create new meanings. Although the peak of the popularity of pop art happened in the last century, this trend still has many followers who create paintings in a modern style.

The founders of pop art are Richard Hamilton and Eduardo Paolozzi, but now this style is primarily associated with the names of Andy Warhol, Roy Lichtenstein, James Rosenquist, Robert Rauschenberg, Claes Oldenburg and other artists.

Perhaps the most famous figure among them is Andy Warhol - American artist, director, designer, producer and one of the most controversial personalities in the art of the 20th century. His works are famous all over the world, and some of them are among the most expensive paintings ever sold.
TOP 5 most famous works of Andy Warhol
Marilyn Monroe (1962-1967)
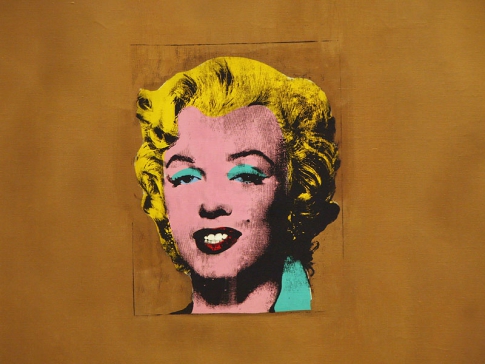
This photo of Marilyn Monroe is the most famous image among the works of Andy Warhol and pop art in general.
He created his first work called "Golden Marilyn" in 1962, when the actress committed suicide. To do this, Warhol used a black-and-white promotional photo for the film "Niagara" (1953) with the image of Marilyn, painted over the canvas with iridescent gold paint and imprinted the face of the movie star right in the center of this composition. Thus, by duplicating photography, Warhol undermines the uniqueness and authenticity of the characteristics of the traditional portrait, showing that it can be an infinitely reproducible image.

Warhol uses the same photo to create entire series of images. Each work with Marilyn was an experiment in color and shadows. Thanks to the technique of applying the image by silkscreen and the help of his assistants, Warhol was able to very quickly create such paintings in the style pop Art.

Warhol later created five portraits of Marilyn in red, blue, orange, sage and turquoise colors. Happened with the first four jobs interesting story: at one of Warhol's exhibitions, one of the artist guests shot them with a pistol (she just asked the artist for permission to "click" the paintings, and the word "shoot" in English means not only to shoot, but also to take photographs). However, this only increased the popularity of the paintings: they were called "Shot by Marilyn", and their price increased.
The surviving fifth painting turned out to be "Turquoise Marilyn", and it is the reproductions of this work that are now most replicated.
Cans of Campbell Soup (1962)
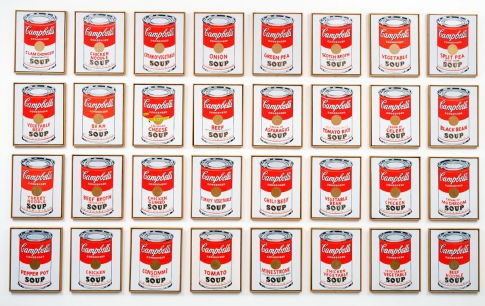
They say it's the owner art gallery and interior designer Muriel Latow pitched the idea for this pop art painting to Warhol when he said he should paint the objects that people see around him every day.
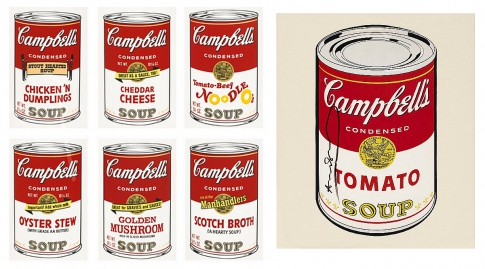
This work is an early example of Warhol's series of repetitive images representing consumer goods. The artist painted cans of soup more than once: there is a picture where the can is depicted in a single copy, a picture where six cans are presented, and there are variants of images of whole rows of cans with different flavors of soup: “32 cans of Campbell soup”, “100 cans of soup” Campbell" and "200 cans of Campbell's Soup".
200 dollar bills (1962)

When Warhol asked his acquaintances what kind of pop art drawings they would like to see, one of the girls he knew asked him what he really loves the most. It was then that Warhol had the idea to draw a dollar bill - that's really the most popular and most massive object of our time. Nothing superfluous is depicted in the picture, only two hundred one-dollar bills laid out in continuous rows.
Eight Elvises (1963)
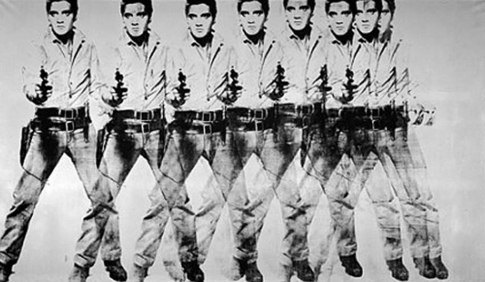
This twelve-foot monochrome pop art painting features eight identical, overlapping drawings of Elvis Presley in cowboy attire. It is unique in that it did not go through mass production like most of Warhol's work. In 2008, "Eight Elvises" was sold for one hundred million US dollars - it is still one of the most expensive paintings ever sold and is considered one of Warhol's masterpieces.
Banana (1967)

In 1965, Warhol became the manager of the famous American rock band under titled The Velvet Underground, which at that time was not yet popular. In collaboration with famous artist the group releases debut album, featuring this pop-art illustration featuring a banana, Warhol's signature, and the phrase "Peel slowly and see" as the cover.
How to Make a Pop Art Portrait in Photoshop
The pop art style is still very popular now: in this style, not only paint pictures, but also make up for theme parties and holidays, draw body painting, and also stylize photographs. If you also want to take a photo in the style of pop art, then this is not difficult - you only need Photoshop and a digital photo that you want to transform.
In order for a pop art portrait to turn out well, it is better to use a photograph where a person is depicted close-up Or at least on the shoulders.
- Open your photo in the editor.

- Apply isohelia or posterization to it (“Image” - “Correction” - “Posterization”). In the pop-up window, select the number of posterization levels - 2.

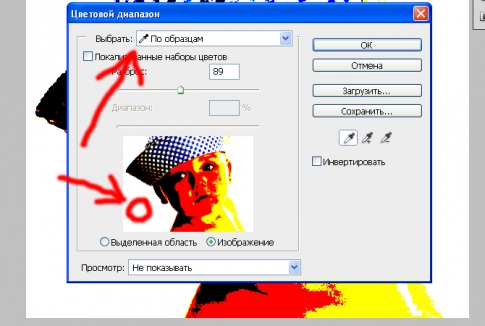
- Go to "Selection" - "Color Range". You will see a window in which you will need to click on the drop-down menu and select the "By Samples" item. The cursor will turn into an eyedropper tool, with which you need to select white - just click on the white area of the document. If your photo has a multi-colored background, use an eraser or brush white color on the toolbar to trace the person in the photo and paint over the background.
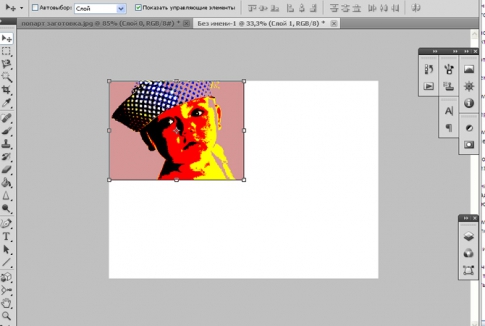
- Now find the Fill tool in the left panel. Choose the color you like from the palette and click on white background left mouse button. The entire associated white field of the photo will be filled with this color.

- So we got the first piece of our future collage. But we need as many as four pictures in the style of pop art for it, so we create new document("File" - "Create") and set the size of the workspace. To determine it exactly, check the dimensions of the first photo - the new document should be twice as wide and twice as long.

- Go back to the first photo, go to the "Select" menu and select "All". Using the combination of buttons "Ctrl + C", copy the resulting selection. Go to the newly created document and paste the copied selection on the white box ("Ctrl + V").
- After that, copy the pop art photo and move it to the right of the first one. You just have to copy the photo again, use the fill and change the colors of the collage components so that they differ from each other.
- That's all - you will get a similar collage in the style pop Art.
And how to make a picture in the style of pop art with your own hands using a stencil, paper and paints, you will learn in this video:
Take it, tell your friends!
Read also on our website:
show more
Almost everyone knows about famous landmark sculptures like the Statue of Liberty in New York or the Little Mermaid in Copenhagen. However, there are others, not too well known, but very unusual sculptures, which adorn cities around the world - we have collected some of the most dynamic ones in this article.
Everyone knows that Adobe Photoshop allows you to create anything with photos and images. Most users resort to using Photoshop only when it becomes necessary to retouch, correct the skin and face. However, you can also create very interesting and unusual photo effects. There are many effects and it is impossible to tell about each. In this article, we will figure out how to make art from a photo in Photoshop. Let's get started. Go!
Interesting effects in action

For example, take a picture of a famous actor
The first step is to choose a photo with which you will work. Next, create a duplicate layer. Note that it's always best to work on the duplicate, not on the actual image. Now go to the menu "Filter" (Filter) and in the list that appears, click "Blur" (Blur). Select "Smart blur". In the window that opens, you need to set the desired parameters. In the "Quality" section, select "High" (High), and in the "Mode" section - "Edge Only" (Only edges). Move the "Radius" and "Threshold" sliders to get the desired result. Choose values close to 8 for "Radius" and 48 for "Threshold".

We set the parameters close to what is shown in the example
The next step is to invert the resulting image. To do this, use the keyboard shortcut Ctrl+I. Now you can disable the current layer. Above the layer original photo create a new one and fill it with white.

Next, create horizontal lines in a separate document. Use the key combination Shift+Ctrl+Alt by pressing the right arrow to copy the line. Copy them about 20 or more pieces. Unite all the lines together, and then turn them at an angle of 45 degrees.
The next step is to select a square of 100x100 pixels and cut out the fragment with lines so that as a result you get a square completely filled with lines.
Now you need to repeat the last two steps exactly, only with the lines slanted in the opposite direction.
Go back to the main document and make a duplicate of the layer, then place it above the white layer. Open the menu "Image" (Image), click "Adjustments" (Correction) in the pop-up window. Then select "Threshold" (Isohelion). In the corresponding box, set the level value. It should be close to 118. In principle, you can stop at this step, but let's go ahead and use the made blanks with lines.

Image correction in isohelion
Go to the layer style and tick the checkbox "Pattern Overlay" (Overlap pattern). In the "Blend Mode" section, set it to "Lighteen". Next, select the striped pattern you created earlier.

The main effect is achieved precisely by the combination of slanted lines.
Now we need to convert the layer to a Smart Object. Right-click on the layer and select "Convert to smart Object" (Group into a new smart object). Install "Multiply" (Multiplication) in the layer blending mode.
Create a new duplicate of the original layer by moving it to the top. Apply isohelia to it, overlay layer and convert to smart object similar to the previous steps, only now set the isohelia value to 100 instead of 118, and when overlaying the layer, use a reverse stripe pattern. Turn on the layer that was turned off at the very beginning. Ready.
After that you can add any texture. Apply it to the resulting image by overlaying, selecting the "Multiply" mode. Adjust the transparency level and your art is ready.

Now let's look at how to make pop art in Photoshop. This is a fairly popular effect that users often use. social networks.

Original photo for pop art
After selecting the desired photo, make a duplicate of the layer. Open the "Filter" menu, then go to "Artistic" (Imitation) and select "Cutout" (application). In the options window, move the "Number of Levels", "Edge Simplicity", "Edge Fidelity" sliders to get the desired result.

Move the sliders as you wish
The next step is to create another duplicate of the layer, but the one you applied the filter to. Go to the Filter Gallery, you can do this through the "Filter" menu. Then open the "Sketch" section. There you will find "Halftone Pattern" (Halftone pattern), that's what you need. On the right, in the settings block, set “Dot” (Points) in the “Pattern Type” item and move the sliders to get the desired look.

Dot size and contrast may vary
Next, set "Overlay" (Overlap) in the overlay mode. At this stage, you can stop if the resulting photo suits you. Also, you can select the original layer, duplicate it and put it above all others, and then adjust the transparency value based on your own preferences. Ready.

Simple manipulations - the new pop art is ready
This Photoshop tutorial will introduce you to famous destination in fine arts like pop art.
Next to pop art is the name Andy Warhol, who was an artist, photographer, filmmaker, and publisher.
It was he who, in the middle of the 20th century, created unique collage paintings from completely unexpected things - from images of cans to such glamorous collages with Elvis Presley and Marilyn Monroe.
This style became incredibly popular at the time, and countless imitations of the artist's work began to appear.
Because creating pop art pictures is very easy, especially if you own Photoshop.
The technique we want to tell you about is that first a black and white stencil is made based on the original drawing. And then parts of this drawing are painted in very bright colors in different variations.
Any portrait can be turned into a pop art drawing, but a photo with clear boundaries is especially suitable for this.
It is desirable that the person in the photo looks directly into the camera lens.
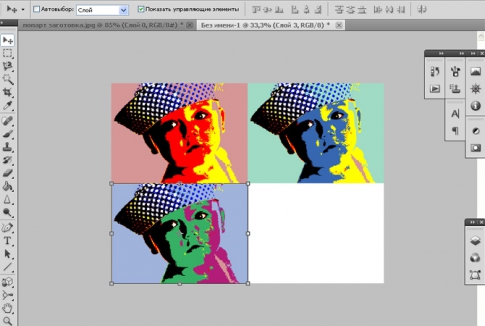
1. Below is the process of cutting out a boy from his native background and placing him on a new one. It is important for us that the boy and the background are placed on different layers.
To quickly remove plain background use tool - Magic wand, if the background is multi-colored, then take a tool - Pen


2. Most likely you have already noticed that pop art images are famous for their very high contrast.
The following steps will remove a lot small parts, so you don't have to be too careful as you work.
Place the bright background layer directly below the working layer (with the boy).
3. To make a high-contrast image, first make sure you are on the cutout boy layer and choose from the menu Image > Adjustment > Threshold.
Move the slider so that the image contains enough shadows so that all the main shapes and features are preserved.


4. Roughly highlight each part of the image that you will color in later.
Press Alt + Ctrl + J to copy each part to a separate layer. Name each new layer. Change the blending mode of each layer to Multiply and hit OK.

5. Activate each layer in turn in the layers palette.
For each, press Ctrl + click on the layer box and go to the menu Edit > Fill .
Click on the Use line, a window will appear where you can select the Color line. Thanks to this, a color palette will appear, where you can choose a bright saturated color to your taste to paint over any part of the image.


6. In the "Layer Style" window (Layer Style appears if you double-click on the layer) select the Color Overlay style (color fill) and change there blending mode (layer blending mode) to Color. Select bright color and click OK.
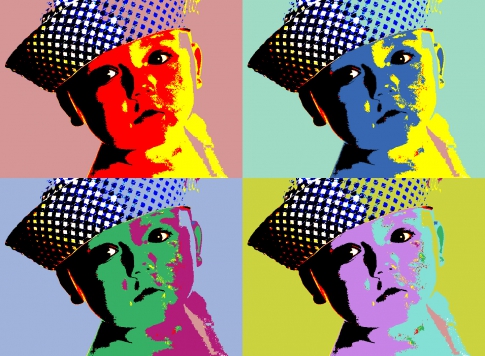
7. When you repeat these steps for each individual section of the image, you will see that you have a real pop art masterpiece in front of you.

8. Save this file in Photoshop format (.psd) and make copies of the layers where you did the coloring. In your layers panel, each area is painted over in a certain color. Now it is very easy to change the color of the area using the Hue / Saturation function (Ctrl + U).
In the end, you can combine all the options into one large image.
Such a combination various options of the same image is very characteristic of the style of the 60s Pop Art.
The modern world is changing everything, and anyone can become anyone, even an artist. In order to draw, it is not necessary to work in some special place, it is enough just to have programs for drawing art on your computer. This article shows the most famous of these programs.
Any graphics editor can be called an art drawing program, although not every such editor is able to please your desires. It is for this reason that this list will include a variety of programs with different functionality. Most importantly, each of the programs can become both a separate tool in your hands, and enter your set, which you can use in different ways.

This graphic editor is not intended for drawing art. More precisely, it was not designed for this. When it was created, the programmers were inspired by children, and the fact that it is in childhood that we become who we are now. This children's program has musical accompaniment, many tools, but is not very suitable for drawing quality art.
artweaver

This art program is very similar to . It has everything that Photoshop has - layers, corrections, the same tools. But not all tools are available in the free version, and this is an important disadvantage.
ArtRage

ArtRage is the most unique program in this collection. The fact is that the program has a set of tools that is great for drawing not only with a pencil, but also with paints, both oil and watercolor. Moreover, the image drawn by these tools is very similar to the real one. Also in the program there are layers, stickers, stencils and even tracing paper. The main advantage is that each tool can be customized and saved as a separate template, thereby expanding the capabilities of the program.
Paint.NET

If Artweaver was like Photoshop, then this program is more like standard Paint with Photoshop capabilities. It has tools from Paint, layers, correction, effects, and even getting an image from a camera or scanner. Plus, it's completely free. The only negative is that sometimes it works much slower with 3D images.
inkscape

This art drawing program is quite a powerful tool in the hands of an experienced user. It has a very wide functionality and a lot of possibilities. Of the possibilities, transformation stands out the most bitmap to vector. There are also tools for working with layers, text and paths.
GIMP

This photo editor is another copy of Adobe Photoshop, but it has a few differences. However, these differences are rather superficial. Here, too, there is work with layers, image correction and filters, but there is also image transformation, moreover, access to it is quite easy.
Paint Tool Sai

A huge number of different tool settings allow you to create almost new tool, which is a plus of the program. Plus, you can customize the toolbar directly. But, unfortunately, all this is available only for one day, and then you have to pay.
In our modern times you don't have to be able to draw to create art, you just need to have one of the programs on this list. They all have one common goal, but almost each of them approaches this goal in different ways, however, with the help of these programs you can create truly beautiful and unique art. What art creation software do you use?
Good day everyone!
Probably, almost every user has seen "strange" photographs of people online, as if it were a picture drawn by an artist. Such a picture has a name - art (example on the left with Nikulin). And, by the way, you can do it quite quickly using special online services.
I think the article will also be useful to all those users who want to make an unusual avatar for social networks (VK, Odnoklassniki, etc.), various forums, applications (for example, Skype, Viber, etc.), and just surprise their friends and relatives.
And so, let's get down to business - to create art.
Note: to make art, you can use various graphic editors(for example, Photoshop). In this article I will not dwell on classic editors (because while you install the editor, set it up, understand how to do it - with the help of the service on the network you will already make dozens of different cool pictures ☺) ...
Choosing a service with the best photo effects
Pho.to
One of the best Russian-language online services for giving various effects to photos. For example, a color photograph can be remade:
- into a black and white drawing, as if it had been drawn: with a brush, pencil, etc.;
- in a color drawing: there can also be a variety of options;
- in a cool and funny picture. For example, your photo will be placed in a frame drawn by a child, an artist, etc. (examples of options are shown below).

Using the service is extremely simple:
- choose the effect you like first;
- upload your photo;
- and after a few seconds - look at your cool art. An example is shown below: isn't it well drawn?!

How the photo has changed: it was - it became (from left to right)
photomania.net
Another extremely interesting site, which is an online photo editor. Here you can upload a photo and quickly process it: including creating from it interesting drawing(art). What captivates this service - it has quite a lot of the most unusual options photo editing: you can, for example, place your photo on the chest of Messi or Ronaldo, put your photo in a frame, give it a magical style, or make yourself a famous actor.
An example of processing is shown on the screenshot below: in my opinion it looks very realistic ☺.

Another interesting art // Photomania.net
PhotoFaceFun.com
Website from huge amount a variety of photo effects: here you can put your photo in a frame, make a photo a painted picture, place it next to some celebrity, etc.

Using the service is also simple: upload a photo, select an effect, see the result (in general, three simple steps).
Below are some examples of how the service works. Very good?!

Several pieces of art: in the gallery, with Putin, an old drawing.
Note: if the service will not process your photo, convert it to another format. For example, I was faced with the fact that the service did not want to accept and process the GIF format, resaving the image in JPG (for this you can use Paint, which is in all Windows versions) - everything started to work normally!
PhotoFunia
A very good Russian-language service with a large collection of photo effects that can be applied to any uploaded photo. What captivates: the choice is simply huge! A photograph can be made in black and white, drawn with a brush or pencil, placed in a frame, with a celebrity, on a TV show, etc.

I note that once you upload your photo, you can immediately try it in a variety of effects (without uploading it a hundred times). Comfortable!
Processing examples are shown below.

A few more interesting effects for the photo: pencil drawing, pendant, gift card (from left to right).
By the way, you might be interested in an article on how to make a photo collage.- . If someone does not know, then a collage is when several photos are combined at once into one large one. It turns out very nice and informative, you can immediately find out how the holiday went (for example).
I say goodbye to sim. Good luck to all!
Additions are welcome...


, poultry farming")


- Burns, Robert - short biography
- The concept of common vocabulary and vocabulary of limited use
- Nancy Drew: The Captive Curse Walkthrough Nancy Drew Curse of Blackmoore Manor Walkthrough
- Deadpool - Troubleshooting
- Won't start How to Survive?
- What to do if bioshock infinite won't start
- Walkthrough Nancy Drew: Alibi in Ashes
- Spec Ops: The Line - game review, review Spec ops the line crashes on missions
- Room escape level 1 walkthrough
- Processing tomatoes with boric acid How much will 2 grams of boric acid
- Cucumber Grass (Borago)
- Bioinsecticide Lepidocid: purpose, properties and application procedure Lepidocide waiting period
- How to change the language to Russian in steam
- Dendrobium noble: room care
- Morphology of plants general concepts - document
- Planting, propagation and care of bamboo at home, photo Growing bamboo from seeds
- How to strengthen the cellular signal for the Internet in the country
- Sanskrit reveals the forgotten meaning of Russian words (2 photos)
- The oldest language Sanskrit programming language of the future Dead language Sanskrit
- Who has dominion over all the earth?