How to decorate a box with your own hands with a cloth. We glue the gift box with a cloth with our own hands
Before the new year is not up to packaging. Pre-holiday chores take a lot of time. But, the gift needs to be wrapped somehow. Today we will see. For this we need:
- shoe box,
- scissors,
- ruler,
- simple pencil
- and colored paper.
Choosing colored paper For pasting the box, pay attention to the following details:
The question is not difficult. There are not many secrets here, but something must be considered. First, let's make sure that our box is enough to pack the prepared gift, i.e. put it in there and close the lid. If it worked out, then we were not mistaken with the size of the box. Now we need to check whether the prepared colored paper is enough for us. Needlework is a fun and creative activity. Therefore, there can be a lot of approaches to each stage. I suggest these methods: you can roughly measure the paper and the box with a ruler. Another way - without pressing the paper to the box and without making folds, position it as you are going to glue the box with paper.
After all these manipulations, we will put the gift away so as not to stain it with glue and cut it by accident. Now put the colored paper face down on the table. On the wrong side we put the box in the most natural way.  Mark the corners of the box with a pencil. We measure the height of the walls. We remove the box and draw a rectangle corresponding to the size of the sole of the box. In all directions, set aside the height of the walls of the box. We draw them. We draw the resulting figure to a rectangle. We add another 2-5 cm to each side. Depending on the height of the walls of the box. They no longer need to be connected in a rectangle. These will be the valves that we will bend inward. We cut the workpiece like this: we cut the short sides to the sole. We leave the long ones as they turned out.
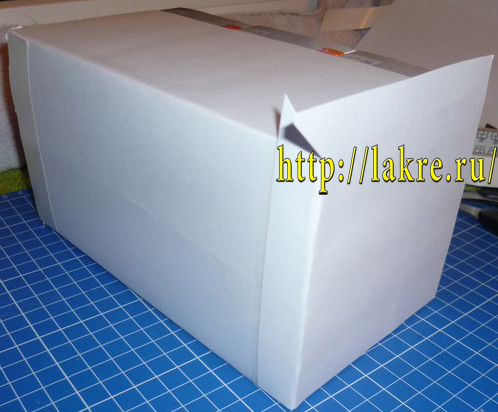
 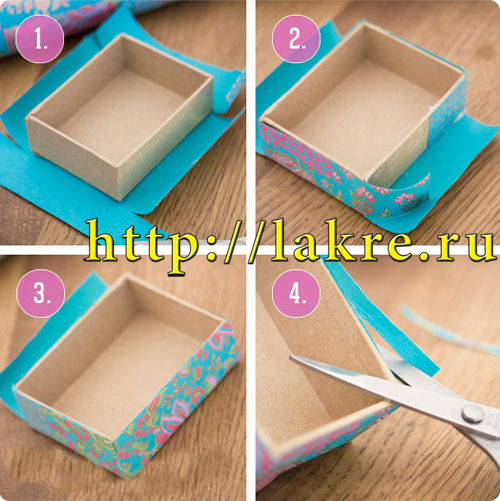 Put the scissors aside and bend the valves in advance. Fold the valves back. Lubricate the entire box with glue and carefully combine the bottom with the place of the sole on paper. Quickly, before the glue dries, we raise the long sides and glue them on the main side. Bend the excess to the short side. They will stick too. Once again, grease the short sides of the box with glue. The valves obtained from the long sides are also lubricated. We press the short sides. All four remaining valves are glued to the inside of the box. We do the same with the lid. If one sheet of colored paper does not completely capture the required area, then you will have to carefully glue several sheets before drawing. If you think that your experience is enough, then you can glue the sheets in turn from one side of the box, then from the other.
If a passionate nature lives in your house, then surely each new shelf quickly "overgrows" with little things that, in the opinion of this Nature, are very necessary and almost priceless. And let's take a closer look at whether there is an unnecessary box at home that would help solve the problem of disorder. If you have one, then feel free to get down to business.
We will need:
- any box (from under shoes, from under paper for a printer, from a lamp)
-PVA glue
- a brush with hard bristles (I buy in the "Tool" store)
-scissors
-fabric of any color that suits you (cotton, coarse calico, curtain fabric)
desire to spend some extended time crawling on the floor
1. Cut off a cut from a large piece of fabric that is approximately the size of the box.
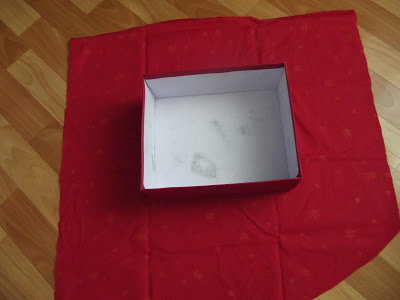
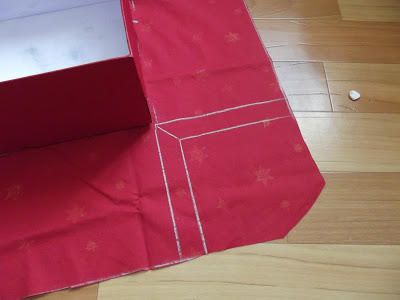
We mark the edges of the box with chalk. We measure the height of the box with a ruler and put this segment on the fabric, adding 5 cm to the hem. And we also mark it with chalk.

You should get these markups.
![]()
Cut off any excess with scissors.

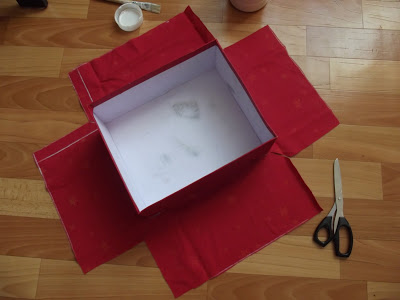
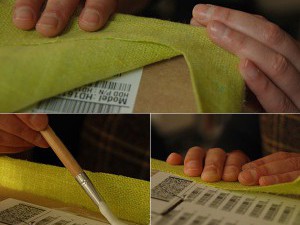
Lubricate the bottom of the box with glue. It is better not to be greedy and not save.

We put the box smeared with glue on the marked areas and turn it over.
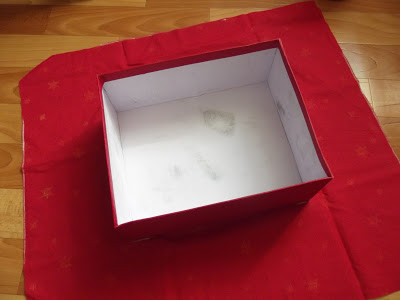
In the direction from the middle to the edges, we begin to smooth the fabric without removing the remaining glue.

We turn the box back. We need to draw corners. To do this, we draw 2 perpendicular lines from the corner of the box. And after another 2-3 cm, draw lines. These actions must be done for each corner.
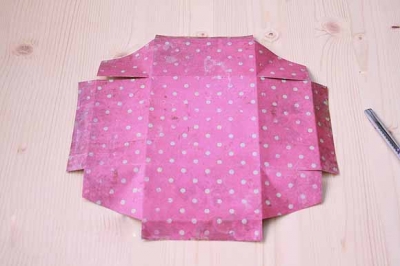
We cut off the excess fabric, making an incision along a diagonal line directed to the corner. And again we do this with all the corners of the box.
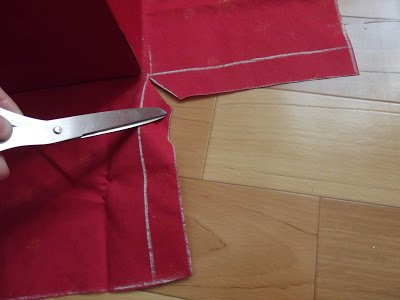
After cutting off unnecessary fabric from all 4 sides, the following blank should be obtained, as in the photo.
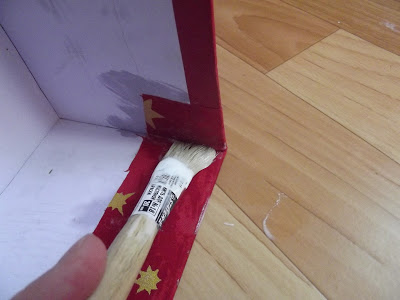
2. We begin to glue the long side. Again we smear with glue, not forgetting to miss the fold (transition of the bottom to the side). If you do not miss it in time, then after complete drying a bubble forms here.
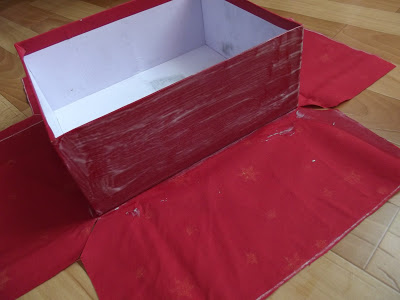
We put the box as you like and glue the fabric, stretching it again from the bottom up and to the sides.

Lubricate with glue on the short side to glue the strap. For strength, glue not only the box, but also the fabric with glue.

And glue the straps in this way on both sides.

The result will be like this. I realized when I glued the second side, so in the photo one side is completed. But it looks the same in both cases.

We glued one long side and fixed the straps. Now you need to wrap the excess fabric inside the box. To make this process go smoothly, it is better to make an incision in the corners.

We put the box on the side with the glued fabric. All other sides wobble freely.

Spread glue on the inside of the box by about 5 cm, at the same time lubricating the fabric.

Slightly stretching the fabric, bend it inward and press it, again smoothing it with your hands.

For the best effect, press firmly with your fingertips to iron the fabric in the corner.

Only the straps remained unused. Lubricate the box and the fabric. And pulling again, glue the strap inside the box.

It will be nice if you also smear the top of the fabric with a brush.
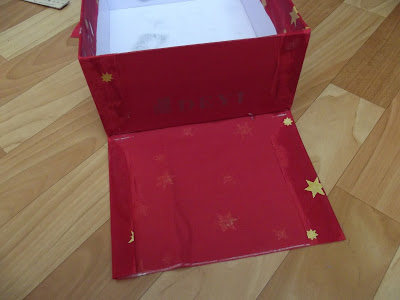
It should turn out something like this.

We pasted over one long side. There is another such side ahead, and two short ones. We begin to paste over the other long side, starting from point 2.
After both long sides are pasted over, it should look like this.

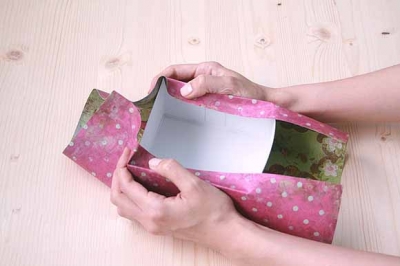
3. We proceed to the short side. We smear with glue the parts of the fabric marked with chalk.

We fold the fabric. At this stage, it is important to fold the fabric, try it on, lifting it up and applying it to the box in order to evenly join the edges.
Having fully convinced that the edge will turn out to be neat: it will not climb to the other side, generously grease the short side with glue and glue it, again smoothing the fabric with your hands in different directions. And once again I want to remind you, do not forget to lubricate the transition of the box from the bottom to the side, otherwise after complete drying, this place will look like a bubble.

As a result of fitting the fabric, you should get such a neat side with a face.
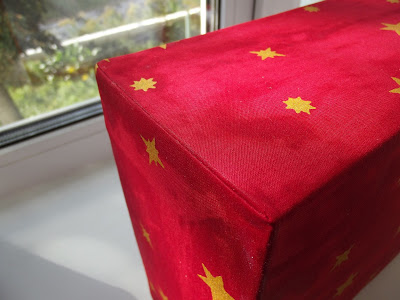
It remains to glue the rest inside. And again we glue both the box and the fabric with glue.

Stretching inward, glue the fabric.

Perhaps the fabric from the inside may not match in height. But if this box is not a gift, then you should not pay attention to such a detail.

And we do the same with the lid. But here we need to make a reservation. If the box is made of paper for a copier (which is very convenient, because you can choose the height of the future box yourself), then the lid from this box needs to be changed a little. Why? The fact is that cloth-covered box becomes a little wider (due to the fabric). And the lid that you made may not fit on the box.
I will try to show in the following posts how this can be done.
Girls, in no case be afraid of such a long explanation. In fact, this process goes much faster. You only have to try once, as you will understand what's what.
Beautiful homemade boxes may be needed as gift wrapping for your family and friends. To create such original packaging, waste boxes from sweets, shoe boxes, postal boxes, etc. are used. It is important that the gift product has a neat appearance. For this lesson, free time and space are allocated so that nothing can interfere creative process. Also, interesting organizers, all kinds of shelves, chests for writing utensils, notebooks and even jewelry are made from unnecessary boxes.
How to glue a box with paper - materials used
For a fruitful workflow, you will need the following items:
- Convenient sharp scissors - they cut paper, cardboard.
- Glue "Dragon", "PVA" or "Kleister". "Dragon" - polymer glue, fastens very well different materials, sold in large bottles, convenient to use. "PVA" - dries quickly, sticks together thin paper, cheap and readily available. Paste is a homemade glue based on flour and water.
- An unnecessary brush that will be needed to apply glue to the surface to be glued. In the case of using the "Dragon", a small rubber spatula is suitable.
- Scotch tape (double tape) or a stapler - can come in handy in difficult places where you need a reliable bond.
- A simple pencil, pen - with the help of these accessories, marks are made on paper or a box.
- Long ruler - will serve to accurately mark the measured length-width of a paper sheet.
How to glue a box with paper - types of paper
- It can be wrapping paper for wrapping gifts, sold in stationery, supermarkets.
- Wallpaper - now available for free sale great amount unique drawings of absolutely different subjects.
- Printed in high resolution interesting small-caliber repeating elements of flowers, lightning, hearts (texture).
- In order to give the box a pleasant appearance, it is necessary to paste over with paper with a pattern strictly corresponding to the direction of the picture, ornament.
How to wrap a box with paper - the process
- If a large sheet of paper is available, the box is placed on this sheet. The most basic, and therefore conspicuous, parts of the box must be glued in one go, with a continuous sheet so that there are no inconsistencies in the pattern.
- With a pencil on the wrong side of the paper, marks are made on the bottom and allowances on the side walls so that the paper sits well.
- After the mark, the resulting pattern is tried on and cut out. Avoid sloppy areas of paper overlay. All irregularities should be cut with scissors.
- Mark the cut sheet with a number or mark "bottom".
- In the same way, you need to do with all the other planes. On integral sheets of paper, the side of the box needed for gluing is placed, measured along with the tolerance for corners. Then the pattern and the part of the box to which it corresponds are marked.
- After all the planes are selected and cut out, it's time for gluing. Imagine which part should be done first and last. The end part and walls must be made without tolerances, because they overlap the joints.
- Glue is applied to the paper so as not to spoil the appearance of the picture. And be sure to glue all the edges of the pattern so that there are no bumps and swelling.
- When gluing, you need to remember that the glue has a smell. After the final touches of work, the box is placed in a well-ventilated place. Polymer glue dries and weathers longer than PVA or paste.
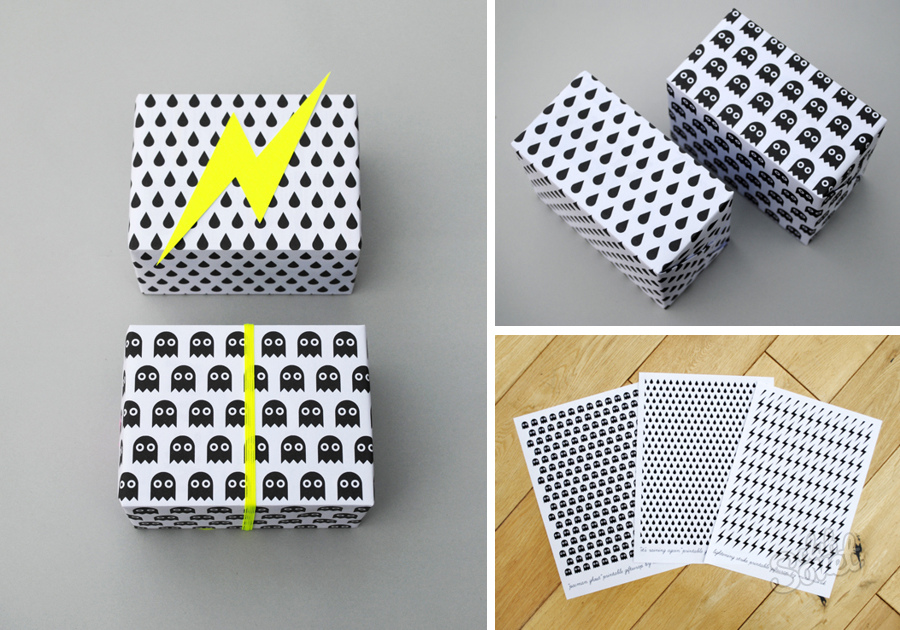
How to glue a box with paper - paper patterns for decoration
- After the main pasting, the product can be improved with decorative paper tapes. To do this, you need to choose a color, texture. If the box is plain red or brown, white, beige patterns will look good on it. If the wrapping paper is patterned, then the decorating details may be plain or completely absent.
- Multi-colored cardstock paper, quilling ribbons (they are also attached with glue) are great for such purposes. Chipboard decorations (very thick cardboard) and decorative tape are also used.

Creative fantasies can lead a needlewoman far. Therefore, you should be careful not to overdo it with saturation. appearance products. Bows and lace will look beautiful only when they are appropriate. Thin paper requires a special approach, the adhesive should be applied quickly, there is no time for impregnation, because ugly swelling or tears can result. It is best to use not thin, not thick, but medium-weight paper.
Any unnecessary container can be turned into a beautiful and practical storage. To do this, you need to know how to glue the box with cloth, paper or other improvised material. What is it for? The fact is that in every house there are a lot of things that need to be stored separately, in containers of a certain size. Such mobility is necessary for cosmetics, paints, devices for various needlework and hobbies, toys and photographs. Ordinary cardboard boxes have an unaesthetic appearance. It is unacceptable to use them in their raw form for storing property. There are several ways to cultivate a box. Consider a master class on finishing containers with various materials.
From ordinary packaging containers, you can make a lot of useful things that will fit into any interior. And not only fit, but also decorate it.
If you beautifully decorate a cardboard or wooden box, you can get the following products:
- Storage for cosmetics. This accessory is necessary for those women who do not have the opportunity to do makeup near the dressing table. A small container is convenient to put in the kitchen or in the bathroom.
- A small chest for storing small children's toys. As a rule, children keep small figures from kinder surprises in them.
- Storage area for women's handicrafts. in boxes different size it is convenient to lay accessories for embroidery, knitting or decoupage.
- Storage for various documentation. These can be personal documents, certificates, receipts and others. securities. You can put children's drawings, paints, pencils and felt-tip pens in a box.
- Gift packaging. It is required for items sold separately. Even branded packaging can be beautifully decorated to create an atmosphere of intrigue.
- House for a pet. A cat, a small dog, a rabbit or a nutria can live in it.
Decorative containers can be stored on racks, window sills, coffee tables and cabinets. Its use is much more convenient than storing these accessories in bulk on the shelves.
Finishing with paper
For work, you can take the packaging from any object or thing. The main thing is that the size fits. If there is no box of the right size, then it can be adjusted to the required parameters. The container can be pasted over with old wallpaper, pages of a glossy magazine or large posters. Everything that has a presentable appearance and looks interesting will go into business.
 For work you will need:
- scissors;
- roulette;
- stationery knife;
- wide brush;
- protractor;
- pencil;
- compass;
- ruler;
- clamps;
- liquid primer;
- PVA glue;
- furniture varnish.
As a rule, such tools and materials are in every home. All family members can be involved in creativity. Children will find this process especially interesting.
 We begin a master class on finishing the box with paper:
- We glue the corners of the container with thick paper.
- We process all external surfaces with a liquid primer. This will make the cardboard stronger and increase its adhesion to the glue.
- We straighten the paper. We put a box on it.
- We mark up on all sides of the cube. Leave room for folds.
- Cut out the piece. We press down the paper at the places of the bends.
- Spread glue on the bottom of the container. We put it in the intended place. We are waiting for the glue to set.
- Alternately glue sides lining to the box. Pay attention to the joints of the fragments.
- Glue the folds to the inside of the package.
- We glue the box on the inside with velvet paper or a bright cloth.
- We cover the paper with varnish. We are waiting for it to dry.
As an additional decoration, you can apply beads, ribbons, glitter or tinsel to the paper.
You learned how to wrap a box with paper. Next, a master class on finishing containers is offered. various types fabrics.
Decorate boxes with fabrics
The fabric applied to the packaging looks much better than paper. In addition, this type of finish is much more practical, stronger and more durable.
 To wrap a cardboard product with matter, you need:
- sewing machine;
- scissors;
- meter;
- glue;
- braid;
- lining fabric or thin foam rubber.
As a rule, the material is supported by the color of the floor or walls. This box will fit perfectly into the interior.
 It is recommended to trim the box with a cloth in the following sequence:
- Cardboard is pasted over with lining fabric or foam rubber.
- Patterns are being made. For this, whatman paper or any paper material that is at hand can be used.
- Patterns are transferred to the fabric. Leave at least 3-4 cm for the seams. The edges of the blanks are overcast.
- Stitching of a cover for a container is carried out. Its fitting on the base is carried out.
- The edges of the cover are trimmed with braid. This will give the box an extra gloss.
- The cover is pulled over the box. Free edges are glued to its inner side. The inside of the box is pasted over with elegant soft fabric.
If there is such a need, the finished product is decorated with additional elements. More simple option is pasting the base material. To do this, you need to choose a glue that will not show through the fabric.
Decoupage of a cardboard box
Packages decorated with napkins look quite original. This method is suitable for products made of cardboard, plywood and fiberboard. In order to perform decoupage, you will need patience, care and accuracy.
Before you start finishing, you need to strengthen the corners and walls of the box. For this, a primer is used and masking tape. After the primer dries, the corners are painted over with bright paint. Soaked napkins are superimposed on cardboard smeared with PVA glue. The dried finish is covered with several layers of acrylic varnish.
The final step is gluing the inside of the box. To do this, use a fleecy fabric or velvet paper.
If you bought a gift without a box, then you can get out of the situation by pasting paper over any cardboard box that you have at home. Question how to wrap a box with paper only at first glance it seems difficult, because there is nothing easier.
Choose the right box to match the size of the gift. It can be a box from under children's shoes, dishes or a new mobile phone. If the box itself is dense, then you can glue it with ordinary wrapping paper. But for boxes made of thin cardboard, thick double-sided scrap paper is best suited, which will additionally hold the volume of the box.
For work you will need:
Wrapping paper (or scrapbooking paper), you can use different colors for the base and cover;
- glue stick (with such a pencil it is most convenient to apply glue to paper in this case);
- scissors or stationery knife;
- ruler, pencil
To properly wrap the box with paper, you don't need to do anything special. The main thing in this matter is accuracy. We will not calculate the dimensions of the paper, but simply "try on" the paper to the box and fold the edges as shown in the photo.

Set the box aside and carefully fold your sheet of paper along all the marked fold lines.

Unfold the sheet and make cuts in it like this. There is no need for special accuracy in this, the main thing is that when you cut out unnecessary corners, do not cut the bottom of the future box.

Place the box in the middle of the cut out template and use the glue stick to start gluing the paper to the box. Start at the bottom of the box and then move on to the sides.


Do the same with the lid of the box. If you are using double-sided scrapbooking paper, then the cover can be glued on the back.


, poultry farming")


- Burns, Robert - short biography
- The concept of common vocabulary and vocabulary of limited use
- Nancy Drew: The Captive Curse Walkthrough Nancy Drew Curse of Blackmoore Manor Walkthrough
- Deadpool - Troubleshooting
- Won't start How to Survive?
- What to do if bioshock infinite won't start
- Walkthrough Nancy Drew: Alibi in Ashes
- Spec Ops: The Line - game review, review Spec ops the line crashes on missions
- Room escape level 1 walkthrough
- Processing tomatoes with boric acid How much will 2 grams of boric acid
- Cucumber Grass (Borago)
- Bioinsecticide Lepidocid: purpose, properties and application procedure Lepidocide waiting period
- How to change the language to Russian in steam
- Dendrobium noble: room care
- Morphology of plants general concepts - document
- Planting, propagation and care of bamboo at home, photo Growing bamboo from seeds
- How to strengthen the cellular signal for the Internet in the country
- Sanskrit reveals the forgotten meaning of Russian words (2 photos)
- The oldest language Sanskrit programming language of the future Dead language Sanskrit
- Who has dominion over all the earth?