Pastel drawing for mother's day. How we draw mom so that she recognizes herself
March 8, International Women's Day, is approaching, and many want to please their mother with a touching gift - a portrait. However, drawing a mother beautifully in stages with a pencil is not an easy task even for artists with experience, but for a child it can be quite difficult. I will show you how to draw a mother easily and effortlessly - just repeat all the steps of this step by step lesson. You will need a pencil, an eraser and paper, we will paint with any suitable material for this - paints, colored pencils, crayons, felt-tip pens and anything else.
Since we are drawing a portrait of mom for March 8th or Mother's Day for the kids, we will need to draw the face and shoulders. People have an oval face shape, so let's start drawing by building such a base. I leave the top open, where we will draw the hairstyle. You may not succeed the first time, but it doesn't matter - just use the eraser and correct mistakes on the go.
Now we need to draw mom's neck. These will be two smooth lines, you should get something like this.


Now we need to beautifully draw the mother's face. I always start drawing faces from the eyes, and the portrait of my mother on March 8 will be no exception. We draw two almond-shaped shapes, and a little higher - the lines of the eyebrows. Here it is especially important to remember what kind of eyes your mother has and try to repeat their shape.

A little lower, I draw a neat nose in the form of just two dashes. Look, it is very easy to draw, but at the same time such a nose looks natural. A little lower I draw the lips and a light line above the chin.

We correct the contours a little - do not be afraid to correct the portrait of your mother on March 8 with a pencil if you want it to turn out beautifully. Here I draw the creases above the eyes, the iris and pupils, as well as the cilia. If your mom has moles, birthmarks or other features on her face, be sure to reflect them!

The matter remains for small - to draw mom's hair and ears. We draw the ears at about the same level as the eyes, and the hairstyle will be the same as your mother's. My mom has short hair with little bangs, so that's how I draw.

Next you need to draw clothes. I draw a neat collar, you can draw my mother's favorite sweater, top, top of the dress. You can add other details - for example, mother's beautiful beads, earrings and other jewelry that she really likes.

If your mom has a different hairstyle - like long hair, a high ponytail, a bob or something else - draw with a pencil exactly how it looks. You can get, for example, like this.

And now our mother's portrait needs to be painted in stages! I draw mommy's skin in beige, add a blush on her cheeks. Hair is a nice brown shade. My mother's eyes are special - one is green, the other is green with a brown spot, I also reflect this in my drawing so that the portrait on March 8 is more recognizable. I do not forget to make the shadows in an orange tone on the skin. I paint my clothes green, to match my eyes

So, I showed you how to draw a mother beautifully for a child on March 8 or on Mother's Day. If you decide to draw a picture of mom and you succeeded, be sure to share the result in the comments, I'm very interested to see. If you have any problems, you can also ask for help in the comments.
Approaching - Mother's Day. On the eve of this holiday, we think: what to give to your beloved mom? You can find the answer to this question in our article. We have prepared great ideas for DIY gifts.
You will need: 3 A3 sheets, black pastel paper 50x65 cm, 2 types of scrapbooking paper (red and with flowers), Moment Crystal glue, pencil, ruler, red satin ribbon, mug, 4 bars.

Master Class
- Take a sheet of A3 format and redraw the diagram of the box.

- Take another sheet of A3 format and redraw the side edges of the box.

- Take the third sheet of A3 format and redraw the diagram of the box lid.

- Cut out pieces from 3 sheets.
- Glue the sides of the box.
- Fold 2 times inside the edge of the lid.

- Fix with glue.
- Cover the sides of the box with black pastel paper.
- Cut out a blank from black paper according to the lid pattern.
- Cover the lid with black pastel paper.
- Cut out 4 rectangles measuring 15x16 cm from black pastel paper.
- Cut out 4 rectangles measuring 13x14 cm from red scrapbooking paper.
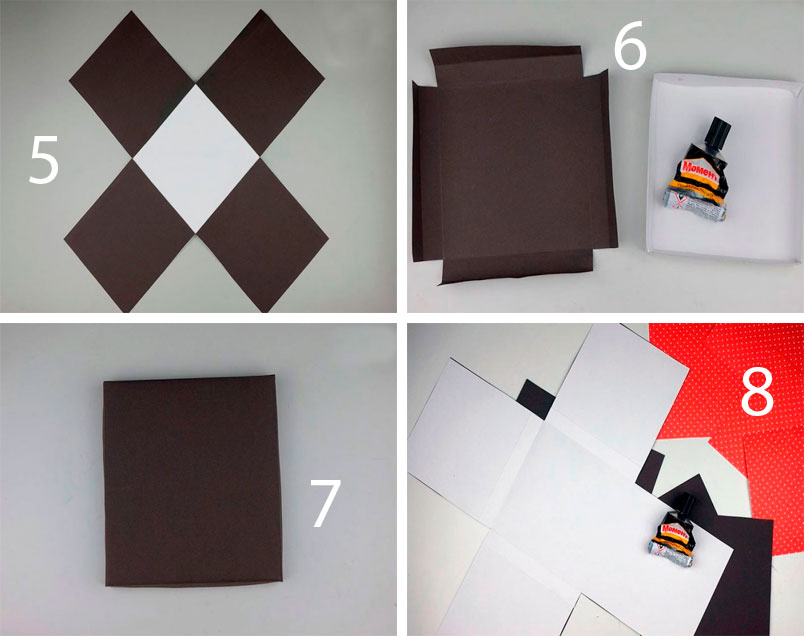
- Paste the inside of the box with black rectangles.
- Attach a piece of red ribbon to each side.
- Glue the red rectangles to the inside of the box over the ribbons.
- Cut out a 15cm x 16cm rectangle from floral scrapbooking paper.
- Glue it to the center base of the box.

- Cut out a 13x164 cm rectangle from floral scrapbooking paper and glue it onto the lid.
- Arrange 4 bars on the sides and tie with ribbons.
- Place the mug in the center, raise the edges and close the lid.

- Decorate the lid with ribbon and tie a bow.
Tulips from corrugated paper and sweets

You will need: corrugated paper of your favorite colors for buds, green corrugated paper for leaves, Raffaello sweets, double-sided thin tape, green teip tape, satin ribbon, packaging material for the bouquet, scissors, wire, pliers, wooden stick, if desired, to create dew - transparent beads , glue gun, tweezers.
Master Class
- Prepare the wire by making the desired number of stems of the same length.

- Cut long strips of corrugated paper, cut the long strip of corrugated into 2 pieces, then cut into 4 pieces. You should get 8 strips, 6 of them will be needed for the tulip bud.
- Turn each strip around the center, bend in such a way that the front sides of the strip are directed in one direction.

- Make 6 blanks in the same way.
- Attach double-sided tape to the end of the wire.

- Attach the candy to the end of the wire.
- Collect the tulip bud in this way: take the first petal and attach it to the adhesive tape. Place the second and third petals near the candy and, holding with your fingers, fix with tape tape.

- Attach the remaining petals in the same way, forming a tulip bud and securing with tape.
- Trim excess crepe paper at an angle at the base of the bud.
- Wrap the stem with tape.

- Cut off a strip of green crepe paper.
- Cut into two almost equal parts.
- Fold each part 4 times and cut out the leaves.
- Pull each leaf out in a spiral using a wooden stick.

- Place a short leaf, and lower on a longer one. Secure each leaf with tape. Tulip is ready! Make the right amount of tulips in different colors.
- Collect tulips in a bouquet in this way: connect 2 tulips and pull them together with teip tape, then add one tulip one at a time, placing the colors in a checkerboard pattern.

- Cut 20 leaves, and arrange them around the perimeter of the bouquet, fixing with teip tape.
- Wrap the bouquet in wrapping paper and tie with ribbon.

- Create dewdrops on the tulip buds by gluing clear beads using tweezers and hot glue.
Vase in decoupage technique
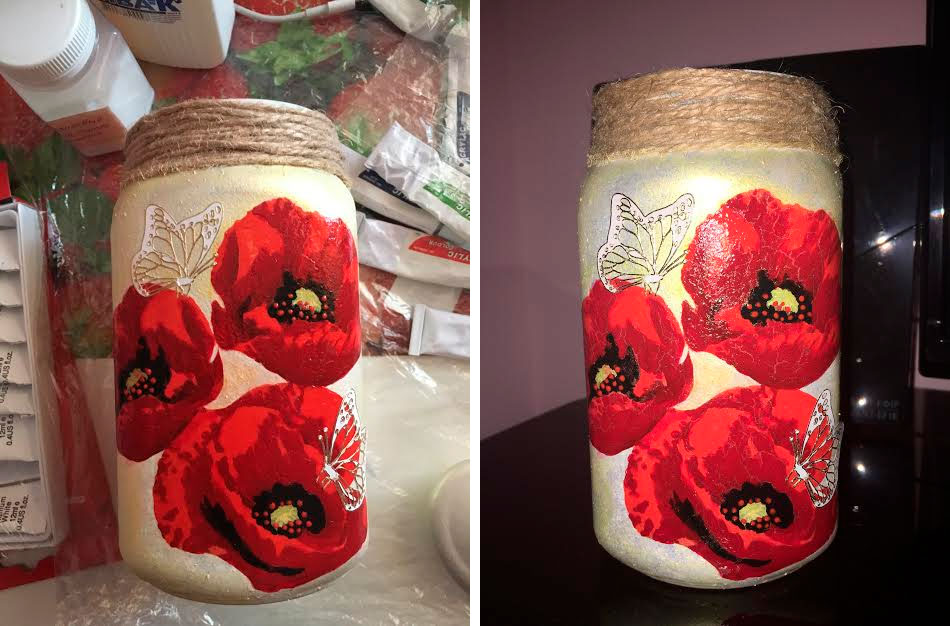
You will need: glass jar, acetone, cotton pad, sponge, decoupage napkins, brush, pva glue, acrylic paints, twine, scissors, water-based acrylic varnish.
Master Class

A vase from a decoupage jar is ready!
fashion necklace

You will need: large colored rhinestones, plastic mesh or thick leather, satin ribbon, superglue, wire cutters, round teeth, golden wire, scissors, a simple pencil, a plate.

Master Class

Fashionable necklace is ready!
Salt dough pencil

You will need: water, flour, extra salt, a cardboard jar for the frame, PVA glue, scissors, a piece of decorative cord or corrugated paper, gouache, a brush, a button, stacks, acrylic varnish for crafts, a toothbrush.
Master Class
- Knead the salty dough in this way: pour a glass of flour, a glass of salt, add water, then knead to the desired consistency of modeling. Separate part of the dough, add beige gouache, then knead.
- Roll out the cake with a thickness of 10-15 mm.

- Apply PVA glue to the outer rim of the jar and wrap with dough. Cut off the excess with a stack, and smooth the joints with a damp brush.
- Create a small dotted texture with a toothbrush on the surface of the dough.
- Knead the brown dough, roll it into a cake 10-15mm thick.

- Cut a 2" wide strip of brown dough and glue it to the bottom of the jar.
- Make 2 large bases for owl eyes from white dough, then glue them.
- Make a beak from brown dough and glue it.
- Blind eyes from turquoise dough and glue them.
- Roll up 8 strips of pink dough, twist 4 flagella from them and make a bow, then leave it to dry for 2 hours.
- Form owl wings with brown dough drops, then glue them on.

- Weave bundles of beige dough and glue on the neck of the jar.
- Roll up a sausage from white dough, draw a lace texture with a stack and glue it as a collar under the beak.
- Put the craft in a warm place for a day.
- Paint the lower part and wings with brown gouache and decorate with white dots.

- Draw pupils and eyelashes with black gouache, wait until the paint dries, then draw white highlights on the eyes.
- Glue a pink bow over the wing.
- glue a button with a bow from a corrugated strip onto the lace.
- Cover the craft with varnish and wait until it dries completely.
Salt dough pencil is ready!
Foamiran head wreath

You will need: foamiran 0.5 cm thick (orange, yellow, cream, light green, dark green and red), scissors, toothpick, curly scissors, oil paint in autumn shades, sponge, sheet of paper, iron, floral wire, ruler, super glue, lighter, lilac clay (for blueberries) or beads, teip tape, foil, wire at least 2 mm thick and 60 cm long, tape or rope, mold (leaf figure).
Master Class
- Print or redraw the leaf templates, then cut them out.

- Circle the templates on foamiran with a toothpick, then cut them out.
- Make a sufficient number of multi-colored leaves, for example 60, remember, the more there are, the more magnificent and beautiful the wreath will look.

- Give some realism to some of the leaves by trimming the edges with curly scissors.
- Scratch a small part of the leaves with a toothpick.
- Tone the leaves in this way: apply a little oil paint on the sponge, blot the foamiran leaf, then remove the excess with a piece of paper.

- Combination of colors: protonate a yellow foamiran leaf with light green and brown paint. Also protonate some yellow leaves with orange, red and light green paint. Protonate red leaves with brown, green leaves with burgundy, brown and dark green.

- Heat the iron on the second mode, attach the sheet for 2 seconds, remove and press against the mold to make an impression of the sheet. Repeat this process with all sheets. Please note that this should be done quickly and very carefully, since foamiran is highly flammable. If you are new to this business, it is better to skip this paragraph and get on with your work.

- Cut the floral wire into 7 cm lengths and make a loop at the end.
- Glue floral wire onto each sheet from the front using super glue.

- Burn the edges of the leaf with fire using a lighter. The edges should be realistically curved. Repeat this process for all leaves. Do this carefully, I remind you that foamiran is highly flammable.

- Roll a blueberry-sized ball of purple clay. Blind 15 berries, put each blueberry on a wire with a loop greased with super glue. Make notches with the tips of scissors on the top of the blueberries and set aside to dry. Beads can be used as blueberries.

- Start assembling the wreath in this way: form small bouquets of leaves and berries, fasten them with teip tape.
- Cut out rose petals in the form of a drop from red foamiran. For one bud, 10-15 petals are required. The number of buds depends on your desire, you can make from 3 to 7.

- Tint the edges of the petals with brown oil paint.
- Make the petals thinner in this way: heat the petal on the iron for 2 seconds, then fold it into an accordion and grind the petal with your fingers. Open the petal and create an indentation and curl the edge of the petal outward. Repeat this process for all petals.

- Finish the edges of the petals with a lighter.
- Roll up a drop of foil, make a loop on the wire, apply super glue and put on a drop of foil.
- Glue 2 petals opposite each other, and form a bud by gluing the petals in a checkerboard pattern, opening the flower. Form the desired number of roses in the same way.
- Make the base for the wreath by cutting 60 cm of wire. Make loops at the ends.

- Cut the tape into pieces 15 cm long, fold the sticky side inside each piece and cut lengthwise into 2 halves.
- Open the tip of the tape, attach to the base 10 cm from the edge and wind the wire.
- Attach bouquets of leaves and berries, fixing with teip tape.

- Weave them in the order you like best.
- Do not forget to insert roses in the gaps between the leaves.
- Attach a string or ribbon to the ends of the wreath.
A wreath on the head of foamiran is ready!
Exquisite topiary

You will need: cream-colored sisal, alabaster, glue gun, newspaper, planter, yarn, trunk, scissors, decoration elements - flowers, beads ...

Master Class

Exquisite sisal topiary is ready!
Handmade soap

Benefits of this soap: has antibacterial and scrubbing properties, ideal for oily and problematic skin, has a pleasant aroma.
You will need: 100 grams of soap base, zest of half a lemon, a teaspoon of liquid honey, a teaspoon of dried lavender flowers, 5 drops of lavender essential oil, 2 drops of lemon essential oil, mold, dishes.
Master Class

Lavender-citrus handmade soap is ready!
Book safe

Mom is a person who can replace everyone, but no one can ever replace her. Aren't these "golden" words? And these: “No gift to mom will be equal to the gift she gave us - life!”?
I bring to your attention beautiful quotes, sayings and aphorisms about mom.
The mother's heart is the deepest abyss, at the bottom of which you will inevitably find forgiveness (O. de Balzac).
***
The art of motherhood is to teach the child the art of life (E. Heffner).
***
God couldn't be everywhere, so he created mothers (Jewish proverb).
***
I love my mother like a tree loves the sun and water - she helps me grow, prosper and reach great heights (T. Guillemets).
***
There is only one most beautiful child in the world, and every mother has one (Chinese proverb).
***
Mom is the person who, seeing 4 slices of pie for 5 eaters, will say that she never wanted it (T. Jordan).
***
Mom will always make us feel like people of a higher class than we really are (J. L. Spalding).
Funny sayings about MOM
The hardest thing for a mom is to accept that other moms have the best kids too.
* * *
For some reason, many women think that giving birth to a child and becoming a mother are one and the same. One could just as well say that having a piano and being a pianist are the same thing. (S. Harris)
* * *
You can't stop being a kid as long as you have a mom (S. Jayet)
* * *
If evolution really works, then why do moms still have two arms? (M. Burley)
* * *
Deciding to have a baby is no easy task. It means deciding that your heart will now and forever roam outside your body. (E. Stone)
***
At first she could not object that the child would not be born nervous, then - that the milk would not dry up. Well, then she got used to it. (E. Meek)
* * *
Caring is when you think about others. For example, one woman shot her husband with a bow in order not to wake the children. (I. Ipohorskaya)
* * *
The Milky Way of our life originates from the mother's breast. (L. Sukhorukov)
* * *
One day your daughter will follow your example, not your advice.
Philosophical thoughts, quotes, statements about MOM
The first gift a mother gives us is life, the second is love, and the third is understanding. (D. Brower)
* * *
Children are the anchors that keep a mother alive. (Sophocles)
* * *
The greatest right of a woman is to be a mother. (L. Yutang)
* * *
Mother's love is omnipotent, primitive, selfish, and at the same time disinterested. She doesn't depend on anything. (T. Dreiser)
* * *
Women are so unhappy on the slope of their beauty only because they forget that beauty is replaced by the happiness of motherhood. (P. Lacretel)
And now interesting sayings about children
The best way to make children good is to make them happy. (O. Wilde)
* * *
Children are holy and pure. You can not make them a toy of your mood. (A.P. Chekhov)
* * *
Children have neither a past nor a future, but, unlike us adults, they know how to use the present. (J.Labruyère)
* * *
There is no more solemn anthem on earth than the babble of children's lips. (V. Hugo)
* * *
A child can teach an adult three things: to be happy for no reason, to always find something to do, and to insist on your own. (P. Coelho)
* * *
A child needs your love the most just when he least deserves it. (E. Bombek)
* * *
The first problem of parents is to teach their children how to behave in polite society; the second is to find this decent society. (R. Orben)
* * *
The child who endures less abuse grows up to be a more self-conscious person. (N. Chernyshevsky)
* * *
Young children have much in common with intellectuals. Their noise is annoying; their silence is suspicious. (G. Laub)
* * *
If people say bad things about your children, it means they say bad things about you. (V. Sukhomlinsky)
Mother's Day drawings

You can draw a gift for mom on anything! But if, due to childhood, the artist has little experience, it is better to go the proven way, using traditional cardboard or thick paper. The optimal size of the "canvas" is an A4 sheet - kids can conveniently place their creations on it, teenagers and adults will be able to fill it with a funny story on a popular holiday theme. In order for the drawing for Mother's Day to be successful, you should choose paints or pencils as a tool. You can also not do without a ruler, eraser, brushes and other stationery. Having defined the "field of activity", it is certainly worth developing a concept for the drawing. For a school competition or an exhibition in kindergarten dedicated to my mother's holiday, it is recommended to draw bouquets of flowers, fairy-tale characters with gifts and cakes, beautiful landscapes, etc. The main thing is that the drawing for Mother's Day is created from the heart. Otherwise, our step-by-step lessons with photos and videos will help to cope with the task.
Step-by-step pencil drawing for Mother's Day for an exhibition in kindergarten - photo and video step by step

Any cute craft made by the hands of a baby will warm the mother's heart and replenish her piggy bank with pleasant little things for children. At the same time, there is absolutely no point in creating delightful masterpieces from expensive and hard-to-find materials. As a gift for your dear one on Mother's Day, you can present a simple pencil drawing with a funny holiday plot. Made with boundless children's love and a non-standard approach to business, any parent will definitely like it. Moreover, such a phased pencil drawing for Mother's Day is ideal even for a thematic exhibition in kindergarten. Further details!
Essential Materials for Mother's Day Pencil Drawing for Kindergarten Exhibition
- white sheet of A4 paper
- sharpened pencil
- paints or colored pencils
- eraser
Instructions for step-by-step drawing in kindergarten for Mother's Day for an exhibition - photo and video


Do-it-yourself drawing for Mother's Day to school for the competition (step-by-step photos and videos)

Flowers can be seen on the canvases of many world painters: Van Gogh and Claude Monet, Henri Matisse and Salvador Dali, Paul Cezan and Pierre Renoir. Why not follow the example of the great artists? Get inspired and be creative! Give your precious mom a floral drawing for Mother's Day, or draw a fresh bouquet of roses for a school pageant.
Necessary materials for DIY drawing to school for Mother's Day
- a sheet of white paper A4
- pencil
- eraser
Risum step by step drawing for Mother's Day to school with your own hands - photo and video


Do-it-yourself step-by-step pencil drawing for Mother's Day for beginners (photo and video)

A step-by-step pencil drawing for Mother's Day is always a worthy gift or addition to it. But even more worthy of praise and admiration is the mother's portrait, made for the holiday by the hands of a child. Of course, drawing people is not an easy task. But with our step-by-step photo tutorial, you can make an amazing image that your mom will love and perfect for displaying at school and kindergarten.
Draw with a pencil a portrait of the dearest woman for her holiday, surprise all your relatives and friends with your artistic achievements.
Essential Pencil Drawing Materials for Beginners for Mother's Day
- a sheet of white paper A4
- sharpened pencil
- eraser
We draw a step-by-step drawing with a pencil with our own hands for mom for her Day - photo and video


Beautiful drawing for Mother's Day in stages with paints - phased photos and videos

Mother's Day is one of the most beautiful autumn holidays. Why not take advantage of this and draw a colorful landscape with paints as a gift to your beloved mom. The theme of the illustration can be a living picture of the nearest forest with a lake or a fantasy study of luxurious autumn nature. With the help of our master class with a photo, a beautiful drawing for Mother's Day in stages with paints will succeed even for beginners.
Necessary materials for painting with paints for mom on her holiday
- a sheet of white paper A4
- ruler
- pencil
- eraser
- brushes of different thickness and hardness
- watercolor or gouache paints
- glass of water
- cotton fabric
We draw a beautiful drawing with paints for Mother's Day with our own hands - step by step photos and videos


Children's drawing for Mother's Day with paints or a pencil is a great, sincere and sincere gift for any parent. A beautiful image, drawn in stages with your own hands, will decorate the competition at school and complement the exhibition in kindergarten. Make a drawing on a popular topic for the holiday according to our master classes with photos and videos - please your beloved mother with a creative approach to congratulations.
On Mother's Day, celebrated on November 26, 2017, children can give their mother a beautiful hand-made drawing or postcard. If a child of 8-9 years old or younger does not yet know how to draw a mother, let him do the work in stages with a pencil or paints. It is very easy to do this - you need to consistently follow the instructions described in the master class. Daughters and sons can give such gifts to their mother for their birthday, and just like that. What to draw for mom, dad can tell them by reading our tips and tricks to the end.
How to children 8-9 years old beautifully and easily draw mom with paints in stages
As a rule, children 8 - 9 years to draw a mother beautifully and paints help very easily - gouache is better. Such drawings are bright, convey all the love of a daughter or son. Let the child follow all the steps described in the master class step by step, and everything will turn out just fine for him!
Draw Mom - Master class for children 8-9 years old
By publishing here a master class on how to draw a mother, we are sure that it will help you understand how to draw a mother beautifully and easily with paints for children 8-9 years old. Help the child to portray his beloved mother, prompting him to follow the sequence of actions.
Get to work together, having prepared paints, a soft brush, a sheet of paper and water in a glass in advance (for rinsing the brush).

How to draw mom, dad, daughter and son with a pencil: step by step instructions
A real strong family is loving parents and their children. Draw on paper a happy moment - all family members on a walk or holiday together. Understand, how draw mom and dad with a daughter and son with a pencil with a pencil, step-by-step instructions will prompt.

Draw a family with a pencil - Master class with step-by-step steps

In order to learn how to quickly draw mom, dad, daughter and son with a pencil - you will find step-by-step instructions on this page - read the detailed master class to the end. By following all its steps in stages, you will get a very realistic drawing.
- First, draw auxiliary lines with a pencil - the outline of the picture. Here you see circles - blank images of the head of dad and son - and lines, legs and arms of the future drawing.
- Draw the head of the child and the man, depicting the hair and ears.

- Continue drawing, depicting, as shown here, the body of a boy.

- Draw the child's legs and the man's arms.

- Draw the details of the boy's dad's clothes - the collar of the shirt or the neckline of the t-shirt.

- "Dress" dad in trousers the way you see it in the image.

- Do not forget about the eyes, nose, mouth of each drawn character.

- Next to the image of dad with his son on his shoulders, draw the outlines of the future drawing of mom and daughter.

- Work on girls' and women's hairstyles by making a ponytail for your daughter and stylish curls for your mother.

- Draw the faces of the heroes of the family portrait with a pencil.

- After drawing the hands of the daughter and mother, “hand” the school bag to the girl.

- "Dress" both beautiful ladies in dresses.

- “Put” women's shoes on your daughter and mother - the photo will tell you how to do it.

- You will get a realistic black and white image of the whole family.

- Color it in and admire the finished drawing! Choose the color of paints or pencils at your own discretion.

How to draw a beautiful portrait of a mother with a child in her arms on Mother's Day: a master class in stages
It is impossible to imagine two closer people than a mother and her child. Hundreds and even thousands of years ago, artists idolized motherhood, depicting the Madonna and Child in portraits. Modern painters continue to follow these old wonderful traditions. However, is it possible to find out how to draw a portrait of a mother with a child in her arms on Mother's Day, to a person far from art? How to please mommy on November 26, 2017? You will need professional advice.

We draw a mother with a child in stages - Explanations on the video
If you decide to find out how easy it is to draw a beautiful portrait of a mother with a baby in her arms on Mother's Day, be sure to watch this video. Here the artist explains in detail and shows all the stages of painting a portrait in gouache.
Gifts made by children's hands are especially dear to a mother's heart. When choosing what to draw for mom's birthday from her daughter, pay attention to our selection of drawings made by children of different ages. On them you see mothers at work, on vacation, in the family circle. Yes, some works look very unpretentious, but is the drawing technique so important? All these drawings have one thing in common - love and sincerity.
Birthday drawing for mom
It is still difficult for preschool girls or students of primary and secondary grades to make intricate gifts with their own hands. The easiest option for them to surprise their beloved mother is to give her a simple and cute drawing, signing it with kind words and wishes. What can you draw mom for her birthday from her beloved daughter? You will find out the answer to this question by looking at a selection of drawings made by girls of different ages.


What to draw mom just like that, but with all my heart
In order to please your beloved mother, it is not necessary to wait for a reason - a holiday or a celebration. A drawing handed to a mother at any time is the most precious gift her child can give. Look at our selection of drawings and find out what to draw for mom just like that, but from the heart. You can use everything in your work - from a pencil and crayons to professional acrylic paints. The main topics for drawings should be “Family”, “We are with parents”, “Our vacation with mom”, “Mom's profession”, etc.

Simple drawings for mom - gifts for no reason
What to draw for mom for no reason, just like that, but with all my heart? The most important thing for mothers is to know that their children love and appreciate them. A drawing presented to mom for no reason - a birthday or a name day - will cheer up mom and let her know that she really is "beloved and the only one" for her child.


How to draw a postcard for mom with your own hands - A great gift for Mother's Day
With the approach of the main, bright and kind holiday of all Russian mothers, coming in 2017 on November 26, children are thinking: how to draw a postcard for mom with your own hands - a great gift for Mother's Day? Of course, you can take half of the album sheet, depict flowers, the sun and a mother with a son or daughter on it. However, a souvenir can also be made voluminous by sticking a bouquet on paper, sandwiched in a child's palm.

Postcard for Mom on Mother's Day - Master class for children
Want to learn how to quickly and beautifully draw a postcard for mom with your own hands and make her a great gift for Mother's Day? Be sure to pay attention to the selection of our drawings - it depicts all the brightest, associated with the name "mother": the sun, flowers, smiling children, nature. In addition, watch the master class on creating a three-dimensional postcard. His step-by-step instructions will help you create an unusual gift on November 26, 2017. For work, as you will understand after watching the video, you only need colored and white paper, glue, scissors, felt-tip pens and a lot of love in your heart.


Now you know how to draw a mother beautifully and easily, and you can help children 8-9 years old and younger wish their mother a happy birthday or just please her with a pleasant surprise. Show your child a selection of our drawings, photos; watch with your daughter or son a video on making a DIY Mother's Day card. What to draw for mom for the holiday, not only dad will tell you, but also our master classes.


, poultry farming")


- Burns, Robert - short biography
- The concept of common vocabulary and vocabulary of limited use
- Nancy Drew: The Captive Curse Walkthrough Nancy Drew Curse of Blackmoore Manor Walkthrough
- Deadpool - Troubleshooting
- Won't start How to Survive?
- What to do if bioshock infinite won't start
- Walkthrough Nancy Drew: Alibi in Ashes
- Spec Ops: The Line - game review, review Spec ops the line crashes on missions
- Room escape level 1 walkthrough
- Processing tomatoes with boric acid How much will 2 grams of boric acid
- Cucumber Grass (Borago)
- Bioinsecticide Lepidocid: purpose, properties and application procedure Lepidocide waiting period
- How to change the language to Russian in steam
- Dendrobium noble: room care
- Morphology of plants general concepts - document
- Planting, propagation and care of bamboo at home, photo Growing bamboo from seeds
- How to strengthen the cellular signal for the Internet in the country
- Sanskrit reveals the forgotten meaning of Russian words (2 photos)
- The oldest language Sanskrit programming language of the future Dead language Sanskrit
- Who has dominion over all the earth?