Photoshop how to make a photo with a simple drawing. How to make a photo as drawn with Photoshop
Styling a photo is always very interesting for beginners (and not so) photoshoppers. Without long introductions, I will say that in this lesson you will learn how to make a drawing from a photo in Photoshop.
The lesson does not pretend to be of any artistic value, I will just show a few tricks that will allow you to achieve the effect of a hand-drawn photo.
One more note. For successful conversion, the photo must be quite big size, since some filters cannot be applied (they can, but the effect is not the same) to small images.
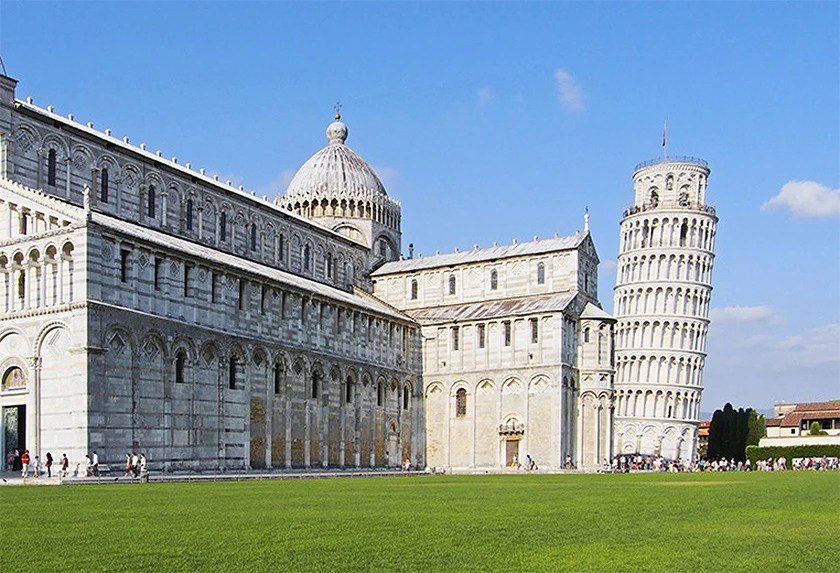
So, open the original photo in the program.

Make a copy of the image by dragging it onto the new layer icon in the layers palette.

Then desaturate the photo (the layer we just created) with the keyboard shortcut CTRL+SHIFT+U.

We make a copy of this layer (see above), go to the first copy, and remove visibility from the top layer.

Now we proceed directly to the creation of the drawing. Go to the menu "Filter - Strokes - Cross Strokes".

Using the sliders, we achieve approximately the same effect as in the screenshot.


Then we go to upper layer and turn on its visibility (see above). Go to the menu "Filter - Sketch - Photocopy".

As with the previous filter, we achieve the effect, as in the screenshot.


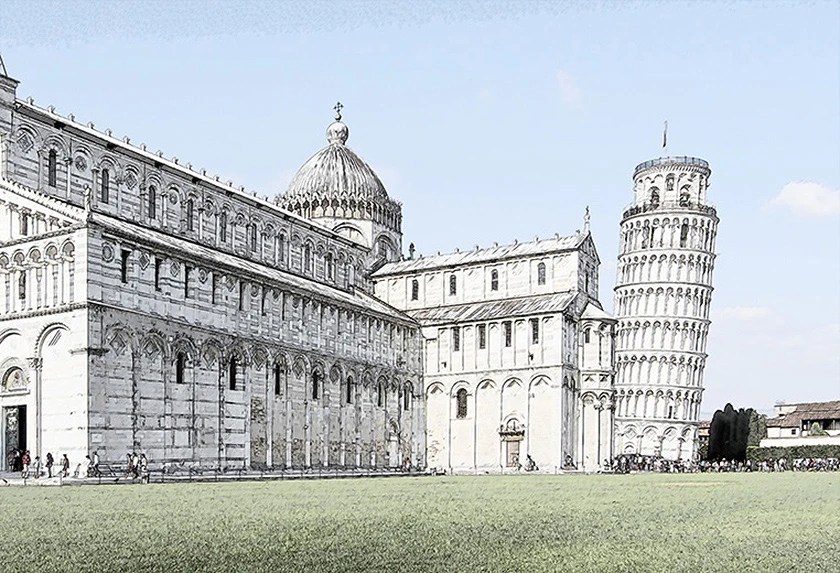
As a result, we get something like this (remember that the results will be fully visible only at a 100% scale):

We continue to create a picture effect in Photoshop. Create a print (merged copy) of all layers with a keyboard shortcut CTRL+SHIFT+ALT+E.

Then go back to the menu "Filter" and choose the item "Imitation - Oil Painting".

The applied effect should not be too strong. Try to keep as many details as possible. The main starting point is the eyes of the model.


We are nearing the end of the styling of our photo. As we can see, the colors in the "picture" are too bright and saturated. Let's fix this injustice. Create an adjustment layer "Hue/Saturation".

In the layer properties window that opens, muffle the colors with the slider saturation and add some yellow color on the model's skin with a slider color tone.

The final touch is the overlay of the canvas texture. Such textures can be found in large numbers on the Internet by typing the appropriate query in the search engine.
Drag the image with the texture onto the model image and, if necessary, stretch it to the entire canvas and click ENTER.

Change the blending mode (see above) for the texture layer to "Soft light".
Here is what should happen in the end:

If the texture is too pronounced, then you can lower the opacity of this layer.

Unfortunately, the requirements for screenshot sizes on our site will not allow me to show the final result at 100% scale, but even with this resolution, you can see that the result, as they say, is obvious.

This lesson is over. You yourself can play with the strength of the effects, the saturation of colors and the imposition of various textures (for example, you can impose a paper texture instead of a canvas). Good luck in your work!
You can easily achieve this with short period. In this tutorial, you will learn how to create drawings from a photo using brushes. If you use a graphics tablet in your work, you can achieve an even better effect. In a similar lesson, another option was considered for creating a pencil drawing from a photograph. So, let's begin!
Here is the result you should get:
The lesson used an image from a paid resource, but you can easily find it on the Internet and free photos a similar topic.
1. Image adjustment
Step 1
Open our source in Photoshop. Double click on the Background layer to unlock it and name it Layer 1. Create New layer and name it Layer 2. Set the foreground color to white and then use the fill(G), fill it with white. Place Layer 2 under the source layer.

Convert the color image to black and white. Make the photo layer active and go to the menu Image - Adjustment - Hue / Saturation and in the settings window that appears, reduce the Saturation to -100.

2. Create a picture effect
Step 1
Let's move on to creating the drawing effect itself. Add a layer mask to the tiger layer. To do this, click on the layer mask icon and immediately fill it with black using the tool fill(G).

Next, switch the foreground color to white. The background color should be black. Activate the tool Brush(B). Choose from a set of brushes Flat blunt with short stiff bristles, set the size to 60 pixels. and start applying strokes on the black layer mask (you can experiment with brushes and sizes and choose another one you like).

Step 2
By continuing to paint strokes with a white brush on the layer mask, we restore the image, giving it the texture of the picture. Try to keep the brush strokes like hatching or cross hatching that mimics the technique of pencil drawing.

Step3
Tool moving(V) Center the image of the tiger in the document and add strokes until you are satisfied. When finished, duplicate this layer with the keys Ctrl+J.

Step 4
Now you need to enhance the effect of the picture. We go to the menu Image - Correction - Levels and set the settings for the RGB channel as in the screenshot, thereby enhancing the contrast and highlighting strokes. After that merge all layers together Ctrl+Alt+Shift+E.

Step 5
You can stop at the result, but it’s better to spend a couple more minutes and make the drawing as close as possible to the real one, made on paper. We will do this with the help of a gradient, we will try to achieve the effect of a photograph of a picture. Right-click on the layer with the picture and in the drop-down menu go to the option Overlay Options(you can just double-click on the layer with the left mouse). Choose a layer style Gradient overlay, set the values as in the screenshot.

AKVIS Sketch lets you turn a photo into pencil drawing.
Now you do not need to masterfully master the pencil to create an original work of art.
All you need is a little imagination and AKVIS Sketch!
The program turns photographs into thumbnails taken pencil or coal, allows you to create not only black and white pencil sketch, but also color drawing, as well as get the effect of watercolor and pastels.

The drawings created by the program can compete with real works. Sketch lets you get amazing quality result similar to the work of an artist.
If you've always wanted to learn how to draw but didn't know how, try AKVIS Sketch!


The program provides two main styles that allow you to create drawings with different types of shading: Classical and Art. Each style comes with a set of ready-made presets.
An intuitive interface, the ability to select parameters using the quick view window, a hint panel and a rich collection of presets will help you quickly get used to the program and learn how to create your masterpieces.
The transformation of a photo into a drawing takes place before your eyes. Frame tape allows you to track the process of converting a photo at different stages and get pictures of different degrees of sophistication without changing the effect parameters.


Using the program, you can prepare illustrations for a book or article, create a unique greeting card, an interesting avatar, a poster or a picture on the wall, a print for a T-shirt.
The program is good not only for processing portrait photographs, but also for views of nature, architectural monuments. Sketch is used by professionals to demonstrate the features of architectural styles, preparing presentations. The program is indispensable when working on an advertising booklet or website, when you want to present a set of images in the same style.
AKVIS Sketch makes everyone feel like an artist!


Batch File Processing helps to quickly, automatically, turn into drawings great amount photos, create cartoons, comics.
Using bookmarks Background, Canvas and Inscription can add additional effects on the image: get a combination of photography and drawing , imitate drawing by different kind
In this tutorial, you will learn how to turn an ordinary photo into an amazing drawing. I will try to explain all the details as clearly as possible, so that everyone can create a similar illustration.
We will be creating the effect shown on the left side of the image. If you want to make the drawing more colorful, use the ready-made action.

For work, we need a stock photo, but you can take any other.
Begin
We open the photo with which we will work. Let's move on File - open(File - Open), select the desired picture and press the button Open. Before proceeding, I will give you a few tips for preparing the document:
- Your photo must be in color mode RGB, 8 bits/ channel(bit/channel). To check if this is the case, go to Image - mode(Image - Mode).
- For best results, your photo should be between 1500-4000 pixels wide/height. To check, go Image - Imagesize(Image - Image Size).
- The photo should be the background layer. If this is not the case, go layer - New - backgroundfromlayer(Layer - New - Convert to Background).
- To perform automatic color correction, go to Image - Autotone(Image - Autotone) Image - Autocontrast(Image - Auto Contrast) and Image - Autocolor(Image - Automatic color correction).

2. Create the background
We will fill the background with a solid color. Let's move on layer - NewFilllayer - Solidcolor(Layer - New Fill Layer - Color) to create a new fill layer and name it "Background Color".

3. Create a basic sketch
Step 1
Now we will create a basic sketch. Select the background layer with cars ("Background" layer in the screenshot) and go layer - New - layerViaCopy(Layer - New - Copy to New Layer) to copy the background layer, then move the duplicate to the very top of the layers panel. After that, press D to reset the color to standard. Let's move on filter - Sketch - Photocopy(Filter - Sketch - Photocopy) and set up the filter:

Step 2
Name this layer "Base Sketch" and change its blending mode to Multiply(Multiplication).

4. Create a rough sketch
Step 1
Now we will create a rough sketch. Let's move on layer - New - layerViaCopy(Layer - New - Copy to New Layer) to copy the Base Sketch layer. We take LassoTool FreeTransform(Free Transform) and increase the Width and Height by 105% as shown below:

Step 2
Name this layer "Large Draft Sketch" and lower the Opacity to 14%.

Step 3
Select the "Base Sketch" layer and go to layer - New - layerViaCopy(Layer - New - Copy to New Layer) to copy it. We take LassoTool(L) (Lasso), right-click on the working canvas, select FreeTransform(Free Transform) and reduce the width and height by 95% as shown below:

Step 4
Name this layer "Smaller Rough Sketch" and lower its Opacity to 14%.

5. Create a rough sketch
Step 1
Now we will create a rough sketch. Select the background layer with cars and go layer - New - layerViaCopy(Layer - New - Copy to New Layer) to copy it, then move the duplicate to the very top of the layers panel. Let's move on filter - Artistic - Cutout(Filter - Imitation - Application) and set up the filter:

Step 2
Let's move on Filter - Style - Find Edges(Filter - Styling - Edge Selection) and then Image - Adjustments - Desaturate

Step 3
Name this layer "Rough Sketch_1", change its blend mode to colorBurn(Background Burn) and lower the Opacity to 30%.

Step 4
Now, using the method above, we will create more rough sketch layers. We repeat steps 1-2, but in the first step we use different filter settings:

Step 5
Name this layer "Rough Sketch_2", change its blending mode to colorBurn(Background Darkening), lower the Opacity to 25% and move it under the "Rough Sketch_1" layer.

Step 6
We repeat steps 1-2 again, but in the first step we use new filter settings:

Step 7
Name this layer "Rough Sketch_3", change its blending mode to colorBurn(Background Darkening), lower the Opacity to 20% and drop it below the "Rough Sketch_2" layer.

Step 8

Step 9
Name this layer "Rough Sketch_4", change its Blending Mode to colorBurn(Background Darkening), lower the Opacity to 20% and drop it below the "Rough Sketch_3" layer.

Step 10
We repeat steps 1-2 again, but in the first step we use new filter settings:

Step 11
Name this layer "Rough Sketch_5", change its blend mode to colorBurn(Background Darkening), lower the Opacity to 18% and drop it below the "Rough Sketch_4" layer.

Step 12
We repeat steps 1-2 for the last time, but in the first step we use the new filter settings:

Step 13
Name this layer Rough Sketch_6 and change its blending mode to colorBurn(Background Darkening), lower the Opacity to 7% and drop it below the "Rough Sketch_5" layer.

Step 14
Now we have to group all the rough sketch layers. Select the "Rough Sketch_6" layer, hold down the Shift key and click on the "Rough Sketch_1" layer to automatically select all six layers. Next we go layer - New - groupfromLayers(Layer - New - Layer Group) to create a group from the selected layers, which we call "Rough Sketch".

6. Create Shadows
Step 1
Now we will add a slight shading to the drawing. Select the background layer and go layer - New - layerViaCopy(Layer - New - Copy to New Layer) to copy it, and move the layer to the very top of the layers panel. Let's move on filter - Style - FindEdges(Filter - Styling - Edge Selection), then apply Image - Adjustments - Desaturate(Image - Correction - Discolor).

Step 2
Let's move on filter - BrushStrokes - AngledStrokes(Filter - Strokes - Oblique strokes) and apply the following settings:

Step 3
Name this layer "Shadow_1", change the blending mode to Multiply(Multiply) and reduce the opacity to 12%.

Step 4
Repeat step 1, then apply filter - BrushStrokes - Crosshatch(Filter - Strokes - Cross strokes) with the following settings:

Step 5
Name this layer "Shadow_2", change the blending mode to Multiply(Multiply), reduce the opacity to 5% and move it under the "Shadow_1" layer to have correct order on the layers panel.

7. Adding Noise
Step 1
In this section, we will add some noise. Select the "Shadow_1" layer and go layer - New - layer(Layer - New - Layer) to create a new layer and name it "Noise".

Step 2
Press the D key to reset the colors to default, then go to Edit - Fill(Editing - Fill) and enter the following settings:

Step 3
Let's move on filter - noise - Addnoise(Filter - Noise - Add Noise) and apply the following settings:

Step 4
Now change the blending mode of the layer to Screen(Lightening) and reduce the opacity to 64%.

8. Toning
Step 1
Now we will add a light toning. Let's move on layer - Newadjustmentlayer - Curves(Layer - New Adjustment Layer - Curves) to add a new adjustment layer, which we call "Toning".

Step 2
Double click on the adjustment layer thumbnail in the layers panel and adjust it:

9. Finishing touches
Step 1
In this section, we will add the finishing touches. Let's move on layer - Newadjustmentlayer - photofilter(Layer - New Adjustment Layer - Photo Filter) to create a new Photo Filter Adjustment Layer, which we call "Tint".

Step 2
Double click on the adjustment layer thumbnail to adjust it:

Step 3
Now let's add some contrast. Press the D key to reset the colors to standard, and go layer - Newadjustmentlayer - GradientMap(Layer - New Adjustment Layer - Gradient Map) to add a Gradient Map adjustment layer, which we call "Contrast".

Step 4
Change the blending mode of the adjustment layer to Softlight(Soft light) and reduce the opacity to 18%.

Step 5
Now we will adjust the saturation. Let's move on layer - Newadjustmentlayer - Vibrance(Layer - New Adjustment Layer - Vibrance) to create a new adjustment layer, which we call "Saturation".

Step 6

Step 7
Now we will adjust the brightness. Let's move on layer - Newadjustmentlayer - Levels(Layer - New Adjustment Layer - Levels) to create a new adjustment layer, which we call "Luminance".

Step 8
Double click on the adjustment layer thumbnail and adjust it:

Step 9
Next, let's add sharpness. Press the keyboard shortcut Ctrl+Alt+Shift+E to merge all visible layers on a separate new layer. Then we go filter - Other - highPass(Filter - Other - Color Contrast) and set up the filter:

Step 10
Name this layer "Sharpness", change its blending mode to Hardlight(Hard Light) and lower the Opacity to 76%.

Congratulations, you made it! This is what the final result looks like:

I will give you some advice on how you can further change the finished drawing:
- Select the "Background Color" layer, double-click on its thumbnail and select a different color. When finished, click OK.
- Play with the opacity of any sketch layer to get a different result.
- Select the "Tinted" layer, double-click on its thumbnail and on the panel Properties
- Select the "Hue" layer, double-click on its thumbnail and in the panel Properties(Properties) apply other settings.
- Select the "Contrast" layer and experiment with its opacity to adjust the contrast of the picture.
- Select the "Saturation" layer, double-click on its thumbnail and in the panel Properties(Properties) apply other settings for Vibrance(Vibration) and Saturation(Saturation) to get a different result.
- Select the "Luminance" layer, double-click on its thumbnail and apply other settings.
- Select the "Sharpness" layer and experiment with its opacity to adjust the amount of sharpness.
We get this result:

Great job!
If you want to brighten up your drawing with a paint effect, use the ready-made action.

The action works in such a way that you just need to brush over the area where the paint should be, then run the action, which will do the rest of the work and give you a completely customizable result.
Each application of this action will generate a new variation, even if you are using the same brushed layer. The action comes with 15 pre-made pattern stylizations, including canvas, halftone, and mesh. You can familiarize yourself with the work of the action in a special
Turn your photo into an artistic masterpiece! SoftOrbits Sketch Drawer will help you convert images into pencil drawings with just a few clicks. Our program will create color or black and white pencil drawings from regular photos, generating neat pencil strokes. You don't need to be able to hold a pencil to be an artist. Sketch Drawer makes creating photos from drawings easy and fun!
Surprisingly, turning a photo into a drawing is quite easy, even if you are not an artist. For this you need a computer with installed program to create a picture from a photo. Sketch Drawer is fast and easy to learn and use. Open the picture, select the picture type from ready set and get a great pencil drawing!
The program has many ready-to-use pencil drawing effects for different types of images. With the help of them you will be able to create like drawings with a simple pencil, and colored pencils, as well as drawings with a pen, felt-tip pen, watercolor, charcoal. You can edit each template by changing its settings to get the effects you want.


Creating a drawing with colored pencils has never been so easy. You do not need not only to be able to hold a pencil in your hands, but even to have one. All you need to convert a photo into a colored pencil drawing is the Sketch Drawer.


Sketch Drawer makes it easy to create both color and black and white drawings. To draw with colored pencils, simply turn on the Color Sketch setting. You can also make a drawing from a photo, made not with a simple pencil, but with a pencil of a given color.
Do you want to convert big number images to drawings with the same settings? With Sketch Drawer, it doesn't matter how many original photos you have. The batch mode available makes it easy to convert all your photos into drawings. You can add photos one by one or whole folders. Just check the settings on one of the photos and get great drawings from all photos in minutes.


- Green tomatoes stuffed for the winter - a delicious snack
- Tomatoes for the winter stuffed with garlic and herbs
- Grissini - Proven Italian Breadstick Recipes
- Raf coffee: the history of creation and options for preparing a coffee drink
- Quick snacks
- Useful culinary tricks for housewives
- Vegetarian mayonnaise at home
- Apple Pie - A Quick Recipe
- Secrets of cooking Tatar sweets chak-chak
- Improving the range and increasing the nutritional value of bread and bakery products
- Features and recipes for onion confiture and jam
- What kind of fish can be salted at home: choices and cooking tips Salt white fish
- What is yantra, types of yantra meaning
- wood burning technology
- How to calculate the specific gravity in different areas?
- Geography of beef cattle breeding (cattle, pigs, sheep), poultry farming
- Analysis of the company's market share is an effective tool for a successful business What share in sales is considered the norm
- The seventh technological mode is cognitive
- Types of one-part sentences
- The concept of dialect. What is a dialect? Grammar Dictionary: Grammar and linguistic terms