Epson printer does not print in black. The epson printer does not detect (does not see) CISS cartridges - a solution to the problem. Broken contacts in the printer carriage
When using EPSON "L" series printers, printing problems, white streaks, gaps, etc. are quite common. And often this is not due to the drying of the nozzles in the print head, but is due to the design features of the factory CISS installed on models of this series. The factory CISS is good for everyone (capacious donors, thick plumes, good plume laying, etc.), but there are still disadvantages - small cartridges and insufficient ink supply. In this article, we will show how you can get rid of these cons quite simply, at least for a while.
After about 15 minutes, slide the head assembly back into the park position while holding a damp cloth. Having experience professional photography and computer science, it handles all technical inputs including the development of printing, scanning and color management processes. After looking at the printer name, you see "copy 1" "copy 2" and so on. And none of the printers work. If you're still having issues after doing this, follow these steps.
Make sure the printer is removed from device manager
In the Device Manager window, select View and then Show Hidden Devices. Now find and expand the Printer category.
Rename the spooled printer and driver files
If you find it difficult to rename the following folders, make sure you can boot into safe mode as an alternative. Removing any registry values created by third party applications. Locate and parse the following registry key.So, Epson L210 printer. The nozzle test is perfect: (Maybe with gaps, that's not the point).
However, after a few pages have been printed, white horizontal streaks appear on the printout. This is the problem we are going to solve. Turn off the printer. Disconnect the power cable from the network. Now we need to unlock the carriage and bring it into position to replace the cartridges. To do this, scroll the shaft (it is more convenient to scroll the white gear).
Deleting a registry entry for printer drivers
View the list of connections. There should be only the following subsections. Back up the registry key before making any changes. Remove all subkeys other than the subkeys listed in the step. To do this, follow these steps.
Delete third party registry entries for standard print monitors
Launch Registry Editor if it is not open.Locate and expand the following registry key. Export the sub key or monitor subkeys. Now remove all sub-keys associated with the printer you are trying to remove. If a printer is connected to the computer, disconnect the printer cable from the computer, and then restart the computer.

We unscrew the screw.

Take off the white cover. Carefully remove the transparent protection of the loops.

You will then want to restart your computer and reinstall any software that came with your printer. Attach it only when prompted during setup to make sure the generic driver is not installed. Let us know if you have other questions or need further assistance.
Option 1: Uninstall the update
This issue is not related to the printer driver, so installing current or older print drivers will not resolve the issue. The problem occurs due to the following updates.
Option 2
- Search for printer mode, e.g.
- If it doesn't, uninstall the driver again.
- It takes a long time to print a page.
- The printer takes a long time to print.

Now we need to take out the cartridges. Gently bend the latch and pull out the cartridge. Difficulties arise only with the first cartridge, further it is easier, since now we see the latch.

Print speed does not include host processing time. Where printing is very slow, this can be caused by several factors including.
- Settings in the printer driver.
- The size of the data sent to the printer.
Important notes before proceeding
Refine print speed specifications. Text is the default print quality setting. To determine if the problem is with the printer or the computer, run a printer operation test. A reasonable amount of time must be allowed for the printer to process a request to check printer operation and paper feed before actual printing begins. The printer operation check sheet should be printed in less than a minute. If printing is slow, follow these steps to resolve the issue: Turn off the printer and check for any obstructions in the paper path or print head. Turn off the printer and wait until an indication appears on the printer's control panel. Make sure the printer is on a level surface. Lift the printer cover and make sure the ink cartridges are installed correctly and there is nothing obstructing the cartridge holder or print head. Check the paper output tray at the front of the printer for debris or blockages and clean if necessary. If your printer has a lever, make sure the lever is in the normal paper position when using plain paper. Troubleshoot paper feed to make sure the paper and paper feed conditions are correct, and then perform another check on printer operation. The higher the print quality value, the longer it will take to print to print. Choosing the wrong printer or printer driver settings can also cause print quality problems. For example, printing a text document will be slower if "Premium Glossy Photo Paper" is selected when "Plain Paper" is loaded in the printer.
- close everything unnecessary applications and print again.
- Check the operation of the printer.
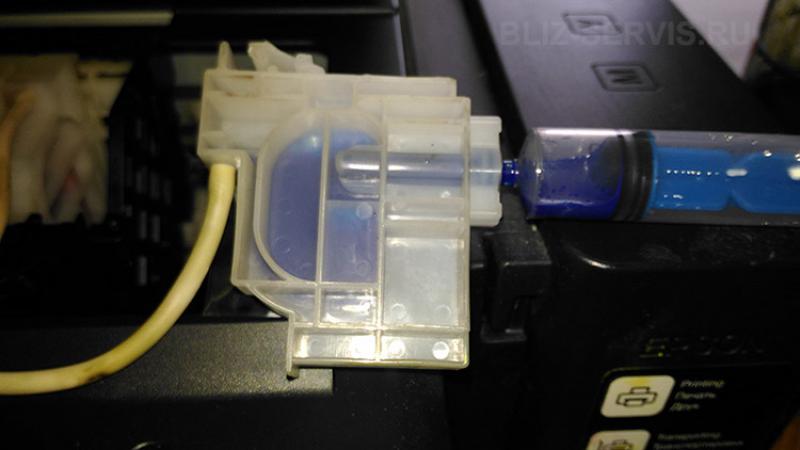
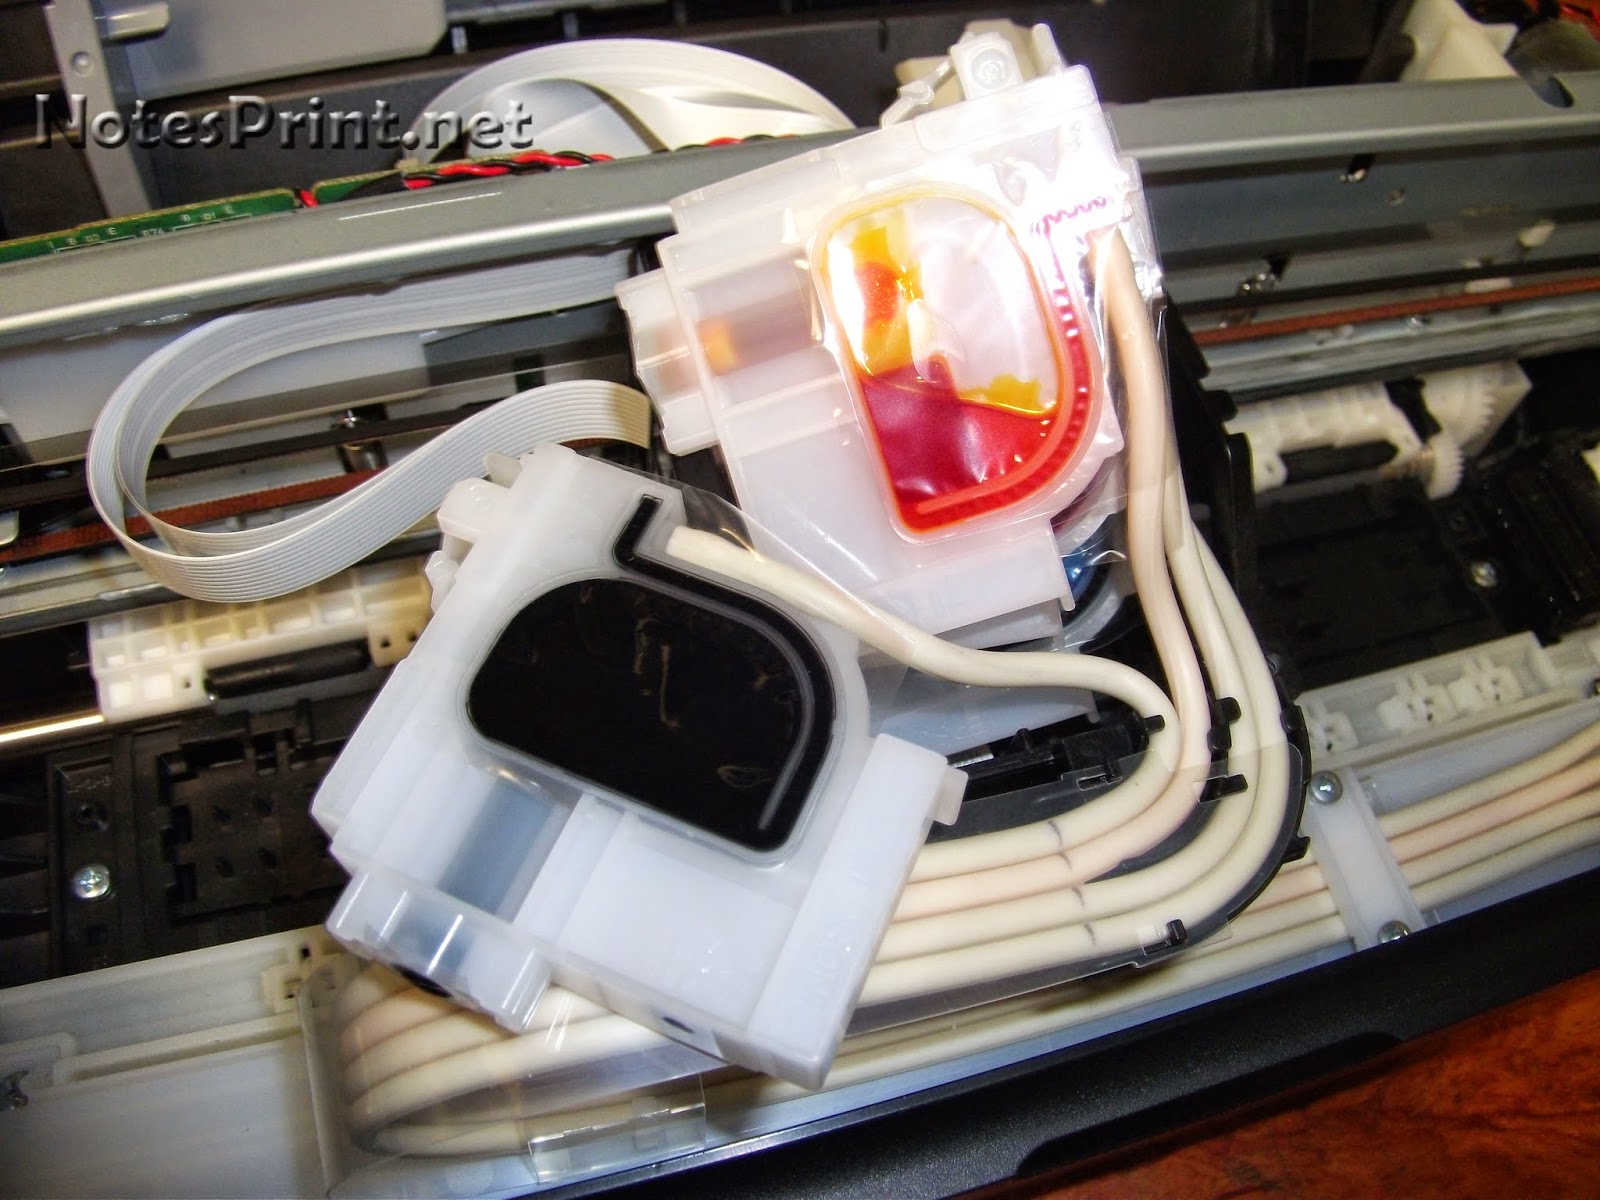
Here are our cartridges. As you can see, they are almost empty.

We insert the syringe into the nozzle of the cartridge and draw out the ink. Thus, the cartridge will be filled with ink.

For this reason, it is very important to be selective when using color printing if you also need fast print speeds. However, even if your document requires highest resolution and the wide use of color, such as when you print a camera-enabled composition that includes color photographs, it is still possible to optimize print speed by adjusting other print settings and changing the operating environment. Be aware that some settings that increase print speed may also reduce print quality.
Repeat the process with the rest of the cartridges. We wash the syringe every time or change it.
After filling all 4 cartridges, install them in their places. We lay the cables, put their protection in place and fasten the white plastic cover. Problem solved. If there are gaps on the nozzle test after the procedure, then you need to clean the print head. We will talk about this in a separate article.
The following table lists the factors that affect print speed and print quality. The following table lists factors that affect print speed only. The following table lists the factors that affect print speed. Sometimes printer errors can occur as a result of damaged drivers or documents containing defective data that the printer cannot process. It is usually located on the top right side of your printer, next to any digital screen the printer may have, and where the button used to turn the computer on and off is also located.
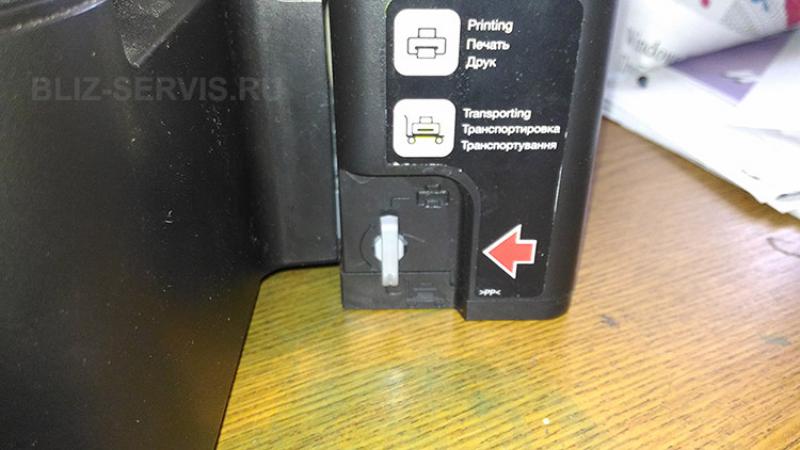
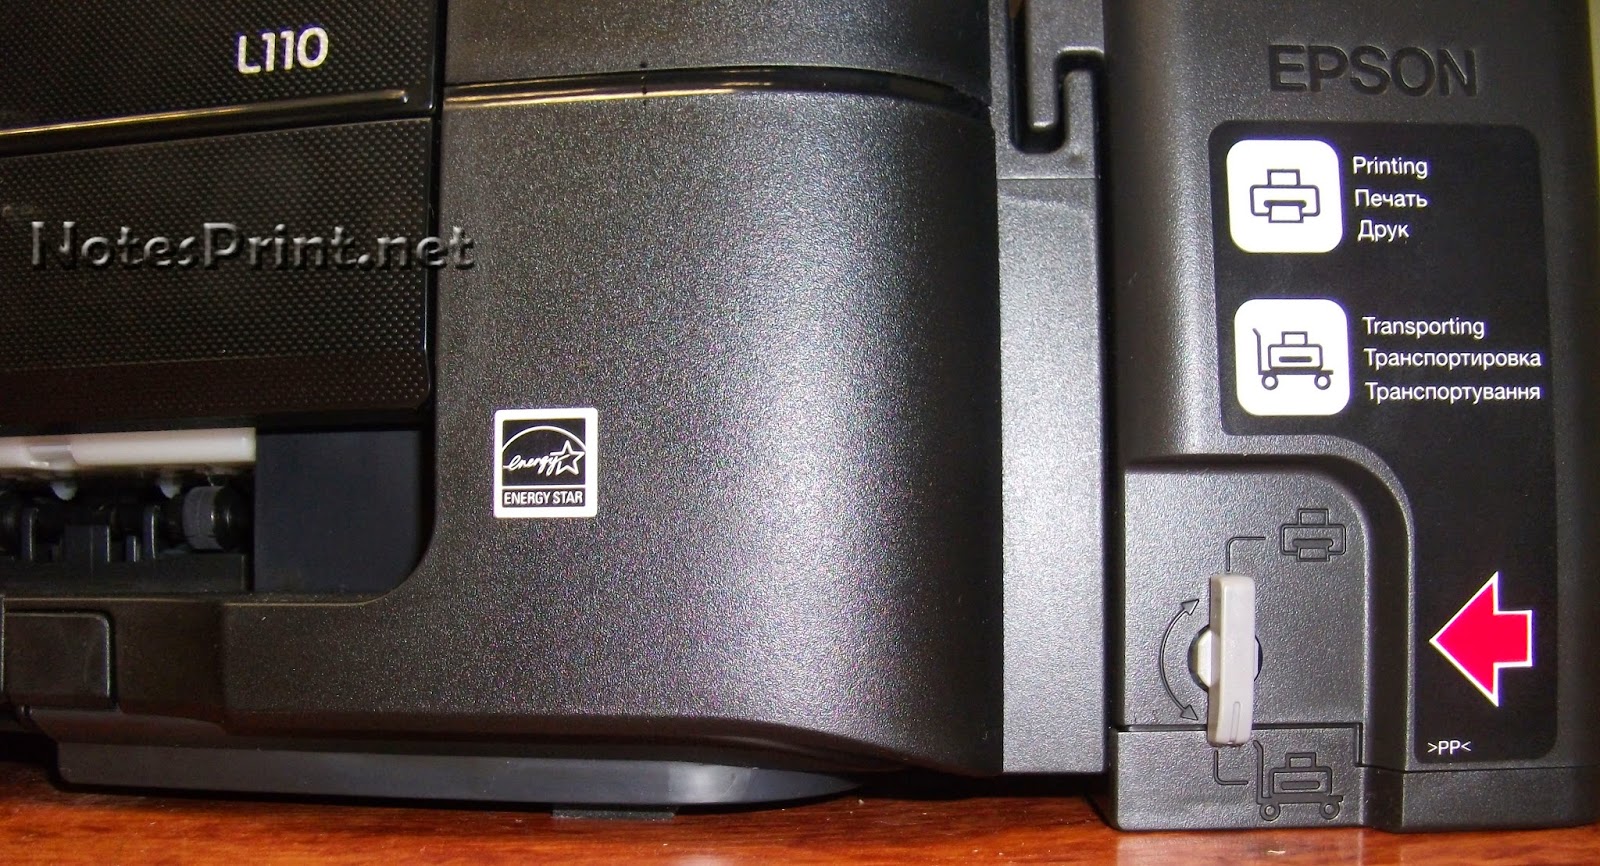
Be sure to turn off the ink supply switch before transporting the printer.
Hello. I want to devote this article to a fairly common problem with printing on devices. Epson series L and its solution. The L110 and L210 devices are especially susceptible to it.
Repeat steps 2 or 3 if you are still experiencing printer errors and trying to print one more time. Update your drivers and check your document for errors if you are still unable to print the document you tried to print before you need to restart your computer.
Updating the software you use to create documents, and to avoid printing documents that display error messages or are out of memory on the screen, also helps prevent printer errors. John DeMorso is an American expatriate entrepreneur, marketing analyst, and web developer.
Somehow I came across an L110 with black problems and I decided to finally write this article.
First of all, the owner was asked the question - does he know about the switch from the transport position to the working position and did he forget to set it to the printing position? They assured me with an oath that they know how to read the instructions and, in general, the factory CISS, original ink, but it doesn’t print .... And they bought it 10 days ago .... And in general ....
Usually, inkjet printers do not allow printing arbitrary sizes without borders. Check the "Enable borderless printing" box as shown below. You will see all the available widths that can be used in this process. Define a custom borderless size. In this example, it's for.
We recommend including the word "borderless" in the description. Set the paper width from the fixed menu. The size will be available in the paper size drop-down menu in the future. When you're ready to print a borderless custom size, select it from the Size drop-down list in the printer properties.
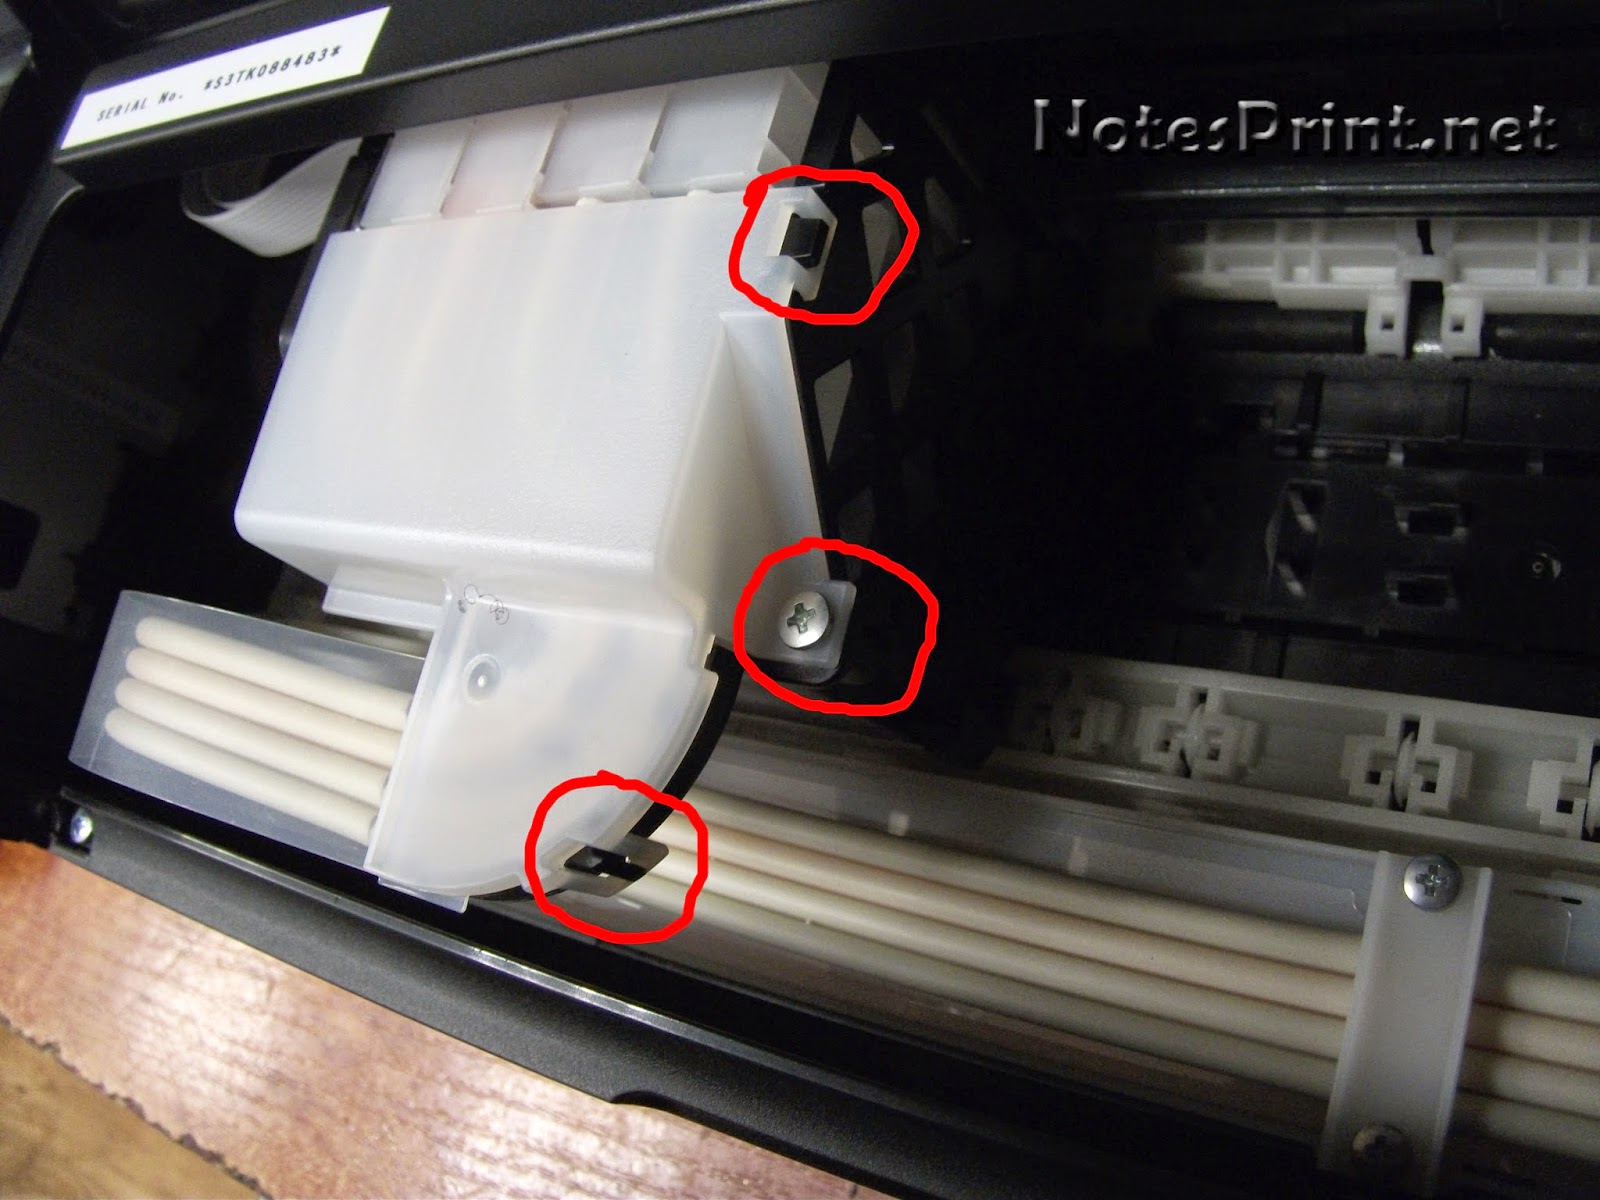
Cleaning did not help, but only aggravated the matter. So, you have to remove the inkwells. I will tell you how this is done using the L110 as an example. First, remove the top cover that covers the ink tanks. On the right, it is fastened with a self-tapping screw and two latches.
Before printing, you must select the "Borderless" checkbox. To ensure borderless printing, your printer expands the file size during printing. We recommend setting this option to Auto Flip and Medium for best results. If you see small white margins on the printer, set the magnification to Max.
To define a custom paper size, you must be in the Page Setup or Print dialog box for your printer. We recommend including the word without margins in the text. Set the borderless size using the table above as a guide to the width. Set the "Non Printing Area" to 0 inches on all sides. The borderless feature will not work if this step is skipped.
And on the left with a plastic retainer

After removing the cover, we make sure that the plastic visor above them will prevent us from removing the ink tanks.
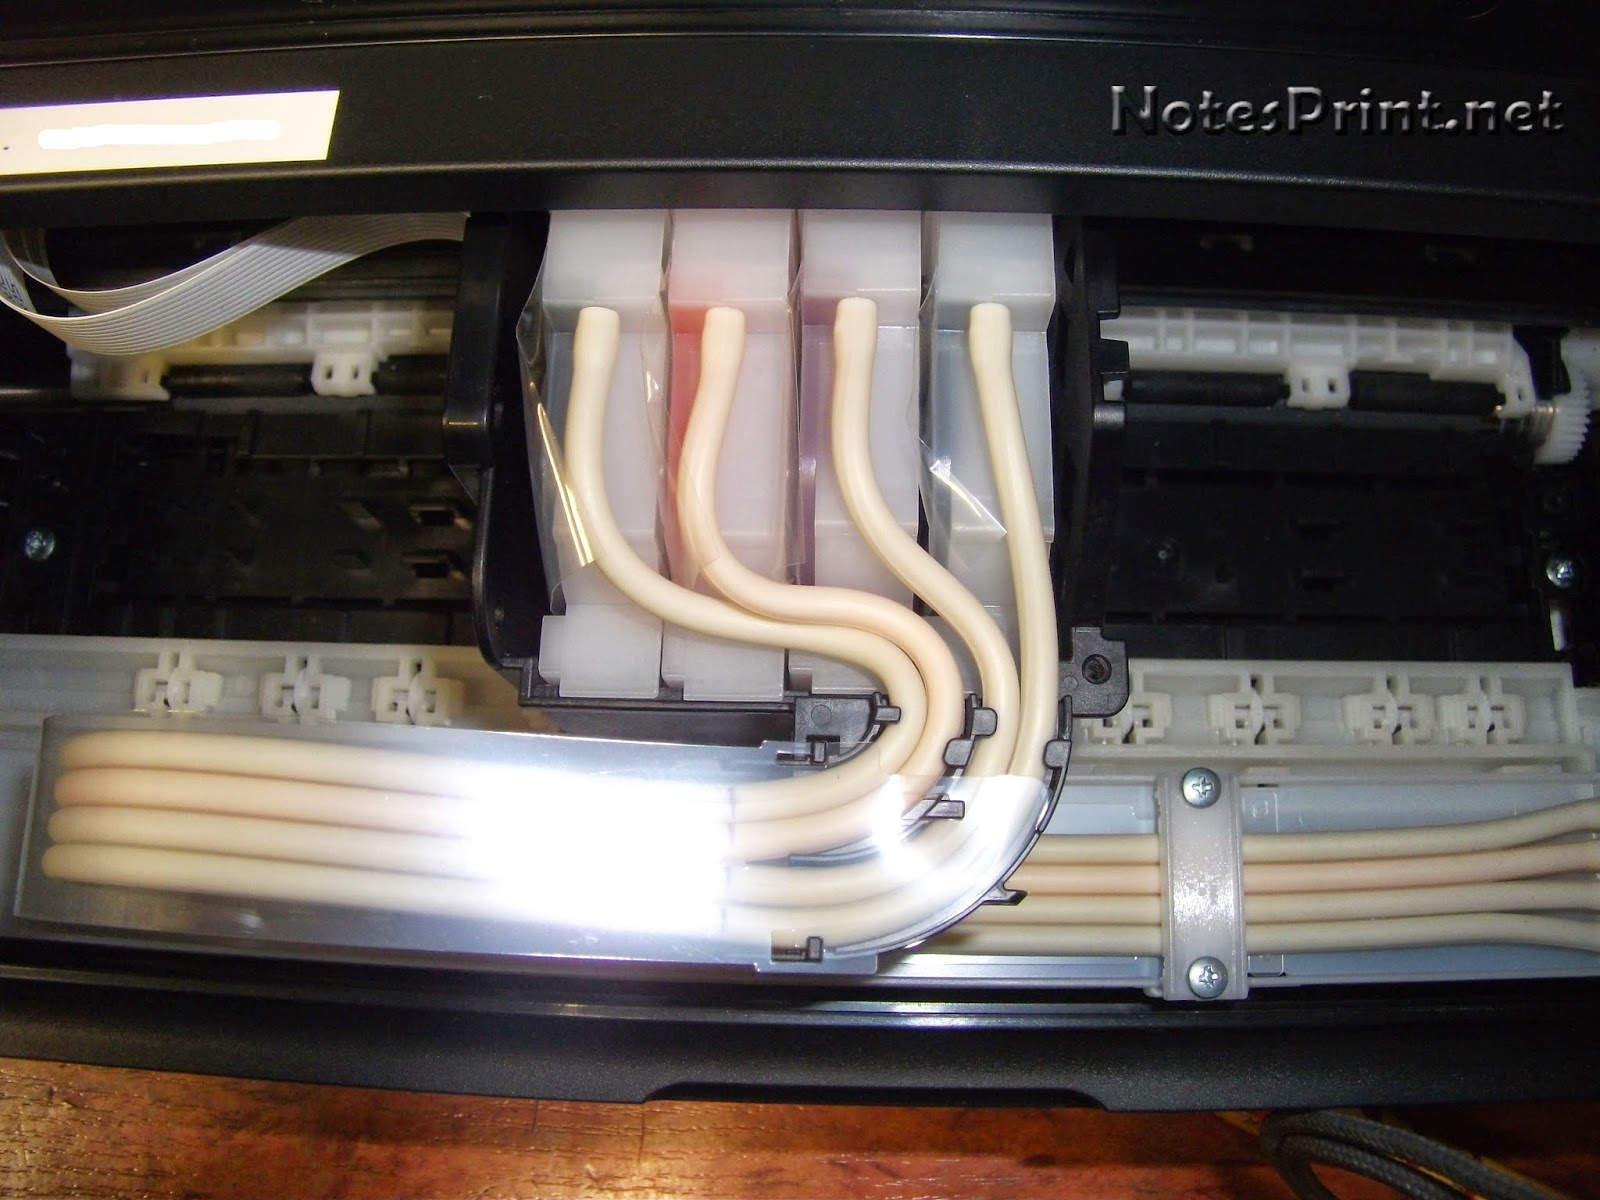
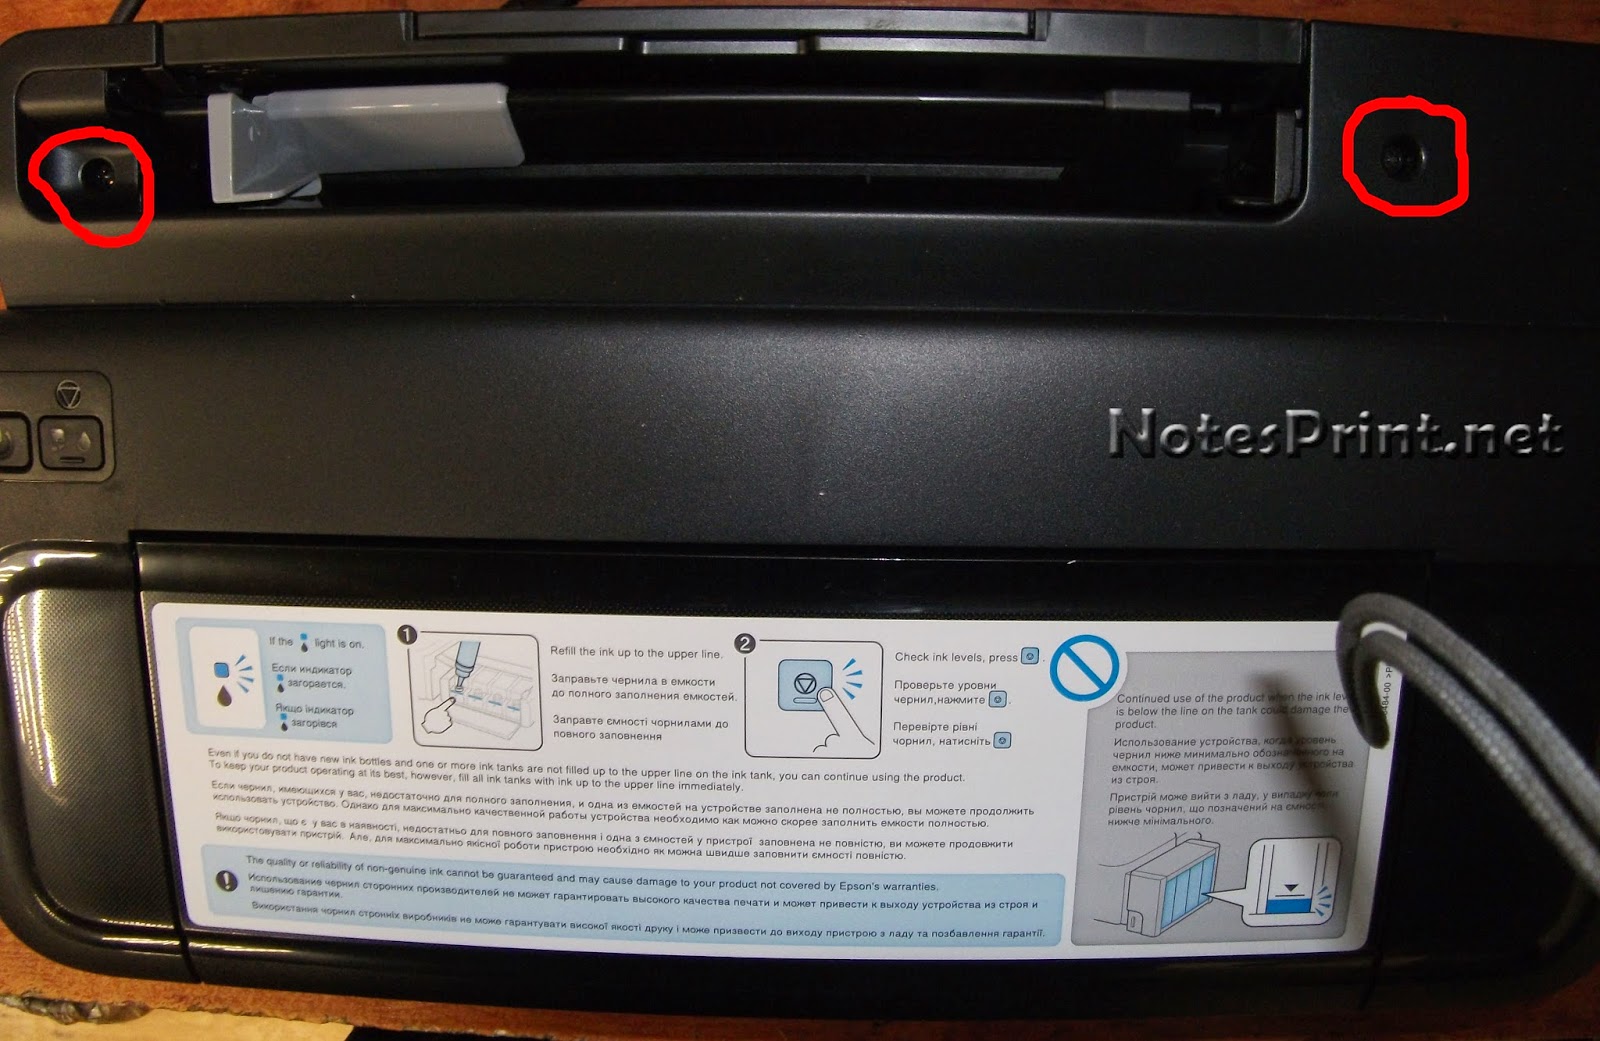
So, we will remove the top cover of the printer. To do this, unscrew the four screws from the top. Two in front
The example below shows a borderless size setting. Once a size has been created and saved, it will be available for use in the Paper Size drop-down menu. This means that the computer knows that your custom size can be printed without borders. Designing a borderless print layout.
Supply paper for borderless printing. As you probably know, inkjet printers expect paper to be fed from the short side. When using a custom borderless size, you must feed the paper-width side down for the process to work.
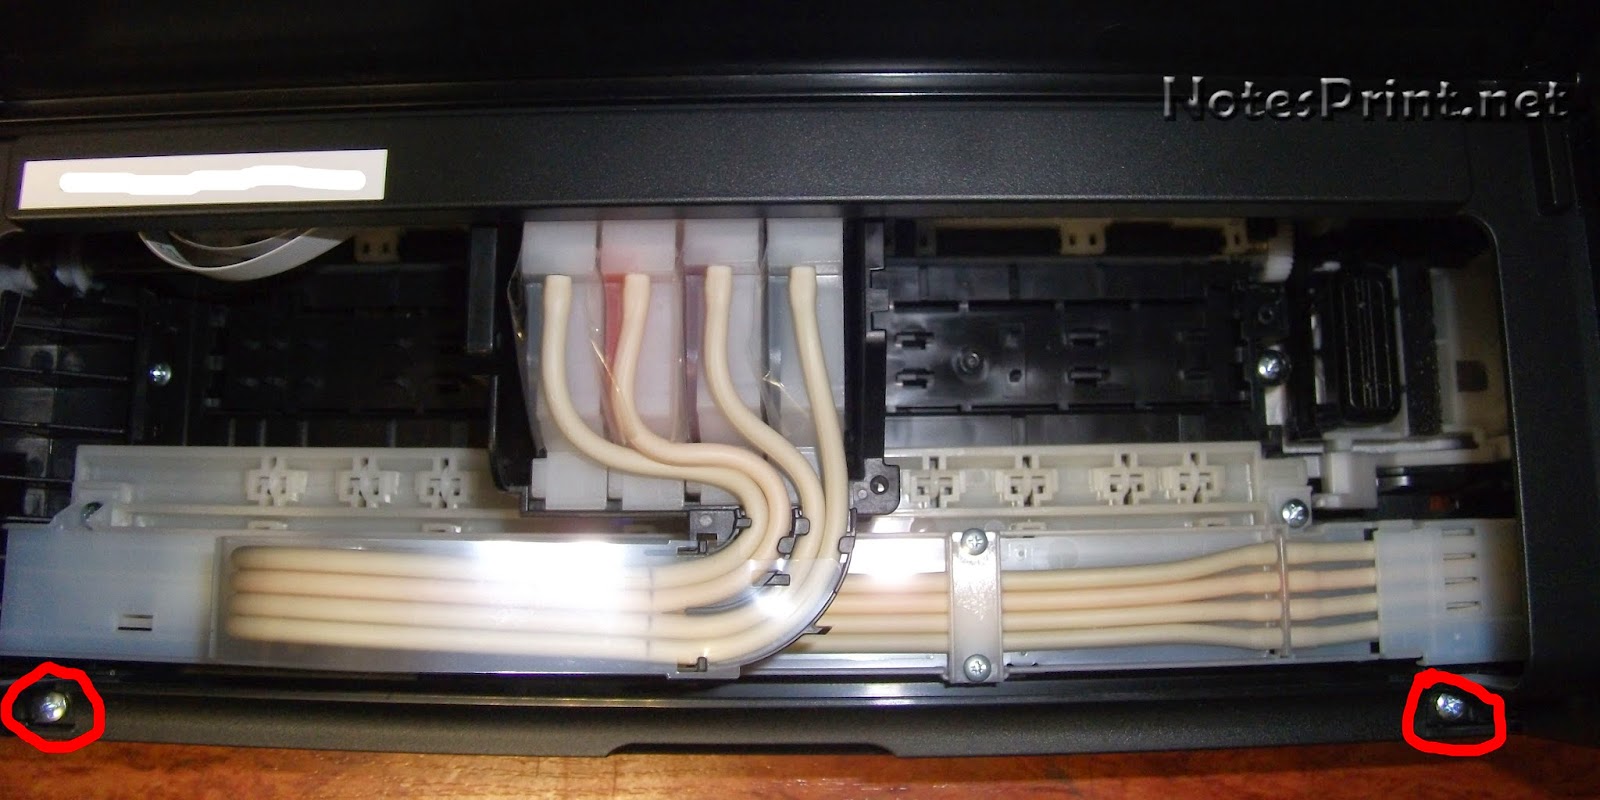
And two behind
After we remove the ink containers from the mounts and unscrew another self-tapping screw on the side

If you do not remember the width of your size, go to the "Custom Settings" menu in the printer properties and view the size definition. Send to the printer like this. Today, of course, there are inkjet printers with more colors that optimize the color reproduction and accuracy of the final print. With the exception of a few models, the printing system moves along a horizontal axis onto the paper and sprays the required ink on a horizontal strip each time. The paper moves vertically to the axis of the print head and the process is repeated until the final image is formed.
Removing the top cover L110

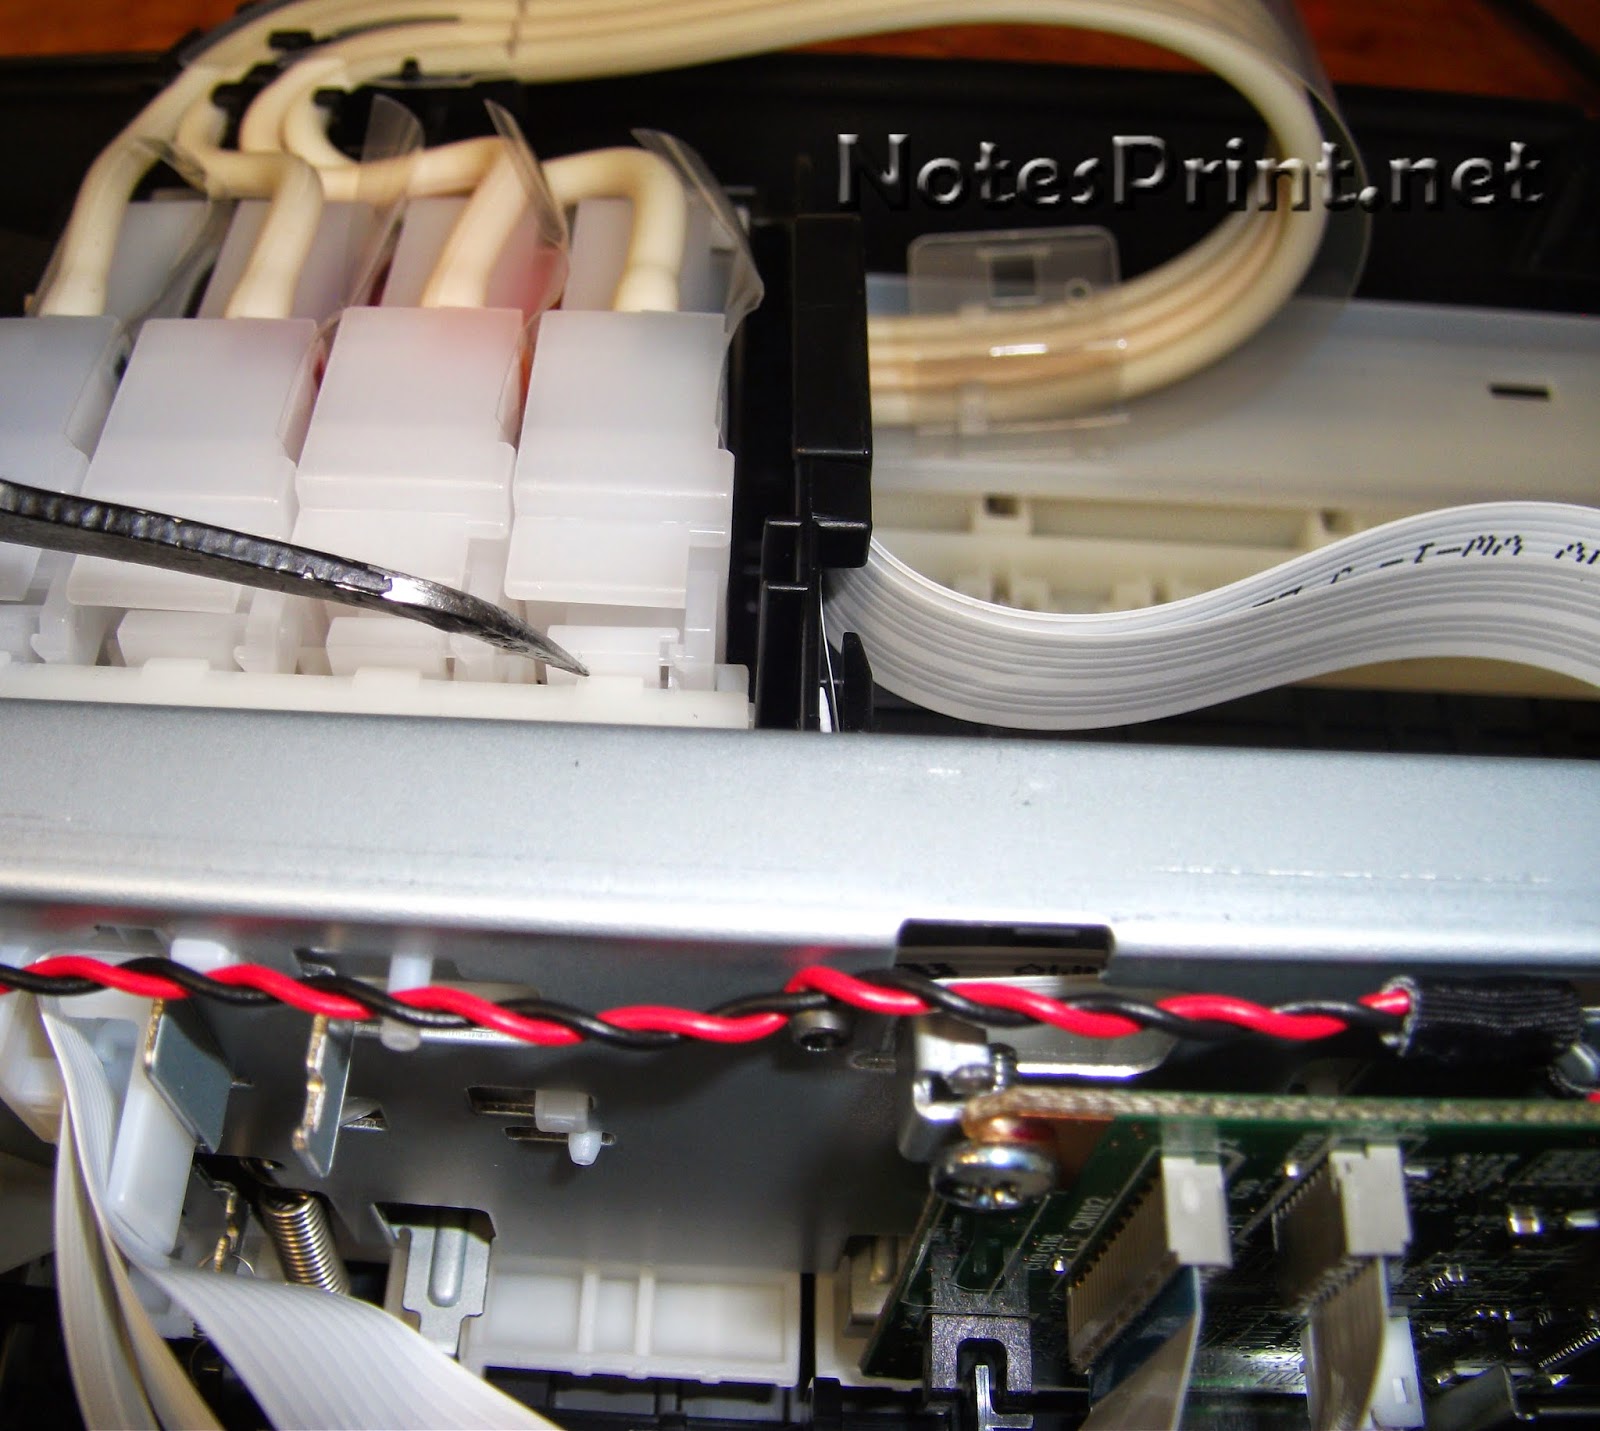
And we take them out
Then the most interesting begins. There was practically no ink in the black capsule, and there was little in the rest. We take a syringe, carefully insert it into the capsule and pull the piston towards ourselves until it is filled with ink. We do this with all colors. Naturally, the switch on the donor containers must be in the print position. You can do it in one if you want.
Thermal technology is one of the two main ways to create inkjet printing. Most printers today rely on thermal technology, which uses heat to spray ink onto paper. There are three main stages in thermal technology. At the first stage heating of ink by means of electric resistors begins. Then the ink, heated and under pressure, begins to flow into the spray nozzle, where it finally hits the paper in the form of a bubble.
This process is repeated constantly. The ink, after being sprayed onto the paper, is then cooled and dried. In thermal technology, it is important to highlight the serious demand for the type of ink to be used in order to have a high temperature resistance, since the entire spray mechanism rests on it. The use of heat in thermal printers creates a need for cooling, resulting in a slight delay in the printing process. Conventional inkjet printers currently have printheads containing about 600 nozzles, each about the same diameter as a human hair.

Then we collect Epson and enjoy printing.
Many people have a question - why does this problem appear? There are many theories on the Internet on this topic from defective donor containers to drops. atmospheric pressure:) I think in some cases the users are to blame - they forgot to set the switch to the desired position, they covered the air intakes with something (I saw this as well). But I do not exclude the percentage of the probability of a factory marriage. In any case, let theorists break their spears, where did this problem come from. But now you know how to deal with it.


, poultry farming")


- Burns, Robert - short biography
- The concept of common vocabulary and vocabulary of limited use
- Nancy Drew: The Captive Curse Walkthrough Nancy Drew Curse of Blackmoore Manor Walkthrough
- Deadpool - Troubleshooting
- Won't start How to Survive?
- What to do if bioshock infinite won't start
- Walkthrough Nancy Drew: Alibi in Ashes
- Spec Ops: The Line - game review, review Spec ops the line crashes on missions
- Room escape level 1 walkthrough
- Processing tomatoes with boric acid How much will 2 grams of boric acid
- Cucumber Grass (Borago)
- Bioinsecticide Lepidocid: purpose, properties and application procedure Lepidocide waiting period
- How to change the language to Russian in steam
- Dendrobium noble: room care
- Morphology of plants general concepts - document
- Planting, propagation and care of bamboo at home, photo Growing bamboo from seeds
- How to strengthen the cellular signal for the Internet in the country
- Sanskrit reveals the forgotten meaning of Russian words (2 photos)
- The oldest language Sanskrit programming language of the future Dead language Sanskrit
- Who has dominion over all the earth?