DIY bracelet for beginners easy. How to make a leather bracelet with your own hands: interesting ideas for current jewelry
The direction of "handmade" has long conquered the whole world. It is not only fashionable and beautiful, but also quite expensive. However, every girl is a needlewoman at heart and it is up to her to develop her skills or not. To do this, we suggest that you try your abilities at the level of a bracelet.
You can always make a bracelet with your own hands, as you personally want. You can remove, replace or add something at your discretion. Can you think of own idea bracelet if you creative person, and if not, then this article will serve as a great helper.
If there is some kind of celebration ahead, and you bought an excellent dress, but you couldn’t pick up the accessories, then rather look at the patterns of weaving bracelets with your own hands, choose what you like, find the necessary accessories and immediately get down to business.
DIY bracelet patterns
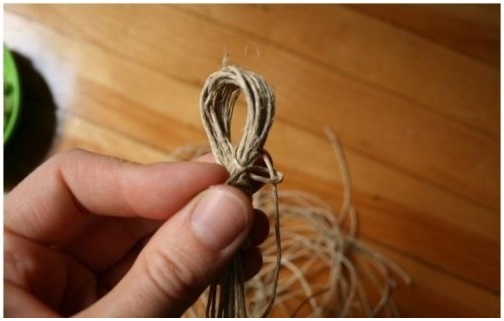
A very delicate and cute bracelet in the form of a bow can be made from loose leather or, conversely, from dense lace. It is quite easy and simple to bring this idea to life, because practically no more costs are needed for it.
Coarse flagella with delicate beads look quite harmonious. Also a minimum of expenses for such a beautiful bracelet.
![]()


![]()
An elegant image will be emphasized by the appropriate decoration, which means interesting composition from ribbons or lace with beads. Everything you need has already been listed. Take not a narrow ribbon and not the smallest beads, indent from the outside of the ribbon, with a needle and thread, string a bead, make a fold, and again the bead is next in line. So continue to the length you need, taking into account the girth of the wrist, and leave a symmetrical free edge. Such a bracelet is attached to the arm with a knot and a bow.

A multi-layer bracelet made of chains, ribbons and rhinestones will look great with any look. Each element must be the same length. They should be fixed on special hooks sold in any needlework stores.


If you have a wide chain, then ordinary threads can make it more original.
Choose the color of the threads you need, purchase special fasteners and get started.

The main thing is to initially tie a knot on one side, after which, a thread is threaded into each link of the chain.


At the end, its edges are glued, fasteners are put on and a new stylish accessory is ready.


A large selection of style elements is offered to us by the accessories market, but how to make a leather bracelet with your own hands? Both leather and its substitutes occupy great place in modern choice of material. It does not require difficulties with processing and effectively complements the image. Leather is used in bracelets for both men and women.
Bracelet styles
We offer to consider several examples of bracelets and instructions for their manufacture.
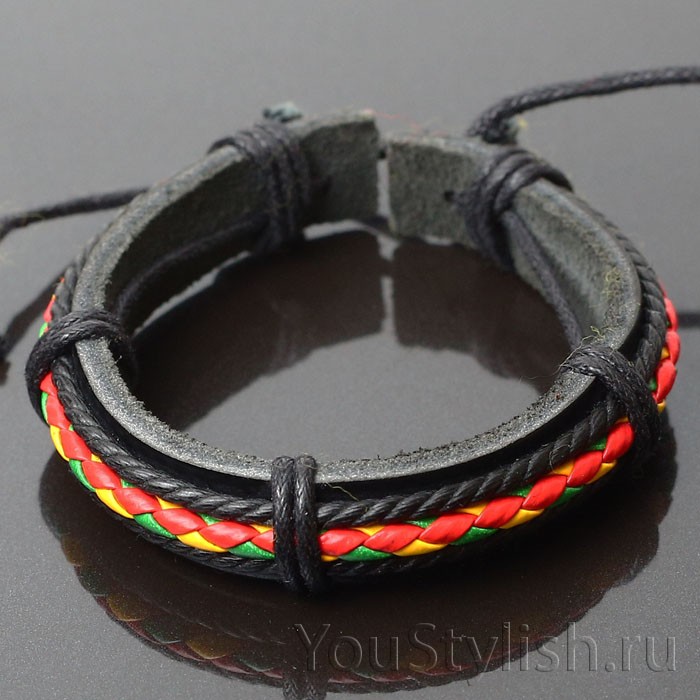
Leather thin strips and waxed leather cords are sold in stores by the yard. Take the right amount and choose the colors. Cut the strips into pieces and secure with cords. Gather different types cords in one bracelet. Add metal jewelry or beads.


Take a long cord so that it goes around your hand several times and fasten special fasteners at the ends.
Note! The caps can be glued on with super glue or hot glue from a heat gun.

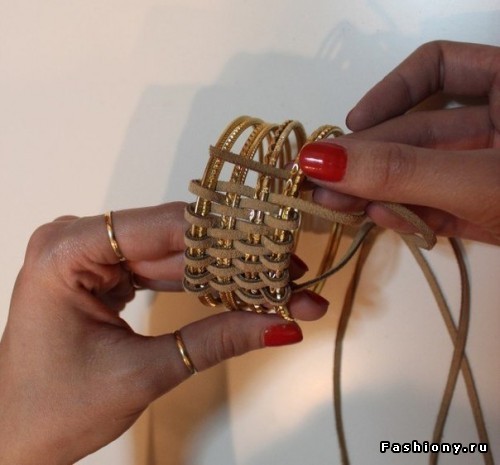
Braid several blanks of metal bracelets with a leather cord like a wicker basket. The scheme of work is very simple, the master class will not take much time.


The simplest type of woven leather bracelets is the “pigtail” method. You can weave different types of laces and stripes. Regular brown and black colors are suitable for various styles clothes, more colorful are chosen for summer vivid images.


An interesting option weaving with leather cord and beads has recently become fashionable. For such bracelets, the road of fantasy is open in terms of a combination of colors of threads and beads.
Graceful cute laces interlaced with beaded thread are tied with dense bright denim threads.


Take beads from 4-6 mm and twist with threads among two leather cords. You will need a needle to help with this.


Wide model
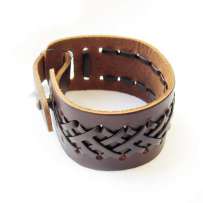
More complex but still affordable way create your own individual accessory - making a wide bracelet like a strap or wristband.
Clasps can be buckles or buttons. On a dense piece of leather, spikes and rivets are glued or attached, holes are made through which cords can be threaded for decoration.


We find suitable material in the form of pieces from an old jacket, bags or boots. Buckle clasps can also be taken from the straps of old bags, buttons get new ones.
It is enough to fasten thick skin with buttons, force out the pattern, paint with paints, paste over with half-beads, embroider with threads.


Thin leather and suede are glued to steel or plastic blanks for bracelets. They are sold in hardware stores and can be of various widths and sizes.
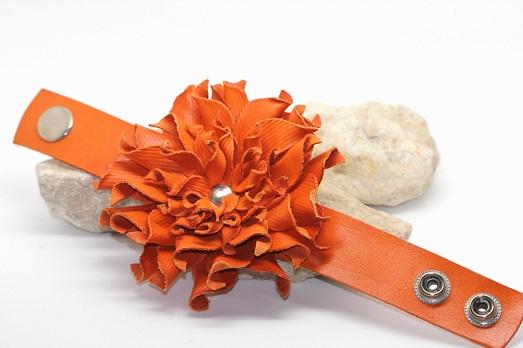
Most often, needlewomen use this material for beadwork. It is not necessary to make bracelets from a single piece of cloth, small pieces of leather can also serve as material for creating jewelry. Fasten geometric shapes or cut out leaves with leather glue. A leather flower, fastened with a button on a strip, becomes a glamorous detail in your look.

Men's options
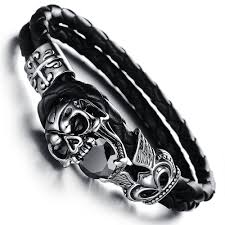
Common associations of a men's bracelet as rock attributes or an addition to the inspiring image of bikers. However, it is still relevant to add fittings, metal inserts engraved with a name, club or ornament, spikes and rivets to such accessories. But in contrast to the informal movement, leather bracelets entered the style of the urban man. Many stars wear such jewelry, and they look no less masculine.


Some types of bracelets pass into the category of purely male work. Made from thick calfskin gentle hand girls find it difficult to cut out any detail. But on the other hand, such bracelets will look very impressive with some folk ornaments which is very fashionable right now. Although the task is simplified if it is possible to glue the embroidery over the skin, and the material itself will play the role of a strong base.


In the presence of sharp special tools, openwork bracelets are made. And such work requires skill and skill. For some ideas, special hole punches of various shapes, circles, stars may be suitable.


Video on the topic of the article
Bead bracelets- inexpensive and accessible to anyone decoration that will complement the suit in any style. Beads are very diverse in form and material from which they are made: glass and stone, plastic and wood, metal and bone - just not listed. And if you use various accessories: accessories, ribbons, lace, leather, etc., then the possibilities to create something beautiful and very individual become almost endless. Mankind made and wore bracelets with ancient times. But they did not immediately become an ornament. Their first purpose is amulets, protectors from influences hostile to man. Somewhere this is preserved even now if the bracelet is made of natural stones. After all, their useful influence and energy are undeniable. But it is enough that you like the decoration and improve your mood.
The simplest DIY beaded bracelets available for making even a child. Yes, and many, probably, made them themselves, having reached their mother's stocks. It is enough just to string the beads on a thread. In general, this option has the right to exist even if you are no longer a child. If the beads are very decorative, and the thread is elastic, then why not. Using accessories, departments with which can now be found even in small towns, you can complicate the design and add decorativeness. In extreme cases, the range of online stores selling accessories for jewelry is very extensive. And ribbons, lace, cord, chains are not a problem to find at all.

Bead and ribbon bracelet has many variations. For the simplest, nothing but a narrow thin synthetic ribbon and beads with a sufficiently large hole, we will need nothing. We cut the end of the tape obliquely at an acute angle and lightly singe it over the flame of a lighter so that it does not fray. Do not overdo it - if you burn too hard, then sagging will form, which will thicken the edge. Stepping back from the opposite edge of the melted ribbon at a distance of 15-20 cm, so that you can then tie a bow, tie a knot, then put a bead on the ribbon close to it, make a knot again and repeat until the bracelet is finished. Finish with a knot. Trim both ends of the tape and melt them. Your bracelet is ready.

Another way is to sew beads onto the ribbon. The distance between them is equal to the diameter of the bead. Having strung a sufficient amount, we trim the ribbon on the thread. We have a very nice decoration. Narrow lace can be used instead of a ribbon. And if you triple the distance between the beads, making three stitches, then appearance decoration will become even more decorative.
For the third option, in addition to beads and ribbons, we need accessories: huggers, pins, a carabiner and a round-nose tool. From a narrow ribbon we will make roses. We put huggers on the beads with the help of pins and make a loop with round-nose pliers. From the wrong side, with inconspicuous stitches, we sew roses to beads, alternating them with each other. We attach a clasp to the extreme beads. It turned out to be a glamorous bracelet. Its only drawback is that the lower part of the flowers does not look very aesthetically pleasing. This is easily fixed by using bracelet connectors, also available from the hardware department - just circles with loops on both sides. Sticking roses on them with a glue gun or instant glue is not difficult. At the same time, the assembly of such jewelry will be much easier, it will look better, and it will be more pleasant to wear it.

Beaded and beaded bracelets can be quite simple if you string beads and beads on a thin silicone rubber band, alternating them with each other. More complex designs are made using weaving and require sufficient perseverance and skill. But it is not the gods who burn the pots, if you wish, you can learn everything, gradually complicating the products.
The sequence of actions can be seen in the diagrams. If the assembly is done on silicone rubber, then you do not need a fastener. The decoration with a clasp looks more elegant. Do not forget to properly fasten the ends of the threads so that your product is not only beautiful, but also durable. You can hide the cut ends inside the beads, if the diameter of the hole allows. If not, then cut them short and lightly melt with a candle or lighter.

Very unusual and beads are obtained if we weave a grid of small pink beads with the usual monastic weaving and diagonally sew an “air” onto this grid. How this same air chain is made: take a thread or fishing line and string beads on it. With a crochet hook, knit a chain from the fishing line with free loops so that each loop of the chain contains 1-2 beads.
Together with beads, you can include larger decorative beads, pieces of crystals, shells, etc. in separate loops. For one bracelet, the chain length should be 5-7 meters. The hardest part is not to mess it all up. Attach the first loop of the chain with a pin to the pillow and, as you knit it, wrap the "air" around the pillow so that the turns lie side by side without running into each other. You can secure with pins. When sheathing, gradually unwind the chain, removing the pins.

To sheathe, sew the end of the air chain to the corner bead, string three or four “air” loops with an accordion on the needle and attach them through 2-4 beads. That is, you string the loops on the needle that came out of the bead and pull the fishing line through 2-4 beads. At the exit point, pick up air loops on the needle again and pull the thread through the next beads. Move in a diagonal direction along the grid lines. At the edge, do not cast on more than two loops. Having rounded the edge, move in the opposite direction along the adjacent diagonal line. large beads irregular shape can be included in the "air", or you can sew them separately in random order or strung on a needle along with the loops of the air chain. When finished, attach the toggle clasp on the chains to the product along the edges of the bracelet. You can simply make an air loop at one end of the bracelet with a needle and thread or fishing line, and attach a button or a large bead of a suitable color to the second.
How to make a beaded bracelet

How to make a beaded bracelet and chains. We will need the following materials: about a meter of a chain, beads of two colors (you can take contrasting ones - black and red, or, on the contrary, choose a tonal combination), beads for the central row are slightly larger than for the extreme ones, a silicone thread with a total length of about 3 m, scissors and three needles. We divide the chain into segments of 5 links.
We pull the thread into the needles so that it is doubled, and temporarily fix the ends of the thread. Further according to the scheme: first we string a large red bead on the middle thread, then we thread the threads through the links of the chain: the extreme ones - through the first and fifth, the middle one - through the third link. The next step is to string small red beads on the extreme threads, put on a piece of the chain, again a large bead on the middle thread and then a piece of the chain. After that, we string small black beads on the extreme threads, and behind them a chain. Thus, we alternate on the extreme threads after a large bead either red or black. We finish with a chain and tie the threads of each row, carefully tightening them so that there are no gaps between the beads. We hide the ends of the threads in the holes of the beads.
Bead bracelet master class

First, let's prepare the accessories: plastic purple beads with a textured surface with a diameter of 8 mm, artificial pearls with a diameter of 3 mm in a pink-lilac hue, faceted transparent crystal beads lilac color, silicone thread or fishing line, 2 ring-shaped connectors and a carabiner. Cut two pieces of thread about a meter long and tie them on the ringlet so that 4 free ends of the same length hang down.
Of these, two ends will be a double middle thread and two will be single extreme. On the central double thread we string successively a pearl, a large bead and again a pearl. On each of the side threads, we string 3 pearls in series, a faceted crystal and again three pearls. We connect all the threads together and pass them through one pearl. We repeat this sequence of operations again until the product is the desired length. Having finished work, we tie a bunch of threads to the ring, cut off the excess and slightly melt the remaining tips. We attach a carabiner to one of the rings.

Weaving bracelets from beads- exciting and an exciting activity. And if you still attract imagination and use various auxiliary materials, sometimes completely unexpected, then you can create original and unique products. See how beautiful and feminine jewelry is made when lace and beads are used together. Of course, you can’t create such a decoration in five minutes, but the result is worth it. Plus, they're not that hard to make. We need lace: machine or handmade. It is up to you to choose a base from synthetic or natural threads, but keep in mind that the fragment must consist of a whole number of motifs.
Synthetics can be melted around the edge to prevent fraying, while cotton or linen may need to be overcast in problem areas by hand or machine. can link necessary basis crochet or on bobbins on purpose, then such problems will not arise. Once the base and matching beads are ready, first place the beads on top of the base without pinning to find the best match.
Only then sew them on. Some of the small beads or rhinestones, if they are also used, can be glued with instant transparent glue or a glue gun. For example, white lace and artificial pearls are selected. Such a bracelet can decorate a wedding attire. If you choose linen or cotton lace in natural colors, then the beads will fit wooden, bone or ornamental stone. For a fastener, sew a button or bead on one end, and make a loop on the other.

It goes well with leather beads. An elegant bracelet is obtained from beads and leather cords. Its production does not take much time. This type of jewelry is unisex, both sexes can wear it, only beads must be selected individually. Take about one and a half meters of leather cord, beads with a diameter of 8-10 mm, a strong thread to match the cord or, conversely, a contrasting one. Fold the cord in half and tie a knot at such a distance from the edge that the prepared button passes into the resulting loop. Fasten the loop motionless, for example, using a clip-clip on a sheet of thick cardboard. In order not to damage the skin, the loop can first be wrapped with a cotton sponge.

Tie the thread to the bottom cord with a strong knot and 2-3 cm from the knot, simply braid the cords so that the thread lies on top of the cord, bends around it and from under the bottom lies on top of the second cord. It turns out like a figure eight from a thread. Then start stringing beads. The thread tension should be sufficient, but not excessive. The thread through the bead should pass twice: first in the forward direction, then in the opposite direction. On one of the cords, each time you can make a fixing coil around the cord. When all the beads are strung, put together the loose ends of the cord and the end of the thread and tie them in a knot. Pass one of the ends through the button and tie a knot from both ends and thread. Trim off the excess. You can additionally fix the tips with glue. Such a bracelet can be made short for one turn around the hand or made long so that you can wrap your hand 2-3 times.

Sometimes a schematic drawing is enough to get the job done. Bead bracelet patterns very easy to find on the internet. Look through the relevant topics in LiveJournal or on specialized resources. If you still have difficulty making a particular model, look for video bead bracelets, which can also be found in abundance on youtube. having mastered various techniques, you will be able to make exclusive jewelry. Headsets from a bracelet and or earrings look very good. And you will not have problems with gifts for relatives and friends either.


, poultry farming")


- Burns, Robert - short biography
- The concept of common vocabulary and vocabulary of limited use
- Nancy Drew: The Captive Curse Walkthrough Nancy Drew Curse of Blackmoore Manor Walkthrough
- Deadpool - Troubleshooting
- Won't start How to Survive?
- What to do if bioshock infinite won't start
- Walkthrough Nancy Drew: Alibi in Ashes
- Spec Ops: The Line - game review, review Spec ops the line crashes on missions
- Room escape level 1 walkthrough
- Processing tomatoes with boric acid How much will 2 grams of boric acid
- Cucumber Grass (Borago)
- Bioinsecticide Lepidocid: purpose, properties and application procedure Lepidocide waiting period
- How to change the language to Russian in steam
- Dendrobium noble: room care
- Morphology of plants general concepts - document
- Planting, propagation and care of bamboo at home, photo Growing bamboo from seeds
- How to strengthen the cellular signal for the Internet in the country
- Sanskrit reveals the forgotten meaning of Russian words (2 photos)
- The oldest language Sanskrit programming language of the future Dead language Sanskrit
- Who has dominion over all the earth?