Crocheted scarf on shoulders diagram and description. Knitted scarves with diagrams and descriptions, master class.
So that it is not cold in winter, and chilly winds do not blow through your neck, you can change an ordinary scarf for a warm downy shawl. It will keep you warm and comfortable throughout the winter. You can easily make such a scarf with your own hands. If you decide to knit a downy scarf, then get ready for the fact that this work has quite a few steps. You must have the most basic knitting skills. To do the job, you will need needles No. 2 and 300-400 grams of fluff.
Instruction
First of all, prepare fluff for the upcoming work. The process of preparing fluff is quite long and laborious, and here's what you have to do:
1. Sort out the fluff, remove all kinds of debris, such as coarse hair, sawdust, etc.
2. Now pluck the fluff before you start washing it.
3. Wash the fluff in warm water with shampoo, rinse twice, dry.
4. Pinch the fluff again, comb it manually with a special comb.
5. Stir (so that the color of the fluff is uniform), comb twice more.
Now start making yarn. Start spinning a thin thread on a thin scarf (which is also called a stole), spin a thicker thread on a regular scarf. Focus on the fact that one scarf will take from 300 to 500 grams of fluff.
Now gather the thread into skeins. Then twist the threads and wind them into balls.
Now proceed directly to knitting a scarf. There are many ways to knit scarves, but in this tutorial we will focus on a scarf that has a solid middle and a beautiful patterned edge. This is a more or less easy way and is suitable for practicing.
Start knitting from the middle. Cast on the required number of stitches plus two more edge stitches. Cast on stitches on two needles and in one thread. Make the number of loops according to the size of the scarf that you want to end up with. For example, for a scarf measuring 120x120 cm, you will need 200-230 loops.
In all following rows, remove, without knitting, an edge loop at the beginning of the row. Insert the knitting needle from right to left, while holding the working thread on index finger. Knit the edge loop at the end of the row as if it were a purl.
To get a square center, do more rows than the number of loops in a row.
Now start knitting the border. Knit it only with facial loops, like the middle. Cast on 5 sts plus 2 hem sts, purl. In all other rows, remove without knitting. Edge loop at the beginning of the row, insert the knitting needle from right to left, hold the working thread on your index finger. Knit the hem at the end of the row as a purl.
When you tie the middle and the border, then they need to be connected. This is best done using an additional thread. To connect on the left knitting needle, dial the edge loops of one side of the middle, and on the right knitting needle - the edge loops of the border.
Now, from the right knitting needle, transfer the loop to the left, knit these two loops as one. Throw two loops on the left knitting needle and knit three loops as one. Continue knitting like this until the end of the border. Tie the next border parallel to the first, and tie the other two completely, tying on the knitting needles along with the corners.
Almost a month of life on a downy scarf!
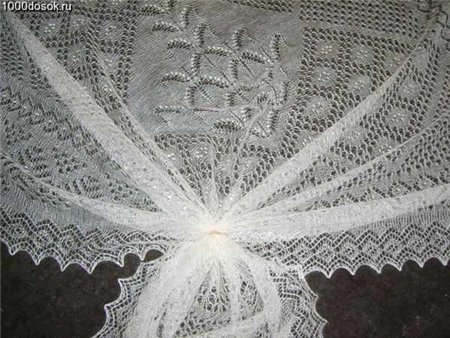
Orenburg shawls, hand-knitted by experienced craftswomen, are a real work of art. It is known that the process of creating a downy scarf by downy knitters consists of a large number labor-intensive painstaking operations that take a lot of time and effort.
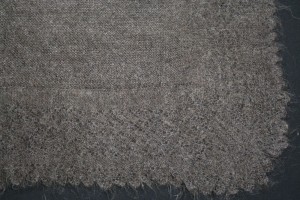
Let's roughly calculate how many days the craftswoman needs to knit a warm and practical downy scarf (as in the photo below) with a mass of 350 grams.
Let's assume that the goat down was already combed from the Orenburg goats, and a preliminary selection of down was carried out from hair, plant seeds and other impurities.
Here are the sequential operations needed to create a handmade Orenburg shawl:
The first combing of the fluff is done on the combs (at least 20 hours of work), then the second combing (10 hours) follows, then the downy thread is spun with spindles (20 hours), grown with cotton yarn in a ratio of approximately 6:1 (12 hours), then there is torsion on spindles (8 hours), a skein into balls (2 hours), traditional knitting of a downy scarf (at least 100 hours) and it takes about 4 hours to finish the scarf.
Of course, our calculations are quite approximate, and for each down knitter, the process will take different time, but those 176 hours that we got are 22 full working days. And this is for an Orenburg scarf with a slightly larger area square meter! But craftswomen often knit larger scarves, working with inspiration, putting a lot of love, initiative, artistic ideas and taste into their craft.
Patterns for knitting Orenburg shawls
The main elements of the drawings of the Orenburg downy shawls, kerchiefs, shawls and cobwebs.
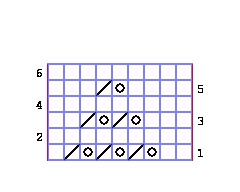
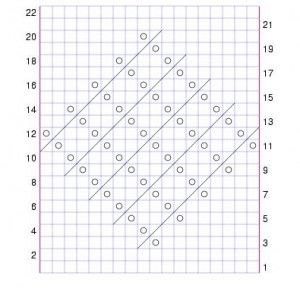
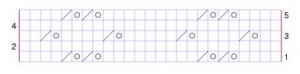
This Orenburg pattern is called "skewers". Needlewomen use it for knitting rhombuses in
the central part of the Orenburg downy shawl.
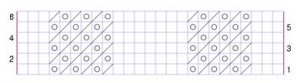
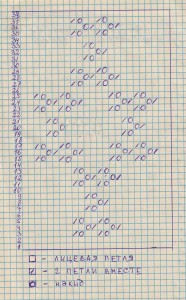
This main element of Orenburg patterns is called "Chervonki". It is great for decorating the border of downy shawls. By folding the elements of patterns with each other, you can independently develop a wonderful own scheme for a downy Orenburg shawl!
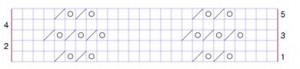
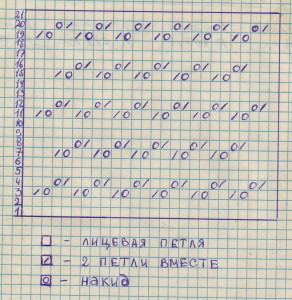
"Honeycombs" suitable for almost any part of the Orenburg shawl in which there is a desire to knit a repeating pattern.
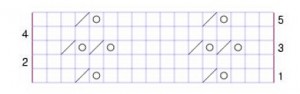
"Harmonic"- a common pattern used to fill the frames and corners of downy Orenburg shawls
Pattern "Cat paws” - often used to fill the corners of Orenburg downy shawls
"Mouse tracks" usually fill the corners and decorate the border of the Orenburg downy shawls.
“Strawberry”- this Orenburg pattern is suitable for decorating the border of downy shawls and filling their corners. "Fish eye". This cross-shaped pattern is sometimes also called "Fish". It is also knitted on the front and back rows, as well as "Peas". You can decorate any part of your Orenburg shawl with this old Russian pattern.
By clicking on the diagram, and thereby increasing it, you can save it and print it in larger size. When knitting this pattern of a downy shawl or scarf, we advise you to cross out the numbers of the connected rows on the printed pattern.
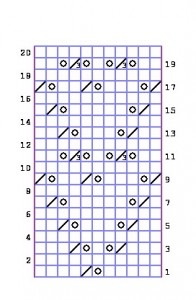
“Peas” is one of the most ancient elements of patterns.
This Orenburg pattern is knitted on the front and back rows, it is often used to decorate the border of a downy scarf, and also fill the corners.
By clicking on the diagram, you can increase its size, save it on your disk, so that you can safely print this diagram later. When knitting the Orenburg pattern, we recommend crossing out the numbers of the connected rows in the diagram so as not to make a mistake and not to knit the same row twice, which often happens with beginner needlewomen.
How to crochet a shawl
From time immemorial, various knitted shawls have been at the peak of popularity. They have a special demand, and even the most demanding and suspicious fashionistas adored such products, despite their own frequent whims.
These magnificent products can not only be a wonderful decoration, giving the whole image a special tenderness and romance, but also warm perfectly frosty winter evenings. They can be knitted not only using the thinnest threads, but also when using thicker woolen ones, for example, as in knitting.
But with the help of a hook, the diligence of a craftswoman and patterns in the presence of this hand knitting in the arsenal, shawls may well turn out to be true masterpieces. How about crochet?
- Despite the fact that there are an incredible variety of patterns with which it is possible to knit a shawl, it is best to start learning to knit this elegant product, best with the lightest patterns, in a special way in order not to get confused in the too cumbersome designations of those patterns. , which are much more difficult;
- Shawls can be knitted in only one shade, or using several different colors;
- In the event that the shawl is created from separate motif parts, everything will be much easier if you first connect all the necessary parts. And only after that, carefully carry out the bonding of all these elements to each other, in accordance with a special scheme, for the reason that in the process of their simultaneous connection, much more skill and attention will be required. But, if you adapt especially and strongly concentrate, there is the possibility of knitting motifs, immediately combining them into the drawing itself and the finished product;
- The simplest method of creating a shawl with a hook, when knitting it, is from the bottom corner;
- When, in an extremely careful way, keep an eye on the pattern and also on all the necessary additions, in a special way so that in the end the product could not be deformed, and the drawing itself, moreover, could not go astray.
Crochet shawl pattern for beginners
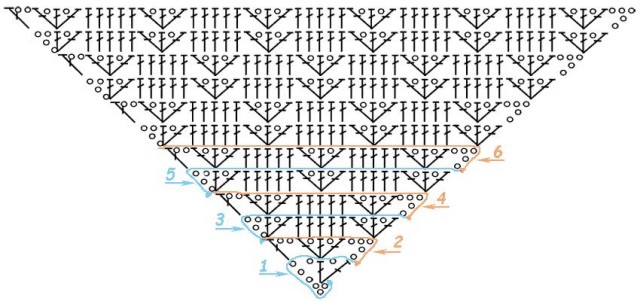
This model of a shawl begins to be knitted from the lowest corner. And the principle of its knitting will be based on adding in each of the rows, in a gradual way, the main report of the future pattern. At the start of each new even row, five loops will be made to lift the row. In odd rows, there will be exactly four of these loops.
You need to start work in this way:
How to crochet a shawl
- To carry out a set of seven air loops;
- 1 row. In the third of the dialed loops, you need to thread a hook and knit one with a crochet from it (st. s / n), and then perform one air loop (vp) and in the same ch, do the second st. s / n .;
- 2 row. In the loop st. s / n of the previous row you need to knit st. s / n, vp, second st. s / n and the second v.p. out of him. Then the third st. s / n in the same loop. After that, you need to knit two vp. and thread the hook into the fourth ch. lifting chain and do exactly 1 tbsp. s / n .;
- 3 row. In Art. s / n of the previous row you need to knit st. s / n, and then do v.p. and in the same loop of the chain do again st. s / n. Next, you need to skip a couple of vp, and then in each of the next five loops, knit 1 tbsp. s / n, and in the third lifting loop in the previous row, you need to knit - art. s / n, vp, art. s / n, vp and 1 more tbsp. s / n;
- 4 row. In the third loop of the previous row or the second st. s / n, again you need to knit * art. s / n, vp, art. s / n, vp and 1 more tbsp. s / n *. Next, you need to skip two loops and in each of the following loops, you need to knit in a sequential manner, 5 tbsp. s / n, again skipping two loops and knitting loops in the next, exactly as at the beginning of the entire row from * to *, making 2 ch. And the row should be finished by knitting st. s / n in the third of the lifting loops;
- Row 5, like all subsequent odd rows, must be knitted to the very finish of the row according to the same principle as that of the third row;
- Row 6, like all even rows, must be knitted entirely and completely, repeating until the very end of this row, the pattern from the fourth row.
- Such a shawl will come out denser, and for this reason, it is possible to knit it from thin yarn.
In this video, you can more clearly see the material, which tells how to crochet a scarf shawl:
We knit openwork shawls
Most of the openwork shawls are often also knitted from individual motifs. For example, a similar model is one of these shawls:
Openwork crochet shawl
And knitting it needs to be done with a 2.5 crochet of thin threads. Actually, it will be quite possible to prepare the motifs in advance, or combine them all at once, for the reason that they will come out small in size. All of constituent parts this shawl will be knitted according to such a light pattern:
The start of the knitting process of this motif will be a chain of thirteen air loops. Then the knitting process will be continued according to the following pattern:
Openwork shawl crochet pattern
- From the first to the fifth row. At the very beginning of this row, you need to make three lifting loops, and then skip one loop, and in the next loop, knit a column without any crochet. Then you need to knit one ch out of it, and then again one loop should be skipped. And you need to knit a single crochet and an air loop. Thus, everything will have to go, right up to the very end of this series.
- Starting from the next row, the knitting process will continue in a circle from the corner of the square.
- Sixth row. You need to knit 6 tbsp. b / n in each of the loops, and then knit five air loops from the last, securing in a circle in the first loop that was created using a connecting loop. Then, in the ring formed, you need to knit two columns without any crochet, four picots from three air loops, and then again 2 tbsp. b/n. After that, in the same direction as the start of the row, each new loop must be knitted with st. b / n, exactly to the middle of that side of the square that follows, and in the future, knitting will be repeated, starting from five ch.
- Seventh row. In the corner of the square you need to knit 1 tbsp. b / n, making six air loops and tying them into the second pico st. b / n, then 6 ch, connecting into the next pico through one and again knitting 6 air loops, which should be fixed with st. b / n in the second corner of the square. You also need to knit all sides of this same square.
- Eighth row. It is necessary to knit in an arc consisting of six loops, 4 tbsp. b / n pico, 4 tbsp. b / n, in the next arc, doing three repetitions of 2 tbsp. b / n and 1 picot, in conclusion, knitting another 2 tbsp. b / n, in the third arc of the side of the square, knitting, as in the very first, 4 tbsp. b / n, pico, 4 tbsp. b/n. But all the following sides of the motive must be knitted in the same way with the first side.
In the event that the motifs were connected in a separate way, at the end of the creation of all these parts at the four points where the picot was knitted, all parts will be fastened together, using a special column, as a connection. In the event that the craftswoman decided to connect the motifs immediately, they will be fastened in the same way during the work process.
And the final stage in the creation of the creation will be precisely the processing of the edge of the shawl, by knitting into each of the loops, in addition to pico half-columns. In the pico itself, two columns of a connecting type should be knitted along the edges and in the middle of 3 tbsp. b/n.
Crochet shawl
The next video will show a different model of the shawl-stole. Its most important difference from all previous accessory models is that it is knitted with Solomon loops:
Square motif shawl
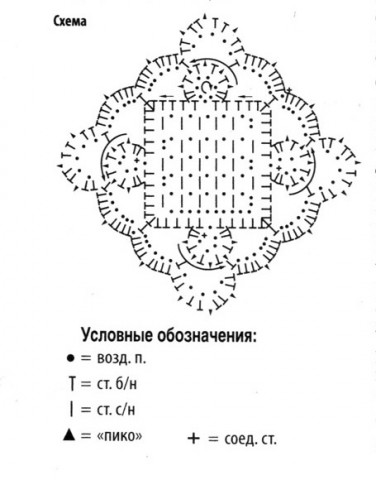
The next snow-white shawl with embroidered flowers, which was created precisely from square motifs, will look incredibly spectacular and rich. It is also not at all difficult to connect. To do this, you will only need to follow the following special scheme:
Shawl square motifs
There are already an incredible number of beautiful models of shawls. They are suitable for every taste and color, for this reason, it will not be difficult for any craftswoman and fashionista to select something especially entertaining for her beloved.
Well, learning how to crochet a shawl will not be so difficult. The most important thing in this process is to carry out a thorough study of the main types of loops in the process of crocheting, having also learned to read all the patterns in the right way.
In this article you will find crochet scarf patterns. A scarf for a woman is such a thing that will never go out of fashion. Various variations of this accessory can be worn on the head, on the shoulders, around the neck or around the hips. It emphasizes femininity, protects from the cold, complements the image - in a word, it does not threaten the scarf to go out of fashion. It happens that in order to complete the image, you need a scarf of a certain color or texture, but you can’t find it on sale. If you are friends with crochet and knitting needles, the task is greatly simplified, because crocheting a scarf according to the pattern is not so difficult even for beginner needlewomen. In addition, schemes usually accompanies step by step description, generously flavored with photo and video materials. There are also a great many patterns for a scarf, the main thing is to make a choice. An openwork thin product can be worn not only in winter and autumn - some models will not seem out of place in summer.
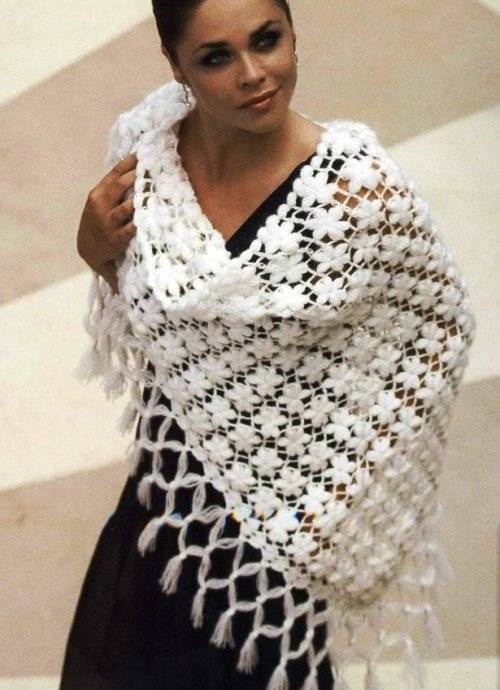
Spectacular scarf white color pretty easy to crochet. It will look very interesting with a black blouse and leggings, as in the photo. For it, you will need 400 grams of yarn of the color you like, in this case white. Crocheted No. 3. The size of the finished product will be 85 centimeters by 90.
Work starts from the bottom. Four air loops are knitted, and then five double crochets are knitted into the first air loop. Further according to the scheme, to a width of 85 centimeters. In this case, 9 rapports of the main pattern are located in the last row.
Tie sides of 90 centimeters with one single crochet. Attach a fringe to the sides of 85 centimeters. Its optimal length in this case will be 20 centimeters.
To make a fringe, you will need threads 41 centimeters long - the required length of the fringe is doubled, 1 centimeter is added to the knot. Each tassel consists of 10 threads, the tassels are attached with a crochet hook to every second arch of the pattern, fixed with a neat knot. If necessary, you can "cut" the fringe so that it is the same length.
lemon and lime
Another version of the scarf, measuring 102 by 107 centimeters, it will need 100 grams of yellow yarn, and 50 grams of green yarn, or in reverse proportion, depending on which color you prefer. It is better to take Moina yarn, in the composition - viscose predominates, a little less polyamide, and quite a bit of silk. The scarf is crocheted No. 5.
The process itself. We collect 5 air loops, and then we work according to the scheme, adding two loops along the left edge in each row. A cycle is knitted from the first to the 24th row, then repeat from the 13th to the 24th row, not forgetting to add loops on the left side. Do not forget to alternate colors - 12 rows of yellow yarn, 6 rows of green. The diagram is attached.
One chamomile, two chamomile
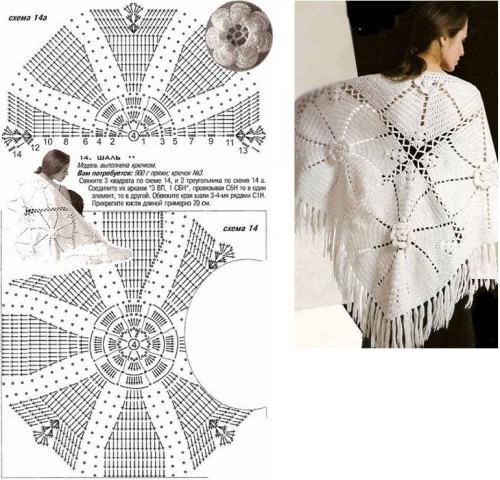
Another option for a crochet scarf, with a large openwork pattern. In size, it will turn out 174 by 94 centimeters.
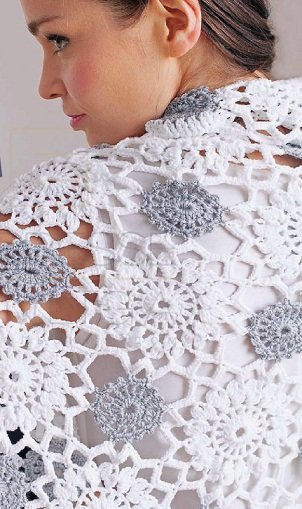
Crochet No. 3.5. It will take about 450 grams of Micro Bamboo yarn (50% viscose (bamboo), 50% polyacrylic (microfiber), 145 m / 50 g), 150 g of Micro gray yarn (100% polyacryl, 145 m / 50 g). The scarf consists of combinations of a large pattern with a smaller one. Large fragments will be 45 pieces, small ones should be 36 pieces.
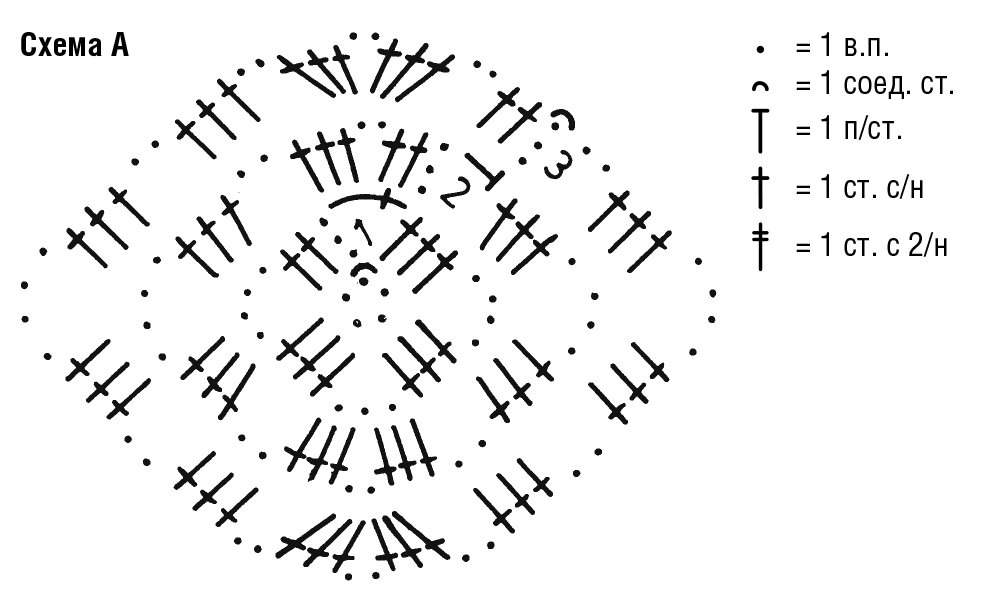
Large flower. Its diameter is 14 centimeters. Knit 6 air loops in a chain, close in a circle with 1 connecting column. Then knit in circular rows according to the pattern. Each circular row starts with initial chain stitches instead of the first loop, and ends with 1 connecting column in the last initial chain loop. As needed, move on to the next circular row, knitting a connecting column. Knit 1 time from the first to the fifth circular row.
Small flower, 6 cm in diameter. Fits exactly the same as large flower. One cycle is performed from the first to the third circular row.
Starting from the second motive, connect the elements with a connecting column. The location of the fragments and the places of their connection are indicated in the diagram.
Grandma's chest
The original scarf, from the so-called "grandmother's squares". Each square measures 12.5 cm by 11 - diagonally. Consists of 28 whole elements and 8 halves. Connect the elements according to the layout plan, or you can crochet in the last circular row. To do this, in the last circular row, instead of the air loop, knit the connecting column into the adjacent air loop.
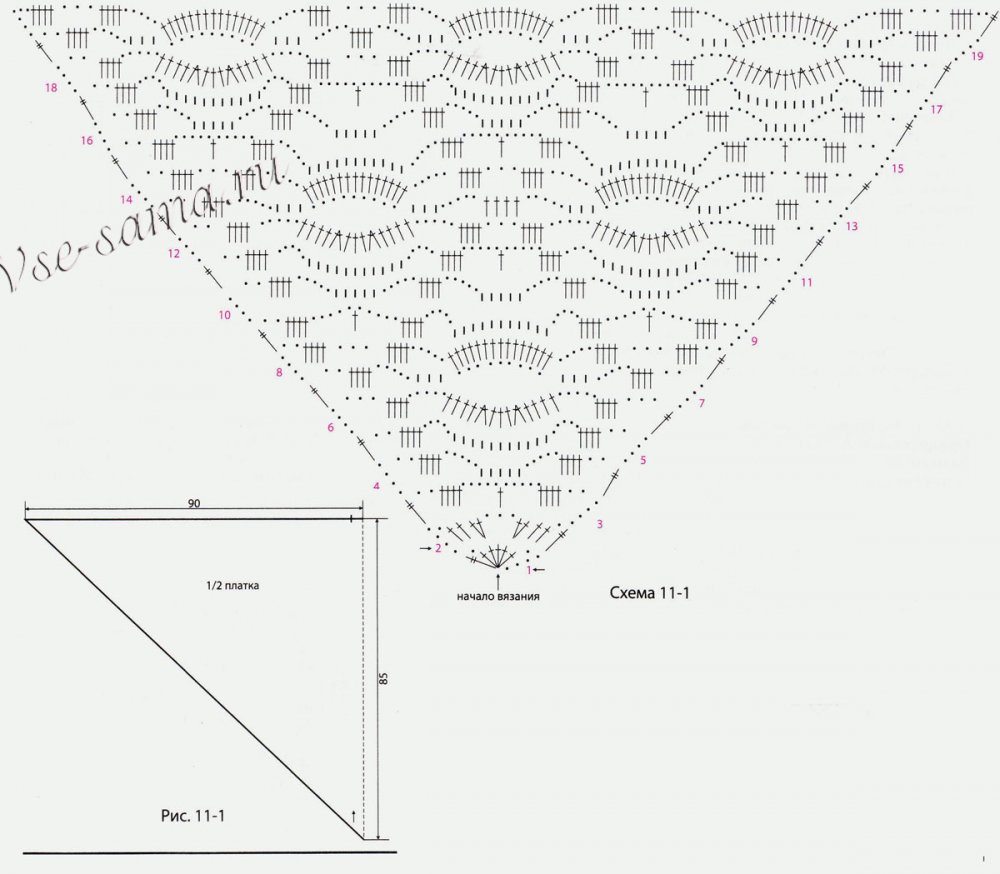
This is a triangular shawl that can be effectively worn wrapped around the neck. Its size is a meter by 40 centimeters, approximately. To work, you will need yarn of 5 colors of 25 grams and hook No. 4. The yarn can be chosen so that the colors blend softly with each other, or you can choose contrasting colors. The scarf pattern is simple to disgrace.
Patterns are a little more difficult. Knit the first chain of 5 air loops, close with a connecting column into a ring. Knit according to the scheme from the first to the third circular row, while each circular row starts with the third air loop instead of the first double crochet, and ends with 1 double crochet, 1 p / st. or 1 connecting column.
The second part of the diagram. It is knitted in the same way as the first scheme, only each row starts with the third air loop instead of the first column or from the fourth air loop instead of the first column with 2 / n.
Tie fringe brushes to two sides of the scarf. Tie to external arches from air loops.
Video material on the topic


, poultry farming")


- Burns, Robert - short biography
- The concept of common vocabulary and vocabulary of limited use
- Nancy Drew: The Captive Curse Walkthrough Nancy Drew Curse of Blackmoore Manor Walkthrough
- Deadpool - Troubleshooting
- Won't start How to Survive?
- What to do if bioshock infinite won't start
- Walkthrough Nancy Drew: Alibi in Ashes
- Spec Ops: The Line - game review, review Spec ops the line crashes on missions
- Room escape level 1 walkthrough
- Processing tomatoes with boric acid How much will 2 grams of boric acid
- Cucumber Grass (Borago)
- Bioinsecticide Lepidocid: purpose, properties and application procedure Lepidocide waiting period
- How to change the language to Russian in steam
- Dendrobium noble: room care
- Morphology of plants general concepts - document
- Planting, propagation and care of bamboo at home, photo Growing bamboo from seeds
- How to strengthen the cellular signal for the Internet in the country
- Sanskrit reveals the forgotten meaning of Russian words (2 photos)
- The oldest language Sanskrit programming language of the future Dead language Sanskrit
- Who has dominion over all the earth?