Draw the nose step by step Portrait Drawing Basics
This time we are learning to draw a nose.
1. Let's start drawing the nose with a simple markup

The nose of each person has unique features, so it is impossible to give accurate advice on how to draw the nose of a girl, child or man. You can only make an abstract or as they say "academic" drawing of the nose. It is this version of the nose drawing that I propose to draw for you with me.
I hope there is no need to explain how to draw these two lines.
2. The contours of the "wings" and the bridge of the nose

The human nose has "wings" and the bridge of the nose, and it is their contours that need to be drawn at this step. The width segment of the "wing" in my drawing is equal to exactly half of the perpendicular line from the beginning of their intersection. You need to draw the nose carefully, keeping the proportions exactly.
3. The drawing of the nose takes on a real shape

After accurate preliminary marking of the nose drawing, it will be easy to draw the nose correctly and beautifully. You can see for yourself that it’s already quite easy to draw further. Outline the streamlined forms of the wings of the nose. Mark two lines from the bridge of the nose and draw the tip of the nose.
4. How to draw a nose. The drawing is almost ready

At this step, remove the extra contour lines, and you will get a real academic nose, all that remains is to draw a few small details.
Get ready for the fact that you will have to correct the shape of the nose several times in the drawing. Drawing a nose is not difficult, but the slightest inaccuracy leads to the fact that the nose will become "chubby" like Santa Claus or thin and skinny like Baba Yaga's.
5. How to draw a voluminous nose

This stage of drawing and the next will consist of only one thing. It is necessary to apply shadows to the drawing with a soft simple pencil so that the nose looks voluminous, like in a picture by real artists.
6. How to draw a human nose. final step

How to draw a nose, at the beginning of a drawing of a person's face or at the end? Usually, when drawing a nose at the end of the lesson, the nose turns out to be distorted, either too small or vice versa. Eyes and nose are the most important elements of drawing a person's face, so it is better to start drawing with them. You can correct the chin, ears and even lips, but if you didn’t “guess” with the nose and eyes, the portrait of a person will not bear any resemblance.
As an example, we will use the so-called Nubian nose - long and wide at the base.

Let's start with the proportions of the nose. They are shown in the first picture. The ratio between height and breadth of the nose should be approximately 1.5:1. Let's draw approximate boundaries in which it will be located. You can not make the lines so bold so that it does not turn out as if in a frame. Just a couple of light strokes are enough to make it clear, or just imagine in your mind.

Let's draw a curve at the bottom in the middle - the base of the nose. And two small convolutions along the edges for the nostrils. Of course, each person has different noses (thicker, wider, narrower, longer) so you should not limit yourself in choosing these parameters.

Now we draw the contours of the nose, the so-called "wings" on the sides. Make them curved at the bottom, and fairly flat towards the top. Their size should fill a little less than a third of the entire length of the nose.


Lightly apply the main lines in the center, as well as the lines where the nose meets the face. It is difficult to draw from a photo, because in reality there are no clear contours, so you need to learn the basic techniques for drawing a nose with a pencil.

Applying darkening in those places where clear lines are not visible will help to solve this problem. Start adding shadows in the places shown in the following pictures:


Fill in the holes of the nose with black, starting from the top corner. Then draw two small lines below the nose wings to create a smooth transition to the lips.

Now carefully add the shadows of the edges of the nasal wings and the tip of the nose, as well as a small area below the nose wing.
Our nose is ready:

How to draw a human nose
Any drawing begins with a sketch on paper. I am sketching a human nose with a pencil - these are just a few lines in order to properly position the drawing on paper and see the contours of the nose.
After I made a sketch in the lesson on how to draw a nose, I need to mark the shadows, without which the drawing would be flat and not beautiful. Shadows give volume, and when I draw a shadow, I always use a light shading, it makes the shadows softer and the drawing more pleasing to the eye.
The sketch is ready, the shadows are marked, and I begin the detailed drawing of the nose. I wipe off the extra details of the sketch and draw the contours more clear. I also draw the darkest part of the picture - the nostril. In the more detailed drawing of the nose, I use light colored H pencils, and a dark 3B pencil for the nostril.
The next step is to start drawing the transitions between the shadows. I detail the drawing, displaying the transitions of light and shadow, in other words, I soften the drawing.
The drawing of the human nose is ready, but to make it look even more beautiful, I will draw a few more shadows around it - shadows above the lips and near the eyes.
HOW TO DRAW THE NOSE?
Take a ruler or by hand (unless, of course, a well-trained hand) draw an even shape as shown in the first figure. At the bottom, paint over a little with a pencil and then give it the desired look.

Draw the same as in the first, but only shade the bottom and the right side.

This stage of drawing the nose in profile, we do everything that was in the first stages.

Let's start with planes. The volume of the nose, as we already know, can be defined in a pyramid (or, in other words, a prism).
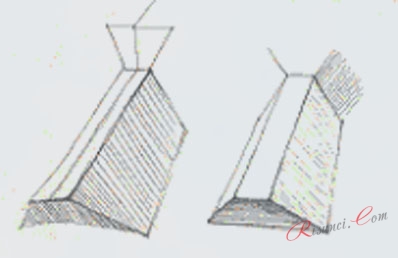
With its help, it is very easy to deal with proportions. So, we have a pyramid. The structure of the nose, as well as the eye, has a common structure - all sorts of bones, muscles, cartilage. Now let's take a look at the fads, how to proceed:
First, we compare, align, calculate the main proportional values.
Then we determine the general shape, its dimensions, so to speak: length, height, width.
Now let's mark the superciliary arch, the length of the prism of the nose, its width in the region of the bridge of the nose, wings, the anterior plane with the tip of the nose and the bridge of the nose itself. All this can be done with the help of already studied and such useful design points. They are located symmetrically to the axis of symmetry, which divides the nose into two equal halves. These points are paired and are located in such places: the points of the upper surface of the nose are located at the level of the bridge of the nose and the tip of the nose, the points of the lateral surface are at the level of the inner edges of the teardrops and the corners of the edges of the wings of the nose.
Simplified nose shape
If we bypass listing all the cartilage and simplify the shape of the nose, only slightly changing it to achieve the level of "liveness", then something like this will come out:

After all, since the nose is a living form, we do not have to study its entire structure - we are not doctors. We have enough of the form that is covered with the skin. But, nevertheless, it's up to you to choose how you want to portray the nose - easier or harder. For more clarity, examine your own nose in the mirror. See? The muscles are well distinguished over large cartilages that look like droplets, the tip of the nose is enveloped in them and then they flow down the lateral cartilages.
The cartilages of the wings are arranged according to a similar system - they look like smaller drops that seem to go under the big ones. But, this living form can also be enclosed in a plane - in the lateral, lower and upper ones - and chiaroscuro can be applied on the plane. Everything else is known in comparison, after you get enough hand in drawing a wide variety of noses, spouts and wear
Most importantly, don't forget about proportions and perspective distortion.

how to draw a nose with a pencil
|
A special part of drawing is the nose, which is often overlooked by portrait painters. Although this should not happen! If your nose does not work out at all, then the whole portrait will suffer. Therefore, we will learn to depict the nose! Three images of the nose |
|
The image in front of you is a normal nose sketch. The nose has a completely simple shape: both lines running the entire length of the nose, a rounded ball that indicates the type of nostrils and nose. |
|
This drawing indicates the initial sketch of the nose, with shadows applied to it. |
|
An absolutely finished illustration of the nose is shown here. In this drawing, the sketch is no longer visible. Here you can see that the features of the nose are no longer filled with sharp lines, but with a shadow. |
|
The illustration above shows the structure of the nose with red lines. To adjust the image of the nose, we raise and lower our red lines. Below in blue is how you can draw a shadow that will be located directly under the end of the nose. Periodically, the shadow will be heavier, and sometimes a little light and soft, but in most cases, under lighting, it will be exactly as shown in the picture. |
|
Of course, it is clear that on the side of the nose or on the side of the bridge of the nose, which is more illuminated, there cannot be much shadow. In order not to make a mistake that beginners most often make, you should not highlight the entire contour of the nose on both sides. This is not beneficial, because the contour makes the portrait look completely unrealistic. So better draw the outline of the nose with the help of shadows. |
|
When you draw or shade around the nose, try to press the pen or hand lightly, because. they require light pressure. These three areas are shown in the figure. In the event that you are drawing a theme that does not contain many sharp shadow transitions on the face, then you should not draw these features too much. In the usual case, you can just slightly shade. For example, as shown above. 1) The area marked in blue has an almost imperceptible shadow and shows the nose from the side. Here, the area near the edge of the eye and the area where there is an inconspicuous sign of a "ball" near the nose are shaded. Usually, where the highlighted side of the nose is, few portraits allow for a little more shading, but not much anyway. Particular attention when shading should be given to the bridge of the nose. To ensure proper illusion of the size and depth of the nose, it is usually required to shade and highlight the details of the nose in the area of the dark side, as shown on the left side of this picture. 2) The next section, when working with which you need to press lightly when drawing, is the "smile line", highlighted in green on the image. This line is usually called the nasolabial fold. In this image, you can see a slight smile effect. Imperceptibly downwards, at first the strokes weaken, and then the strokes completely disappear. There are types of faces in which the "smile line" is much darker and longer. 3) On the surface of the skin, on the upper lip, from the area of the line located in the middle, the philtrum comes out, which joins the protrusion of the upper lip. In the figure, the groove is defined in red and is also applied with light strokes. |
|
Also, you can not ignore the white areas near the nose, which are shown in the figure above. As aptly noted in the highlighted image, the areas near where the nostrils begin are not delineated in many cases. The drawing will look much rougher if you select the entire base of the nose (under the nostrils). Let's pay attention to the area that is on the side of the nose, located in the middle of the beginning of the "smile line" and the nostrils. You don't have to place "smile lines" directly next to the nostril. Some faces have a gap between the nostrils and the smile line. Pay attention to this nuance when you start drawing the area near the nose. In this picture, the space is slightly increased. Paying attention to the various typical characteristics of faces, you will notice this space. |
|
In this figure, the nose is shown at an angle, which is in the projection. If our portrait is shown in a projection instead of a front view, then the nose is also in the same projection, which means it will look at a slight angle. In the picture, you can see a purple line that takes place in the very center of the face. To the left of the purple line is the area of the nose, sketched in red lines. On the other side of this line there is a blue shading that indicates the area of the nostril. In this case, the nose is drawn rotated, and does not look symmetrical at all on either side. Green color indicates that the edge of the nostril lives approximately on the same line as the corner inside the part of the eye. Similarly, when viewed from the front, they will be in the same line. With an orange line, I marked how to draw the edge of the nostril in relation to the center of the mouth. Although different people have different shapes of nose or mouth, they are mostly depicted in this way. The girl shown in the figure does not have a too large or very wide nose, however, we will apply the "method of lines" to her. Those who are just starting to master the technique of drawing depict their noses as too narrow. To achieve a successful nose width, pay special attention to this. |
|
Take a look at the purple nose. This indicates how far away from the face it is. Don't be afraid to draw it. Feel free to experiment with the nose, but do not change its length too much. Keep in mind that if the noses you draw are the same length, they will look completely unbelievable. Since people have different faces, their noses should also be different. Draw them as close to the original as possible. The proportions of your nose must be respected. As you can see from the two red and two purple lines above, the length is not that much longer than the width. The same size does not exist for all faces. However, some of the artists draw the nose either too long or too short. For the most part, your portrait should be realistic. |
|
Draw a nose with a pencil, step by step: 1) First, draw a sketch of the nose. The lines on the sides of the nose should not be darkened. One side is usually shaded more than the other. 2) Now you need to shade the base of the nose and its side, which lives in the shade. Mark the nostrils in the picture. Next, you need to shade the nostril that is in the shade. 3) Finish shading the nose. We select with soft hatching the areas of roundness of the nostrils and the area of the "ball" of the nose. |
Draw the nose from the front
Let's figure out how to draw a nose with a pencil, step by step.
- The first thing you need to decide is what kind of nose you want to draw. There are many types, sizes, shapes and even designs of the human nose.
- First try to draw the nose you are looking at from the front. Draw a two-dimensional triangle or pyramid-like figure.
- This sketch shows the third stage. Draw more clearly the lines of the bridge of the nose, and also schematically sketch out the nostrils and the tip of the nose.
- When the sketch is ready, carefully look at the drawing again. Erase all unnecessary lines, and also decide on the size of the nose. Apply the desired shadows on the nostrils, eye pads and a little on the bridge of the nose. Your nose will look incredible.
Draw the nose side view
Now let's try to figure out how to draw a person's nose, which is viewed from the side.
- In order to draw a nose from the side, or if you want to depict a person's face in motion, you need to start with the following. Draw the shape of a half diamond as shown in the figure, and then go to the sixth point.
- The nose that we are trying to draw will turn out to be straight and rough, more suitable for men or women with large facial features. Draw a thicker line over the bridge of your nose, smooth the corners at the tip and draw a nostril.
How to draw a human nose with a pencil
We draw a nose, step by step.
If you decide to draw a person's face, it is important first of all to draw the person's eyes correctly, but not only. There are no "little things" in the portrait of a person. All facial features must be drawn accurately, including the correct and beautiful nose. In this lesson you will be able to draw a person's nose step by step. The drawing of the nose is made with a simple pencil.
1. Let's start drawing the nose with a simple markup
The nose of each person has unique features, so it is impossible to give accurate advice on how to draw the nose of a girl, child or man. You can only make an abstract or as they say "academic" drawing of the nose. It is this version of the drawing of the nose that I suggest you draw. I hope there is no need to explain how to draw these two lines.
2. The contours of the "wings" and the bridge of the nose
The human nose consists of "wings" and the bridge of the nose, and it is these contours that need to be drawn in this step. The width segment of the "wing" in my drawing is equal to exactly half of the perpendicular line from the beginning of their intersection. You need to draw the nose carefully, keeping the proportions exactly.
3. The nose takes on a real shape
After an accurate preliminary marking of the drawing, it will be easy to draw a nose correctly and beautifully. You can see for yourself that it’s not difficult to draw further. Outline the streamlined forms of the wings of the nose. Mark two lines from the bridge of the nose and draw the tip of the nose.
4. Lesson "How to draw a nose" is almost finished
At this step, remove the extra contour lines, and you will get a real academic nose, all that remains is to draw a few small details. Get ready for the fact that you will have to correct the final shape of the nose several times in the drawing. Drawing a nose is not difficult, but the slightest inaccuracy leads to the fact that the nose will become "chubby" like Santa Claus or thin and skinny like Baba Yaga's.
5. How to draw a voluminous nose
This stage of drawing and the next will consist of only one thing. It is necessary to apply shadows with a soft simple pencil so that the nose looks voluminous, like in a picture by real artists.
6. How to draw a human nose. final step
When to draw a nose, at the beginning of a drawing of a person's face or at the end? Usually, when drawing a nose at the end of the lesson, the nose turns out to be distorted, either too small or vice versa. Eyes and nose are the most important elements of drawing a person's face, so it is better to start drawing with them. You can correct the chin, ears and even lips, but if you didn’t “guess” with the nose and eyes, the portrait of a person will not bear any resemblance.


- We draw a nose, step by step.
If you decide to draw a person's face, it is important first of all to draw the person's eyes correctly, but not only. There are no "little things" in the portrait of a person. All facial features must be drawn accurately, including correctly and beautifully...
- We draw a portrait step by step (option 1).
Drawings of a person's face, a portrait is the most difficult type of fine art. Learning to draw a portrait of a person correctly, even with a simple pencil, requires not only time for learning, but also talent. The complexity of drawing a portrait of a person lies in the ability ...
- Draw Easter eggs step by step.
1. First of all, using simple shapes, mark the space occupied by the future drawing 2. Approximately two-thirds of the resulting quadrangle will be occupied by a basket 3. Draw an elegant napkin and basket handles 4. Next, you can draw eggs. They must...
- We draw spring, step by step (option 2)
This landscape is a wonderful drawing for nature lovers. Follow the red lines in each illustration to find out exactly what to draw in this step. The lines drawn in the previous steps are highlighted in grey. I will show you...
- We draw lips, step by step.
This lesson presents several diagrams of how to draw a person's mouth with a pencil in stages. First you need to draw the guides, the middle of the lip and the ending. Then draw out the very shape of the lips and apply a shadow.
For the vast majority of people, the nose is the most prominent part of the face. Often it is this “detail” that gives the image expressiveness and individuality. If the artist has no idea how to draw a nose, he will not be able to achieve a portrait likeness.
What will be needed for work?
For training sketches, you can use any familiar materials: pens, liners, felt-tip pens. However, for a long portrait, you will need paper, a simple pencil of medium hardness. At first, an elastic band will not hurt either: you will have to make adjustments. But, if you know how to draw a nose with a pencil, over time, all other materials will submit to you.
Theoretical Foundations: Proportional Relations
First of all, let's figure out whether the person is in front, or full face. It doesn't matter if you are working from nature, photography or imagination. Before drawing the nose (as well as eyes, mouth, ears, and so on), you need to outline the contours of the face on paper and determine how the sizes of its parts relate to each other. Of course, you can learn to depict the nose separately, but for a better understanding of proportional relationships, it makes sense to at least schematically designate the whole face. So, first of all, draw an oval and outline the main construction lines on it:
Eyebrows will be located on the upper transverse line, the mouth along the lower one, and the middle one indicates the base of the nose. Keep in mind that the length of the “back”, that is, the front surface of this organ, is about a third of the height of the head, excluding the hairline. Thus, the bridge of the nose will be located just above the line of the eyes (look at the illustration below and see for yourself). The height limits are defined!

As for the width of the base of the nose, it is approximately equal to the distance between the eyes. It is also worth noting that the length of the back is close to the height of the ear. Mark the borders of the nose on the oval of the face.
How to draw a nose with a pencil in stages: determine the overall shape

Since you are drawing with a pencil, practice tonal modeling, as there is no better tool for this job. To show that the nose is a protruding part of the face, shade its side planes. Thus, its back and tip will become the lightest areas in your drawing. But the lower plane of the nose (including the nostrils) under normal conditions is always in shadow: shade it as thickly as possible (but within reasonable limits, of course). Your drawing should become more voluminous, expressive and realistic.
Shutdown
Suppose now you know how to draw a nose with a pencil in stages. Now you have to check if it looks like the original. If the similarity leaves much to be desired, double-check all proportional relationships. You may have incorrectly defined the corners. Of course, even a novice will not portray the owner of a hooked nose as snub-nosed, but any errors in the designation of values \u200b\u200blead to a loss of similarity. Specify the width of the wings and their shape. Do not get carried away with the details: the reliability of the image does not depend on them, but on the correct transfer of proportions. Evaluate how the nose as a whole looks on the face. It should not "get out of the big picture." You may need to tone down or move a few lines.
How to draw a nose in stages: profile
Looking at the face of the model from the side, we see only one plane of the nose. This simplifies the task. The main thing that is required of you is to "catch" the characteristic features and display the form correctly. Pay special attention to the position of the tip of the nose relative to its wings (higher, lower, on the same line), as well as the break in the bridge of the nose and the nature of the back (it can be convex, concave or straight). If you manage to capture these nuances correctly, the model will at least be recognizable. The illustration below shows different types of noses. They bear little resemblance to each other (and it's not just the color). If you take a closer look, you will find that they differ mainly in the shape and length of the back, which determines the silhouette as a whole.

Now you at least in theory know how to draw a nose. But without practice, all this information is completely useless. As often as possible, draw noses of various types, make short sketches of acquaintances and friends, analyze the shape, note the patterns in the structure of parts of the face. The theory should not be discounted, but still, it is practice that will help you master the art of portraiture, especially if you do not have an art education.
Studying the face of a person, we got to the nose, the structure of which contains many interesting points. By changing its size and shape, you can create portraits of surprisingly nice or completely unpleasant people. Today's topic: how to draw a human nose, it's very interesting.
Structure
Correctly depicting this part of the face is not as easy as it might seem at first glance. The nose strongly protrudes forward in relation to the rest of the face, and significantly changes its shape depending on the angle. In order not to miss important details and not make an unfortunate mistake, let's take a closer look at how this part of the face works.
The nose is made up of bone, cartilage, and soft tissue.

Angle and shape
It is not always necessary to be very detailed. Most often, when drawing a portrait, it is more beneficial and correct to consider it as a general form, similar to trapezoid or pyramid. This will help you correctly and accurately convey the shadow and light on this simple three-dimensional figure. If necessary, you can always add some features and details.
 In such forms it is convenient to enter the nose from different angles.
 How to draw the nose as the main object, or if it acts as a very important characteristic part of the face? In this case, you will have to draw it properly. You should start with general shapes, large patches of shadow and light. 
We mark the shadow and light on a simple form, and then we can proceed to a more detailed drawing.
Different types and forms
See in the picture below the features and details of various shapes, different skin textures, highlights and shadows. 
The main, most noticeable differences in shape and size: the tip, wings and the presence of a hump.
The tip can fall significantly below its base or be raised up. The illustration below shows different views in profile: straight, upturned and long.

On this topic, you can fantasize and train for a very long time, because there are a lot of variations.
We draw in stages
And now let's create some sketches in stages in the profile. For the first experience, it is best to find a high-quality photo, with good light (where the shadow, light and highlight are clearly visible) and use it as a nature. 
- In accordance with the angle, we enter into a suitable geometric figure. In profile, it is enough to show the borders and the general shape with a few lines.
- We show the nostrils, tip and back with simple shapes (ovals, circles or angular shapes).
- Refine all these shapes with more confident and precise strokes. We add the necessary details (nostrils, hump, relief) and slightly outline the shaded fates.
- We refine the shadows and light, draw the details.
Video tutorial
For detailed instructions on how to draw a nose, see the detailed video tutorial:
I hope this material was useful and interesting for you.
See my works, in which I definitely use everything that I just told you about:
I wish you good luck and creative success!
Consider one of the methods for drawing human noses for beginners. In this lesson, we will do without serious construction, but we will learn simple ways to draw a completely realistic nose. To get started, we suggest doing a few simple exercises.

Draw a horizontal "ladder" on the sheet, as shown in the figure, and practice "fitting" various noses into it in profile. Notice how different they are.

Now try another way that allows you to draw a snub, straight and curved nose (again, in profile). Draw two circles of different sizes, larger in front, smaller in back, as shown in the figure: if the nose is snub-nosed, the second circle is lower than the first, if it is straight, equalize the lower borders of the circles, and if it is curved, equalize the upper borders. According to this scheme, drawing the outline of the nose becomes quite easy. 
Now you can shade the resulting noses. Note that the highlights and darkest shadows lie differently on different types of noses. The darkest places in frontal lighting are in the nostrils and behind the wings of the nose. After lightly shading the entire shaded area, apply cross strokes to enhance the contrast.
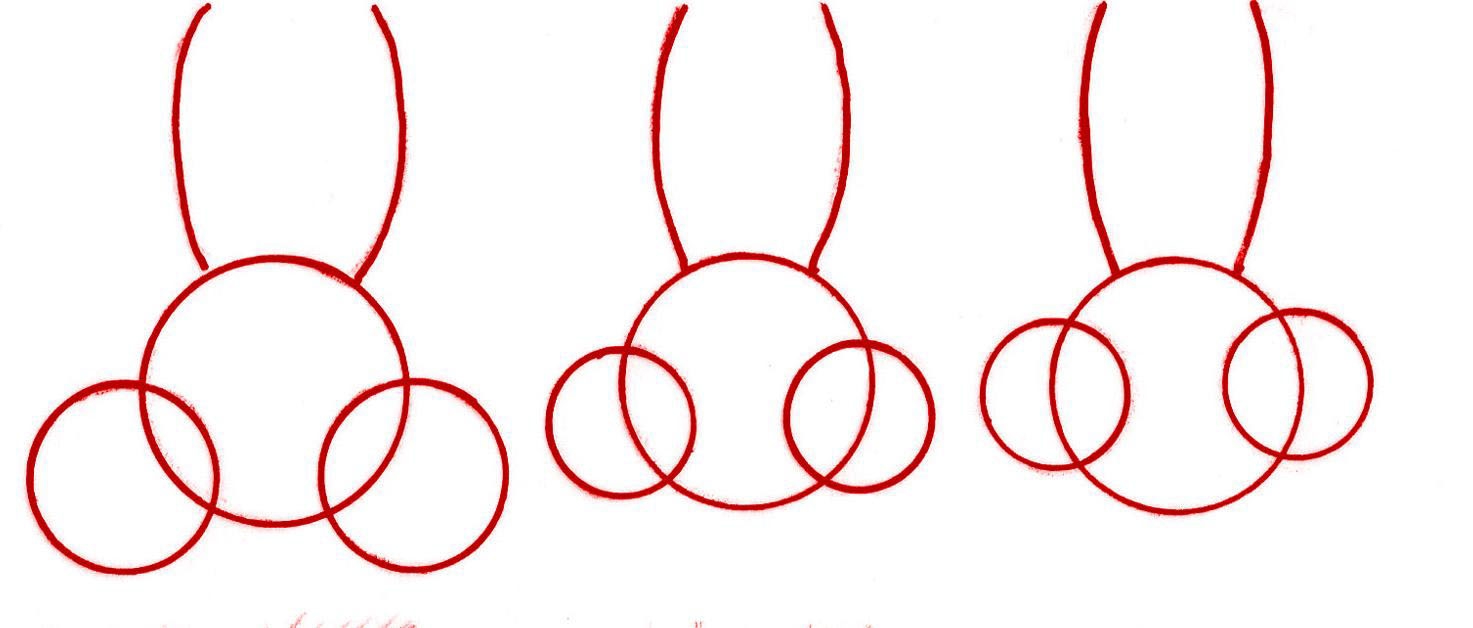
And now let's draw the same three types of noses from the frontal angle. First, let's draw such an auxiliary diagram. For all three types, draw the same large circle - this is the tip of the nose, and two rounded lines - this is the bridge of the nose. We draw smaller circles on the sides (nostrils) at different heights: for the snub-nosed one below (and more than others), for the straight one we will equalize the lower borders of all the circles, and for the bent down one we will draw small circles along the middle line of the large circle. 
Mark the bridge of the nose, the tip of the nose and the nostrils with lines. 
You can start hatching. Try to keep clear lines only around the nostrils, and shape the bridge of the nose and tip with light strokes.


, poultry farming")


- Burns, Robert - short biography
- The concept of common vocabulary and vocabulary of limited use
- Nancy Drew: The Captive Curse Walkthrough Nancy Drew Curse of Blackmoore Manor Walkthrough
- Deadpool - Troubleshooting
- Won't start How to Survive?
- What to do if bioshock infinite won't start
- Walkthrough Nancy Drew: Alibi in Ashes
- Spec Ops: The Line - game review, review Spec ops the line crashes on missions
- Room escape level 1 walkthrough
- Processing tomatoes with boric acid How much will 2 grams of boric acid
- Cucumber Grass (Borago)
- Bioinsecticide Lepidocid: purpose, properties and application procedure Lepidocide waiting period
- How to change the language to Russian in steam
- Dendrobium noble: room care
- Morphology of plants general concepts - document
- Planting, propagation and care of bamboo at home, photo Growing bamboo from seeds
- How to strengthen the cellular signal for the Internet in the country
- Sanskrit reveals the forgotten meaning of Russian words (2 photos)
- The oldest language Sanskrit programming language of the future Dead language Sanskrit
- Who has dominion over all the earth?