Fundamentals of oil painting. How to draw with oil paints: a guide for beginners Rules for painting with oil paints
Foreign artist and good art school teacher Johannes Vloothuis teaches thousands of students how to paint in oils (among other painting techniques). Johannes gave us the top 10 tips for oil painting artists. I think you will agree that every artist should know these basic techniques in painting.
1. Use white underpainting or quick-drying whitewash.
One of the common problems that oil painters have is that when you add a layer of paint on top of another, they tend to blend. For example, it is difficult to add snow on mountain tops when the first coat of paint is still wet.
When an artist goes into a frenzy and encounters such a problem, he gets frustrated and puts the painting aside and returns to work a few days later. There are special new whites that can solve this problem, unlike standard titanium whites. They are called quick-drying white or white underpainting.
2. Thin lines in oil.
Most, if not all, oil painters get frustrated when trying to draw thin lines with oil paint, especially on wet paint. Even signing a painting is not easy if the signature is small. Here are some ways to achieve this without waiting for the oil to dry:
- Use a plastic card instead of a spatula
- Use acrylic paint over dry oils
- Another innovative way is to use pastels. Usually it does not dry, but you can fix it with a layer of varnish.
If you visit an art gallery and look at the oil paintings up close, you will see the voids in the strokes in the painting with the color of burnt sienna - this is an underpainting. It provides the following benefits:
- On a white background, it is more difficult to evaluate and choose a color
- In the open air in sunny weather, a white canvas will be too bright. You can, of course, wear glasses, but there will be obvious problems with color matching
- It's almost impossible to paint an entire white canvas in a quick, spontaneous plein air and you'll end up with white gaps between the strokes.
- Oil paint is not 100 percent opaque, so the gaps in the underpainting between strokes will play an important role in the perception of the picture. If you are painting a picture with warm colors, for example, autumn, then it is better to make an underpainting in a cold color.
Underpainting Johannes Canyon Vista 
The completed landscape of Vista Canyon by Johannes Vloothuis
4. Applying oil in a thick layer
One big advantage of acrylic and oil paints is the ability to apply a thick, thick layer that can convey a three-dimensional look. Other paints such as watercolors and pastels are not of this quality. My advice is to start with a thick layer of oil paint and work your way up to a thin layer. Add drops of paint only for small details - tree trunks, stones, flowers, leaves.
In the picture below, you can see that the flowers and leaves are applied in a thick layer and therefore a foreground effect is created. 
Carmel Mission Johannes Vloothuis
5. Dry brush to create texture
In order to paint heaps of leaves, a lawn, foam in the roar of waves and waterfalls, use the Dry Brush technique. Dry brushing is a term used to refer to the technique of applying paint by "spreading" a small amount of paint. The drybrush technique can make a tree look shabby, paint lots of small leaves, paint foam near the water, and add weeds to the grass.
For a more visual representation, in the video below you will see how to draw a tree using the "dry brush" technique.
6. Painting on an already dry canvas
Alla Prima or wet on wet is a popular drawing technique in oil painting. However, the time and size of the painting may not allow you to complete the artwork in one sitting. Working on dry painting does not give the desired blending effect. This can be a problem when doing water reflections that require blending.
In order to work on dry painting, I recommend first adding a thin layer of Liquin Oil Thinner. The new paint will dissolve, but will not merge with the previous layer. This way you can soften the edges of the image!
7. Invest in professional quality paints and save on canvas.
Canvas is an expensive and mostly secondary expense, however, many professional artists choose to use this high quality canvas in their paintings.
I admit there is some benefit when it comes to drybrushing on canvas as it frames the painting nicely, but I don't think such a benefit is worth the high cost.
available in our online store.
You can prepare your paintings by simply applying Liquitex super-heavy plaster with a paint roller onto a wood panel. This will leave random raised little bumps, mimicking linen fabric. Use masonite or birch for the panel. And, instead of wasting money on canvas, splurge on professional paints and you'll reap the rewards.
8. Use different colors to create more interest in the painting
Solid monochrome colors are boring, so top artists exaggerate and add multiple variations of similar hues in the same area. Try this: Partially blend the colors on your palette until you've evened out the saturation (roughly 50 percent blending). Apply more force when squeezing out the paint. You should be able to see subtle color variations in every stroke. This takes some practice, but once you get the hang of it, your paintings will look more alive.
You can also use a multi-colored mixture to paint foliage, grass and rocks. You will learn about this in the short art video below, which shows you how to draw different types of green realistic foliage.
Also watch the video to learn how to mix colors and what strokes you can draw thick fir trees.
9. Draw fog for the depth of the atmosphere
I think fog is completely undermined in landscape painting. Scenes where fog is beautifully drawn can deliver a deep atmosphere to your painting.
In an art gallery, I once saw a beautiful picture of the Upper Yellowstone Falls with a lot of fog, where it fell down to the bottom. However, I could see through the fog and it looked very realistic. This has been achieved through the use of white zinc, which has a characteristic translucency. You can also use it to add haze to distant mountains and other areas where fog can add atmosphere.

10. Use your fingers
There is an unfounded fear of using oil paint, especially if there is skin contact. Be aware that leading manufacturers list toxicity levels on paint tubes.
I love mixing oil paints and I want the strokes to be even. Fingers can touch and apply the right pressure on the canvas, applying good strokes. You can't do that with a brush.
Well, buy high-quality spatulas and brushes in our online store in the appropriate section and section
All people have been trying to draw since childhood. Someone does it well, and in the future a person connects his life with art, but for someone far from everything works out. Everyone has been to a gallery or an art exhibition at least once in their life. And, of course, from time to time there was a desire to take and draw something by myself, just for myself. Today we will tell you where to start our creativity.
For oil painting you will need:

1. Stretched canvas;
2. Palette;
3. Pencil 2B;
4. Decorating brush 25 mm;
5. Brushes for oil work;
6. Oil paints.
Oil paints are sold either in specialized stores or in regular supermarkets. They come in two types: a set that contains several different colors of paints or they are sold individually. It is best to buy oil paints separately. Firstly, this way you can replenish your collection due to the fact that you will use some color more often, and some less often. Secondly, if you run out of paint of a particular color, you just need to buy it in addition, and not purchase a whole set.
It is best to choose special brushes for working with oil. Pork bristle brushes are the most convenient. They are more solid and will work great for your work. It is better not to experiment and do not paint with your fingers, this can be dangerous, since oil paints are very toxic.
The palette may also be needed in the work. If you plan to paint all the time, then you should buy a special wooden palette. But in principle, glass or a plate can play the role of a palette. The paint on the palette should be squeezed out gradually, from left to right. You should never immediately mix light and dark colors. The middle of the palette should remain empty, where we will mix our paints. There are also special whites that can be used between paints. They usually consume a lot of them, so it's better to stock up on them in advance.
Oil painting technique
There are several types of oil technique: a la prima and multilayer.
A la prima - This is a technique that involves the rapid application of paints to the canvas. This technique does not require preliminary pencil sketches. We paint the landscape with oil in the same way gradually, but very quickly. If you did not have time to finish your painting, you can finish it the next day, since the paint, by this time, will not dry yet. In this technique, it doesn’t matter at all whether we paint the sky with oil, or paint mountains with oil, or paint water with oil, the main thing is an abundant amount of paint.
Multi-layer technique
suitable for longer periods of work. This technique involves applying several layers of paint. When we paint nature with oil, we need just such a technique. Since in one picture, you can combine many images and transfer them to the canvas.
We always paint a landscape with oil in stages. Don't take on everything at once. First, draw what you want on the canvas with a pencil. This is done in order to correctly distribute the ton and paint in the future. After, it is recommended to apply primer. In principle, there are canvases already impregnated with soil. The primer itself helps the paint adhere better to the canvas.
LET'S LOOK AT SOME EXAMPLES YOU CAN TRY TO PAINT WITH OIL:

1. How to paint grass with oil.
This is the easiest one to start with. Prepare the necessary paint and make several shades of green on the palette. Initially, if you doubt your abilities, draw what you want with a pencil. And then, already use the paint. Apply paint to the canvas smoothly, from bottom to top. Use darker paint on the bottom, lighter on top. Carefully work with a brush, do not make too abundant lines so that they do not turn into a blot.

2. How to draw water with oil.
Water is the next stage, already more complex. Try to convey shallow water and depth with shades of colors. This can be done by using a lighter blue or a darker blue. Take a canvas and approximately mark on it with a pencil where it is deep and where it is shallow. Prepare paint on the palette. Apply paint to the canvas gradually. First, draw a small area, use light tones of paint for this, after depth, a dark blue color will come in handy here. Don't forget about color transitions. You can also depict waves with small strokes of white paint.

3. How to paint trees in oils.
First draw the tree on the canvas with a pencil. Try to convey the branches of the tree, foliage and contours as naturally as possible. The pencil is very easy to erase and this will allow you to practice before working with paints. Then take on the paint. To begin with, depict the trunk itself, with brown paint, add small stripes with a darker shade, depicting the bark of a tree. Branches draw in lighter tones. Foliage can be any color. If the tree is spring, then you can “play” with green shades, but if it is autumn, then yellow, red and green colors are perfect.

4. How to draw grapes in oil.
The drawing of grapes requires special attention. Before work, study carefully either similar works or photographs depicting this berry. One of the most difficult elements will be the leaves, which will require special attention. If this is still very difficult for you, just draw berries. Draw bunches of grapes with a pencil. Try to stick to the natural oblong shape. After that, with paints, first circle the contours of the berries with darker paints, paint over the rest of the berry with a slightly lighter paint. Use white paint or other light colors to paint highlights.
div > .uk-panel", row:true)" data-uk-grid-margin="">


The artist always tries to show his connoisseur what his soul feels, strives to convey how he sees the world around him. This feature lies not only in what the artist depicts, but also in what technique he works. The material used by the master is also important. Oil paints, unlike acrylic, gouache and watercolor, have the property of long drying, since the layer of oil paints can remain wet for a long time. When drying, if any detail in the future picture did not suit the artist and there was a need to fix something, a thick oil layer can be removed with a special knife - a palette knife.
Then a new layer of paint can be easily applied to the canvas! In addition, the oil has another specific feature: due to its slow drying, the artist can mix colors, turning them into an incredible palette of color diversity and smooth color transitions.
How to draw First of all, you need to choose the paint itself. In this matter, the main criterion in the selection of material is its quality. Oil paints with class "AA" are quite resistant compared to class "C" paints, since the latter quickly fade and lose their saturation. Oil painting for beginners should start with an introductory theory, because first of all you need to know the material you are working with and be able to choose and apply it correctly. This situation occurs when, when applying a second layer of oil to the canvas (without first drying the first layer), the color of the image changes. In this regard, it is necessary to familiarize yourself in detail with the features of the composition of paints and the nuances of their application.

How to paint with oil paints and how to mix them? Representing the image of the artist, on a subconscious level, there is a picture of a man with a scarf in a "French" beret, who holds a large palette with brushes in his hands. It is the palette that is the main element of the artist's image. Predominantly, the palettes are made of wood and are shaped to be held in the left hand along with the brushes. These have a thumb hole. It should be noted that a good wooden palette is processed and impregnated with oil, after which it is dried. This procedure is necessary so that the oil contained in the palette is not absorbed, otherwise the paints are subject to rapid drying.
How to paint with oil paints and which brushes are best to use? Oil painting requires a separate approach to the selection of materials. oil should choose flat bristle. An important point is that you can not write with one brush. During the creative process, the brush is not washed (only at the end of the work), so using the same brush for light and dark colors can lead to improper mixing and “contamination” of the base color.

How to paint with oil paints on canvas? Canvas is the basis for the future painting. In order for the picture to turn out realistic and saturated, it is necessary to choose the right material from which the canvas is made. For oil painting, hemp or linen is suitable. The fabric of your canvas should be knot-free, even and dense. An important point: be sure to prime the canvas! In specialized art stores, you can purchase both a ready-made primed canvas and perform this procedure yourself.
Someone who can't do it? Painting a person with oil is a complex multi-stage process that requires certain knowledge and skills. In addition to the fact that you need to perfectly know the proportions of the human body and be able to correctly and correctly compare them, painting such an oil portrait requires additional awareness of the preparatory stages of working with materials, the stages of applying and mixing paints. Therefore, a young, novice artist must initially accustom himself to thoughtful, systematic, serious work and the right attitude to the material with which he works.
Painting plays a huge role in the development of culture, for many centuries it has been developing, introducing the world to new techniques. Drawings of cavemen prove that painting allowed to demonstrate their thoughts and feelings. Their creativity is characterized by features: contours made with ash, chalk, clay - these are animals that are hunted; man is a hunter. It turns out that already in prehistoric times there was a kind of technique.

Animals from the 12th century
Colorful painting appeared somewhere in the 12th century, so ocher was used to depict the body of living creatures, which was accidentally found in a cave, while hooves and horns were painted with charcoal. The desire to create colorful “works” forced people to discover new things, thanks to which primitive oil paints appeared in the 7th century. After researching old works, scientists discovered natural pigments in them.
What can you draw
However, artists figured out how to paint with oil paints only in the 15th century. Jan van Eyck actively used them for his works, arousing the increased interest of others in them. Over time, he was the first to create rules explaining how to properly use such paints.
The Case of the Painting of the Dutch School of Painting
The methodology of the Dutch school always strikes with its realism and beauty. They were able to create such paintings that to this day delight both ordinary museum visitors and connoisseurs. So in the 80s, the attention of experts was attracted by a picture with a bouquet of flowers, from which a drop of dew allegedly fell on the table. Experts have come to a consensus that the drop is so very real and you even want to brush it off. It turns out that it "did not dry" for 600 years. Such "drops" make painting eternal.

What oil paints are
Oil painting for beginners will be difficult, but interesting, because the color palette
represented by a large assortment:
- titanium white;
- red cadmium;
- viridian greens;
- bright red paint;
- dioxin purple;
- soot gas;
- yellow cadmium;
- orange cadmium;
- azure, etc.
And how to paint with oil to achieve expressiveness and realism? We need to develop and gain experience. To do this, you will need to allocate time, be patient and some drawing supplies.

Where can you find paints
Art stores offer a large selection of professional kits for creativity. For beginners, you can buy a small inexpensive kit for testing, it will be enough to create small paintings. It is recommended to master this technique by depicting bright things, for example, fruits or vegetables, not monophonic, but with iridescent sides.
For drawing, oil is useful not only for paints, but also for:
- canvas (a cardboard sheet will do);
- a few brushes.
Canvases are most often represented by a rough cloth or paper with a special primer coating. Beginning artists are better off buying a canvas stretched on a stretcher. As for the brushes, they are divided according to: stiffness; size; the hair used to make it. So hard and wide are useful for the background, soft for drawing, and thin for small strokes.
How much "oil" and paints does a novice artist need?
Too expensive sets are not worth buying, because you will use only a part. For those who are just starting to master the "oil" enough
5 different brushes:
- flute wide;
- medium #2, #3;
This set is enough for any picture. Do not despair if nothing works right away, everything comes with experience. By learning and practicing drawing techniques, you will succeed. Yes, the methods are complicated, but they are necessary. You will learn how to mix colors and create new shades. It turns out that the whole process of creating a work consists in the constant editing of tones. It is very exciting.
What should a painter know?
Only a diligent person can achieve the visible desired result from the first attempts. It is also important to have at least some drawing skills. It will be useful to be like classes, watch instructional videos, they will help you handle oil paints and brushes.

Step by step learning
So, how to paint with oil on canvas? We suggest you familiarize yourself with how to work on a picture. Stretch the canvas on a stretcher and prime it so that the paint lays evenly and does not soak. The most uncomplicated and fairly reliable soil is considered water emulsion paint combined with PVA, 1:1. Before applying to the canvas, the mixture is well stirred and diluted with water, the composition should be such as cream. You can work with the canvas only after the fingers stop sticking to its surface.
Next, draw with oil in stages, following our instructions. We create a background, it can be just a painted part or some kind of drawing. You will need a palette knife, it is very convenient for them to distribute the paint, getting an even and thin layer. This will allow the oil to dry much faster, as you know, this process is very long, it can take months. Be prepared to postpone further work for a long time.

Dried canvas - the next stage
As the canvas has dried up, you can start drawing a sketch, on a light background this is done with a pencil, and on a dark one with a small one. Be sure to make the contours before you start painting with oil.
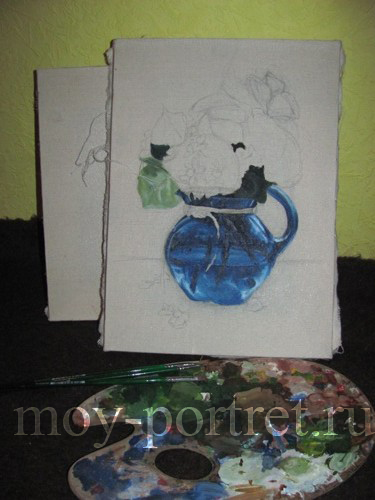
If your painting will consist of several parts, then first draw the largest object. For example, you draw a jug, cups, a vase, plums, sweets, a tablecloth. And this means that you will use a variety of colors.
An integral part of the picture - shadows
Start painting with oil from a jug, apply brown color to the palette and dilute it slightly. Dip the brush into the resulting mixture and apply strokes. Having completed work with this subject, you need to deal with its shadows, brown paint will help you with this, but of a darker and deeper shade. To do this, add black oil to brown oil and combine them well. The shade for the shadows is ready, where they will be located, you yourself determine. Then you start working on the cups, they are made of the same material (conditionally), which means that working with them is similar to what was done earlier. Do not forget that light falls on objects at the same angle.

At the next stage, we deal with a vase filled with plums. Don't try to make a glass vase as there should be a lot of hues that in real life show up in glass. It is better for a novice artist to make a faience version, for which, in addition to painting, ordinary shadows will be required. Drawing plums is the easiest, the main thing is that they look natural, which means they overlap one on one.
And finally
Color the fruit in dark blue. In those places where they touch each other, you need to draw a thin line, as if separating them. For realism, you need to add fruit cuttings, but not to every berry. As for sweets, the main thing is to make the right contours. You can paint them however you like.
After completing the work, leave it to dry, turning it "face" to the wall.
Oil paints are quite a complex material and it will not be possible to quickly master oil painting. Even great masters can correct and remake their works more than once, bringing them to perfection. But along with the difficulties, oil painting opens up new horizons in creativity, makes it possible to make light sketches and more complete deep works, embodies the play of light and shadow, creates overflow and smooth flow of colors.
It doesn’t matter if you are an artist with many years of experience or just starting to master the fine arts, you are going to create a masterpiece or make a small sketch - first you need to choose oil paints, brushes, canvas and other necessary tools.
Before you start working with color, you need to transfer the drawing to the canvas. If you decide to paint a portrait, then consistently, mouth, nose, face oval, neck, hair. This can be done with a pencil, charcoal or carbon paper. After drawing the drawing, it must be fixed on the canvas. This is done so that the paint adheres better to the base. In addition, particles of the material with which the drawing was applied can interfere with the paint, thereby changing its color. It is better to do this with a special fixer. You can make a sketch with highly diluted oil paints, in which case fixing is not needed.

There are two main techniques for working with oil paints: in one go - Alya Prima and multilayer.
Professional artists usually choose the technique of multi-layer prescription, as it makes it possible to better convey depth and reveals all the possibilities of oil painting. The essence of this method is that, having drawn a contour, they make underpaintings - they place light spots and shadow accents on the canvas. Do this with a thin layer of highly diluted paint. Then the picture is written more densely in all the variety of colors and shades. And in conclusion, glazing is done - the application of translucent colors to the already dried main ones. This allows you to create a deep color with an overflow effect.
The disadvantage of this method is that it takes six to twelve months to create a painting.
If you decide to master the technique of multilayer painting, then you should study some of the nuances associated with the properties of oil paints. If the initial layer is not allowed to dry, then during the second application, the oil may dry out - become dull. Such defects can be eliminated with retouching varnish. You can also use oil, while the remnants that are not absorbed into the paint are removed the next day with a blotter. In ancient times, craftsmen wiped heavily dried paint with a cut onion or garlic, this improves the adhesion of the layers to each other.
Each new layer should be equal in thickness to the previous one, or it is worth applying paint more thickly. But in no case is it thinner, otherwise the paint will simply crack when it dries.

Over time, oil paints become a little transparent, and those unwanted places that were smeared begin to shine through the top layer. Therefore, you can finally get rid of unwanted elements only by scraping them off while they are still wet.
Works in the Alya Prima technique are created much faster. In addition, this method is easier and perfect for beginners. The point of painting using this technique is to complete all the work before the paints harden. That is, from the beginning of work, the artist has no more than three or four days left. Short terms can also be an advantage if you decide "quickly". The thickness of the stroke affects the drying time: the thicker the paint, the more time it will take. Therefore, diluted paints are often used here, sometimes allowing them to shine through the oil. This creates an effect of lightness and light.


, poultry farming")


- Burns, Robert - short biography
- The concept of common vocabulary and vocabulary of limited use
- Nancy Drew: The Captive Curse Walkthrough Nancy Drew Curse of Blackmoore Manor Walkthrough
- Deadpool - Troubleshooting
- Won't start How to Survive?
- What to do if bioshock infinite won't start
- Walkthrough Nancy Drew: Alibi in Ashes
- Spec Ops: The Line - game review, review Spec ops the line crashes on missions
- Room escape level 1 walkthrough
- Processing tomatoes with boric acid How much will 2 grams of boric acid
- Cucumber Grass (Borago)
- Bioinsecticide Lepidocid: purpose, properties and application procedure Lepidocide waiting period
- How to change the language to Russian in steam
- Dendrobium noble: room care
- Morphology of plants general concepts - document
- Planting, propagation and care of bamboo at home, photo Growing bamboo from seeds
- How to strengthen the cellular signal for the Internet in the country
- Sanskrit reveals the forgotten meaning of Russian words (2 photos)
- The oldest language Sanskrit programming language of the future Dead language Sanskrit
- Who has dominion over all the earth?