Draw a diagram of the object. How and what can be drawn in a Word - from simple shapes to complex diagrams
Good day dear friend. When working with text documents, tasks often arise, the solution of which is not always obvious. In this article we will talk about one of these tasks, namely:
How to make a diagram in word
To make this article as useful as possible for you, I decided to move away from general provisions and analyze the drawing up of a diagram on a specific example. We will use two methods - using tables and shapes, only using shapes.
Here is the schema itself:
Let's start drawing this diagram in a word document.
Drawing a diagram with tables and shapes
- Open the desired document and move to the place where you want to insert the diagram.
- Open the "Insert" tab on the top toolbar.

- Let's use the "Drawing Tables" tool. Open Table and select Draw Table.

- Now, using a pencil, draw all the cells of our circuit. I draw to explain the process. I ask you not to pay attention to the accuracy of the result. To resize a cell, move the cursor to its border. Use the icon to move a cell.

- Now we need to add arrows. To do this, use the "Shapes" item on the "Insert" tab.

- From the palette of shapes, select the desired arrows and place them between the cells of the scheme.

- Use edit points to change the shape of the arrow.

- The rest is to add content to the cells. To do this, click on the cell and type the desired text. To format text, use the appropriate icons on the Home tab

That's all. There is another way to draw a diagram.
MS Word is, first of all, a text editor, however, you can also draw in this program. Of course, you should not expect such opportunities and convenience in work, as in specialized programs originally intended for drawing and working with graphics, from Word. Nevertheless, a standard set of tools will be enough to solve basic tasks.
Before considering how to make a drawing in Word, it should be noted that you can draw in this program in two different ways. The first one is done manually, similar to how it happens in Paint, although a little easier. The second method is pattern drawing, that is, using pattern shapes. You will not find an abundance of pencils and brushes, color palettes, markers and other tools in the brainchild of Microsoft, but it is still quite possible to create a simple drawing here.
Microsoft Word has a set of drawing tools that are similar to those of the standard Paint integrated into Windows. It is noteworthy that many users do not even know about the existence of these tools. The thing is that the tab with them by default is not displayed on the program's quick access panel. Therefore, before you start drawing in the Word, you and I will have to display this tab.
1. Open the menu "File" and go to section "Options".

2. In the window that opens, select the item "Customize Ribbon".

3. Section "Main Tabs" check the box next to "Drawing".

4. Click "OK" for your changes to take effect.

After closing the window "Options" a tab will appear on the Quick Access Toolbar in Microsoft Word "Drawing". We will consider all the tools and features of this tab below.

Drawing tools
In the tab "Drawing" in Word, you can see all those tools with which you can draw in this program. Let's look at each of them in detail.
Tools
This group contains three tools, without which drawing is simply impossible.
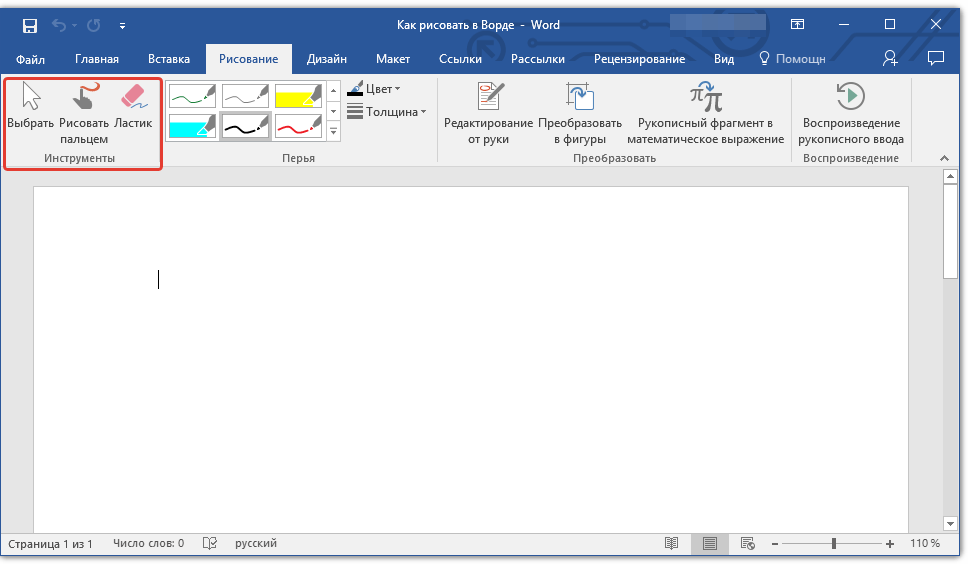
Choose: allows you to point to an already drawn object located on the document page.
Finger draw: designed primarily for touch screens, but can also be used on conventional ones. In this case, instead of a finger, the cursor pointer will be used - just like in Paint and other similar programs.

Note: If you need to change the color of the brush you are painting with, you can do this in the adjacent tool group - "Feathers" by clicking on the button "Color".
Eraser: this tool allows you to erase (remove) an object or part of it.

Feathers
In this group, you can choose one of the many available pens, which differ primarily in line type. By clicking on the "More" button located in the lower right corner of the styles window, you can see a preview of each available pen.

Tools are located next to the style window. "Color" and "Thickness", allowing you to select the color and thickness of the pen, respectively.

Transform
The tools located in this group are not intended entirely for drawing, or even not at all for these purposes.

Editing by hand: allows you to edit documents with the pen. Using this tool, you can manually outline text fragments, underline words and phrases, point out errors, draw pointing arrows, and so on.

Convert to shapes: once you've sketched a shape, you can transform it from a drawing into an object that you can move around the page, resize, and do all the manipulations that other drawing shapes can do.

To convert a sketch into a shape (object), you just need to point to the drawn element using the tool "Choose" and then click the button "Convert to Shapes".
Handwritten fragment in mathematical expression: we have already written about how to add mathematical formulas and equations in Word. With this group tool "Convert" you can enter into this formula a symbol or sign that is not in the standard set of the program.

Playback
By drawing or writing something with a pen, you can turn on the visual reproduction of this process. All it takes is a click of a button "Handwriting Playback" located in the group "Playback" on the Quick Access Toolbar.

Actually, this could be the end, since we have considered all the tools and features of the tab "Drawing" Microsoft Word programs. But you can draw in this editor not only by hand, but also according to templates, that is, using ready-made shapes and objects for this.
On the one hand, this approach may be limited in terms of capabilities, on the other hand, it provides a much wider choice of tools for editing and designing the created drawings. For more information on how to draw shapes in Word and draw using shapes, read below.
Drawing with Shapes
It is almost impossible to create a drawing of an arbitrary shape, with roundings, variegated colors with smooth transitions, shades and other details using this method. True, often such a serious approach is not required. Simply put, do not make high demands on Word - this is not a graphics editor.
Adding a drawing area
1. Open the document in which you want to make a drawing, and go to the tab "Insert".

2. In the illustration group, click the button "Shapes".

3. In the drop-down menu with available shapes, select the last item: "New canvas".

4. A rectangular area will appear on the page in which you can start drawing.

If necessary, resize the drawing field. To do this, drag one of the markers located on its border in the required direction.
Drawing tools
Immediately after adding a new canvas to the page, a tab will open in the document "Format", which will contain the main tools for drawing. Let's consider in detail each of the groups presented on the quick access panel.
Inserting Shapes
"Shapes"- by clicking on this button, you will see a large list of shapes that can be added to the page. All of them are divided into thematic groups, the name of each of which speaks for itself. Here you will find:
- lines;
- Rectangles;
- Basic figures;
- Curly arrows;
- Figures for equations;
- Flowcharts;
- Stars;
- Callouts.

Select the appropriate type of shape and draw it by left-clicking the mouse on the start point. Without releasing the button, specify the end point of the shape (if it is a straight line) or the area that it should occupy. Then release the left mouse button.

"Change Shape"- by selecting the first item in the menu of this button, you can literally change the figure, that is, instead of one, draw another. The second item in the menu of this button is "Start changing nodes". By selecting it, you can change the nodes, that is, the anchor points of specific places of the figure (in our example, these are the outer and inner corners of the rectangle.

"Add caption"- this button allows you to add a text field and enter text into it. The field is added at the location you specify, however, if necessary, it can be freely moved around the page. We recommend that you first make the field and its edges transparent. You can read more about how to work with a text field and what you can do with it in our article.
Shape styles
Using the tools of this group, you can change the appearance of the drawn figure, its style, texture.
You can change the shape's outline color and fill color once you've chosen the one that suits you.

To do this, select the appropriate colors in the drop-down menu of buttons. "shape fill" and "Shape Contour", which are located to the right of the window with template shapes styles.

Note: If the standard colors do not suit you, you can change them using the parameter "Other Colors". You can also choose a gradient or texture as the fill color. In the menu of the "Outline Color" button, you can adjust the thickness of the line.

"Shape Effects" is a tool with which you can further change the appearance of the shape by choosing one of the proposed effects. Among these:
- Shadow;
- Reflection;
- backlight;
- Smoothing;
- Relief;
- Turn.

Note: Parameter "Turn" is available only for 3D shapes, some effects from the above sections are also available only for shapes of a certain type.

Word Art Styles
The effects in this section apply exclusively to text added with a button. "Adding an inscription" located in the group "Insert Shape".
Text
Similar to WordArt styles, effects apply exclusively to text.
streamline
The tools of this group are intended for changing the position of the figure, its alignment, rotation and other similar manipulations.

The rotation of a figure is performed in the same way as the rotation of a picture - by a template, strictly specified, or arbitrary value. That is, you can select a standard rotation angle, specify your own, or simply rotate the shape by dragging the circular arrow located directly above it.


In addition, using this section, you can superimpose one shape on another, just as you can do with drawings.
In the same section, you can wrap text around a shape or group two or more shapes.
Word lessons:
Note: Group Tools "Organize" in the case of working with figures, they are absolutely identical to those when working with drawings; with their help, you can perform exactly the same manipulations.
The size
There is only one possibility of a single tool of this group - changing the size of the figure and the field in which it is located. Here you can set the exact value of the width and height in centimeters or change it step by step using the arrows.

In addition, the size of the field, as well as the size of the figure, can be changed manually using the markers located along the contour of their borders.

Note: To exit drawing mode, press the key. "ESC" or left-click in an empty area of the document. To return to editing and open a tab "Format", double click on the picture/shape.
That, in fact, is all, from this article you learned how to draw in Word. Do not forget that this program is primarily a text editor, so you should not assign too serious tasks to it. Use specialized software for such purposes - graphic editors.
Working in a Word document with text, you may come across pictures, diagrams, drawings. By inserting various objects into the text, it becomes more visual, and the one who reads it perceives the information better.
In this article, we will look at two ways in which you can create a diagram in the text editor MS Word - this is a SmartArt drawing and inserting regular Shapes. I will show in Word 2010, but these screenshots will also work if you have Word 2007, 2013 or 2016 installed.
The site already has articles: how to add a picture to Word, and how to make a graph in Word. By clicking on the links, you can read them and make your document interesting and more informative.
How to draw diagrams with SmartArt
You add a diagram to a text editor by inserting a SmartArt graphic into your document. To do this, go to the tab and in the group "Illustrations" click on the button "SmartArt".
This window will appear. In it you need to choose the appropriate picture. On the left, click on the section, in the example "Hierarchy", and select one of the proposed drawings. On the right is the preview area, see how it looks and what it is more suitable for.

Now let's start placing blocks. You can delete unnecessary ones by selecting it with the mouse and clicking the "Delete" button. Remove, thus, all unnecessary rectangles.

Next, you need to add blocks. Select the one under which you want to insert additional ones, and on the tab "Add Shape", in the list, click on the item "Add Shape Below".
After that, select the top rectangle again and add another one below. Here you can also choose to add the desired object above the selected block, in front of it, or behind it.

After you make the previous point, you need to type the text. Select the diagram area and on the tab "Working with SmartArt"- "Constructor" click on the button "Text area". Or on the left border, click on the button with two small arrows.

A small window will open on the side. In it you need to enter the text for each of the blocks. Here, the levels are marked with markers, and by clicking in front of the marker, you can see where the text will be entered.
Write next to each marker what text should be in which object.

When everything is filled in, the window for adding text can be closed by clicking on the cross in it.

Now you can work on the appearance of the circuit itself. To do this, select it and go to the tab "Working with SmartArt"- "Designer". In the SmartArt Styles group, you can choose any other style.

You can also "Change Colors" diagrams by clicking on the corresponding button.

If the selected view does not suit you, you can change it in the corresponding group. Hover over any of the suggested layouts to see what your diagram will look like. If this layout is more suitable, click on it to select.

By going to the tab "Working with SmartArt"- "Format" you can change any shape or text. For example, select a shape, press "Change Shape" and click on any other from the proposed list. For each, you can change the fill, outline, or add an effect.
In the same way for text, select it and you can apply one of the ready-made styles, change the fill, outline or add an effect.

In the end, I got this scheme.

How to draw an arrow diagram using Shapes
You can make diagrams in Word in another way, without using ready-made templates, but create it by inserting suitable shapes into the document.
To do this, open the tab, click on the "Shapes" button and click on the one you need from the list, it can be an oval, rectangle, rhombus, and more.

After that, the cursor will change from a stick to a plus sign. Use it to draw a shape in the right place in the document. Then you will see a tab "Drawing Tools"- "Format". On it, click on the "Shapes" button again and click on the one you need in the list. Add them all like this.
If you have drawn an object on a sheet and you need to move it a little, then you can do this with the mouse, capturing it beyond its border. Or select it, hold down the "Ctrl" key and move it using the arrows on the keyboard.

Next, let's connect the blocks with straight lines or arrows. Select one of them to open the tab "Drawing Tools"- "Format". Then click "Shapes" and from the drop-down list, click, for example, on the arrow. Draw an arrow so that it points directly to the block itself. You can connect multiple arrows with a straight line.
You can read more about how to make arrows in Word in the article by clicking on the link.
To draw a straight horizontal or vertical line while drawing an arrow, press and hold the Shift key .

Using a straight line and an arrow, I managed to draw just such a diagram.

Now let's change the appearance of the arrows. Select them in turn, and for each you can choose one of the ready-made styles, or click "Shape Outline" and choose the color, arrow thickness, and more.

By clicking "Shape Effects" you can add one of the proposed effects. I chose shade.

Having drawn and changed the appearance of all the arrows, we move on to the text. Select one rectangle and on the tab "Drawing Tools"- "Format" press the button "Draw an inscription". A plus sign will appear instead of the cursor. Draw them a rectangle for the inscription in the desired block.


As you can see, the label rectangle is filled with white and has an outline. Let's take this away. Click on it and on the tab "Drawing Tools"- "Format" select "shape fill"- "No fill".

We repeat the same for the contour: “Shape contour” - “No contour”. Do this for all blocks with text.

The next step is formatting the written text. Select the text and on the "Home" tab, select the font, size, color and center it.

So, we changed the appearance of the arrows and the text in the diagram, it remains to work with the blocks. Select any of them with the mouse by clicking on it - a tab will open "Drawing Tools"- "Format". In the Shape Styles group, click on the one you like. Or use the Fill, Path and Effects buttons to make any look that suits you best.

If, having drawn a diagram, you notice that you need to change one of the blocks, for example, a rectangle to a rhombus, then you do not need to delete it and draw a rhombus, you can simply replace it. Select the rectangle, for example, go to the tab "Drawing Tools"- "Format" and click on the button, which shows a line with markers. Select from the list that opens "Change Shape" and specify which one to insert.
The Microsoft Word text editor contains all the necessary tools for creating diagrams directly in the documents themselves. The main tools for creating diagrams in Word are vector shapes and SmartArt objects. With their help, with a minimum number of settings and time, you can create schemes of almost any complexity and adapt them in accordance with the needs and tasks that the document being created solves. Consider the use of these tools with examples.
How to make a diagram in Word using SmartArt objectsSmartArt objects are ideal for building small, generic logic diagrams. To use them to make a diagram in Word, follow these steps.
- Open the document in which you will create the diagram and go to the section Insert in the main menu of the text editor.

- Make a double click on the button smart art and in the window that opens, select the appropriate template for the scheme. For example, we have chosen a hierarchical block list. Click the button OK to insert a template on a page.

- Let's edit the template to match the planned scheme and add signature blocks. To do this, click the button labeled Text area from the tab Constructor or just left click on the schematic area.

- A window will appear in which you can edit the scheme as a text list, changing the structure due to the multi-level organization of the list and adding labels to the blocks that will become the lines of the list.

To begin with, let's bring the structure of the circuit to the intended one. As a result, we will need to create the following schema.
- Delete all lines in the list except the first one. In this case, only the first initial block will remain on the diagram.

- Using key translations Enter and changing nesting levels of the list with the key Tab Let's modify the list in accordance with our goal. To make it clearer for yourself, you can remember that the keyboard shortcut Enter+Tab will add blocks in the vertical direction, and the key Enter- in horizontal. As a result of the changes, we get the following template.

- It remains only to add inscriptions and get the finished scheme. If necessary, you can always change the color template of the entire scheme and fine-tune the parameters of the figures included in it, such as fill, line colors, characteristics of shadows, shapes and rotation of the figure, etc.


How to create a diagram in Word using shapes
We talked about how to create diagrams in Word using vector shapes on the pages of our website in the corresponding article. We will not repeat ourselves and suggest that you familiarize yourself with the materials of the article, in which an example of working with figures is considered in sufficient detail and the necessary illustrations are given.
At first, it may seem difficult for you to work on creating diagrams in Word, but with a little practice and experimentation, you will master all its nuances and be able to create diagrams of any complexity.
Flowchart in Word .
A student or engineer often has to create different schemes from blocks with arrows and inscriptions. Someone has a special program for this, and some know how to create such diagrams in Word. If the blocks in the diagram must be connected by arrows or if the diagram is supposed to be “built up” with new blocks, then instead of tables it is better to use the option of creating a diagram as a graphic object. Word's built-in drawing tools allow you to create an arbitrarily complex diagram. At the same time, the text content is located not in the main document, but in special graphic inserts - inscriptions.
Let's try to make such a scheme.
Block diagram inWord 2003
Click on the bar Drawing figure Rectangle. There should be such a frame (without inscriptions). In it, we will create our block diagram.
Advice
The Drawing toolbar is usually located at the bottom of the program window. If you do not have a drawing panel at the bottom, then go to the menu View – Toolbars, and check the box for Drawing.
 Click the button AutoShapes on the panel Drawing, select a command block diagram, and then click the desired shape.

Then click in the frame box where you want to place this shape.

If it is not where you want it to be, then drag it with the mouse.
Select and arrange the rest of the shapes of your future diagram in the same way.

You can drag these shapes and resize them.
Now let's add labels to our shapes. To do this, on the toolbar Drawing and click on the icon Inscription.

Then we click on the shape in which we want to insert this inscription. A small frame will appear with a blinking cursor inside.

We write the name of our block. The text inside this field can be formatted like plain text in a document. The label box can also be dragged and resized. Labeled blocks can be copied and pasted into other blocks.

By default, the inscription is enclosed in a rectangular frame. If you want to impose an inscription on a figure of a different type, this frame should be deleted. To do this, right-click on the frame with the caption and select the Format Caption item from the context menu.

In the opened dialog box, open the tab Colors and lines. In line group Color. Choose an option no lines.

Advice
It's even easier to insert text in a different way. Right-click on the block in which you want to paste the text, and select the item from the drop-down menu. Add text.
For beauty, the figures can be painted in different colors. To do this, select the desired shape with a mouse click and click on the Fill color icon on the Drawing panel and select the color you like in the palette that opens.

In the same way, blocks with inscriptions can be filled in so that they are not white, but colored or the same color as the block diagram.
Now let's add arrows to our scheme.
Arrows on the chart are drawn using the Arrow tool. Their properties can be changed in the same way as label properties. In this case, you can control the thickness of the arrow, the type of line, the shape of the end of the arrow, etc.

Clicking on the button AutoShapes – curly arrows, and select the arrow. Then we go to the field of our flowchart and click with the mouse where we want to insert an arrow. You can fill it with any color.


, poultry farming")


- Burns, Robert - short biography
- The concept of common vocabulary and vocabulary of limited use
- Nancy Drew: The Captive Curse Walkthrough Nancy Drew Curse of Blackmoore Manor Walkthrough
- Deadpool - Troubleshooting
- Won't start How to Survive?
- What to do if bioshock infinite won't start
- Walkthrough Nancy Drew: Alibi in Ashes
- Spec Ops: The Line - game review, review Spec ops the line crashes on missions
- Room escape level 1 walkthrough
- Processing tomatoes with boric acid How much will 2 grams of boric acid
- Cucumber Grass (Borago)
- Bioinsecticide Lepidocid: purpose, properties and application procedure Lepidocide waiting period
- How to change the language to Russian in steam
- Dendrobium noble: room care
- Morphology of plants general concepts - document
- Planting, propagation and care of bamboo at home, photo Growing bamboo from seeds
- How to strengthen the cellular signal for the Internet in the country
- Sanskrit reveals the forgotten meaning of Russian words (2 photos)
- The oldest language Sanskrit programming language of the future Dead language Sanskrit
- Who has dominion over all the earth?