How to draw car headlights. How to draw a car with a pencil in stages? Headlights and wheels of a sports car
 Many children like it because it allows them to express their thoughts and fantasies. Also, such an activity contributes to creative development. Sometimes kids want to draw their favorite cartoon character, toy, but it can be difficult for them to figure out how to do it. Mom can help the child in creating his own masterpiece, suggesting all the actions step by step on the way to the goal.
Most preschool boys love toy cars, watch cartoons about them, and collect stickers. Sometimes girls have the same preferences. Therefore, you can consider how to draw a car in stages for a child. Of course, for very young children, the drawings will be easier, but for older children, you can offer more complex ideas.
How to draw a car for a child 3-4 years old?
It will be interesting for very young children to depict even the simplest cars.
Option 1
The passenger car is well known to kids, so it would be a great idea to draw it.

- The baby should be offered a sheet of paper and a simple pencil. He can draw a rectangle on his own, and draw a trapezoid on top.
- Next, inside the trapezoid, draw windows. At the bottom of the rectangle you need to depict two wheels. In front and behind, you can draw the headlights and visible parts of the bumpers in the form of small squares.
- Now you can draw the door. To do this, let the kid draw a couple of vertical lines on the rectangle. In front of the window, you can draw a small strip at an angle, which will look like a piece of the steering wheel. Let mom ask the baby to highlight the arcs above the wheels so that the picture becomes more expressive.
- At the final stage, you should erase all unnecessary with an eraser. Let the baby try to do it himself, if mom helps.
Now the picture is ready and, if desired, it can be decorated with pencils or felt-tip pens. The kid will surely be delighted with how easy it is to draw a car with a pencil almost independently.
Option 2
Many boys like trucks. This is confirmed by the fact that almost all the guys have a toy dump truck or something similar. The kid will be happy to try to draw such a car.
- First, the child must draw two rectangles of different sizes, in the lower left part of each of which there should be semicircular notches.
- Under these notches, you need to draw small circles.
- Next, the semicircles should be extended so that circles are obtained around the small circles. These will be the wheels of the truck. A smaller rectangle on top should be drawn so that it looks like a cabin and depict a window in it. Next, the headlights and parts of the bumpers are applied to the corresponding places of the larger and smaller rectangles.
- The child can decorate the received truck at his discretion.
This is how the kid will be able to master how easy it is to draw a truck. In the future, he can do it on his own, without the help of his mother.
How to draw a car with a child over 5-7 years old
If the baby has already mastered some of the techniques and is happy to get acquainted with more complex methods, then you can offer him other ideas.
You can consider how to draw a pickup truck in stages

You can give such a picture to your dad or grandfather, or you can show it to your friends and tell them how to draw a beautiful car.
Step one. Let's make a geometric shape of a parallelepiped (I hope you know what it is). Let's write a typewriter into it. Step two. Let's outline the frame of the nine with light long strokes.  Step three. Let's start drawing all the parts in more detail.
  Step four. Let's add shadows for realism, voila - even better than live:
How to draw a truck with a pencil step by step
Step one. To begin with, we have to outline on paper the locations of the structural parts of the truck. With the help of straight lines sketch out such a frame.  Step two. Let's start drawing the body, cab and wheels.
  Step three. Let's add details: glasses, mirrors, and other trifles.
  Step four. We will remove the auxiliary lines with the help of an eraser, add shading for realism. Here's what happened:
How to draw a carriage with a pencil step by step
Step one. Let's outline the location of the objects with lines.  Step two. Now let's sketch. Enter the necessary elements in each of the segments
  Step three. Outline the contours more clearly, even add shadows.
  Step four. Delete unnecessary lines and add hatching. It worked out pretty well:
How to draw a sailboat with a pencil step by step
Step one. Sketch a few lines that vaguely resemble a ship.  Step two. Designate the locations of the sails.
  Step three. Draw the hull and other structural parts of the ship.
  Step four. Next, we have to more accurately draw all the elements, outline the contours.
  Step five. Let's add hatching, shadows, draw waves from below.
How to draw a Lamborghini with a pencil step by step
Step one. Draw a polygonal shape in which to place the car.  Step two. We clearly distinguish the body with headlights and the hood.
  Step three. We complete the body of the car, add wheels, side mirrors and other details.
  Step four. Add hatching and remove extra lines.


How to draw Kamaz with a pencil step by step
Step one. Divide the paper into several square sectors representing different parts of the car.  Step two. In the appropriate squares draw the wheels of the car, the body, the cargo compartment and the windshield.
  Step three. Sketch the front part first, apply the shadows, the license plate, draw the wheels and windshield.
  Step four. Do the same with the other half, sketch it with large hatching.
  Step five. Clean up the drawing and erase the extra lines with an eraser.
  Step six. Add hatching if necessary to make it look more realistic. Here's how it should turn out:
How to draw Lada Priora with a pencil step by step
Step one. Draw the body of the car and the front wheels.  Step two. Add headlights, rear wheels and other details.
  Step three. Outline everything with a thicker line.
  Step four. Shade and write instead of numbers Lada Priora.
How to draw a fire truck with a pencil step by step
Step one. Let's start small, select the area for the drawing with a geometric figure, as in the figure below.  Step two. We sculpt the shape of the car, add three wheels in circles. From above, with a short horizontal line, we will select a place for a water gun.
  Step three. Round the shapes, make softer transitions. Determine the centers of the wheels by drawing perpendicular lines.
  Step four. The main form is ready, now we just add all the accessories and elements: headlights, bumpers, doors, windows.
  Step five. Darken the bottom of the car, use short lines around the wheels to create the shape of the tires and finish adding various lotions.
How to draw Boomer with a pencil step by step
Step one. Draw an oval circle.  Step two. Carefully turn the drawn pseudo circle into a car body. With straight lines we highlight the structural parts: doors, hood, roof.
  Step three. We make the shape more rounded and even, highlight the windshield and door windows. We also carefully draw two wheels.
  Step four. The main elements are ready, let's move on to the smaller details. Let's draw the headlights, bumper and side spoilers, side mirrors, don't forget the steering wheel.
  Step five. We draw tires, we create a shadow under the car, we easily hatch windows and a cowl.

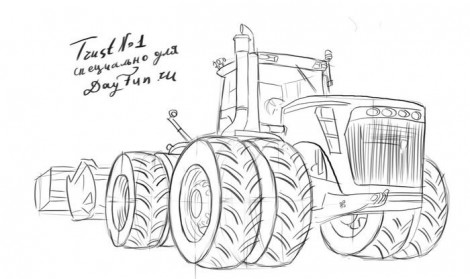
How to draw a tractor with a pencil step by step
Step one
In the center of the sheet, we will place large figures and set the shape and position of our drawing. Here are two parallelepipeds - a tractor cabin, huge uneven circles - wheels, and behind a trapezoid.

step two
Let's outline the outline of the cabin and give it a shape. Large uneven circles should become large, massive twin wheels. Behind, inside the trapezoid, draw buckets.

Step Three
Let's draw the tractor cab. Let's draw the pipe and the front part. Let's circle the wheels. Let's pay attention to the bucket.

Step Four
Let's show what we can barely see inside the cabin. From above we will place all sorts of flashlights-dimensions. Carefully consider all the details on the body and try to transfer them to your sheet. Inside the wheel we see a disc.

Step Five
Since we have a tractor, the tires have a high tread. Missing radiator grille and a few small things. OK it's all over Now! The tractor is ready! With what I congratulate you!
How to draw a sports car Audi S 5 Coupe
Step one.
Let's draw the body of a sports car.

Step two.
Let's denote the lines of the window, and the location of the wheels.

Step three.
Let's erase the auxiliary lines. Outline the contours of the Audi.

Step four.
Add doors and front bumper.

Step five.
Now the details. We draw door handles, a tank, rims, headlights and an Audi logo.

Step six.
It remains to darken the front of the car using hatching. Here is a drawing of a sports car:

How to draw a bicycle with a pencil step by step
Step one
First, let's show the outline of the bike, its main lines. That is, well, you and I should get two oval wheels connected by a frame, the basis for the seat and steering wheel.

step two
Circle the ovals-wheels, make them wider. We will show the rudder line as smooth. We circle the already existing basis for the seat, give it a shape. We draw another line down from the saddle, draw the front sprocket and pedals.

Step Three
Draw the thickness of the rubber. A fender is located above the rear wheel. Now let's turn to the frame and fork of the wheel. We will decorate the saddle, show the seatpost. Let's move on to the steering wheel: here are the handles and the steering column.

Step Four
Now let's pay attention to the details. We still do not have enough wheel rim with nipple. Further we draw cartridges on a back wheel and a chain. Draw holes on the star. Let's make the pedals voluminous. There are stripes on the bike handles. Draw a line on the saddle separating its sidewall.

Step Five
There is very little left to reach the goal. Namely, a box for a chain and spokes for wheels. Now you know how to draw a bicycle with a pencil. Too bad you can't ride it. But you want to!

How to draw a bus with a pencil step by step
Step one.
We draw the base. She will serve us a huge parallelepiped, located in the very center of the sheet. That is, you need to remember a little geometry. By the way, if you remember about the "vanishing point" from the pro-room lesson, then this is very cool. Because this trick works with the top and bottom lines of our bus. And somewhere far, far away they intersect.

Step two.
We draw wheels. Remember, an important rule: those objects that are close seem large, further away - small. And if you look at an angle, then the visual effect is such that you see the circle as an oval.
- either parallel to the base of the bus,
- or parallel to the vertical lines of the bus itself

Step Three
We divide the resulting windows into sections. Perhaps there are already passengers sitting inside.
Let's add rectangular headlights to our drawing.

Step Four
We will make our drawing more voluminous and lively. For each line of the window, we will make a parallel. Inside the wheels we will show the disks.
Let's remember the details: these are the wipers, the rear-view mirrors, the door, and the turn signals. Ready:

How to draw a motorcycle step by step
Step one
The first thing to do is to draw an axial horizontal line for the wheels. So we will immediately set the directions for our drawing. Now the wheels themselves. Let's outline the horizontal axes. The visual effect is such that we see them not quite round, but slightly elongated vertically. Moreover, the wheel closest to us is larger.

Above - the angular contour of the motorcycle.
Connect the visual of the ear with a horizontal line.
step two
Let's make the wheel closest to us voluminous. Let's show the width of the rubber of the rear wheel and its wide fork. On the motorcycle body itself, we will need to make a lot of straight reference lines, which we will need next. Look carefully at the picture and try to do the same.

Step Three
We continue to draw wide wheels. Above them are wide wings. Let's show the seat and front plumage.

Step Four
All the details of a two-wheeled friend need to be turned from angular into smooth and elegant. We carefully draw the details.

Step Five
Outline the outline of the base, make it brighter. Here, our brainchild is already visible.

Step Six
There are a couple of barely noticeable inscriptions on the body. But we noticed them and draw them. Now you need to give a shadow to some details that are in depth, darkened. Well, it's done!

 How to draw a car with a pencil step by step
So let's get started.
Step one.
We draw a contour. All lines are smooth and smooth. Sharp corners minimum. We start drawing from the base, outline the top of the car, and then show the lines of the hood and windshield. More precisely, at this stage, these are auxiliary lines. We draw wheels: what is located closer to us is slightly more distant.  Step two.
Now we need to draw the windshield. In doing so, we focus on the auxiliary lines drawn. Let's draw a rearview mirror.  Step three.
From the hood we draw the side windows. At the same time, as it were, we will continue the line of the hood to the trunk, and then we will draw the windows themselves and show the side view mirror. We will draw a line along the side of the barrel, which will give relief to our car. Ahead, at the intersection of the auxiliary lines, we draw the radiator lining: several almost parallel lines, and on the crosspiece itself - the brand name of the manufacturing concern. Next, draw the headlights. At the same time, again, we rely on our auxiliary lines. 
Step four.
We draw the bottom, outline the bumper. Notice how we can see the wheels from under the wings. Show us the doors. Move on.  Step five.
On the hood we will show the relief lines of the body. Let's draw the cross of the Merc badge. Let's draw handles at the doors. Now you need to draw a picture on the bumper. The drawing should not turn out flat, but voluminous. To do this, on the one hand, we seem to repeat the contour of the figure.
The last thing left. Here you need to try: wheel rims. Let's draw both the cross and the arches to show the wide tire and the voluminous rim.  Step six.
We erase everything, all auxiliary lines! Well, the car is ready! You can circle! 
Step one.
Let's draw the basic geometric shapes that will help us in the future. The first is an elongated ellipse. It is located not horizontally, but slightly at an angle. You need to position the figure closer to the left side of the sheet. We still have some room left.  From the ellipse to the side we draw two lines - the axis of the tail of the aircraft. Inside the plane - axial long line. You can cheat and draw it on a ruler. Let's draw a small oval to our ellipse - the future turbine. So, the main defining parts are ready and we can move on.
Step two.
This step is more difficult than the first. As carefully as possible, starting from the turbine, we draw the contour line upwards, drawing the contour of the windshield. Next, draw the roof, which should be parallel to the axial long line. We are gradually approaching the tail section. Here we have to help the axis of the tail. Focusing on them, we need to draw a tail.  Happened? Let's move on!
Step three.
We draw the second turbine of the engine, and then draw it in detail. Now we need to connect the body of the aircraft with a smooth line with the tail. From the body of the aircraft at the rear, we will show another feature, almost horizontal.  Step four.
On the body of our aircraft we draw another long line parallel to the axial one. We continue draw an airplane step by step draw the details as shown in the picture.  Step five.
Along the long line we draw: a windshield, a hatch for landing and for an emergency exit, portholes.  Step six.
Now we erase the auxiliary lines. We take a soft pencil or a black felt-tip pen in our hands and draw a contour!  Step seven.
The last step: coloring! Looks like our plane is ready to take off!

STEP 1. As in the previous lesson, first draw an elongated shape of the car. And also draw two lines, as shown in the figure, on which the windshield will be located later.

STEP 2. Next, we make sketches of the future shape of the car. We start with the extreme left wing, and then move on to the right. Draw the wheels, hood and windshield. Sketch out the headlights. And you can also roughly outline the location of the wheels using two lines, as shown in the figure.

STEP 3. Here we have to add a lot of details to the car. Let's start with the lower grille, spoiler and headlights. Then we move on to the trunk and wheels. You can draw rims on wheels the way you like best, or copy from our example.

STEP 4. We already have a good drawing of the car, however, that's not all. It is necessary to add more details on the body and hood. Add some stripes also on the roof of the car, make ventilation holes. Draw a round shape for the tires.

STEP 5. It remains to add the finishing touches to drawing the car. Let's make rear-view mirrors, draw the headlights, and begin to apply a pattern to the tires. You can also add wipers.

STEP 6. We erase the extra lines with an eraser, and outline the residual contours of the car. Here's how you should do it.


STEP 1. The first step is pretty easy. All you have to do is make an elongated shape for the future car. It should look like an oblong box. It even reminds me of a guitar or a violin. Try to repeat exactly as shown in Figure 1.

But if you want, you can use a ruler to draw the windows of the car and round them out by hand later.

STEP 3. Start painting the glasses. Windshield first, passenger side window later. Some Barbie girl or famous singer Debbie Ryan may be sitting there. Next, draw the headlights.

STEP 4. On pencil drawing of a car we see the car from only one side, so we draw only one door and steps under the door. Add window frames. Don't forget to make a handle and a keyhole.

STEP 5. Moving on to the hood. Draw two lines on the hood and below the grille. Next, outline the lining for the spoiler and the bumper.

STEP 6. We are all set to go. It remains only to draw the wheels of the car. Please note that the wheels are not round! Under the weight of the machine, they flatten out a bit at the bottom. It will look more realistic. And of course, the tires are not perfectly round.

STEP 7. And finally, we carefully draw the rims. Try to repeat as in the picture, or you can draw your own version, so they can be of different types and shapes, for every taste and color.

STEP 8. We delete unnecessary auxiliary lines with the help of an eraser and outline the contours. Here's how we should be:

How to draw a train with a pencil step by step
Step one. With long drawn lines we will create a figure of a train in motion with a small chimney on top.  Step two. Let's add a lot of wheels, headlights in front and other accessories of the locomotive.
Another lesson on the topic of modern technology. But this time, not a robot or a phone, but a car. You will learn easily and quickly. Personally, the whole process took me literally 10 minutes. Of course, this is not a perfect drawing, but you can work a lot more, adding a lot of details, thereby making the car very realistic. (Or vice versa) Before getting down to business, I must warn you. This is not the only car on our site. You can also draw:
- (which girls like);
And at the end of this article there will be links to 6 more cool cars that you can easily copy. So read to the end. And now let's start studying step by step lesson. STEP 1. The first step is pretty easy. All you have to do is make an elongated shape for the future one. It should look like an oblong box. Something like a guitar or a violin. Try to repeat exactly as shown in Figure 1.
 STEP 2. Using this shape, we will gradually add details, and draw out the real body of the car. It's best to start with the roof and then move on to drawing the wheels and rear. Do not use rulers or auxiliary tools as the car has rounded shapes. And here everything is much easier than, for example, drawing a helicopter. But if you want, you can use a ruler to draw the windows of the car and round them out by hand later.
  STEP 3. Start painting the glasses. Windshield first, passenger side window later. Some Barbie girl or famous singer Debbie Ryan may be sitting there. Next, draw the headlights.
  STEP 4. On pencil drawing of a car we see the car from only one side, so we draw only one door and steps under the door. Add window frames. Don't forget to make a handle and a keyhole. STEP 5. Moving on to the hood. Draw two lines on the hood and below the grille. Next, outline the lining for the spoiler and the bumper.
  STEP 6. We are all set to go. It remains only to draw the wheels of the car. Please note that the wheels are not round! Under the weight of the machine, they flatten out a bit at the bottom. It will look more realistic. And of course, the tires are not perfectly round. STEP 7. And finally, we carefully draw the rims. Try to repeat as in the picture, or you can draw your own version, so they can be of different types and shapes, for every taste and color. STEP 8. We delete unnecessary auxiliary lines with the help of an eraser and outline the contours. Here's how we should be:
  Here, I hope you will already know about. And here is how Roma Burlai drew it:
  Do you still want to see car pencil drawings? Write about it in the comments!
 An article on how to apply beautiful airbrushing to a car body. The nuances of the technology of applying images to the machine. At the end of the article - a video of beautiful 3D drawings on the car body.

The content of the article:
The car demonstrates the status, character and temperament of its owner. Many motorists want to stand out from the background of other vehicles, so they apply various patterns to their cars. In fact, a whole art arose, which is called airbrushing. Now anyone can make a real work of art out of their car. In this article, we will consider the nuances of applying drawings to the body of your car.
Advantages and disadvantages of airbrushing

Before choosing a pattern and applying it to a car, you need to understand the pros and cons of airbrushing.
The advantages include:
- The opportunity to demonstrate your own individuality, your hobbies, catch the enthusiastic glances of passers-by and other motorists on your car;
- The ability to hide small body defects, cracks and scratches with the help of drawings;
- The presence of a drawing on a car significantly reduces the likelihood of its theft. Few people will steal such a car, since it is easy to find later, and getting rid of the drawing is too expensive and expensive.
- High cost of work;
- After an accident, a car with a pattern is more difficult to restore;
- It is usually difficult to sell a car with airbrushing, because not all buyers will like the drawing on it.
What tools are needed

Naturally, certain tools are needed to apply the selected pattern:
- Airbrush. This is the main device that sprays paint under pressure onto the surface of the car body. This ensures accurate and accurate spraying.
- Compressor;
- Connecting hoses;
- Paints;
- different skins;
- Fixative for varnish;
- Solvent and degreaser;
- Polishing machine with different wheels.
Finding this equipment is not difficult. All this is sold in specialized stores. Particular attention should be paid to paints. Now you can find different types of mixes, but novice artists can use the universal paints and thinners of the 646 and 647 brands, which can be used for a wide range of tasks. In principle, working with automotive paints is similar to working with conventional paints.
As a rule, drawings are applied to the hood, doors, trunk lid, front or rear fenders. With a strong desire, you can paint the whole car.
The complexity of the drawing

Since airbrushing is an art, many nuances must be taken into account in this matter. First of all, a lot depends on the complexity of the pattern that needs to be applied to the car. There are three categories of complexity of drawings, which in turn require different levels of skill from the artist.
- First category. It includes simple graphic drawings: different lines, patterns, stripes, elementary geometric shapes.
- Second category. In this case, the drawing is limited to one artistic object, the creation of which uses multi-component paints.
- The third category includes complex artistic drawings with multiple objects and applied backgrounds. In this case, a variety of colors can be used. It is important for the master to mix paints correctly and create a smooth transition of colors. If everything is done professionally, a simple car will become a unique masterpiece.
How to draw

A special airbrush is used to apply the drawing. But when creating an ornament, landscape and animals, brushes and paints are used, and the artist’s manual labor is used. You can also stencil if using the techno style.
The paints used must be of high quality, durable and resistant to various atmospheric precipitation.
Naturally, you should use a wide range of colors so that you can compose any desired shade. Also, during the drawing, it is necessary to add reflective and light-accumulative paints. To give greater strength, the drawing is covered with several layers of varnish, which, among other things, will give the image “depth”.
These are the basic drawing rules. But it is important to strictly observe the technology of airbrushing.
The main stages of airbrush technology

It all starts with choosing the right pattern. At the same time, it is important to determine its theme, maintain proportions, colors, style of the image and ensure its correct placement. It is also important to choose the right background so that the drawing looks beautiful and expressive. After that, you need to understand where it is best to place the selected image on the body.
When the theme of the drawing is chosen, you should start developing a sketch. This will help collections of drawings, graphics tablet, camera, laptop, scanner. If you are good at drawing, paper and pencil are enough. The drawing using Photoshop must be applied to the photo of the car and add fragments of the selected drawing. Everything, the sketch is ready.
Then you should carefully study the nature of the image in order to choose the appropriate method for applying the picture. As mentioned above, each method needs its own tools. If it is “just a sticker” or a decal, then a stencil is enough. If you need to depict various complex objects with smooth color transitions, you will have to use an airbrush and brushes.
It should be remembered that it is important to place the drawing correctly, because what looks great on paper will not always look beautiful on the body.
Not only that, improper placement can "kill" the style of the entire car. Therefore, you need to be very careful about choosing the location of the pattern on the car body.
A computer will help with this. The whole process of modeling and positioning the image on the car body is performed using a computer.
If you are an experienced professional, you can do it all manually. However, it should be borne in mind that the body has a complex relief and shape. It has different protrusions and transitions that can affect the look of the picture. Therefore, it is still better to enter the image into a PC, apply different versions of the painting, nuances of the body geometry on it. Now images can be presented in three-dimensional form, which will allow you to carefully see and edit all the shortcomings.
If everything suits you, you can proceed to preparing the car body for applying the image.
Car preparation

The first step is to remove the door handles, mirrors, headlights, all rubber seals and other elements to ensure uniform application of paints and varnishes.
After that, matting is performed. It is necessary to process only the top layer of varnish so that the paint adheres well to the surface. All scratches and small chips should be repaired. You can work with special matting sponges that do not leave scratches.
All parts and elements not involved in the drawing must be pasted over with adhesive tape or paper so that paint or varnish does not get on them. The place where the drawing will be applied must be cleaned of dust and degreased.
Drawing process

First you need to draw the main sketch. As a rule, in this case, stencils are used, which make it easy to make the base. It is desirable to make the very first lines not very bright and more blurry. It is important to keep the airbrush perpendicular to the surface of the body.
The drawing should be applied carefully and accurately, excluding sudden movements. The hand must be held calmly, but firmly, to avoid smudges. Gradually (layer by layer) it is necessary to display the entire image. First, the base is outlined, and then new details are added.
Success in this business depends on the correct setting of the airbrush. It is necessary to set the required line thickness and pressure supply.
Paint should be applied in layers. Moreover, you can apply the next layer only when the previous one dries. It is important to remember that light shades are applied first, since dark ones are difficult to paint over later.
At the very end, the finished drawing must be covered with several layers of varnish from a spray gun so that the image is fixed. When the varnish hardens, it is necessary to start polishing. This is the final stage in the procedure for drawing a picture on the car body.
The durability of the pattern will depend on compliance with the technology and the quality of the materials used.

- When drawing, work in a respirator with a high-quality air filtration system. This will help maintain health, because paints and varnishes are quite toxic.
- In order for the drawing to retain its beauty for a long time, it is necessary to periodically apply protective agents to it. Be sure to buy a protective and abrasive polish. As a rule, if the technology has been followed, the image will last as long as the factory body paint.
- If you want to delete the picture in the future, there may be some problems. When applying temporary airbrushing, it can be easily removed using special washable paints. But it’s not so easy to get rid of constant airbrushing. You will either have to repaint the car, or cover it with a special film.
- If the image occupies more than half of the surface of the body, you will have to re-register the documents for the car, since its color has changed.
- Airbrushing is considered a multi-color coloring of a car. It should not copy the identification coloring or symbols of special vehicles. The fact of the presence of an image must be noted in the passport of the car.
- Airbrushing, if desired, can be insured in CASCO. In this case, the insurance company will cover all the costs of restoring the image.
Summing up
If you decide to decorate your car with some kind of pattern, you should carefully consider whether you need it. If necessary, and you have certain skills, you can draw a sketch yourself and apply a drawing to the body. If you have never held brushes in your hands, it is better to entrust this matter to professional craftsmen.
Video - beautiful 3D car body tuning:
If you are not a professional, but an ordinary parent who needs to somehow entertain a restless son, then this article is for you. Drawing is a very rewarding activity. Most kids love to do this. Often they want to get a good result quickly the first time. For mom and dad who do not understand the learning process, it is quite difficult to help the baby. However, there are simple and visual ways. After studying the article, you will be able to explain to your child how to draw a car in stages with a pencil.
What is the use of such a hobby
From early childhood, it is worth teaching a child to draw. This is a great way to develop fine motor skills, as well as an opportunity to know the world and yourself. As you know, the formation of speech in children directly depends on the ability of the hand to perform a variety of movements. Early art classes have a positive effect on kids. From this article you will learn how to draw a car. Photos will clearly demonstrate the process. Based on the material presented, any parent will be an excellent teacher for their crumbs.
Already up to a year, you can give children pencils, finger paints, felt-tip pens. At first, it is enough to show simple lines and shapes on the sheet. Gradually, the child will learn new and more complex things. Preschoolers already want to depict those objects that they like best: girls - dolls, boys - cars. Children dream of being the best in everything, so the drawing should be like a real one. It is unlikely that a child will succeed in doing it beautifully and correctly without a sample. Need clear instructions. Parents can buy manuals that tell you how to draw a car, a ship, an airplane, a helicopter and many other interesting items for boys in stages with a pencil. The same books are sold for girls.

How to stimulate a child
Girls tend to be more assertive. They like to paint and sculpt. Boys prefer active games: run, jump, exercise on the horizontal bars. If your son loves art, he probably asked you more than once about how to draw a car in stages with a pencil. In this case, you can simply offer the boy to work with the allowance. Perhaps the baby will not even want you to be around during the creative process. He will prefer to please you with a finished painting.
If the child does not draw very well or is not too diligent, you need to interest him in the process by showing him how easy it is to draw a car. Even if you don’t know how to do it, follow the pattern and follow the task. Any step-by-step instruction makes it possible to depict any object in stages. The meaning of these actions is to decompose a complex object into simple lines, by completing which you get the desired image.

Practical lesson
Now we will tell you how to draw a car in stages with a pencil. The first option shows a thumbnail image. In the second case, drawing tools will be used. You can take a ruler with ready-made stencils of a circle, oval and other geometric shapes. This will make the job much easier.
A special grid will be a significant help to an inexperienced artist in drawing. It helps to maintain the proportions of the subject without measuring the sample. This is done as follows:
- On a transparent film, draw vertical and horizontal lines at a certain distance, for example, 1 cm. The smaller this length, the more accurate the drawing will be.
- Overlay the grid on the finished sample.
- See how each image path traverses the cells.
- On your sheet, where a cell of any size is also drawn, try to repeat the pattern.
With this method, you can scale objects by enlarging or reducing your drawing relative to the original.
We make a large car
Depict a box that limits the shape of the car from all sides.

Specify where the wheels will be located.

Outline the windshield, side windows.

Draw the lines of the headlights.

Make side racks.

Outline the rear view mirrors.

Draw the lines of the doors.

Smoothen the silhouette of the car.

Detail the image.

Erase extra lines.

Now you can color the picture with a felt-tip pen or watercolor.

Draw with stencils
The easiest way to depict any object without volume. The second example shows how to draw a car from the side.

The sequence of actions will be as follows. Take a ruler and draw rectangles as shown in the sample. Draw the contours of the car.

With a compass or using stencils, draw the circles of the wheels.


, poultry farming")


- Burns, Robert - short biography
- The concept of common vocabulary and vocabulary of limited use
- Nancy Drew: The Captive Curse Walkthrough Nancy Drew Curse of Blackmoore Manor Walkthrough
- Deadpool - Troubleshooting
- Won't start How to Survive?
- What to do if bioshock infinite won't start
- Walkthrough Nancy Drew: Alibi in Ashes
- Spec Ops: The Line - game review, review Spec ops the line crashes on missions
- Room escape level 1 walkthrough
- Processing tomatoes with boric acid How much will 2 grams of boric acid
- Cucumber Grass (Borago)
- Bioinsecticide Lepidocid: purpose, properties and application procedure Lepidocide waiting period
- How to change the language to Russian in steam
- Dendrobium noble: room care
- Morphology of plants general concepts - document
- Planting, propagation and care of bamboo at home, photo Growing bamboo from seeds
- How to strengthen the cellular signal for the Internet in the country
- Sanskrit reveals the forgotten meaning of Russian words (2 photos)
- The oldest language Sanskrit programming language of the future Dead language Sanskrit
- Who has dominion over all the earth?