How to check if the system unit is working. How to check the power supply
There is a lot of discussion around the issue of choosing a processor, video card or motherboard, but few people know that all this will not work correctly without a good power supply. This part converts the incoming voltage and distributes it to all elements of the computer. If the "machine" does not turn on, the first thing to check is the PSU.
How to check the health of the computer's power supply
A power supply failure is extremely rare, because all modern models have protection against power surges, overloads and other network problems that could disable it. However, if the computer does not turn on, the first place is not to check the processor, but to test the power supply. As a rule, if there are problems with it, the system unit does not show any signs of life: there is no rotation of the fans, noise from the hard drive or motherboard.
To test the power supply, you need to turn off the computer, on the back of the PSU, switch the toggle switch to the “off” position. For the convenience of work, the part must be removed from the system unit. As a rule, the power adapter has an atx format, which is standard for most case models, and a set of cables for the motherboard, video card, coolers, hard drive. They should be checked for serviceability first.
Power pin connectors
Checking the computer for operability begins with the presence of power supply to all elements of the system. To test the power pin connectors, the PSU will definitely need to be turned on, but for this it is not necessary to connect the part directly to the motherboard or anything else. To do this, a paper clip is enough to close the circuit or cooler, the main thing is that the power supply does not work “idle”.
If you have connected a cooler, then you can not be afraid to turn on the power supply. In the instructions or on the packaging, and often on the device itself, it is written what voltage should be applied to the lines. Using a multimeter, you can check each for compliance with the declared indicators. If somewhere the power does not match or the indicator is completely absent, this is the place where the PSU breaks down. This method will be described in more detail in the method for checking the motherboard power cable.
Computer power cable

In some cases, the cause of the breakdown is not one of the cables of the power supply, but the power cord that supplies voltage to the device. It can break when it is in the wrong position for a long time, burn out in places where the wire is exposed, etc. Replacing this element of the system is the easiest, so when checking the computer's power supply, they simply try to turn it on. For this you need:
- Connect the cooler as described above so that there is a load.
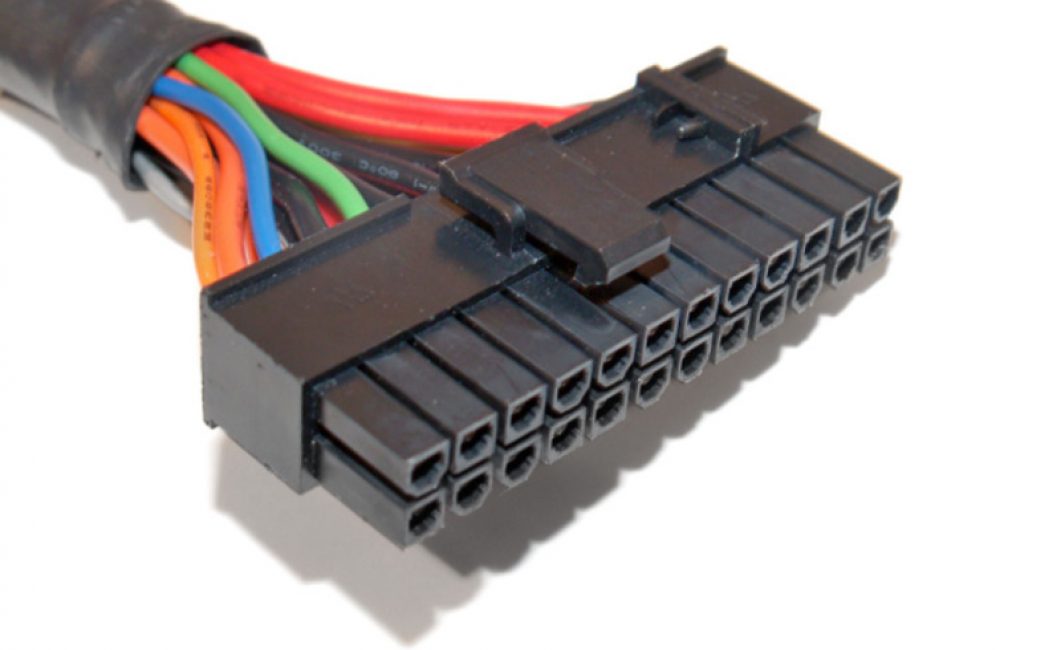
- If there is no cooler, then two contacts must be closed on the 24Pin (atx) cable.
- Locate the green wire and the black wire that will need to be shorted.
- Take an ordinary paper clip, unbend it to make the letter U.
- Insert one end of the paper clip into the green wire and the other end into the black wire. This will tell the PSU that it is connected to the motherboard and allow it to turn on.
- After that, you can turn on the device.
- If the cooler of the device starts spinning, it means that power is being supplied to it, and the problem is not in the power cord.
- If it does not spin, then the cable or some part inside the computer power supply itself is faulty.
Motherboard power
To check, you need a 24Pin (atx) cable that connects to the motherboard. It is not difficult to find it, it is the largest and has 24 pins (the old 20). A paperclip is already installed on it, if you did not connect the cooler. All the wires of this cable are painted in different colors, not for the sake of beauty, they indicate specific indicators. The colors mean the following:
- black - earth;
- orange - + 3.3V;
- red - +5V;
- yellow - +12;
- green - PS ON (paired with the "ground" starts the power supply unit, so they are closed by a paper clip);
- gray - +5V;
- purple - + 5V;
- white - -5V;
- blue - -12V;

Depending on the manufacturer, brand of computer power supply, these values \u200b\u200bmay differ slightly, but most devices correspond to the above characteristics. You will need a multimeter to test the wires. One probe (negative, black) must be connected to the black wire, and the second (red) to the contact being tested. You must compare the declared voltage (by color) with the actual voltage. If significant discrepancies are observed somewhere, then this wire can serve as the reason for the incorrect operation of the PSU.
Checking the capacitor with a multimeter
The main task of this power supply element is to maintain, maintain an electric charge and smooth the voltage in the electrical circuit. For example, everyone has observed the “flashing” of light, which is essentially a short-term voltage drop in the network. Power supplies with faulty or bad capacitors do not withstand at such moments, the computer reboots. The good ones at this moment release the accumulated energy and provide enough tension to continue the work of the system. You can check the capacitor as follows:
- To check the capacitor, you must set the multimeter to the "ringing" mode.
- If there is none, then to measure the resistance with the set value of 2 Kiloom.
- Attach the black probe to the negative leg of the capacitor, and the red one to the positive one. If you mix it up, then nothing terrible will happen, but you won’t be able to check it either.
- If everything is done correctly, then the capacitor will begin to charge. The indicator should be above 2M, which indicates sufficient capacity of the part and its serviceability. If the indicator is lower than or equal to 2M, the capacitor must be replaced.

How to test a resistor with a multimeter
The above describes in detail how to check the cables of the computer power supply, but the breakdown does not always lie in them. Sometimes smaller parts, such as resistors, are the cause of the failure. A burnt part can be detected with the naked eye, but sometimes the problem lies in incorrect resistance. To check you need:
- Turn on the multimeter in resistance measurement mode.
- View the nominal value either on the resistor itself or on the board next to it. If this data is not available anywhere (Chinese manufacturers put colored circles), then you can set the value to 2000 ohms, and if it is exceeded, the number 1 will simply appear.
- Set the black probe to "minus" and the red probe to the "plus" of the resistor.
- If the nominal and actual resistance do not match, the part must be replaced.
- Deviations of 5% are allowed.
Computer power supply test program
How to check the power supply of a computer with a multimeter is understandable, but there is an option without having to remove it from the system unit. You can download a program with which you can check the PSU. It is used, as a rule, for spontaneous shutdowns, reboots, "blue screens of death". Before manually diagnosing, it is important to understand what specifically causes such failures. In some cases, the processor or driver is the cause. You can use the OCST program to check.
This software creates the maximum load on a particular element of the system. It is not recommended to use the program on cheap, weak systems. Inside it there are several tabs that relate to the processor and memory, video card and power supply. The load on a specific element will determine the problem with it. You need to do the following:
- go to the "power supply" tab;
- set the appropriate resolution for your monitor;
- test type - "manual";
- duration of the check - 1 hour;
- shader complexity - the optimal parameter offered by the program;
- check the boxes next to the boxes “full screen”, “hypertrading”, “64 bit Linckpad”;
- press the "ON" button.

If failures occur during the test, the program compiles a report on the errors that have occurred, indicates their nature, which allows you to work with specific problematic elements of the computer. This becomes a serious reason to remove the PSU and manually check it in detail with a multimeter. Remember that if you disassemble the part yourself, the warranty obligations from the manufacturer are removed.
Video: Checking the PC Power Supply
Good day, dear friends, acquaintances, readers, admirers and other personalities. Today we will test computer through OCCT.
It is often necessary to find out the cause of the occurrence, and just any problems, ranging from reboots / freezes to computer shutdowns.
In "field" (i.e., in normal working) conditions, this is not always possible, because some problems have a rather peculiar, so to speak, floating character and it is not so easy to diagnose them. Yes, and usually it’s not enough just to find out what is to blame, and not the software part, but you also need to understand what exactly is intriguing, or rather, which particular piece of iron is buggy. In such situations, specialized software for checking stability comes to our aid.
Do you want to know and be able to do more yourself?
We offer you training in the following areas: computers, programs, administration, servers, networks, site building, SEO and more. Find out the details now!
After starting in front of us, we will see a red USSR-shaped window of the program (see screenshot above) in which, in theory, the Russian language should be set immediately. Before that, a window with a donation button may appear, while it can be closed (well, or immediately support the developer, it's up to you).

If this is not the case, then click on the gear icon on the right, and then set the desired parameter. Or use as is.
How to test a computer
The program has a set of tabs:
- CPU:OCCT and CPU:LINKPACK, - testing the stability of the processor under stressful conditions (in terms of load, power, temperature, etc.);
- GPU:3D, - testing the stability of the video card;
- POWER SUPPLY, - testing the stability of the batteries (motherboard, power supply, circuits, etc., in general, load tests).
Let's try each of them, because each has its own parameters.
ATTENTION! Use with caution OCCT on laptops due to the high load generated and warming up. On laptops with a weak/damaged cooling system (and other elements), this can lead to unpredictable consequences. Probably wise to use on them AIDA64.
Before the test, go to the above settings (where you set the language) and set the processor temperature limiter (most often 85 too large value) and other (if necessary) components.
This is done in the following way. We exhibit:
- Test type: auto;
- Test duration: 1 hour 0 minutes;
- Test Mode: large data set.
Comments on the items that were put up:
- Works for the specified time, i.e. an hour or more (or until an error is detected), allows you not to waste extra time on diagnostics;
- Test time, is the test time;
- Data set, - determines the level of load and the generated heating, as well as the number of tested elements. If the data set is small, then only the processor is tested, if it is medium, then the processor + memory, if it is large, then the processor + memory + chipset. In a large set, warming up is stronger, but you can find more errors, in a small set, there is less heating, but you can miss something important;
Other options:
- Inaction at the beginning and at the end - leave as is, allows you to reduce the load before / after the launch and read the necessary data;
- Test version, - select the one that corresponds to the installed version of the operating system;
- Number of threads, - as a rule, a checkmark " Auto", but if it is determined incorrectly (less than the number of physical and logical processor cores), then you can set it manually by unchecking it.
ON
The second tab is CPU: LINPACK, is another test, but exclusively of the processor, and not of many elements at once (see the description of the first tab above).
Test warning
Worth with caution refer to this test, because it loads and heats up the processor extremely strongly (including the core power supply, if supported by the motherboard) and is extremely extreme test. It is recommended to use only in the presence of a powerful cooling system and an urgent need for diagnosing it and the processor. In other cases, it is better to use the first test.
For those who decide (usually required if the first test did not reveal problems, but "visually" they remain):
- Test type: auto;
- Test duration: 1 hour 0 minutes;
- Test Mode: 90% memory (I recommend closing all possible programs, etc., or reducing this value to 70-80%);
- 64 bit
- AVX-compatible linkpack
Then all you have to do is press the button ON and wait an hour (or less if an error is found, the computer freezes, turns off, or shows some other signs of overheating and failure) while the system scan is in progress. The analysis of the results is discussed at the end of the article.
Supported crossfire and SLI, checking and detecting many errors during strong heating during loads, as well as, using a special system, artifacts (image distortions) are determined. You can do testing with a different number of shaders, FPS and everything else.
Here, in fact, we expose the following:
- Test type: auto
- Test duration: 1 hour 0 minutes
- DirectX Version
- Permission
- Type of: full screen (tick);
- Checking for Errors: for the first test, there is usually no need to check it, for the second (if the problem visually persists, but no errors were found), it makes sense to check the box;
- Shader complexity: in general, this parameter is responsible for the number of operations performed by the video card in one pass (most often, the maximum available value is selected, or, if you need to specifically test for some application, then we select the value that the application uses);
- Limiter: 0 (zero) or 60 (if you use vertical sync and need to test work under it).
Then all you have to do is press the button ON and wait an hour (or less if an error is found, the computer freezes, turns off, or shows some other signs of overheating and failure) while the system scan is in progress. The analysis of the results is discussed at the end of the article.
The test itself usually looks like in the screenshot above. It does not start immediately (see periods of inactivity), it can change the type of picture (image). Significant visual distortions (it is difficult to confuse them with something) are artifacts and indicate problems with the video card, its memory, and anything else.
ATTENTION! Quite difficult to analyze, it is recommended to use only if the first tests did not find out anything and nothing, but the problems persist. Dangerous and definitely not suitable for cheap ones ( noname) and low-quality power supplies. Use at your own risk.
Similar to the previous test, the following is set here:
- Test type: auto
- Test duration: 1 hour 0 minutes
- DirectX Version: if available, then 11, if not, then 9, if you need to specifically test for some application, then select the value that the application uses;
- Permission: current, or, if you need to specifically test for some application, then select the value that the application uses;
- Type of: full screen mode (tick);
- 64 bit: if the system and processor support;
- AVX-compatible linkpack, - it makes sense to avoid if you don’t know what it’s about;
- Use all logical cores, - must be set if the checkbox is available (may be unavailable if they are not there or there is no access to them).
Then all you have to do is press the button ON and wait an hour (or less if an error is found, the computer freezes, turns off, or shows some other signs of overheating and failure) while the system scan is in progress. The analysis of the results is discussed below.
Analysis of test results OCCT
As a result of the tests, you can get the following result:
- Graphs, - most often, in the absence of a severe physical failure (shutdown, reboot, freeze, etc.), are the result of any test, contain temperatures, voltages and other data for analysis;
- Mistake(in the program), - usually a kernel error or something else that stops the test (but the computer works), most often its number or at least a brief description is indicated (kernel failure of such and such);
- Blue screen of death, - that it makes sense to read;
- Physical failure(or operation of protection), - shutdown, reboot, freeze and similar horrors of life.
How to take off with it;
- For analysis temperature charts read (pay special attention to the maximum allowable values), if in doubt, refer to the documentation for the overheating component (paper or on the manufacturer's website) to analyze the maximum allowable temperatures;
- For analysis food related schedules, you should understand that slight discrepancies are acceptable (by tenths, hundredths, and less, orders), excluding certain values (for example, the processor power supply can change quite a lot, due to energy saving technologies, frequency control, overclocking, etc.). If it is difficult to figure it out, then contact us on the forum) for a more powerful one, or they (failures) are the result of a complete failure of the component. The latter are the most difficult to diagnose; most often, failures of the power supply (not completely turning off the computer or not turning it on immediately) and / or video card (image artifacts) are immediately clear.
If there are complex problems that need to be sorted out by looking at graphs and so on, then please contact us, for example, on the forum.
Afterword
I repeat that one of the most powerful stability tests, which, in principle, can be found. It is quite often used by overclockers (those who overclock computer components) in order to test stability, which says a lot.
As always, if there are (reasonable) thoughts, questions, thanks or additions, then, traditionally, write them in the comments to this article (or on the forum mentioned above).
Thank you for being with us.
Stability to you!
You, like most personal computer users, have probably already encountered various problems associated with the failure of any vital configuration components. Just such details directly relate to the PC power supply, which tends to break down with an insufficiently high level of care from the owner.
In the framework of this article, we will consider all the currently relevant methods for checking PC power supply elements for operability. Moreover, we will also partially address a similar problem encountered by laptop users.
As we said above, a computer power supply, regardless of other assembly components, is an important detail. As a result, a breakdown of this component can lead to the complete failure of the entire system unit, which makes diagnostics much more difficult.
If your PC does not turn on, it may not be the PSU's fault at all - remember this!
The whole difficulty in diagnosing such components lies in the fact that the lack of power in the PC can be caused not only by the PSU, but also by other components. This is especially true of the central processor, the failure of which manifests itself in a huge variety of consequences.

Be that as it may, diagnosing problems in the operation of a power supply device is an order of magnitude easier than with malfunctions of other elements. This conclusion is due to the fact that the component in question is the only possible source of energy in the computer.
Method 1: Checking the power supply
If at any time during the operation of your PC you find it inoperative, you should immediately check the presence of electricity. Make sure the network is fully functional and meets the requirements of the power supply.
Sometimes power surges can occur, but in this case, the consequences are limited to turning off the PC on its own.

It will not be superfluous to double-check the PSU connection cord to the network for visible damage. The best test method would be to try connecting the used power cable to another fully working PC.

In the case of using a laptop, the steps to eliminate the presence of problems with electricity are completely similar to those described above. The only difference here is that in the event of a malfunction with the laptop cable, its replacement will cost an order of magnitude more expensive than in case of problems with a full-fledged PC.

It is important to carefully inspect and check the power source, whether it be an outlet or a surge protector. All subsequent sections of the article will focus specifically on the power supply, so it is extremely important to solve all the problems with electricity in advance.
Method 2: Using a jumper
This method is ideal for initial testing of the PSU for its performance. However, it is worth making a reservation in advance that if you have never interfered with the operation of electrical appliances and do not fully understand the principle of operation of a PC, the best way out is to contact technical specialists.
If any complications occur, you can put your life and the condition of the PD in serious danger!

The whole point of this section of the article is to use a manually made jumper to subsequently close the contacts of the power supply. It is also important to note here that the method is very popular among users and this, in turn, can greatly help if there are any inconsistencies with the instructions.
Before proceeding directly to the description of the method, you will need to disassemble the computer in advance.


You can learn a little more about turning off the PSU from a dedicated article.
Having dealt with the introduction, you can proceed to the diagnosis by using a jumper. And right away it should be noted right away that in fact this method has already been described by us, since it was created primarily to be able to start a power supply unit without using a motherboard.

After familiarizing yourself with the PSU start-up methodology given by us, after power is supplied, you should pay attention to the fan. If the main cooler of the device does not show signs of life, you can safely conclude that it is inoperable.

A broken power supply is best replaced or sent to a service center for repair.
If after starting the cooler works properly, and the PSU itself makes characteristic sounds, we can say with a high degree of probability that the device is in working order. However, even under such circumstances, the guarantee of verification is far from ideal and therefore we recommend that you make a more in-depth analysis.
Method 3: Using a multimeter
As can be seen directly from the name of the method, the method consists in using a special engineering device "Multimeter". You will first need to acquire such a meter, as well as learn the basics of its use.

Usually among experienced users, the multimeter is referred to as a tester.
Refer to the previous method after completing all test instructions. After that, making sure that it works and keeping open access to the main cable of the power supply, you can proceed to action.
- First you need to find out what kind of cable is used in your computer. In total there are two types:
- 20-pin;
- 24 pin.


Don't forget to use hand protection!
As in the earlier method, after power is supplied, the PSU may not start, which directly indicates a malfunction. If the cooler still works, you can proceed to more detailed diagnostics by using a tester.

All values given are roundings of these figures, as slight differences may still be due to certain circumstances.
After completing our instructions, make sure that the received data complies with the voltage level standard. If you notice significant enough differences, the power supply can be considered partially faulty.
The voltage level supplied to the motherboard is independent of the PSU model.
Since the PSU itself is a rather complex component of a personal computer, it is best to contact specialists for repairs. This is especially true for users who are not familiar with the operation of electrical devices.
In addition to the above, a multimeter may well come in handy in the process of checking a laptop's network adapter. And although breakdowns of this type of PSU are rare, you can all find problems, in particular when using a laptop in rather harsh conditions.

The laptop model has absolutely no effect on the level of electricity supplied.
In the absence of these indicators, you need to carefully examine the network cable again, as we said in the first method. In the absence of visible defects, only a complete replacement of the adapter can help.
Method 4: Using a power supply tester
In this case, you will need a special device for testing the PSU for analysis. Thanks to such a device, you can connect the pins of PC components and get results.
The cost of such a tester, as a rule, is somewhat lower than that of a full-fledged multimeter.
Please note that the device itself may differ significantly from the one presented by us. And although power supply testers come in different models that differ in appearance, the principle of operation is always the same.
- Read the specification of the meter you are using to avoid difficulties.
- Connect the appropriate wire from the PSU to the 24-pin connector on the case.
- Depending on personal preference, connect the other pins to the dedicated connectors on the case.
- It is recommended to use the Molex connector without fail.
- Use the power button of the measuring device to take readings of the PSU.
- On the screen of the device, you will be presented with the final results.
- The main indicators are only three:


It is also advisable to add voltage from the hard drive using the SATA II interface.

The button may need to be pressed briefly.

- +5V - from 4.75 to 5.25 V;
- +12V - from 11.4 to 12.6 V;
- +3.3V - from 3.14 to 3.47 V.
If your final measurements are below or above the norm, as mentioned earlier, the power supply requires immediate repair or replacement.
Method 5: Using System Tools
Including cases when the PSU is still in working order and allows you to start the PC without much difficulty, you can perform troubleshooting using system tools. At the same time, note that checking is mandatory only when there are obvious problems in the behavior of the computer, for example, spontaneous turning on or off.

If your computer often freezes or constantly requires a reboot, or does not turn on at all, then a possible cause of such problems is a malfunction of the power supply.
The power supply supplies power to all components of the computer chassis. It transforms the incoming AC voltage into DC.
Malfunction symptoms

There are a number of signs that are characteristic of a malfunctioning battery. The power supply does not work in the desired mode under the following conditions:
- Pressing the power button does not start the system unit. There is no light and sound response to the inclusion. Coolers do not rotate. In such a situation, the power supply may malfunction or there may be breaks in the wires, poor AC supply from the network;
- The computer does not turn on the first time. The problem is either in the power supply, or in a loose connection of the connectors, or in a malfunction of the power button;
- The computer turns off for no apparent reason at the stage of loading the operating system. The reason for this may be an intermittent transmission of voltage from the power supply to other computer components. This malfunction can also indicate an overheating of the power supply and, as a result, it is forcibly turned off.
- Having a blue screen.
- The presence of a burning smell.
Block Inspection

Attention!
Checking the correct operation of the computer power supply involves carrying out certain manipulations under voltage. Be extremely careful to avoid accidents. Before starting the test, inspect the integrity of each cable. Do not touch parts with wet bare hands.
1 Visual inspection of the power supply.
This is the first and easiest way to check.
- Unscrew 4 (or 6) screws, disconnect the block from the computer case;
- Unscrew the screws that are in the block body and disassemble it;
- Carefully inspect the power supply chip. Pay close attention to capacitors.

If there are swollen ones among them, then the protection of the power supply is faulty. Parts need to be replaced urgently.
If no problems are found in the capacitors, then we recommend removing dust from the power supply, lubricating the fan and assembling the device, and then try connecting the computer.
Power check
This check is carried out by turning on the power supply without attaching it to the motherboard.
- Turn off your computer. Then turn off the switch on the back of the computer's power supply.
- Remove the computer cover. Disconnect the power supply from other parts of the computer. Disconnect each cable. Be sure to remember or take a picture of the order in which you connected all the elements so that you can connect all the cables back later.
- Take the motherboard power cable that comes from the power supply. Find the green wire.
- It must be shorted to any of the black wires.. Do this with a paper clip or a small piece of wire.

- Connect any device to the power supply. For example, an old unnecessary hard drive. This is necessary to give the power supply a certain load, the absence of which can lead to damage to the unit.
- Connect the power supply to the network and press the power button on the block body.
If the fan starts spinning, then the power supply is working.
Even if this test method showed that the power supply is working, this does not mean that it is fully functional..
Checking with a multimeter

Now you need to check whether the power supply transmits constant voltage in full. For this:
- Unplug the power supply and use a paperclip or a piece of wire to short out the motherboard cable. So you bring the block into working condition.
- Give the power supply any external load. Connect a floppy drive, hard drive or cooler to it;
- Take a multimeter - this is a universal tester that measures current strength. Set the tester to DC voltage test mode.
- Check voltage between orange and black wire, between red and black, and between yellow and black.
- We stick the black probe of the multimeter into the connector opposite the black wire, we connect the red probe of the tester in turn to the connector contacts, to which the wires of the colors we need are suitable.

A working power supply will produce the following voltage values:
- 3 volts for orange wire;
- 5 volts for red wire;
- 12 volts for yellow wire.
If the test gave you a malfunction of the power supply, then it can be disassembled and repaired. After completing the work, collect all the contacts and install them correctly.
If the test showed that your power supply is working, but the difficulties with the computer continue, then most likely the reason is something else.
Hello dear readers! Today we will deal with a purely practical matter. If you are interested in computer hardware, then it is good to consolidate theoretical knowledge with practice, right?
Let's say you bought a new one for your computer. Or you want to replace a burned-out block with a used one.
You can put it right away (and play the lottery), but it's better to check before installing. You want to know how to do it, don't you?
Standby voltage source
First, a little theory. Where without her!
Computer contains standby voltage source(+5 VSB).
If the power supply plug is plugged in, this voltage will be present on pin 21 of the main connector (if the connector is 24-pin).
This standby power supply starts the main inverter. A purple (most often) wire comes to this pin.
It is necessary to measure this voltage relative to the common wire (usually black) with a digital multimeter.
![]() It should be within + 5 + -5%, i.e. be in the range 4.75 to 5.25 V.
It should be within + 5 + -5%, i.e. be in the range 4.75 to 5.25 V.
If it is less, the computer may not turn on (or it will turn on “once”). If it is more, the computer may "freeze".
![]() If this voltage is not present, the power supply will not start.!
If this voltage is not present, the power supply will not start.!
Lightweight power supply load
If the standby voltage is normal, it is necessary to connect a load to one of the connectors in the form of powerful resistors(see photo).
 A resistor of 1 - 2 ohms can be connected to the +5 V bus, and a resistor of 3 - 4 ohms can be connected to the +12 V bus.
The power of the resistors must be at least 25 watts.
This is far from the full load. In addition, the + 3.3 V bus remains generally unloaded.
But this is a necessary minimum at which the power supply unit (if it is in good condition) should start up without “harm to its health”.
Resistors should be soldered to the mating connector, which can be taken, for example, from a faulty external case fan.
Starting the power supply
 After the load is connected, the PS-ON contact (most often green) should be closed with the adjacent common (usually black) conductor.
The PS-ON contact is fourth from the left in the top row if the key is on top.
You can close it with a paper clip. The power supply should start. This will cause the cooling fan blades to rotate.
We remind you that it is better not to turn on the computer power supply without load!
First, it has protection and control circuits that may prevent the main inverter from starting. Secondly, in "lightweight" blocks, these chains may be absent altogether. In the worst case, a cheap power supply may fail. Therefore, do not buy cheap power supplies!
Output voltage monitoring
All connectors will show output voltages. All output voltages should be measured. They must be within 5% tolerance:voltage + 5 V must be within + 4.75 - 5.25 V,
voltage +12 V - within 11.4 - 12.6 V,
voltage +3.3 V - within 3.14 - 3.47 V
![]() The voltage value in the +3.3 V channel may be higher than +3.47 V. This is due to the fact that this channel remains without load.
The voltage value in the +3.3 V channel may be higher than +3.47 V. This is due to the fact that this channel remains without load.
But, if the other voltages are within the normal range, then with a high degree of probability it can be expected that the voltage in the + 3.3 V channel under load will be within the normal range.
![]() Note that the 5% tolerance on the upside for +12V is too big..
Note that the 5% tolerance on the upside for +12V is too big..
This voltage feeds the hard drive spindles. At a voltage of + 12.6 V (upper limit of the allowable range), the driver chip controlling the spindle overheats and may fail. Therefore, it is desirable that this voltage be smaller - 12.2 - 12.3 V (naturally, under load).
 It should be said that there may be cases when the unit works on this load, but on a real one (which is much larger), the voltages “sag”.
But this happens relatively rarely, it is caused by hidden malfunctions. You can make, so to speak, an “honest” load that simulates the real mode of operation.
But it's not that easy! Modern power supplies can deliver power of 400 - 600 W or more. To test the operation with a variable load, it will be necessary to switch powerful resistors.
Powerful switching elements are required. All of this will heat up...
A preliminary conclusion about the performance can be made even with a light load, and this conclusion will be reliable in more than 90% of cases.
A few words about fans
 If a used one makes a lot of noise, it most likely needs lubrication. Or, if it is badly worn, in a replacement.
Most of all, this applies to small fans with a diameter of 80 mm, which are installed on the back of the power supply.
The fan with a diameter of 120-140 mm rotates at a lower speed to provide the necessary air flow, so it makes less noise.
In conclusion, we note that a high-quality power supply has a "smart" control circuit that controls the fan speed depending on temperature or load. If the temperature of the radiators with power elements (or the load) is low, the fan rotates at a minimum speed.
With an increase in temperature or an increase in load current, the fan speed increases. This reduces noise.
Victor Geronda was with you.


, poultry farming")


- Burns, Robert - short biography
- The concept of common vocabulary and vocabulary of limited use
- Nancy Drew: The Captive Curse Walkthrough Nancy Drew Curse of Blackmoore Manor Walkthrough
- Deadpool - Troubleshooting
- Won't start How to Survive?
- What to do if bioshock infinite won't start
- Walkthrough Nancy Drew: Alibi in Ashes
- Spec Ops: The Line - game review, review Spec ops the line crashes on missions
- Room escape level 1 walkthrough
- Processing tomatoes with boric acid How much will 2 grams of boric acid
- Cucumber Grass (Borago)
- Bioinsecticide Lepidocid: purpose, properties and application procedure Lepidocide waiting period
- How to change the language to Russian in steam
- Dendrobium noble: room care
- Morphology of plants general concepts - document
- Planting, propagation and care of bamboo at home, photo Growing bamboo from seeds
- How to strengthen the cellular signal for the Internet in the country
- Sanskrit reveals the forgotten meaning of Russian words (2 photos)
- The oldest language Sanskrit programming language of the future Dead language Sanskrit
- Who has dominion over all the earth?