How to check the ram levels of a computer. Testing RAM using programs
The Windows 10 64-bit RAM test is performed at the POST stage. That is, even when starting the PC. Checking the RAM shows that the system can load its processes there. Otherwise, various failures are possible, and no self-respecting manufacturer will allow this to happen. Therefore, Windows 10 also has its own tools to perform the same actions. The only exceptions to this rule are virtual machines, which do not need to run POST tests. The logic is simple: if someone has run a copy of the system, then the PC is, of course, functional.
Third party sites, one of the most famous being memtest.org, distribute third party utilities. It comes in handy from time to time. Usually a programmer tries traditional techniques, sees what exactly he doesn't like, and then creates his own software and sometimes even tries to sell it. There are hundreds and even thousands of examples. What is good about checking memory with third-party utilities? You can't tell if you don't try.
POST test
The default POST test starts every time the PC is started. But many do not like that it takes time, and disable the check through the BIOS. As a result, the system loads faster and the RAM is loaded less. Consistently following this policy can result in blue screens. When one of the RAM lines fails. Make sure it's not in the BIOS of the virtual machines.
There is no choice on most laptops. It is not available in many modern PCs either (the ability to turn off the check). If required:
- Go to the Advanced BIOS section.
- Look for a setting with a name like Quick Power on Self Test.
- Setting this option to Enable disables the check on boot.
In modern boards, you can operate with fast loading. For the most part, this option overrides the POST test, and with it the memory test.
Built-in tools

The OS will then boot. Based on the results of the check, actions are taken to replace the rulers. It’s not difficult to select the one you need, so we won’t dwell on it (sort it out in turn if you don’t know any other way). After downloading, you will receive another message (in case the master has gone to drink coffee).

This will finally show what exactly needs to be done.
Note! The same snap-in opens when you search for the phrase "memory checker" or through the Run tool (Win + R) by typing mdsched.
Third Party Utilities
Download the image from memtest86.com and go!

How does the utility work? She writes a pattern (pattern) to the specified address, and then tries to read it. In this case, it's fffffff, but on the second pass, it's a different number.

There are many options for how to reliably check each bit of RAM. Note that the utility is aware of processor caches. She indicated their size and speed of circulation:
- L1 Cache 64K.
- L2 Cache 256K.
- L3 Cache 6 MB.
The authors have always believed that the speed should consistently fall, but something else is shown on the screen. Live and learn. In the meantime, the software went to write the pattern 00000000 to check for any stuck bits. The software can work indefinitely, but at some point it will write what exactly needs to be done next.

In our case, nothing needs to be done, since the RAM is in order. Press Esc to exit the utility interface. The only negative is that the bootloader does not have a skip option, so you need to go to the BIOS again, and disable booting from DVD there, or remove the USB flash drive. It depends on what medium you are working from.
View result
If for some reason the program finished testing, but the result could not be checked (colleagues / family / laziness interfered), use the system messages.

How to check
Since the tests are free, it makes no difference which one to check the RAM. From under DOS there is little difference, 32-bit commands are used or 64-bit ones. Therefore, even the system checks the memory for errors during the boot period.
Many, creative, successful people have a healthy and strong memory. And vice versa: forgetfulness, absent-mindedness, sclerosis are synonymous with ill health, troubles and problems. It is unlikely that anyone desires such qualities for themselves. It is the same with a computer: if the memory is in order, working with it is a real pleasure. And if not, expect surprises. Unpleasant.
Today we’ll talk about why there are problems with RAM (RAM), what symptoms they make themselves felt, and why using faulty memory modules is dangerous. And also - how to check RAM for errors and what to do if you find them.
Why memory fails
There are not too many reasons for unstable operation or complete inoperability of RAM. Here they are:
- Malfunction of the RAM modules themselves (they are also RAM modules - R andom A ccess M emory). The culprit is most often a banal marriage, which sometimes manifests itself after months or even years of work.
- Individual incompatibility of simultaneously used RAM or memory sticks and the motherboard. Occurs despite the support declared by manufacturers. As a rule, it comes to light at the first connection.
- Incorrect RAM frequency and timing parameters in BIOS. Occur after changing the default settings in order to overclock or find the optimal mode for the joint operation of several bars.
- Bad contact in the connector. The reason may be the formation of an oxide film on the surface of the contact group of the RAM module.
- Malfunction of the slot, power circuit elements, breakage of tracks and other defects of the motherboard related to memory.
How RAM problems manifest
The "clinical" picture of memory failures, unlike the reasons, is very, very diverse - from the complete inoperability of the computer to errors in the operation of applications that occur haphazardly and without connection with any action.Typically, RAM problems make themselves felt by the following symptoms:
- PC or laptop does not respond in any way to pressing the power button.
- After you press the power button, the system speaker beeps that POST failed. Moreover, codes (combinations of short and long beeps) do not always indicate memory problems.
- The computer turns on and immediately turns off or restarts cyclically at any stage of the boot.
- After switching on, error messages are displayed on the screen. For example: " CMOS checksum error», « CMOS checksum bad" etc.
- During startup and operation, the operating system crashes with critical errors (blue screens). For problems with the RAM are especially characteristic PAGE_FAULT_IN_NONPAGED_AREA, UNEXPECTED_KERNEL_MODE_TRAP, DATA_BUS_ERROR, PFN_LIST_CORRUPT, KERNEL_STACK_INPAGE_ERROR, UNEXPECTED_KERNEL_MODE_TRAP, but there may be others. Very often they are different.

- The image on the screen disappears or is distorted (video memory defects). In the absence of discrete video with its own memory, the latter is allocated from the operational one.
- The computer slows down or freezes until the user restarts it.
- The file transfer and copy functions stop working.
- Errors occur when starting and running applications. For example, " Memory cannot be read\written" and others.

- Programs are not installed or removed.
- Files stop being saved. Or, once saved, they cannot be opened.
- Operating system components are damaged.
As you can see, this list contains almost everything that can be in case of a computer malfunction. And this is just because of a broken RAM!
By the way, often memory problems disguise themselves as other problems and declare themselves in the most bizarre way. There were cases when they were manifested by constant crashes of the antivirus program (gives a reason to “sin” for elusive viruses), unstable Wi-Fi connection, loss of device drivers (after installation, the driver only works until the computer is restarted), etc.
Sometimes the same failure appears constantly, sometimes they alternate. It is not uncommon to see a combination of several errors, such as blue screens of death and system function failures.
What are the consequences of using a faulty RAM? To the most deplorable. Namely, to the loss of data with which you work on a PC. During the process of opening and overwriting, errors will accumulate in the files, which sooner or later will make them unreadable and possibly unsuitable for recovery.
What to do first
Since the RAM malfunction has so many "faces", it should be ruled out for any obscure problems with the computer.
In cases where the computer does not turn on, shuts down or restarts before loading the operating system, and also before testing memory using programs, do the following:
- Turn off the power to the system unit - unplug the cord from the outlet or press the off button on the power supply / surge protector. Open the case cover and make sure the RAM sticks are properly and fully seated in the slots. If at least one module is not fully inserted, the computer will not turn on.

- Remove the strips from the slots and clean their contact groups with a school eraser. If the problem is oxide plaque, which breaks the contact, it will be solved.
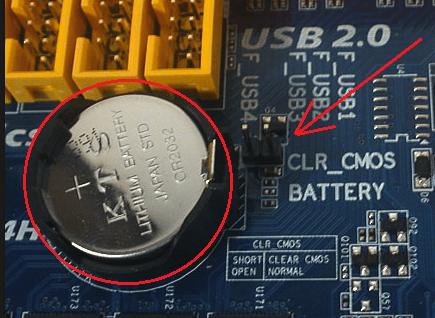
- by removing the flash memory battery for 15-30 minutes or closing the contacts of the Clear_CMOS jumper (other names are CLCTRL, CLR_CMOS, JBAT1, etc.).
If a crash prevents the computer from starting, try turning it on with one RAM module by installing it in different slots. If there are several modules, check them one by one.
Finding RAM Errors Using Programs
Software diagnostics of RAM is carried out under the same conditions under which failures occur. When you're unsure if memory is causing problems and want to find out, leave all RAM modules plugged in as configured. If you need to determine which of the bars is out of order, check them one by one.If you're using Memory Acceleration Technology, select the profile that's having problems for the first check. If there are errors, do another check with XMP disabled.
The RAM diagnostic tool built into Windows - Windows Memory Diagnostic Tool, perhaps not the most popular tool for such tasks, but the most accessible. The utility versions included with Windows 7, 8.1, and 10 support DDR-DDR4 generations of RAM up to 64 GB (but in fact, possibly less).The myths that the system tool is able to detect only obvious problems, while hidden and subtle problems are not, are made up by users who have not bothered to figure out how to work with the utility correctly. Yes, by default it runs a quick check and a minimal set of tests, but if you change the settings, its sensitivity will increase significantly.
To launch the Windows Memory Diagnostic Tool, press the key combination Windows + R and enter in the line " Open» command mdsched.

Then confirm your consent to the restart. To have access to the entire RAM space, the utility will reboot the computer into DOS mode.

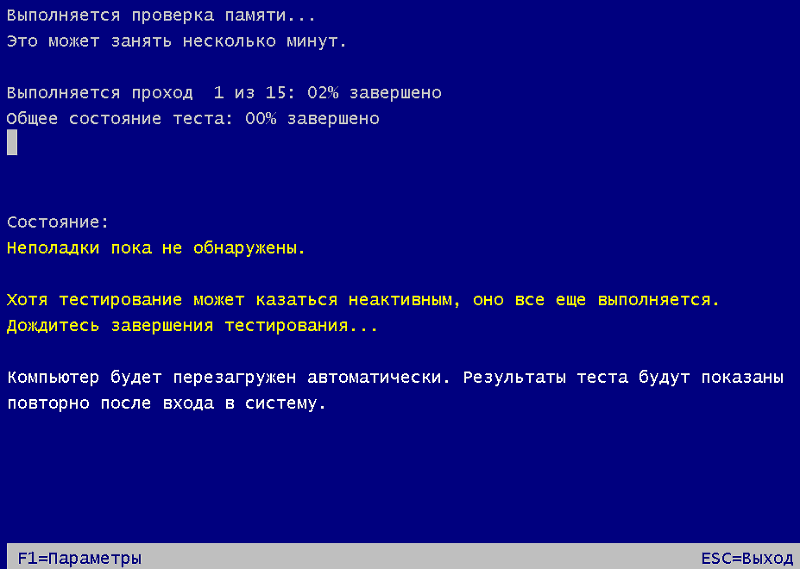
The check will start immediately after the restart. As already said, this will be a superficial scan, which reveals only obvious errors. You can either wait for it to finish or stop it by pressing the go to settings key F1.
The program has few settings, and they are intuitive.
- The first option is a set of tests. For in-depth diagnostics, select " Wide". Press Tab to move to the next item.
- Further - use or non-use. For the utility to access only RAM, the cache is desirable disable.
- The last option is the number of passes. The more of them, the higher the probability of discovering hidden errors, so if time is not running out, put no less 8-15 .

Press F10 to exit the setup menu.
A full, deep check of the RAM by any means always takes a long time. As practice shows, the majority of defects are detected already in the first hour of the test, but some emerge only after multiple passes - after 6-8 hours from the start of the test.
Messages about found errors appear on the same screen in the " State».
Memtest86
The utility (do not confuse it with Memtest86+, which has ceased its development since 2013) is a classic of the genre. Its first algorithms were developed over 20 years ago. To date, they have improved and meet all the standards of memory and platforms produced now.Memtest86 seventh version (latest), released in free - free edition, and two paid editions. The Free edition does not have the ability to save scan reports to disk, create configuration files that can be used to set test parameters for the program, and also exclude the processor cache from the scan. In addition, some tests were cut out of it, in particular, the use of instructions for reading / writing 64-bit and 128-bit data and error simulation to test the correction function (ECC) of server memory.
Despite the limitations, the capabilities of Memtest86 Free Edition are enough for the vast majority of home users. Searching for hacked paid versions or buying them is completely useless.
Unlike the Windows tool, Memtest86 is optimally configured by default, so it's easy enough to run. But before that, the downloaded file (iso image) will have to be written to external media - DVD or USB flash drive, and . The tool for creating bootable USB flash drives, along with the utility itself, is also available for free download on the official website of the latter.

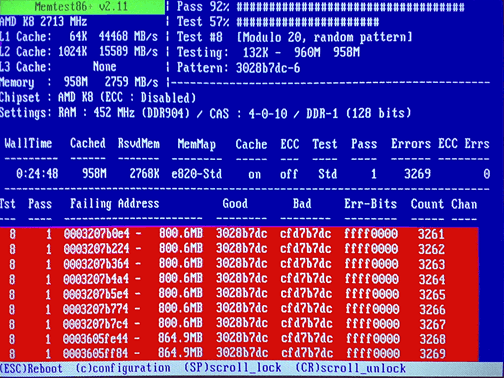
The Memtest86 interface is in English. The green cancer in the screenshot above circles the initial data: processor information - frequency, volume, cache speed, and memory information - speed and volume.
The area on the right - in a yellow frame, displays the current execution of the program: the sequence number of the test, the percentage of its completion, as well as the percentage of completion of the entire loop ( Pass).
An orange frame circles information about the time elapsed since the start of the scan ( Time), number of passes ( Iterations), addressing mode ( AdrsMode), sequence number of the cycle ( Pass) and errors found ( Errors).
Error details, if any, are listed below. It is impossible not to notice them, since this area is highlighted in red.

At the very bottom of the screen, the program control options are listed.
Information about testing methods and procedures, descriptions of tests, rules for creating configuration files, and much more is available at .
GoldMemory
The utility has another powerful RAM testing tool built on alternative algorithms. It often detects errors that cannot be detected by Memtest or other means, but, unfortunately, it is a paid solution. You can only use the 30-day demo version for free, which is essentially useless.The full - registered version of GoldMemory allows you to test all types of modern DDR-DDR4 RAM up to 64 GB. It has 4 scanning modes - fast (the only one available in the demo version), normal, advanced and custom. Supports batch batch files. Saves reports and inspection history. It can work in continuous mode - until a manual stop.
Like the previously discussed utilities, GoldMemory works in a DOS environment - it starts from a bootable DVD or USB flash drive (the paid version also includes media creation tools). Testing starts immediately after downloading.

The program interface, like Memtest 86, is in English. At the top of the screen are version and license information. The block in the orange frame in the screenshot above displays information about the current execution of tasks and settings.
The settings menu is circled in red. Here:
- The "T" key controls the choice of test mode.
- "C" - enables and disables the continuous scan mode.
- "M" - allows you to change the method for determining the size of RAM.
- "B" - enables and disables the test benchmark.
- "F" - determines whether or not to save the report file.
- "A" - turns on and off the sound notification of found errors.
- "X" - determines whether to terminate testing when errors are found.
- "E" - controls the transition to an accelerated test mode, which saves up to 50% of time while maintaining normal efficiency.
By pressing the "T" key in user mode, you can select from a list of test groups to identify specific problems.
After the start of the scan, the area where the menu is located will display a list of found errors. You can't ignore them either.
Well, what to do with a faulty RAM?
And the authors of diagnostic utilities claim that not all errors that programs detect are related to a malfunction of the RAM itself. In addition to it, they respond to problems with the cache memory of the processor, motherboard, as well as hardware incompatibility. If you suspect the latter, it is advisable to repeat the memory test on another computer. If there are no errors on it, then this is the case.Errors that are detected with non-standard timings and frequencies do not always indicate that the memory is no good. If it normally passes tests in normal mode, it can be installed in a computer that is used without overclocking. On it, most likely, it will work as expected.
Defective RAM modules should definitely be replaced. I think it will not be difficult for owners of stationary PCs to do this on their own. Another issue is laptops. If the model is equipped with removable RAM sticks, as in the photo below, this is also easy to do.

Cases of malfunction of non-removable RAM - soldered on the motherboard, are solved in different ways. Installing a bracket in an additional slot, if there is one, usually does not help, since the first BIOS accesses the non-removable module. If he "died", the additional one will not work either.

Discrete RAM modules, as you may know, are equipped with an SPD chip that stores information about operating frequencies and timings. Integrated memory does not have its own SPD, and all data about it is contained in the BIOS. In order for the laptop to see the bar in the slot, you need to remove information about the integrated module from the BIOS.
If the board does not have a connector for a discrete module, the only solution is to solder a new RAM chip to replace the failed one. If several chips fail, it is sometimes more profitable to replace the entire motherboard, since such repairs are not cheap.
Happy checking!
More on the site:
No computer "Alzheimer": how to check the RAM of a PC and laptop updated: May 2, 2017 by: Johnny Mnemonic
It may be necessary to check the performance of RAM in cases where there is a suspicion that the blue screens of death in Windows, oddities in the operation of the computer and Windows are caused precisely by problems with RAM.
This guide will look at the main symptoms of failing memory and walk you through the steps to test your RAM to find out exactly if it's the problem using the built-in memory test utility in Windows 10, 8 and Windows 7, as well as using third-party free program memtest86+.
Symptoms of RAM errors
There are a significant number of indicators of RAM failures, among the most common symptoms are the following
- Frequent occurrence of BSOD - Windows blue screen of death. It is not always connected with RAM (more often with the work of device drivers), but its errors can be one of the reasons.
- Crashes during heavy use of RAM - in games, 3D applications, video editing and graphics, archiving and unpacking archives (for example, an unarc.dll error is often due to problematic memory).
- A distorted image on the monitor is more often a sign of video card problems, but in some cases it is caused by RAM errors.
- Computer won't boot and beeps endlessly. You can look up the beep charts for your motherboard and see if the audible beep is consistent with memory failures.
Once again, the presence of any of these symptoms does not mean that the matter is in the computer's RAM, but it is worth checking it. The unspoken standard for this task is a small memtest86+ utility for checking RAM, but there is also a built-in Windows Memory Diagnistics Tool that allows you to check RAM without third-party programs. Both options will be discussed next.
Windows 10, 8 and Windows 7 Memory Diagnostic Tool
The Memory Checker (Diagnostic Tool) is a built-in Windows utility that allows you to check RAM for errors. To launch it, you can press the Win + R keys on your keyboard, type mdsched and press Enter (or use the Windows 10 and 8 search and start typing the word “check”).

After running the utility, you will be prompted to restart the computer to perform a memory check for errors.

We agree and wait for the scan to start after a reboot (which in this case takes longer than usual).

During the scanning process, you can press the F1 key to change the scan settings, in particular, you can change the following settings:
- The type of check is basic, normal, or wide.
- Cache usage (on, off)
- Number of test passes

Upon completion of the verification process, the computer will restart, and after logging in, it will display the results of the verification.
However, there is one caveat - in my test (Windows 10), the result appeared after a few minutes in the form of a short notification, it is also reported that sometimes it may not appear at all. In this situation, you can use the Windows Event Viewer utility (use search to launch it).
In the Event Viewer, select "Windows Logs" - "System" and find information about the results of the memory test - MemoryDiagnostics-Results (in the details window by double-clicking or at the bottom of the window you will see a result, for example, "Computer memory was checked using the Windows Memory Tester; no errors found."

Checking RAM in memtest86+
You can download memtest for free from the official website http://www.memtest.org/ (download links are at the bottom of the main page). It is best to download the ISO file in a ZIP archive. This option will be used here.
Note: there are two sites on the Internet for memtest - with the memtest86+ program and Passmark Memtest86. Actually, it's the same thing (except that the second site has a paid product in addition to the free program), but I recommend using memtest.org as a source.

- The next step is to burn the ISO image with memtest (after extracting it from the ZIP archive) to disk. If you want to make a bootable flash drive with memtest, then the site has a kit for automatically creating such a flash drive.
- Best of all, if you check the memory, you will be one module at a time. That is, we open the computer, remove all RAM modules, except for one, and perform its check. After the end - the next and so on. In this way, it will be possible to accurately identify the failed module.
- After the boot drive is ready, insert it into the disk reader in the BIOS, set the boot from the disk (flash drive) and, after saving the settings, the memtest utility will load.
- No action is required on your part, the check will start automatically.
- After the memory check is complete, you will be able to see what RAM memory errors have been found. If necessary, write them down so that you can later find on the Internet what it is and what to do with it. You can abort the scan at any time by pressing the Esc key.

Checking RAM in memtest
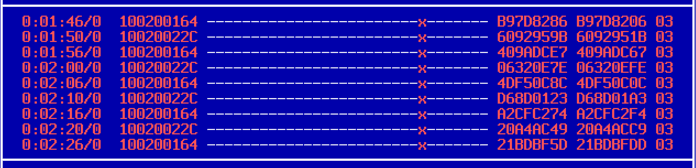
In case there are errors, it will look like in the picture below.

RAM errors identified by the test
What should I do if memtest finds RAM errors? - If failures seriously interfere with work, then the cheapest way is to replace the problematic RAM module, besides, the price is not so high today. Although sometimes a simple cleaning of the memory contacts helps, and sometimes a problem in the operation of the RAM can be caused by malfunctions of the connector or components of the motherboard.
How reliable is this test? - reliable enough to test the RAM on most computers, however, as is the case with any other test, you cannot be 100% sure of the correctness of the result.
RAM failure is a common cause of the appearance. If your computer began to regularly demonstrate such a blue screen, then it makes sense to check the RAM for performance. Luckily this is very easy to do. In this article, we will consider two ways to test memory at once, using the built-in mdsched utility and using the third-party Memtest86+ program.
Checking RAM health with mdsched
The easiest way to check RAM for operability is to check it with the mdsched utility. This utility is built into the Windows operating system and is present in all its modern versions, including Windows 7, Windows 8 and Windows 10.
In order to check the RAM using mdsched, you must first. To do this, press the key combination Windows + R. Next, you need to enter the command "mdsched" and press the Enter key.
This will launch the mdsched utility. This utility will offer you two options for checking RAM. If you select the first option, the computer will restart and the scan will start immediately, and if you select the second option, the scan will be scheduled for the next time you turn on the computer. You can choose any of these options, there is not much difference between them.

Either way, the next time you boot your computer, the Windows Memory Diagnostic Tool will launch. By default, the memory will be checked in basic mode.

If you want to perform a more detailed test of the RAM performance, you can interrupt the current test using the F1 key and select another test mode. In total, the Windows Memory Diagnostic Tool offers three modes for checking RAM for performance, these are:
- Basic mode - the simplest and fastest test, includes MATS +, INVC, SCHCKR;
- Normal mode - a more detailed check, including LRAND, Stride6, SCHCKR3, WMATS+ and WINVC checks;
- Wide mode - the most detailed RAM test, which includes MATS+, Stride38, WSCHCKR, CHCKR4, WStride-6, ERAND, WCHCKR3, Stride6 and CHCKR8 tests.
In addition, while the Windows Memory Diagnostic Tool is running, you can disable or enable the memory cache check. To do this, first press the F1 key, then the Tab key, and then select from three options:
- included;
- Turned off;
- Default;
Keep in mind that the more detailed verification method you choose, the longer it will take.
Checking RAM health with Memtest86+
You can also check the performance of RAM using third-party programs. One of the most famous programs of this kind is Memtest86+. Memtest86+ runs exclusively from the boot disk, so it can be used even when the operating system is not installed or running.
You can download an ISO image of a boot disk with this program on the website. You can also download Hiren's boot CD (), which includes Memtest86+. You can read about how to burn a bootable ISO image to disk.
Memtest86+ is very easy to use. We boot from the boot disk and run Memtest86+. Immediately after launching, the program starts checking your RAM for performance.

If any errors or malfunctions are found, red messages will appear on the screen. If there are no errors, the message "Pass complete, no error" will appear.
To access the settings of the Memtest86+ program, you need to press the "C" key on the keyboard. To complete the check, press the "Esc" key.
Which now and then pop up at different intervals.
To exclude RAM from the list of suspects, you need to carefully check it. We will check the RAM for errors through a small programmemtest.
2 How to check RAM for errors
Unpack it and run the installationmemtest . Select your flash drive and check the box next to the selected flash drive. We launch. All your bootable flash drive is ready.
Now we restart the computer and set the bootloader. To do this, go toBIOSpressingDelbefore the system boots. And as the primary boot, select our disk or USB flash drive, depending on wherememtest recorded.
If everything is done correctly, then instead of loading the operating systemWindowswill loadmemtest and the RAM will be checked for errors.

The program itself tests each block of RAM for errors.memtest can last 6-8 hours for just one stick of RAM.
But thanks to 9 different levels of testing, it is very good at finding errors in RAM, if any.
My advice to you ifmemtest finds errors, it is better to change such RAM to a new one, because sooner or later memory problems will begin anyway.
By the way, it is very useful to conduct a similar test after buying a new memory bar. If errors are found, then you can immediately go to the store and exchange the RAM bar for a new one.
memtest perfect for ownersWindows XP.For those who are too lazy to fiddle with the bootloadermemtest , inWindows Vistaand 7 has a built-in utility.
To run it, select start and in the line execute, type the command -mdsched.exe . You will be prompted to reboot, to which we answer yes.

After the reboot, the utility for checking RAM for errors will automatically start.

Pressing F1 select the scan settings. This is of course notmemtest
with 9 test cycles, but still suitable as an alternative.
I usually choose a wide test set with 4 repetitions.
Now you know how to check RAM for errors, soon I will review an excellent program for testing a hard drive, and we will also learn how to deal with dead pixels on monitors. Interesting?
Then subscribe to be among those who read the latest articles first. That's all for me and I'm sincerely happy for those whose RAM passed the test without errors. Congratulations your RAM will serve you for a long time 🙂


, poultry farming")


- Burns, Robert - short biography
- The concept of common vocabulary and vocabulary of limited use
- Nancy Drew: The Captive Curse Walkthrough Nancy Drew Curse of Blackmoore Manor Walkthrough
- Deadpool - Troubleshooting
- Won't start How to Survive?
- What to do if bioshock infinite won't start
- Walkthrough Nancy Drew: Alibi in Ashes
- Spec Ops: The Line - game review, review Spec ops the line crashes on missions
- Room escape level 1 walkthrough
- Processing tomatoes with boric acid How much will 2 grams of boric acid
- Cucumber Grass (Borago)
- Bioinsecticide Lepidocid: purpose, properties and application procedure Lepidocide waiting period
- How to change the language to Russian in steam
- Dendrobium noble: room care
- Morphology of plants general concepts - document
- Planting, propagation and care of bamboo at home, photo Growing bamboo from seeds
- How to strengthen the cellular signal for the Internet in the country
- Sanskrit reveals the forgotten meaning of Russian words (2 photos)
- The oldest language Sanskrit programming language of the future Dead language Sanskrit
- Who has dominion over all the earth?