How to do sketches the right way. Pencil sketches of animals and people
Recently, a very big fashion has gone to sketches, many teach how to do it, but in fact there are no special tricks in this matter. All you need is practice, observation and a great desire. You can sketch without knowing how to draw at all, and moreover, it helps in learning in the future.
For many, people are often the most difficult object, and in my post I will try to tell you how to make sketches of people easily and simply. The main task of the sketch is to capture the moment, some features, the pose without going too much into detail. It is very cool to draw with soft pencils with different pressure, but there is a danger of diluting dirt, so if you are not very confident, take a medium hard pencil, for example, I like 4B. Faber Castell, Lyra, Koh-i-noor, Stabilo have good pencils. It is very useful to draw with materials that cannot be erased - a marker, pen, felt-tip pen. A soft pencil is also sometimes problematic to erase.
I don't see any problem drawing from video, but the most interesting things are best drawn from life. Great places where there are a lot of people, in different clothes, different ages, in different poses - a station, a shop, a cafe, and so on.
Choose a comfortable place for yourself where people walking by will not hurt you, look over your shoulder and interfere in every possible way. Headphones in the ears, in which music may not even play, can help from unnecessary conversations. The most important thing to remember is that people generally don’t care and many will not pay attention to you, so that’s okay. You can take a friend with you to be sure, if it’s very scary. It is very easy to draw in the subway, at the train station, at the bus stop where people are just passing by, and besides, it is a good practice to draw quickly - each drawing should take you about 5 minutes, maximum 10 if it is already a complicated figure.
People come in three "kinds" - standing, walking or running and sitting.
In order to quickly fix the position, you need to present the figure in simple forms. Do not try to fix everything at once, stop at sketching the mass. It helps a lot to cut off the excess. Use circles, ovals, rectangles, try to break even a complex figure into simple shapes.

Gradually you will learn to see the correct ratio in the figure and such sketches are a great way to convey the pose and movement - in the picture above you can see that people are running or walking, and not standing for example. At the same time, it is completely unrealistic to say who is who.
The next step is to add some basic details and tone.

You should not go away from simple forms, you just need not to paint over the whole figure. By the way, there are a couple of life hacks to make life easier. Drawing people from the back is easier because you don't have to draw the face. And drawing shadows is also very simple - you need to divide each part of the body in half lengthwise and make the lower part darker.

The next step is to depict more complex poses and environments, add details, but do not move away from generality.

Such sketches train several good skills at once - draw quickly from life, capture the most important thing, notice interesting details and transfer them to your work. Drawing different characters pumps the fantasy skill very well, and from any sketch you can then get an interesting idea, a hero of great work. The biggest charm is that an intuitive understanding of the basic proportions and human anatomy in general is gradually being developed, which will greatly help in further learning.
So draw people - it's actually not as difficult as it seems and very cool!)
As practice shows, for hundreds and even thousands of centuries, sketches have been used by artists, designers, inventors, architects and engineers to quickly display scenes, objects or their thoughts on paper.
Some sketch what they see directly, others sketch ideas that come to mind before they are forgotten.
Some sketches become the basis for a work of art or an invention. And others remain only in the album.
Whatever the reason for creating a sketch, there is always an opportunity to make them better. After all, fortunately, sketchers in their history, based on experience, have created their own golden fund of tricks and tricks.
We'll take a look at the best tips from the best sketchers in this article.
1. Make the sketchbook your friend.
Drawing in an album teaches you to first look, then observe, and finally, it becomes possible to find a source of inspiration in it.— Le Corbusier
Any drawing requires practice. But, since sketching is, in many ways, aimed at capturing the present moment, it is not enough to sketch only on a planned schedule. It takes a lot of practice to create spontaneous sketches, and for this you always need to have an album with you.
Countless great artists always carried a sketchbook with them wherever they went. Pablo Picasso used his sketchbook to constantly practice his technique. His notebooks are full of preliminary drawings for some of his great works, as well as copies of paintings he liked, or just sketches of views from his studio.
Film director Guillermo del Toro uses his notebook to describe in detail the ideas behind his films. His notes are interspersed with illustrations of weird and wonderful fantasy characters, caught whenever he had an idea. Other artists also use their scrapbooks to collect fleeting ideas to use later. British ceramic artist Grayson Perry describes his notebook as "an archive of silly notes that later become art".
The most famous sketchbook creator was Leonardo da Vinci. In his albums you can find anything: from anatomical drawings to inventions in the field of technology.
There is one common feature of all these albums. Compared to an artist's finished work, which may appear highly detailed and accomplished in a gallery or movie screen, sketchbook drawings are rougher, simpler, and more spontaneous. And, thanks to the habit of their creators to always carry their album in their pocket, sketches in them could be created at any time.

Buy a sketchbook from your local art store and let it become your new best friend. Whenever you see something interesting, take the time to do a quick sketch. It doesn't have to be perfect, and you don't have to sit down at the table every time or look for another convenient place to sketch.
Get into the habit of it, and very soon you will begin to look at the world through the eyes of a sketcher. The artist John Ruskin wrote that people who often draw the world around them begin to see it differently.
“Two people go for a walk. One makes sketches, the other has no such practice. They will go down the green path... One will see the alley and the trees... But what will the sketcher see? His eyes are accustomed to seek the origins of beauty and to penetrate into the smallest details of beauty.”— John Ruskin
The main idea:
Buy a pocket album and don't part with it. Do sketches spontaneously when you have a great idea or see an interesting scene.
2. Learn to hold your hand correctly
The first secret of a good sketch may seem obvious - it all depends on how you hold your pencil.
Incorrect hand placement is a typical beginner's mistake. Most people try to draw by holding a pencil in the same way as when writing. But this is not the best solution for drawing, using the same muscles as when writing.
The most important thing to understand is that different drawings require different hand positions.
Australian artist Helen Southes identifies four different ways to hold a pencil while sketching:
as when writing, the hand rests on paper. suitable for drawing intricate details
extended grip - when the hand is raised from the sheet and can create free lines
top grip is good for hatching
the lower grip can make extended lines
For more technical, precise drawing, such as an architectural sketch, the lines should be straight and as precise as possible. Architect Bob Borson recommends a curious trick for beginner sketchers: Try not to move your wrist or arm from the elbow, but move your whole arm from the shoulder.
This eliminates the "wobble" created by small movements of the wrist and elbow.
The main idea:
Learn different pencil techniques, hand positions, what types of sketches they are suitable for. Practice your accuracy by drawing from the shoulder rather than at the wrist.
3. Don't be afraid to wash
Many skeptical beginners envy those who make almost no eraser adjustments to their work. They are upset by the sight of their own drawings, full of corrections, which they perceive as a failure.
But, as English artist Stephen Farthing explains, even experts make adjustments. In his series of lectures at Oxford, he points to the drawing of John Ruskin, perhaps the creator of the most talented sketches of nature in history. If you look closely at the drawing, you will see that Ruskin is constantly erasing and redrawing the lines, making dozens of tiny corrections.
“This is the essence of modern drawing, Farthing explains, Draw, make mistakes, correct them by drawing the right lines.
Using an eraser will give you great sketching practice. You will make more confident lines, because they can always be corrected. Instead of carefully trying to get the "perfect" line, you can take risks and draw without overthinking, knowing that you can erase it if necessary.
Sketches will become more lively, lighter and more similar to the original object.
The eraser can also be used for artistic effect on its own. Some sketches can be made beautiful by first covering a piece with graphite or charcoal, and then using an eraser like a pen to whiten out the highlights, as Disney animator Aaron Blaze demonstrated in his drawings of fabulous creatures.
The main idea:
All great artists use an eraser. Include it in your list of materials and don't be afraid to make corrections.
4. Learn to use tone
Tone is the gradation of dark and light. This is what makes our image three-dimensional, gives a sense of depth.
The simplest example of how to use tone is to see how light hits an object. The part closest to the light will be almost white, the farthest part will be the darkest. Between them there will be gradations, the sharpness of which depends on the softness of the light source.
However, there are many other ways to use tone.
Tone can give a sense of distance. In his art lectures, Stephen Farthing describes how John Ruskin, in his sketch of the mountain scene, uses darker tones in the closer parts of the image and lighter in those farther away, as in his sketch of the Alps below.

Sketchbook by John Ruskin
How tone affects a drawing depends not only on the darkness of the applied strokes, but also on how they are laid, in what direction. Different strokes can be used to create the feel of different objects in an image.
In his 1900 book The Practice and Science of Drawing, the English artist Harold Speed explains how different stroke directions can be used to create tone.
“Hatching lines that follow the shape suggest softness, rounded strokes give the fullness and tangibility of the form, lines can be hard and intersect in all directions, due to their diversity, a riddle of tone arises”. — Harold Speed.
Speed does not recommend messy scribbles, they look unprofessional and do not help in creating tone.
Pencil can be given a very even tone—good for smooth skin, clouds, or shiny hard objects—by a method known as brushing or polishing (described by artist Diane Wright).
Brushing consists of rubbing the design with a soft cloth or compressed paper and results in a soft, "mottled" texture, while polishing requires rubbing the sketch with a very hard (3H) pencil and this method retains more detail.
The main idea:
There are many methods for creating tone to make the objects in your sketches saturated. Carefully study shading techniques, how to use tone to show light, depth, and texture.
5. Create a "Dictionary of Meaningful Things"
When you get familiar with sketching tools, you can create a catalog from different materials (pencil, 3d pen, chalk, graphite, charcoal...) and techniques (hatching, crosshairs, shading, polishing...).
But how quickly can you get your bearings when sketching? When you grab your sketchbook to sketch a beautiful scene before it disappears, you may not have time to stop and consider whether it would look better with a 2B or 3B pencil, with a curved or crossed stroke.
As a solution to this problem, the Ashmolean Museum recommends creating a "dictionary of meaningful things" and writing it down in your album. Each time you learn a new tone technique or acquire a new type of pencil, mark it in your "vocabulary" and give it a short label.
This way you can quickly refer to your "vocabulary" whenever you start drawing. Quickly assess what method is best to sketch the scene in front of you. This is especially useful for painting outdoors where your time may be limited and your decision must be made outside the comfort of the studio.
Hello! Recently, I have not been able to sit down to shoot regular video lessons, and even more so video courses, but I still try to draw regularly. It is clear that with a high load, there is no time left for large masterpieces. But this is not a reason to completely abandon the creative component of life. During such a period, the art of sketching or quick sketches comes to the rescue. If you only have 10-30 minutes a day free, then they are quite enough to devote to quick sketches, thereby not only maintaining your drawing skill, but also improving your view of things, the confidence of strokes and lines.
In this article, I will talk about some services that allow you to sketch more efficiently. Let me remind you that the main idea of sketching is to depict the main idea, the concept of the drawing, on paper in a very short time, so that this idea is understandable to any viewer. At the same time, the time limit plays a very important role - the artist begins to look at the object of drawing differently, highlights only the characteristic features and features of the object. In sketching, the individual traits of the artist himself, including emotions, can be very clearly manifested. the drawing is done quickly, vividly, with the desire to convey the image of the object as quickly as possible.
I decided to try my hand at the art of sketching and now I know for sure that I will not give up this business, because. I see in this process a lot of useful things for myself, especially in the direction of developing creative abilities. For the experiment, I used one of the foreign services quick poses, where photos of models are provided free of charge for sketching for a while. I will return to this site a little later, but for now let's look at others:
characterdesigns.com
This resource, in addition to information about the development of the character, offers a whole set of photosets that can be used as reference for sketches. There is no time limit here, as well as options for selecting objects. The principle is simple - choose a set of photos opposite " Choose a photoset:"and press the button . Next, choose your favorite photo and draw a sketch. This is the simplest option and essentially only provides you with photos. You have to control the drawing time yourself, which is a big minus.
reference.sketchdaily.net
An excellent service with a tool for submitting references on various topics with the ability to select a time interval. By clicking on the link, you can choose what you want to draw - the full body (Full Body), body parts (Body Parts) or animals (Animals). For example, you decide to draw hands. To do this, you need to go to the bookmark Body Parts and set the settings:
- Body part (Part): hands (Hands)
- Gender: male (Male)
- View (View): front (Front)
- Time interval (Time): e.g. 2 minutes
Next, click on the button . A random photo will open for you and the countdown will begin, during which you must have time to draw the object depicted in the photo. Adrenaline starts to go off scale when you don't have time, and time comes to an end very quickly 🙂 That's when in the next picture you start to think how to be in time and what steps you need to take for this. Your own view is born on what needs to be drawn first and what to detail later, so that it can convey the main features of the object.
I will not translate all the settings here. Even if you do not know English, you can find out by simply enumerating the parameters what each setting item is responsible for. There is nothing difficult there. Let's move on to the next service.
artists.pixelovely.com
Also a very nice site specially made for sketching with the ability to choose what you want to draw. And as in the previous service, in addition to human figures, you can choose references of different animals and birds. Consider choosing a reference for drawing a human figure. To do this, go to the Practice Figure Drawing section and select the answers to the questions.
For example, we want to draw only male dressed (covered) models with a time interval of 2 minutes. In this case, the settings will look like this:
Next, click on the button and start drawing. After 2 minutes, the picture will change to another one and you will start a new sketch. Of the minuses - it is not visible how much time is left until the end of the time interval, there is no timer.
quickposes.com
Well, we got to the service, which I stopped at one time. The service differs from similar ones in that for a certain number of hours you get a certificate from quickposes . There are 3 levels of certification:
- Level 1 (for 10 hours of drawing)
- Level 2 (for 30 hours of drawing)
- Level 3 (for 70 hours of drawing)
BUT! There is a prerequisite! Only 30 minutes of drawing spent per day are credited to the certificate. This means that you can get a first level certificate in a maximum of 20 days, provided that you draw for 30 minutes every day.
This is done mostly in order to instill in you the skill of daily sketching. The certificate itself should not be a goal, it's just a nice addition, as the author of the site writes.
If you want to track time and get a certificate, then prepare your email address and go to the main page of the quickposes website:
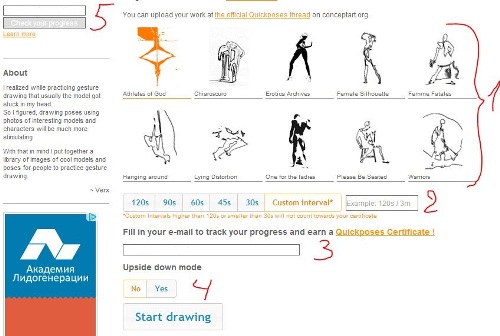
Here we need to select options:
- themed poses, such as athletes or warriors
- reference display time interval
- your email
- inverted mode (I always put No)
And push the button to start drawing.
To check your progress, you can enter your email in the left column of the site (number 5 in the screenshot above) and click on the button .
It is important to always use the same email address, because later on it will send you a certificate.
Here are some of my sketches that I drew using the references of this service:
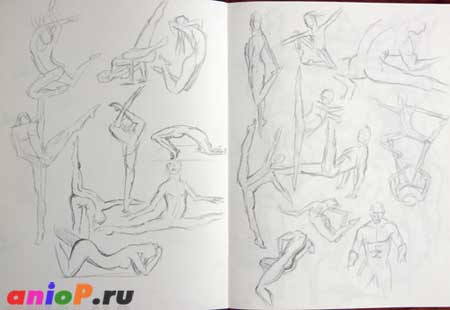


It was very interesting to try to make sketches with different materials, for example, pen, pencil, charcoal, pastel and on different papers. I always set the interval to 120 seconds, because in addition to the main silhouette, I wanted to have time to add a few details. But sometimes this was difficult to do, because. time was running out quickly.
I would like to note that several times I had a very interesting state, when all thoughts left my head and the hand itself drew what it considered necessary. At the same time, I kept in mind the drawing completely, and not some individual details and strokes. It's quite difficult to explain in words, but it's much easier to feel when you draw quickly and want to make the drawing recognizable at the same time.
I didn't manage to draw every day. There were days when there was no time even to allocate 10 minutes. Either there was time, but there was no strength. So instead of 20 days, I scored 10 hours of drawing in about a month. At the same time, on the 4th-5th day, thoughts began to creep into my head, such as why do you need this, you don’t need to force yourself to do it every day, etc. 🙂 But if you don’t pay attention to them and continue to draw, then they soon leave and you just enjoy from the process.
As a result, after about a month, I received such a certificate in pdf format by mail:

At the same time, both from the results and from the sensations, I noticed that the strokes and lines in the sketches became more confident and much more pleasing to the eye.
I suggest you try your hand at quick sketches. Draw anytime, anywhere, be liberated in drawing. It is not necessary to create only full-fledged pictures. Even 5 minutes of sketching is good for creative development.
Careful mastering of all the lessons of this course will help you take the first steps in studying human anatomy and proportions, teach draw people from life and from your imagination, in various poses and in motion, naked and in clothes.
The first lesson is a preparation for the actual study of the figure, and also lays the foundation for the structure of further work. The practical exercise at the end of the lesson will be of particular value to you as an artist when creating a model of a person and in preparing preliminary sketches, drafts, thinking of ideas, suggestions, actions, and poses where the figure is to be drawn without the use of models or copying. I highly recommend give him the utmost attention, and by no means skip it.
We draw a person from nature
In order to draw something well from memory or from your imagination, you must first build up a stock of basic knowledge on the subject. It is best to start drawing from nature. By constantly observing those around you, you can easily and quickly learn a lot of information about proportions, shape and structure, and in the process you will also develop your drawing skills. No amount of information gleaned from textbooks on drawing a person cannot serve as a substitute for this valuable exercise.
You must learn information not only about the shape and structure of the body, but also gain a deep knowledge of how people stand, sit, and move if you want them to be convincing on paper. For this reason, you must always use a sketchbook.
sketchbook
Just as a writer needs a notebook to jot down thoughts, and an athlete needs to exercise regularly to be in top shape, the artist needs an album or sketchbook to constantly hone your skills and visual memory. Your sketchbook should always be with you, so choose the best size for you and carry it in your bag or backpack with a simple pencil. It is not necessary to buy an expensive sketchbook, because. you will have to do a lot of sketches and notes, and you will not even notice how quickly it will end. Buy something simpler so you don't have to worry about the cost. Sketchbook catalog from web-paint.
The best place to start probably at home. Your family members are ideal sitters because they are easily accessible and often engage in less active activities such as reading or watching TV.
 In order to keep your "models" ready to pose, it's best not to spend too much time on each drawing. Each sketch must be done no more than 10 minutes. This is of great importance, because At this stage, quantity is important, not quality. You will quickly learn how to capture the essence of a pose or character in a few strokes and your work will be very realistic.
After doing a few sketches in a familiar environment, you will soon feel confident enough to take your sketchbook outside. Find a suitable secluded spot for yourself where no one will disturb you and try to make some sketches.
You should get into the habit of drawing all the time. Whenever you have a free moment, take out a sketchbook and sketch the people around you: standing at the bus stop, sitting in a cafe or at work is a good opportunity to sketch people nearby. A pencil or ballpoint pen is ideal as a tool.
 Use only one side of the paper. There are three reasons for this. First, cheap paper shows through, so the lines you draw on one side can affect the quality of your work on the other. Secondly, even if you use good quality paper, the pencil drawings on the back pages will rub off the roughness and spoil each other. The third reason for using only one side is that in due course you can take apart your sketchbook page by page and compare one work with another to check your progress.
At first, you will have no more than a tilt of the head or a turn of the shoulders before the subject starts to move. This is normal: everything you do contributes to the growth of your knowledge of the human figure. These details may not seem very valuable, but they are. If you are able to portray a unkempt-looking young man slumped in front of a bus stop or a tired old woman burdened with shopping, your work will have authenticity, because the essence of character lies precisely in the subtlety of such details. You will be surprised how easy it is to notice and how it will be appreciated by everyone who sees your work.
 Your sketchbook should serve as your personal document. In fact, many artists also take notes in it and add comments to sketches, thereby increasing their usefulness later, especially if the sketch is to be used as the basis for a finished drawing.
Do not strive for neat, well-groomed drawings, artistically arranged on the page. Your album is not for that. Now your goal — capture character and the position of the selected object within a few minutes. Pick someone who is likely to stay in the same position for a while longer and get to work. Do not be shy. Do not try to make attractive lines, this exercise is to quickly capture the moment. Your sketches should be a real pleasure to see and sketch the life around you, as well as help you develop a sharp eye and a confident stroke.
If you've never tried sketching, you might think it's hard work, but it's not. This is the most enjoyable and most rewarding activity. It relaxes and invigorates, and is also a means of improving drawing skills.
 Always keep a sketchbook with you, wherever you are. This is so important that I won't get tired of repeating it. Draw people waiting on a train platform, or people sitting on a park bench, or your family members watching TV. In bars, restaurants, cafes and on the street you can see people of various sizes and builds. Tag them in your scrapbook and you will never regret it. Sketching is not only fun, it's also the best way to expand your knowledge and skills. If you want to create living realistic works, this should become a habit. Sometimes it is worth including the background and surrounding details in the sketch. It could be surrounding trees or buildings. When you start drawing from your head, this experience will be very valuable.
 As we progress through the course, we will periodically return to this topic, drawing sketches from life. Without this exercise, your powers of observation and your drawings from memory will gradually deteriorate until they are little more than a series of clichés.
Practical task
Make at least 20-30 sketches of different people in different settings. I do not advise you to move on to the next lesson until you complete this task. This exercise should become your regular daily workout.
The article used materials from the book Ron Tiner "Figure Drawing without a model".
If you have an irresistible desire to learn how to draw, you should start with sketches. A sketch is the beginning of any drawing and even a picture. Before creating a work of art, most creators collected complete sketchbooks that showed what each character in the picture would look like, their environment, layout and color palette.
After all, a sketch is a kind of artist's notes, a fixation of thoughts about the life around him in general and some future work in particular. A good artist always walks with a notebook so that he has somewhere to draw a new impression.
This article will tell you how to choose the right object, what tools you need, give advice and show examples to a novice sketcher.
Tools
Anything is suitable for sketching, even a napkin and a toothpick soaked in espresso. But since we are learning, it is best to take thick paper (for drawing) A4 format, no more, pencils of different densities, an eraser.
An object
Of course, anything can become an object for a sketch, but first you need to choose an object that is motionless, independent of natural light sources, accessible. That is, you should not choose animals (the first sketches will be created for a long time, the horse will not withstand so much).
Houses, benches, sculptures are also not a good choice for a first sketch. Drawing sketches implies the placement of light accents, but what if a cloud suddenly comes up or, on the contrary, suddenly clears up?
The best option is a mug, a toy, a flower on your desk under a lamp. You can also take the finished one and try to draw it, for which you also first need to make a sketch.

The tools are ready, the object is selected, we can begin.
How to draw a sketch?
Imagine your subject without details, as if you were looking at it in the dark. You can practice by turning off the lights. What remains the main thing? What lines, contours, shadows indicate that this is a mug, and not a bucket or a cactus? Got a performance? Forward!
Determine the center of the sheet, draw two lines through this point - a vertical and a horizon.
Now determine the approximate center of your sketch (after all, the subject can be asymmetrical and stand above or below the horizon line), so draw two lines. Now you will not get lost in space.
We proceed to the image of the object itself, its contours. To begin with, you can not even draw lines, but dots or dotted lines.

When they reflect the shape of the object, circle them in the main one.
The next step is placing shadows on the object and defining it in space. The example shows the creation of a sketch of a fictional girl (character), but if your mug is on a pedestal, its edge is chipped off, and behind it is an openwork napkin, all this - albeit in general terms - should be clearly visible.

Even a fantasy hero on a sketch should have all the details worked out, because a sketch is an instruction for creating a drawing.
If there is a desire or need, you can finish the sketch with color accents. You can paint with anything, do it in sufficient detail or just apply color spots.
Regular classes will certainly lead to the fact that soon you will get original, original, informative sketches, and most importantly - very quickly!

Another exercise is "five lines" - allow yourself to depict an object with only five lines or less. Trying to fulfill this condition is better when you already have some experience. Choose objects that you see fleetingly (from the window of the minibus, passing in the elevator) - train your visual memory.
Try and don't give up, sketching is fun!


, poultry farming")


- Burns, Robert - short biography
- The concept of common vocabulary and vocabulary of limited use
- Nancy Drew: The Captive Curse Walkthrough Nancy Drew Curse of Blackmoore Manor Walkthrough
- Deadpool - Troubleshooting
- Won't start How to Survive?
- What to do if bioshock infinite won't start
- Walkthrough Nancy Drew: Alibi in Ashes
- Spec Ops: The Line - game review, review Spec ops the line crashes on missions
- Room escape level 1 walkthrough
- Processing tomatoes with boric acid How much will 2 grams of boric acid
- Cucumber Grass (Borago)
- Bioinsecticide Lepidocid: purpose, properties and application procedure Lepidocide waiting period
- How to change the language to Russian in steam
- Dendrobium noble: room care
- Morphology of plants general concepts - document
- Planting, propagation and care of bamboo at home, photo Growing bamboo from seeds
- How to strengthen the cellular signal for the Internet in the country
- Sanskrit reveals the forgotten meaning of Russian words (2 photos)
- The oldest language Sanskrit programming language of the future Dead language Sanskrit
- Who has dominion over all the earth?