How to learn to draw portraits of people. How to draw a portrait - step by step tutorial for beginners
Today's lesson is devoted to such a type of drawing as a portrait. A portrait is an image of a person or a group of people that exists (or existed) in reality. The main task of the portrait is to repeat the lines of a living face with an artistic interpretation. For example, I took a photo of a wonderful American singer, actress Debbie Ryan. Here is her photo: I will say right away that the portrait is one of the most difficult types of drawing, since we have to convey all the features of a person. If you don’t succeed the first time, don’t be discouraged, people learn from mistakes =). So let's try draw a portrait of this girl step by step with a pencil.
STEP 1. Start drawing with a circle describing the face. On it, apply light strokes where the eyes and nose will be located.  STEP 2. Now, with light strokes, sketch out the contours of the real shape of the head. Please note that it has a slightly square shape. Add bangs tilted to the right side like y.
  STEP 3. Let's move on to the outline of the elements of the face. Sketch thin eyebrows, upper eyelids, and eyelashes with strokes. Then start drawing the nose. The nose is a very important part of a portrait that is sometimes overlooked by beginners. This element can drastically change the entire portrait as a whole. We'll take a closer look in the next lessons.
  We step further. 4. It remains for us to finish sketching the eyes. Here you need to carefully outline the eyeballs. Add also cilia and upper, lower eyelids. STEP 5. You are almost there. Now we have to draw the mouth. Look closely at her lips. (Do you want to learn how to draw lips correctly? Then read the lesson: How to draw a smile) We draw folds on the skin to show her emotions, a smile. The lips are slightly raised. The edges can be shaded a little with a pencil. STEP 6. The last thing we need to do is a hairstyle. She has long straight hair, slightly wavy. Try to draw with smooth lines, and you can also add some thicker lines to create the effect of voluminous hair. After all that has been done, we erase the auxiliary lines with an eraser, refine the edges. We should get this picture:
  I hope everything worked out for you. Ask questions about the lesson. Show off your masterpieces! Leave your comments below, write what pencil drawing lessons you still want to see. I recommend taking the following lessons:
A familiar artist said that if you draw for 30 minutes every day, after 2 years (350 hours) you can learn to photograph anything. I believed.
Mistake #1: To learn how to draw, you need to be able to draw a straight line and a round circle. I read it on my head in a sucky article. The lines I still have are crooked and the circles are not round. So what? Look at my honest eye, not bad for crooked hands.
Mistake #2: Learning without a plan or purpose. I tried to draw several times: I drew “non-circular circles”, I immediately took up the portrait - until I realized that it was not mine. Demoralization guaranteed. Faith in your crooked hands and mediocrity only grows stronger. Until the age of 28, I believed that I had no “talent”.
For a beginner adult, the question “How to learn to draw?” turns into "How to learn to draw?". And behind him arises - "What to copy?". You need a step-by-step plan, a list of pictures for each day. If you sat down to study, you should know what you will draw so as not to get stuck on choosing the right picture.

For a beginner, it is important to learn how to draw in stages. Not just today I draw Homer with a pencil, tomorrow Mickey Mouse. No. The difficulty must increase. I looked for a plan in bookstores, chose a book. Basically, there is an academic drawing: 10 pages of theory and 1 example. Instead of step-by-step illustrations of what to do and how to do it, a mountain of text and recommendations - how to hold a pencil, which pencils to choose, what strokes there are - sucks. I want to learn how to draw something simple and fun, and it's like they're preparing me for an art academy.
And hooray, Mark's book caught my eye: "You can draw in 30 days", with a bunch of step-by-step examples, with a minimum of theory. This course is the most powerful I know if you want to learn how to draw with a pencil on your own. Without a drawing plan, there is little chance.
Why learn to draw
I started drawing the following drawings in the belief that I was mediocre at drawing. But because I know that almost everything I know about myself is not true. I decided to double-check myself: do I really have crooked hands or did I suffer so much at school.

Sphere
The main drawing element. We draw shadows and half-shadows of the sphere.
The time indicated is taking into account the reading of the textbook. Drawing itself takes half the time.


Cube
Basic building brick of any pattern.


Cube modifications


Drawing a texture with a pencil


Flags and rose


Draw cubes - advanced level


Drawing Spheres - Advanced
From this stage you obligated to buy shading - paper pencil. In the previous tutorials, I blended with my finger, then with a #3 feather.
All the magic of penumbra: volume, small shadows in the corners, when drawing an eye and a portrait - thanks to shading. Your drawing ability will seem to be multiplied by three! You'll be blown away when you compare your results.


Flags, scrolls


Cylinders: volcano, cup

Draw a living tree

Room in perspective

Street in perspective

Drawing in the central perspective: the castle, the city


Perspective lettering

Learning to draw a portrait

Learning to draw a hand

Exam: first portrait!
Drawing people is much more difficult than drawing roses or anime. The face must not be distorted - every mistake is immediately noticeable. You need to learn how to draw people when you feel confident that you can draw a recognizable outline and sketch of a face.
Portraits cannot be drawn quickly, diligence and care are required. Here is the portrait of my wife:

Learning to draw pictures from scratch
I painted eight paintings in total for a day, half the time. I also practiced with a pencil for one day. It takes 50-150 hours to learn how to draw to the same results, even if "hands grow out of your ass." In terms of serials, this is 2-3 seasons of Dr. House.
Vasya Lozhkina painted the first acrylic painting “And I like you” for 6 hours. What is acrylic and how to deal with it - I did not know. I also held the brush for the first time after school.
It is not easy to knead the desired shade. Quit everything because it doesn’t work out - I was torn every half an hour. You need someone to support you. I went to study at an art studio and drew under the supervision of an artist. A year later, a couple of times I took drawing lessons online from the same teacher.

I learned to draw with a pencil, and the skill turned out to be complex. I took a brush for the first time after school and painted. Long 6 hours, crooked, but how cool! Now I can make an extraordinary gift - draw a picture for a friend, a bookmark in a notebook, a caricature for work. Even did a little cartoon.
First painting: pastel, acrylic, gouache and oil. All techniques are from scratch, and hanging on the wall is not a shame.

How to learn to draw correctly - algorithm
Learning to draw with a pencil is the base: demolish angles, line sizes, respect proportions. Just learn not to be afraid to draw. Master the initial level, and then only more fun and easier.
How to learn to draw
We draw with gouache.
Matte color, thicker than watercolor, is also diluted with water. Great for beginners: it's easier to fix inaccuracies than watercolor. Cheap material.


We draw acrylic paints.
The most accessible professional material. Acrylic dries quickly, 5-15 minutes. It is easy for them to apply a second layer, to correct flaws. If it is of good quality, then it is resistant to water.
Acrylic paint on canvas. You can also outline anything: a wall, a stool, a cup, a helmet, an ashtray, a T-shirt, photo frames. I recommend then to open the work with varnish from a can.

We draw pastel - dry and oil.
The technique of drawing with pastel is unusual - you need to draw with crayons, rubbing them on paper.

The technique of drawing with oil pastels is similar to drawing with pencils, but has its own characteristics.

We draw with oils.
Complex professional paints. Durable, but you can’t buy cheap ones - they crack.
It dries for a long time, about 2-10 days. This is a plus - you can always remove the layer, draw, shade. But also a minus, you need to very carefully apply a layer on top so as not to spoil what is. I do not recommend their use for beginners.

We draw with a simple pencil.
Fundamental drawing tool. Almost all illustrations, sketches and paintings are first drawn in pencil. Then it is rubbed down to barely visible lines, or on top we draw with paints. Errors are easily corrected. #1 for beginners.
We draw gel pens.
A simple tool for drawing in color. The technique of drawing is similar to the technique of drawing with a pencil - after all, a pen, not a brush. Errors can only be corrected in Photoshop.

We draw with felt-tip pens. Analogues: markers and professional "copics".
More variety of colors than gel pens. The set will cost less. After 1-2 years, the felt-tip pens dry out and you need to buy a new set.

Felt pens soak the paper a little and it starts to sag, because of this I don’t like to draw with them. You can point 2-3 times and the line becomes more saturated, you can draw penumbra.
We draw with watercolors.
Cheap materials, and familiar from school. They are diluted with water, so a new layer of paint blurs the previous one. It is difficult to master how she will behave. From scratch, on your own, it's not easy to learn how to draw details. The advantage is availability.
Are you able to learn how to draw with a pencil? . Find "Why?", buy a textbook and draw for fun. In a month - be surprised at your abilities.

This is the second lesson of the Spanish artist Luis Serrano, the first was on drawing a male portrait.
We will be painting a portrait of actress Audrey Hepburn from the legendary film Breakfast at Tiffany's (1961). For the lesson, we need B, 3B and 6B pencils, an eraser, Canson Marfil paper.
To get a well-drawn portrait, it is necessary, first of all, to draw a good sketch. To do this, we must correctly display all the details of the face and proportions in order to achieve a resemblance to the photo. Only in this way will we achieve the best result. If we make a bad sketch, there will be a high probability that our portrait will not turn out. Draw guide lines to make it easier to sketch.

We make a sketch with a pencil B, trying not to put much pressure on the pencil. We start drawing from the left eye, if you are right-handed (if left-handed, then from the right).

We draw other features of the face, constantly comparing with the original and trying to maintain proportions. Try to erase less with an eraser, because the paper gets dirty and deteriorates.

The similarity of the sketch is not very great, but we see that the main features and proportions are conveyed correctly. After you finish the sketch, take a break and look at it with fresh eyes, if everything suits you, move on.
Step 1. Let's start drawing the eyes. We begin to draw the eye with a 3B pencil, namely the pupil and eyelashes. We draw the eye, which is located on the left hand.

Step 2. Look carefully at the top of the eye, the pupil and the eyeball are darkened up the most. the eyelid always casts a shadow, and because of this, the eye does not look flat. We draw eyelashes. First draw a thick line, then add small strokes with a pencil, imitating eyelashes. Make shadows on top of the eye, as well as in the corner of the eye.

Step 3. We draw the second eye, as well as eyebrows. Then we start drawing the nose. All are drawn with a 3B pencil, unless otherwise noted. He starts painting with the nostrils, trying not to make them too big and enlarged so that the nose does not look like a pig. Apply soft shadows on the right and bottom of the nose to give volume to the nose. Shadows should be soft to convey the tone of the photo. We apply shadows on the face on the right side.

Step 4. We continue to shade the face, apply a shadow under the nose and slightly highlight the notch above the upper lip. Very gently and softly apply the shadow on the cheek on the left side. Then we draw the mouth - this is a difficult task, especially if it is open. Fortunately, her teeth are barely visible, so it will be a little easier for us. First of all, we draw the area inside the mouth, do not enlarge the teeth when drawing. When drawing the inside of the mouth, you can use a softer pencil to give it a darker shade. Then we begin to draw the upper lip, creating shadow transitions.

Step 5. Draw the bottom lip. First, shade the upper and lower area of the lower lip, so that the center is untouched, remaining white. Then, with separate strokes, repeating the shape of the lip, we apply shadows on the lower lip, creating an imitation of a glare.

Step 6. Apply shadow to the chin.

STEP 7. Now let's start drawing the hair, for some people this causes panic. But it is necessary to draw the hair in order to achieve the completeness of the portrait, because. traced facial features and underdrawn hair create a terrible impression, it doesn’t eat well. First we will draw the ear, then we will look at the photo and define the dark areas of the hair, then we will draw them.

Step 8. Then darken the lighter area of the hair with a softer tone, the strokes should be uneven. Then we draw lines between the dark areas to simulate the shine of the hair.

If you look at the top of Audrey's head, you will see the result of these actions. Hair, like everything else, has a shadow, brightness. bumps. A typical mistake for beginners is to draw a lot of hairs without defining dark and light areas of the hair, it turns out something like a hair brush. we make this mistake because we know that hair consists of many hairs, but when we look at them, we don’t see every hair, we see the big picture, they become like a whole, having curls, strands. Draw the rest of the hair based on the above.

Step 9. We draw a bang, then draw an earring with a patch of light in the form of a star.

Step 10. We draw an earring, its details are not clear, because. the image is too contrasty and a lot of detail is lost.

Step 11. We apply a shadow on the neck, it should be dark enough so that it can be seen that this is a shadow.

Step 12 Now let's move on to the hand. Many people hate to draw them because don't understand how. In Audrey, the details of the hands are barely visible, we will draw them that way too. We begin to hatch the back of the hand with a very light tone.

Add soft shadows to the fingers. I put a darker shadow on the joints, lightly mark the nails on the index and middle fingers, without going into details.

Step 13 Draw a cigarette. We apply shadows, focusing on dark and light areas.

Step 14. Now we will draw a necklace, but it is hard to see in the photo, so we will turn on the imagination and vision, without going into details, using sharp shadows, we will draw something similar to a necklace.

Step 15. Draw the dress, making the hatching tone dark. In the lower part we make a smooth transition so that it does not hurt the eyes. Then we apply shadows on the shoulder (the strip on the shoulder is the shadow from the nozzle on the cigarette). And we finish our work. We look at it, if you are more or less happy, we sign the work. We drew Audrey Herburn.

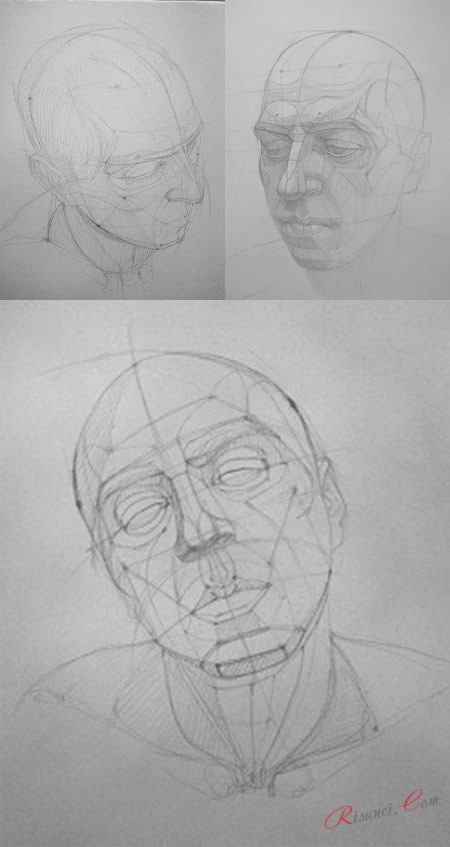
In order to master the portrait, we need paper, a pencil, and in extreme cases - in a very extreme case - an eraser. We use it only when we understand that we can no longer help the drawing with a pencil. Then we isolate ourselves from society - we ask those around you not to interfere with you - and solemnly start learning to draw a portrait with a pencil.
To make it more convenient to correctly understand and perform the drawing, it is better to adhere to a kind of " instructions for use».
First you need to make a detailed inspection of our subject of drawing - that is. It is necessary to carefully consider everything and think over the form ... Or better, make a couple of sketches so that it is more convenient to see the constructive form.
 It would be very good to draw nature itself in different positions, with different turns and angles. You can also lightly move the pencil over the subject of drawing in order to feel exactly how the shape is arranged.
Now an equally important part in the portrait is your place of work. It must be selected taking into account a convenient and acceptable view of nature. To begin with, it is better that nature itself be in a calm state - that is, no strong and unusual angles.
Composition layout
Now you need to compose the entire composition on paper. At this point, ours is working in an enhanced mode, because we will need to find places for individual parts of the composition - for heads and torsos.
We recheck the main volumes, detect rotations and the main, basic construction axes. Now we need to build the shape: first all together, then all in turn, and then all together again.
With each change or addition to the drawing, one must also remember the perspective ratio, the proportionality of the forms and the correspondence of these forms to each other. That is, you need to ensure that everything is harmonious.
Now we need to highlight the eternal opposition - in other words, we need to separate the light and the shadow. For this, a neat unhurried is used.
Modeling the shape of a portrait
The next step is to model the form with what we already have: overlying chiaroscuro and spatial vision. In the process of modeling various little things, it is important to remember that this little thing is part of everything, and, therefore, it must harmoniously fit into this “everything”.

As a result, you should get something like this
Like any student, you will find mistakes - do not hesitate, but do not be discouraged either. Now let's proceed to their analysis, and, accordingly, to the correction.
So, one of the most common mistakes, or rather even effects, is that the work is very dark, overdrawn. The second effect is airy forms, they are, as it were, wadded, not like real ones. This pattern is also called cast iron. It's all about the proportions. Well, besides, construction lines can be overly expressed.
Such defects can be caused by artist's problems with chiaroscuro. Or rather, even with chiaroscuro on the volumes. After all, he is trying to correctly convey the volume of the head, but he does not manage to separate the particular from the general, that is, to impose a shadow not only over the entire drawing, but also in separate parts so that it looks acceptable.
It may also be a mistake that the person who is trying to draw a portrait cannot connect the individual details into a general picture in any way and the drawing looks ... as if torn. The draftsman tries to "overwrite" this oversight with the help of hatching.
In other words, the draftsman should once again work out the drawing of details.
If the above effects occur in your drawing, then proceed to the methods of avoiding this. If, during the transfer of the form by hatching, you feel that something is wrong, immediately postpone work on the tonality and once again carefully consider the volume of the head. You can lightly go over the shape with a pencil, mark with accuracy any detail, inclinations, turns, indents, and so on. Thereby, you will be able to feel the interconnection of all areas with each other.
 Moreover, we turn on our logical thinking - not again, but again - and consider these very details of the head, that is, where it begins and ends, why this way and not otherwise. In addition, with the help of this analysis, you can still distribute light and shadow, as well as position in perspective. (which item is active is closer, and which is not).
This problem has been dealt with. Further, in a countdown: if you, having started to deal with the constructive form and volume, suddenly and suddenly felt discomfort (sudden urge to sneeze, go to the toilet, or drink water does not count), then choose one of the following options.
We try to mentally divide the object of drawing (the head in our case) by the bends of the form on the plane with a glance. This way it will be easier to model the volume.
Drawing details
We try to understand the essence of the form: how exactly it is arranged. Then we build the volume using any conditional planes or constructive lines (if you mix everything - it's not scary).
Again, it should come out no less well than in the figure:
Below is another drawing, which is slightly overdrawn, but it is much more convenient to consider, as an example, work on head volume, tone and details.
It is very difficult to put them in the holes intended for them - they usually come out either flat or bulging, like a frog.
So, when drawing eyes, you need to remember about their design - that they have a voluminous eyeball, lower and upper eyelids, superciliary arches, which tend to cast a shadow on the eyes.
It is also not easy to distribute chiaroscuro on the hair: for example, the upper part of the hair is lightened, while the temporal part is hidden by penumbra. Hair on the temporal line is worked out especially clearly, because it is there that the head goes into the back of the head - this is how we show the bulk of the hair.
It is very important to successfully search for the proportions of volumes - both in general and separately, details, the mutual proportionality of these details. The fact that proportionality is not found or distorted, you will understand if you cannot recognize your nature in the drawn portrait.
 I repeat again: therefore, do not hesitate to work on them first. The most important thing in is the main proportions, volume, all sorts of planes and constructive points.
You can catch the volume of the head of the passerby you are interested in ( or a passerby), favorite actor or just a little man from advertising ( no, so what? a good way to turn long minutes of commercial break into an interesting and useful activity).
div > ", delay:300)">
We study the structure and proportions of the face and head, pay attention to the muscles of the face. We also draw and learn all the features of the parts of the face and head - eyes, nose, lips, ears, etc.
Knowledge of the structure of the skull is essential in order to draw good portraits. We study the structure of the bones and muscles of the head. Creating an expressive portrait using different shading techniques.
We will pay great attention to the study of chiaroscuro. Using a combination of light and shadow, we can create the impression of depth of space, volume and density.
The study of the proportions of the head.

Draw the head of Venus with a pencil. Full face.
What makes a good portrait? Lighting and contrasts are of great importance when drawing a portrait. You will learn to see an object as a form. What the different parts of the face look like, what are their sizes, what shapes are there inside the larger shape, how do they interact. Everything you draw from now on should be puzzle pieces that, when combined, create a complete picture. You only need to decide for yourself what shape they are and how dark or light they are. In this lesson, you will see how this applies to drawing a human face.
Consider the basics of the structure of facial details and the principles of their image (eyes, eyelids, eyebrows, ears, nose, chin, neck).

Draw a portrait with dry pastel(soft material) according to the pictures.
You will learn how to draw with pastels. We work on tinted paper.
Let's talk about different styles of portraits.
You will also learn how to draw people of different ages and convey human emotions on paper.

Sketching a portrait with markers.
Sketching is a quick drawing technique. It allows you to perform quick drawings, reflecting the composition and main ideas, conveying emotions and atmosphere.
You will learn how to draw with markers and create stylish drawings.
During the lesson we will draw 1-2 works. A4 format.
The portrait is one of the most compelling and challenging genres for a sketch artist. After all, sketches are a rapid process, without many hours of clarification and study. So, you need to grab and convey the character literally in a couple of lines. But it is this airiness that captivates the viewer. Many sketchers, feeling confident in their abilities, sooner or later turn to the portrait genre, and some go completely into it.

Sketching a portrait in watercolor.
We use watercolor, watercolor pencils and a liner.
Sketching is a wonderful skill that helps you quickly, efficiently, beautifully and coolly transfer your idea from head to paper. In other words, sketching is a unique tool for realizing your ideas.
Let's draw 1-2 works of A4 format.
Often a portrait made using the sketching technique turns out to be more lively and realistic. The reason is that we work on sketching with the heart, not with the head. We capture the very essence and character of the face, draw with minimal means, but more capaciously, without much thought and a passionate desire to get exactly in proportion.

9th and 10th lessons
You are drawing portrait from your photos. Draw the one you want to draw (relative, acquaintance, self-portrait).
You choose the material yourself - pencil, pastel, watercolor, charcoal. and you can draw one work in 2 lessons, or 1 work in each lesson. A4 or A3 format (your choice)


, poultry farming")


- Burns, Robert - short biography
- The concept of common vocabulary and vocabulary of limited use
- Nancy Drew: The Captive Curse Walkthrough Nancy Drew Curse of Blackmoore Manor Walkthrough
- Deadpool - Troubleshooting
- Won't start How to Survive?
- What to do if bioshock infinite won't start
- Walkthrough Nancy Drew: Alibi in Ashes
- Spec Ops: The Line - game review, review Spec ops the line crashes on missions
- Room escape level 1 walkthrough
- Processing tomatoes with boric acid How much will 2 grams of boric acid
- Cucumber Grass (Borago)
- Bioinsecticide Lepidocid: purpose, properties and application procedure Lepidocide waiting period
- How to change the language to Russian in steam
- Dendrobium noble: room care
- Morphology of plants general concepts - document
- Planting, propagation and care of bamboo at home, photo Growing bamboo from seeds
- How to strengthen the cellular signal for the Internet in the country
- Sanskrit reveals the forgotten meaning of Russian words (2 photos)
- The oldest language Sanskrit programming language of the future Dead language Sanskrit
- Who has dominion over all the earth?