How to draw realistic rain. How to draw rain How to draw sad rain
This phenomenon is easily explained, but mere mortals refuse to accept scientifically based facts on faith and come up with their own explanation of what is happening. It is easier for them to believe that this is a magical ritual, or they send rain on the sinful earth. Therefore, before drawing rain, I will try to dot all the e and restore the status quo. So, rain is a phenomenon seen only in our solar system due to the presence of ashdwao on it. This phenomenon brings a lot of benefits and joy. For example:
- It washes away dirt, makes the world a bit cleaner. Sometimes, on the contrary, it makes big puddles and a lot of dirt, but this also brings only a lot of fun, especially for kids;
- He makes people sad and even write poetry.
- It acts as a natural sedative. British scientists have proven that the sound of rain has a positive effect on the nervous system;
- He also inspired the legendary composition of Yuri Shevchuk called Rain. (In case anyone does not know this is a group of DDT). Before writing this lesson, I myself listened to it several times. I recommend it to you, it is very inspiring and thought provoking.
Even during such atmospheric phenomena, thunder and lightning are also observed, but this makes it even more mysterious and epic. They are more difficult to draw and in the future I am going to make such lessons. In the meantime, I hope you find this tutorial helpful:
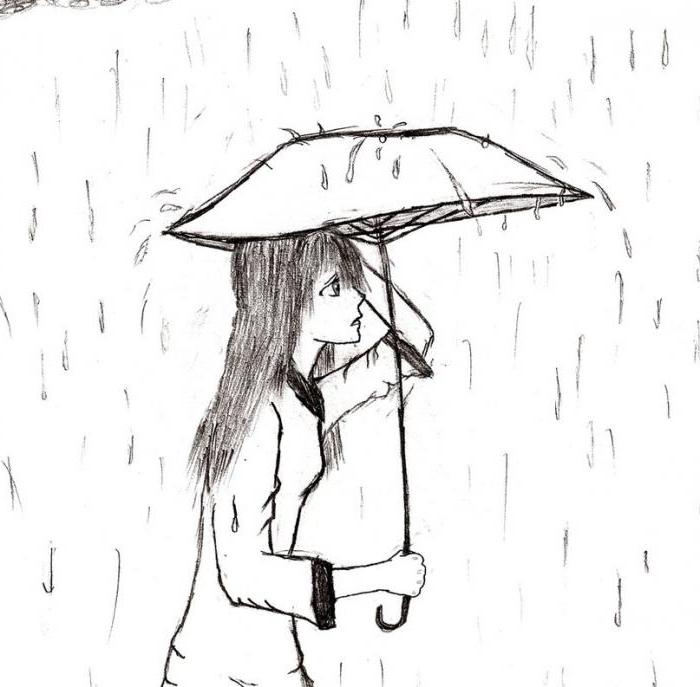
How to draw rain with a pencil step by step
Step one. Let's mark on paper the location of the girl and the umbrella.  Step two. Let's draw the details of the umbrella and the girl's body.
  Step three. Let's add droplets and shading.
  Step four. Let's add more droplets, remove the auxiliary lines and correct the contours. That's all.
  What else can I recommend to you? We have such lessons, try to portray.
Drawing water drops that look like real ones is not difficult. To do this, you need to remember a few rules that professional artists use. The image of an object is formed in the human eye is formed by different colors and amounts of light. To get a three-dimensional figure like a drop, you need to create an image on which an imitation of light and shadow will be made.
First, cover a sheet of paper with a solid background and draw a circle on it with a simple pencil. The circle should not be too even to make the drop look natural. The figures show a view of the drop from above, from the side, and in flight.
.jpg)
.jpg)
.jpg)
.jpg)
.jpg)
Take a darker color than the background of the picture and draw a crescent-shaped shadow under the drop. Add some dark paint to the top of the drop on the opposite side. Add a blue tint to the drop to make it more like water. Use for this very pale paint, thickly diluted in water. Add the same blue tint to the piece of shadow that is in contact with the drop from above. Emphasize the outline of the drop using brown paint. At the end of the work, add a highlight inside the drop with white paint.
.jpg)
How are drops formed?
Clouds are made up of microparticles of water and tiny ice crystals. One cloud may contain several tons of moisture, but it is not necessary that the water inside it will unite. From such a cloud, not a single drop may spill. As the cloud moves and rises, the temperature changes. Warm air cools and water vapor condenses. Droplets gather around dust grains and other particles called condensation nuclei. Moisture microparticles interact with each other and combine. When the connection becomes heavy and gains weight, it falls to the ground. Most do not reach the ground, but dissolve right into the air. Large drops reach 6 millimeters in diameter and fall at a speed of about 7 meters per second. Small drops are called drizzle. They sink to the ground very slowly and in winter they can turn into snow on the go. Such a process was observed by modern scientists with the help of cameras raised into the air on aircraft and carried out macro photography.
While waiting for the rain to stop, I took some photos with my phone. On the collage attached to the text, you can see how different they turned out.
The peculiar shower ended after five minutes, but during this time its intensity changed several times. The photo shows that the lighting also varied.
As the rain intensified, the lights dimmed considerably, and the top right image is blurry. It is dominated by red-brown tones. As soon as the downpour subsided, white clouds appeared in the sky, throwing their reflection onto the shiny wet asphalt. All photos were taken around 7pm.
From reference to painting
Upon returning home, I was determined to include in my picture the best details captured both in memory and in the photo. The list includes: a flat, pale sky typical of a shower, warm shades of red and brown in the third image, mud streaks on the asphalt, bubbles and a colorful reflection in the puddles of the intersection, two silhouettes jumping over these puddles, and a hazy background. Based on the collage, I made two study sketches with graphite.

As a result, the second option seemed to me the most acceptable for the correct arrangement of light and shadow.
Easy way to write rain | Scratching method
Almost at the very end of my work, when the canvas was already dry, I scratched vertical dotted lines with a knife. This gave a believable raindrop effect.

OK it's all over Now. Now you know an easy way to paint (or rather scratch) rain with watercolors.
Everyone perceives rain differently. He makes someone sad, another has fun, jumping through the puddles, and the third generally begins to write poetry, inspired by the cloudy atmosphere. Have you ever wanted to depict this natural phenomenon on paper? Consider how to draw rain with a simple pencil and
We prepare materials
First, let's lay out in front of us on the table everything that can be useful in the drawing process. The workplace should be well lit and free from unnecessary things.
So what tools do you need:
- Sheets of paper.
- Simple pencils.
- Eraser.
- Colored crayons, pencils, markers or
- Tassels.
- Glass with water.
- Palette (a small board for mixing paints).
- A picture of rain (if necessary).
Learning what rain looks like
Before you draw rain, you need to get to know him better. This will help make the drawing more realistic. Find different pictures depicting a downpour, drizzling precipitation and look at them carefully. If possible, catch a drop of rain with your hand or clothing. Take a good look at the trail of fallen water. See what the drop looks like. Is it big or small, round or elongated, transparent or colored? Rain is especially beautiful in sunny weather, when it shimmers with all the colors of the rainbow.
When you draw a downpour or drizzle, remember what drops you saw. This will make it easier to concentrate and complete the landscape.
What is characteristic of rain
Be sure to consider all the details that you need to draw. It rains in cloudy or sunny weather, in a wooded area or in an urban area, it rains heavily or not very much. All this will affect the drawing. Unless, of course, you want to make it realistic.

So, what features are important to consider when depicting rain:
- Overcast and gray dominance.
Usually, when it rains, the sky is covered with clouds so that the sun is not visible. In this case, the picture must be done in a restrained color scheme with a predominance of gray. Darker colors should be applied to all painted horizontal surfaces, thus simulating moisture.
- Contrast.
Nearby objects must be clearly reflected in the picture. And the background objects will be hidden by the rain, and therefore they are practically invisible.
- How to draw rain depending on the terrain.
On asphalt or concrete surfaces, puddles accumulate faster. The earth absorbs moisture well. But this does not mean that there is no need to draw puddles in the forest and field at all.
- Reflections.
In puddles, even the smallest, nearby objects will always be visible. How to represent it on paper? Just duplicate the mirrored objects with elongated vertical spots.
- Additional attributes.
Rain can be accompanied by lightning, water circles and people running under umbrellas.
How to draw rain with a pencil in 10 steps
- Step one. First think about what you want to draw. For example, a person walking in the rain.
- Step two. Draw a horizon line with a pencil.
- Step three. Sketch the silhouette of a man or woman. The head may not be visible, because the person is hiding behind a newspaper or an umbrella.
- Step four. Sketch an umbrella or newspaper.
- Step five. Mark the background objects (road, houses, clouds, trees, lanterns, and so on).
- Step six. Now draw in detail a person with an umbrella (or a newspaper).
- Step seven. Erase unnecessary lines with an eraser.
- Step eight. Draw background objects.
- Step nine. Add hatching and shadows.
- Step ten. Draw the rain itself. It can be depicted with frequent hatching, long lines, dashes with curved tips, or ordinary drops. In all the pictures in the article, the rain is drawn differently, pay attention to this.
The pencil drawing is ready. If you wish, you can give it a color. By coloring only individual objects, you will convey a special atmosphere in the picture.
How to draw rain in stages with watercolors
The drawing will immediately begin to be done with paints. Don't be afraid to work without a simple pencil! So let's get started.
- Step one. Draw a cloud with gray paint. This will make it clear where the rain will come from.
- Step two. Dilute the blue paint a little with water on the palette. You should get a liquid consistency, a little fluid.
- Step three. Dip the brush into the resulting paint and draw the contours of small drops. Draw in rows in a vertical order, moving better from top to bottom.
- Step four. Draw drops of medium size.

- Step five. And then the biggest ones.
- Step six. Now fill the drops with blue paint, slightly diluted with water. This will give a transparent effect.
- Step seven. Let the drawing dry.
- Step eight. For large and medium drops, make white highlights with a slight movement. The rain turned out to be real.
How to draw pouring rain? Decide on the slope of the drops. Draw them with thin vertical lines along one oblique.
As you can see, rainy landscapes are not as complicated as they seem.
Drawing an autumn landscape in stages
Drawing master class. Landscape-mood "Late autumn"
Kokorina Elena Yuryevna, teacher of fine arts, Slavninsk secondary school, Tver region, Torzhoksky district.
Purpose of work: the drawing master class is intended for children from 10 years old, teachers of fine arts and teachers of additional education. The drawing can be used to participate in competitions, exhibitions, interior decoration or as a gift.
Target: execution of a landscape on the theme "Late autumn"
Tasks:
to develop the idea that through the selection of colors it is possible to convey in the drawing a certain weather and mood characteristic of a rainy late autumn;
to form the skills of wet toning paper with watercolors;
to cultivate interest in landscape painting and in the process of drawing itself.
For work we need: landscape sheet, watercolor, water cup, brushes of various thicknesses and hardness (squirrel or pony No. 4, No. 2; bristles No. 8), wax pencils.

All rain and rain. puddles everywhere,
Streams are pouring onto the ground from the roofs.
Every day is cloudier and worse,
And from the sharp autumn cold
Don't know where to find shelter.
All the rain and rain ... the roses withered,
Flowers are frozen, do not bloom,
And there are only tears on the trees...
Another week and frost
They will come to us menacingly from the north.(M. P. Chekhov)
Late fall. Many consider this time boring, sad and sad. Probably so. Usually during this period it rains endlessly, the sun hardly comes out, the birds do not sing, the days look gray, it starts to get dark earlier. The trees are already completely bare, the leaves have flown around. The sky hangs low with gray clouds. But in late autumn there are very pleasant days. Suddenly the rain stops and it gets a little warmer, fog curls over the ground. Breathe easy...
Today I propose to draw a landscape that conveys the mood of late autumn, which Alexander Sergeevich Pushkin told us about in his poems:
The days of late autumn are usually scolded,
But she is dear to me, dear reader,
Silent beauty, shining humbly.
So unloved child in the native family
It draws me in...
For the picture, take a gray-blue tinted cardboard. With a black wax pencil, draw the basis of our landscape.
Let's start with a tree. Let's draw a trunk and branches.

Let's draw a horizon line.

Let's draw a house.

Around the house, a fence.

Let's draw the details of the house: windows, roof.

Draw several large leaves on the branches of trees.


We will also add a few leaves to the ground, and in the foreground - a small puddle.

Let's draw clouds in the sky.

Stage two: paint over the drawing with watercolors.
Let's start by filling the background. To get blurry tones, we use the technique of toning paper in a raw way.
I want to remind you the technique of toning in a raw way. Wet a sheet of paper with water in wide strokes with a wide brush. Then, on a wet sheet, we apply the paint of the color we need and the color of the picture that suits this color. We apply so that the borders of the paint touch, even slightly overlap each other. So with one color you can highlight the earth, and with another the sky, and the border between them is blurred.
When drawing gloomy, rainy, cloudy weather, we will use gray, black, purple, brown, dark blue ... a range of colors.
To fill the sky, we will use purple watercolor, iron blue and ultramarine.


We paint the trunk of the tree. To do this, we take black watercolor, natural umber and sepia.

Fill in the lower part of the picture. For autumn withered grass, we use natural umber and burnt sienna.


We paint the house. For the walls we use golden ocher and natural sienna; for the roof - kraplak dark red and sepia.


We make a drawing of the background. To do this, take a brush with hard bristles and use the “poke” method to draw trees.


With short strokes we set the texture of the blades of grass in the foreground.


Paint over the leaves on the tree and on the grass with golden ocher.

Shade the foliage of the trees with black paint and emphasize the texture of the trunk of a nearby tree.

For the puddle, let's take the same colors as for the sky: purple watercolor, iron blue and ultramarine.


On this you can finish the drawing, but I suggest the third stage: draw the details of the drawing with wax pencils.
We emphasize the gray clouds with a black wax pencil.

We introduce black, dark blue and purple pencils in the upper part of the sky. We put the strokes horizontally, easily. Emphasizing rather than overlapping the texture of the paint.


With a black pencil, we emphasize the trunk and branches of the tree.


Let's introduce a dark green pencil into the grass.

With a yellow pencil, we emphasize the shadows on the walls of the house.


Looking carefully at the picture, we see that there is not enough foliage on the tree. Therefore, we take a brush with hard bristles and golden ocher and, using the “poke” method, apply paint on the crown of the tree and under the tree.


, poultry farming")


- Burns, Robert - short biography
- The concept of common vocabulary and vocabulary of limited use
- Nancy Drew: The Captive Curse Walkthrough Nancy Drew Curse of Blackmoore Manor Walkthrough
- Deadpool - Troubleshooting
- Won't start How to Survive?
- What to do if bioshock infinite won't start
- Walkthrough Nancy Drew: Alibi in Ashes
- Spec Ops: The Line - game review, review Spec ops the line crashes on missions
- Room escape level 1 walkthrough
- Processing tomatoes with boric acid How much will 2 grams of boric acid
- Cucumber Grass (Borago)
- Bioinsecticide Lepidocid: purpose, properties and application procedure Lepidocide waiting period
- How to change the language to Russian in steam
- Dendrobium noble: room care
- Morphology of plants general concepts - document
- Planting, propagation and care of bamboo at home, photo Growing bamboo from seeds
- How to strengthen the cellular signal for the Internet in the country
- Sanskrit reveals the forgotten meaning of Russian words (2 photos)
- The oldest language Sanskrit programming language of the future Dead language Sanskrit
- Who has dominion over all the earth?