What to draw a portrait. Portrait Drawing Basics
This is one of the most difficult types of art. The physique must be studied in detail in parts. We have already considered some elements. Before you start, be sure to read these few recommendations from professional artists:
- First you need to think about the approximate location of all the elements
- For sketching, take a sharpened pencil of medium hardness (I used HB and 2B, write in the comments which pencils you used), which will allow you to sketch thin lines.
- Do not erase the sketch lines until the desired result is clearly visible.
- Keep proportions
- Note that the face has a pointed shape at the bottom and a more rounded one at the top.
- Practice! The more you train, the better you will learn to convey the necessary emotions and nuances of human facial expressions.
And now let's move on to the lesson.
How to draw a person's face step by step:
Step one. The face of this oval shape. First, make an oval and divide it with lines. The vertical line exactly in the middle crosses it, and the horizontal lines are arranged as follows. The first divides the face just below half, and the second still half from the remaining lower part of the face. We can't give exact measurements because everyone's faces are different. But the task of these lines is to outline (this is vertical), as well as the location of the lips (horizontal bottom line). Keep in mind that these will need to be erased later, so don't press too hard on the paper with the stylus. If you press hard on the paper, it will deform, and the drawing will look like a girl who is preparing for plastic surgery. (Will be )  Step two. Make indicative strokes at the place where. And also add lines for , and halfway between the nose and chin. Make the line that represents the lower lip wider.
  Step three. Let's move on to drawing. They are located just above the nose. The outer edges of the nose indicate where the inner corners of the eyes will go. Make a sketch as shown in the picture. There is another important factor to consider here. Human anatomy is arranged so that the distance between the eyes is equal to the size of another eye. This is indicated by the red arrow in the figure. Now let's add the eyebrows. Tip: even if one eyebrow is raised and the eyebrows are the same height, start drawing from the inside (points closer to the nose). To get an idea of how high the eyebrows are, add another imaginary eye above the left eye - this should give you more or less the correct height for the eyebrows.
  Step 4 Let's add a mouth. In the previous lesson, we already covered some points. For example, we tried to depict . But there is another important point, a lot of questions from novice artists about how big should the mouth be? Draw mentally two lines from the inner corners of the eyes down. This will be the approximate size of the company, with a smile it can be a little wider.
  Step 5. Now we erase the auxiliary lines that we made in the first two steps. Let's see what we got. In principle, the sketch is ready. Now it remains to decorate, add shadows.
  Step six. Give the shape of the face more specificity. Pay attention to the cheekbones and the shape of the chin. This woman has a strong chin, but try not to make it too strong or she will turn into a man. Draw black pupils, and add eyelids. requires focus. This is the mirror of the soul.
  Look closely at the animation. You will see in what sequence it is best to do this.
 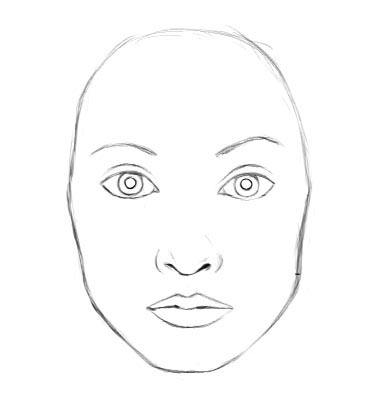 Step last. With a simple pencil, add shadows to give the drawing volume and make it more realistic. That's all. We will look at other parts of the human body in more detail in the following lessons. Leave also your work, and write comments about how, Only we have such lessons, see for yourself.
We can now take a close look at the details. And we'll start with the face. The face of a person is the first thing we pay attention to in any situation, and this also applies in a certain way to art: the observer will first of all consider a face with your characteristic features. Transferring a face to paper, especially drawing lively expressive expressions, is undoubtedly worth the effort.
In this tutorial, we'll get to know the main components face drawing - proportions, features and angle, and in the next lessons we will analyze in more detail the various facial expressions.
1. Proportions of the face
Full face:
In this position, the skull will be a flat circle, to which the outline of the jaw is added, which generally forms the shape of an egg, pointed at the bottom. Two lines perpendicular to the center divide the "egg" into four parts. To distribute facial features:
- Mark the midpoints of the left and right halves of the horizontal line. These points will be the eyes.
- Divide the vertical bottom line into five equal parts. The tip of the nose will be at the second point from the center. The lip fold will be at the third point from the center, one current below the tip of the nose.
- Divide the upper half of the head into four equal parts: the hairline (if the person does not have bald patches) will be located between the second and third points from the center. The ear will be located between the upper eyelid and the tip of the nose (if the face is at the same level). When a person looks up or down, the position of the ears changes.
It is useful to know that the width of the face is the width of five eyes or a little less. The distance between the eyes is equal to the width of one eye. It is uncharacteristic for people to have wide or too close eyes, but this is always noticeable (wide-set eyes give a person an innocent childish expression, and narrow-set eyes arouse suspicion in us for some reason). The distance between the lower lip and chin is also equal to the width of one eye.
Another criterion for measure is the length of the index finger above the thumb. In the diagram below, all lengths are marked according to this criterion: ear height, distance between the level of hair growth and the level of the eyebrows, the distance from the eyebrows to the nose, the distance from the nose to the chin, the distance between the pupils.

Profile:
From the side, the shape of the head also resembles an egg, but pointed to the side. The center lines now divide the head into front (face) and back (skull) parts.
From the side of the skull:
The ear is located directly behind the center line. In its size and location, it is also located between the upper eyelid and the tip of the nose.
- The depth of the skull varies between two dotted lines (as shown in Step 4).
From the side of the face:
- Facial features are arranged in the same way as in full face.
- The deepening of the bridge of the nose either coincides with the center line, or is located slightly higher.
- The most prominent point will be the level of the eyebrow (1 point from the center).

2. Facial features
Eyes and Eyebrows
The eye is built from two simple arcs, shaped like an almond. There are no strict rules here, since the shape of the eyes can be completely different, but there are general recommendations:
- The outer corner of the eyes is higher than the inner, and not vice versa.
- If you compare the eye with an almond, the rounded part of the pupil will be from the side of the inner corner, decreasing towards the outer corner.

Eye Details
- The iris of the eye is partially hidden behind the upper eyelid. It crosses the lower eyelid only if the person looks down or squints (lower eyelid lifts).
- Eyelashes curve outward and are shorter on the lower eyelid (actually, it is not necessary to draw them every time).
- If you want to depict the oval of the lacrimal canal in the inner corner of the eye, as well as show the thickness of the lower eyelid, this is entirely up to you; Too much detail doesn't always look good. The addition of such details is proportional to the complexity of the drawing.
- The same can be applied to drawing the crease of the eyelid - it adds expressiveness and makes the look less anxious. I think it's best not to add a crease if you're doing a stylized drawing or if your drawing is too small.
The eye in profile is shaped like an arrowhead (sides may be concave or convex), with a slight indication of the upper eyelid and, optionally, the lower. In life, we do not see the iris in profile, but we see the white of the eye. When I was working on the lesson, many said that “it looks strange”, so the iris still needs to be marked.
As for the eyebrows, it's easiest to draw them after the eyes to repeat the curve of the upper eyelid. Most of the length of the eyebrow looks inward, and its tip is always a little shorter.
In profile, the shape of the eyebrow changes - it becomes like a comma. This "comma" continues the level of the lashes (where they curve). Sometimes the eyebrow seems to be one with the eyelashes, so you can also draw one curve for the top of the eye and the border of the eyebrow.
The nose is usually wedge-shaped - it is easier to visualize and give it three-dimensionality before adding details.
The septum and sides of the nose are flat, which will be noticeable in the finished drawing, but already at the sketch stage it is necessary to mark them in order to properly distribute the details later. In our wedge, the lower flat part is a truncated triangle connecting the wings and the tip of the nose. The wings curve towards the septum to form the nostrils - note that when viewed from below, the lines that form the sides of the septum are in the foreground, parallel to the face. The septum protrudes lower than the wings (when viewed directly), which means that at a ¾ view, the distal nostril will not be visible accordingly.

The most difficult part of drawing a nose can be deciding which parts of the nose are best left out for a natural looking result. You don't always have to completely draw the wings of the nose (where they join the face), and in most cases the drawing looks better if you just draw the bottom of the nose. The same goes for the four lines of the nasal septum, where they connect with the face - in most cases it will be better if you draw only the lower part of the nose (wings, nostrils, septum) - you can alternately cover the lines with your finger to make sure . If the head is turned ¾, it becomes necessary to draw the bridge of the nose. You will need a lot of observation, trial and error to recognize the unique features of the nose. Cartoonists have this feature - you need to carefully consider the outlines of the noses in order to understand why they are depicted that way. We will come back to this issue in the next lessons.

Lips
Mouth and Lips Tips:
- First you need to draw the labial fold, as this is the longest and darkest of the three almost parallel lines that form the mouth. In fact, it is not a continuous straight line - it consists of several implicit curves. In the picture below, you can see exaggerated examples of the movement of the mouth line - note that they follow the line of the upper lip. This line can be "softened" in several ways: the depression above the lip can be narrower (to distinguish corners) or so wide that it becomes invisible. It may be the other way around - the lower lip is so full that it creates a feeling of pouting. If you find it difficult to keep symmetry at this stage, try starting from the center and drawing one line on each side.
- The upper corners of the lips are more visible, but you can soften them up by drawing two wide curves, or soften them so that they are no longer noticeable.
- The lower lip certainly resembles the usual curve, but it can also be almost flat or quite rounded. My advice is to mark the lower lip with at least a regular dash under the lower border.
- The upper lip is almost always narrower than the lower lip, and it protrudes less forward. If its contour is circled, it should be more pronounced, since the lower lip already stands out with its shadow (it should not exceed the size of the lip in size).
- In profile, the lips resemble an arrowhead in shape, and the protrusion of the upper lip becomes obvious. The shape of the lips is also different - the upper one is flat and located diagonally, and the lower one is more rounded.
- The lip fold in profile deviates downward, starting from the intersection of the lips. Even if a person smiles, the line goes down and rises again in the area of \u200b\u200bthe corners. Never raise the line level when drawing in profile.

Ears
The main part of the ear (if drawn correctly) is shaped like a letter FROM from the outside and the shape of an inverted letter U from the inside (the border of the upper cartilage of the ear). Often draw a smaller U above the earlobe (you can put your finger to your ear), which goes further into a smaller letter FROM. Ear details are depicted around the ear opening itself (but not always), and their shapes can be quite varied in different people. The drawing can be stylized - for example, in the drawing below, the ear in its general form resembles elongated "@" symbols.

When the face is turned to the front, the ears are depicted in profile, respectively:
- The lobe, formerly indicated in the shape of an inverted U, is now visible separately - the same when you observe the plate from the side and then see its bottom, as if it were closer to you.
- In shape, the ear opening resembles a drop and stands out against the general background of the ear.
- The thickness of the ear from this angle depends on the proximity to the head, this is another individual factor. However, the ear always protrudes forward - this has happened in the course of evolution.
Seen from behind, the ear appears to be separate from the body, mostly a lobe connected to the head by a canal. Do not underestimate the size of the canal - its function is to make the ears protrude forward. In this perspective, the canal is more significant than the lobe.
3. Angles
Since the head is based on a circle where facial features are outlined, changing the angle of the head is easier than it seems at first glance. However, it is even more important to observe the positions of people's heads from different angles in life in order to remember all the ridges and valleys that overlap in the most unexpected ways. The nose undoubtedly recedes considerably from the head (the eyebrows, cheekbones, center of the lips and chin also protrude); at the same time, the eye sockets and sides of the mouth form some depressions on our "circle".
When we drew the face in full face and in profile, we simplified the task to a two-dimensional image, where all the lines were flat. For all other angles, we will need to rearrange our thinking in a three-dimensional world and realize that the shape of an egg is actually an egg, and the lines that we used before to arrange facial features cross this egg like the equator and meridians on a globe: at the slightest changing the position of the head, we will see that they are rounded. The arrangement of facial features is just drawing intersecting lines at a certain angle - now there are three of them. We can again divide the head into upper and lower parts, "cutting" our "egg", but now we need to keep in mind: the components closest to us look thicker. The same applies to drawing a face in a raised or lowered state.
man looking down
- All features are curved upwards, and the ears are "raised".
- Since the nose protrudes forward, its tip falls below the original mark, so it seems that it is now closer to the lips, and if a person lowers his head even lower, then the nome will partially close his lips. From this angle, you do not need to draw additional details of the nose - the bridge of the nose and wings will be enough.
- The arches of the eyebrows are quite flat, but can be curved again if the head is tilted too far.
- The upper eyelid of the eyes becomes more expressive, and it is enough to slightly change the position of the head so that they completely hide the orbits of the eyes.
- The upper lip is almost invisible, and the lower lip is enlarged.

man looking up
- All lines of facial features tend downward; the ears also move down.
- The upper lip is visible in full (which does not happen in full face). Now the lips look pouty.
The eyebrows are more arched and the lower eyelid is lifted, making the eyes look squinted.
- The lower part of the nose is now fully visible, both nostrils are clearly displayed.

The man turns
- When we see a person almost completely turned away, the superciliary arches and cheekbones remain of the visible features. The line of the neck overlaps the line of the chin and is located next to the ear. When a person turns, we also see eyelashes.
- Also, when turning, we can see part of the eyebrow line and the protrusion of the lower eyelid; also appears the tip of the nose directly from behind the cheek.
- When a person turns almost in profile, eyeballs and lips appear (although the crease between the lips is small), and the line of the neck merges with the line of the chin. We can still see the part of the cheek covering the wing of the nose.

Time to practice
Use the quick sketch method to sketch on paper the facial expressions that you notice around you in a coffee shop or on the street.
Do not try to detail all the features and do not be afraid to make a mistake, the main thing is to convey the features from different angles.

If you find it difficult to draw in volume, take a real egg (you can boil it, just in case). Draw three lines in the center and add dividing lines. Observe and draw the egg with contour lines from different angles - this way you will get a feel for how the lines and the distances between them will behave from different angles. You can outline the facial features on the surface of the egg along the main lines and see how they change in size as the egg rotates.
Drawing a portrait is an interesting and difficult task. Not every famous artist knows how to do this. Basically, artists who draw portraits well are self-taught, who have a well-developed sense of beauty, but even they need to learn a lot. If you draw, for example, a landscape, then it is not at all necessary that it looks like the area that you wanted to depict, the vision of nature that you have is enough. In the case of a portrait, things are a little different. After all, anyone can compare the portrait with the original and say whether it is similar or not. And not many portrait painters manage to achieve one hundred percent similarity. The secret is that the main thing is not this at all, but to consider in each person that unique thing that distinguishes him from everyone else and depict it on paper.
Don’t be tempted to learn how to draw a portrait of a person right away, after about five portraits you will see progress.
Start by taking a close look at the model. Your task is to find a special feature, and then transfer it to a piece of paper. If you accurately determine the proportions of the parts of the face, then it will already be similar. If you have ever seen cartoons, you have noticed that such an artist only focuses on any part of the face, and it turns out very similar.
Start drawing the person with a pencil. Depict facial features in the form of geometric shapes, then mark with a pencil the distance between the eyes, between the mouth and nose, chin and mouth, etc. Observe the dimensions of the parts of the face relative to each other. When you see that the portrait has begun to emerge, you can proceed to the volume and shades.
Portrait drawing algorithm
We offer you a few rules to learn how to draw portraits.
- Outline the outline of the face, make sure that it does not occupy the entire sheet. But do not make it too small so that it is more convenient to apply the eyes, nose and lips. To make the outline not stand out too much, blend it with your fingers or an eraser.
- With a mechanical pencil, carefully shade the places where the hair will be, try to hatch in one direction. When shading, be careful with the direction of the hair, it depends on what hairstyle you get. If you act consistently, you will achieve similarity. The hair on the head lies in the same direction, which means we draw them in the same direction. Lengthen the hair lines gradually, stroke some areas several times to get a darkening, like a shadow. Try not to leave a single unshaded area in the hair area.
- Now is a very important moment. Take a sheet of white paper and gently blend the entire hairstyle, do not press hard and do not go beyond the boundaries. So the hairstyle will turn out whole and will look realistic. Blend in the direction of hair growth.
- Do not forget about the glare. Take a pointed eraser and draw lines with it in several places. Note that the lines don't have to be perfectly parallel, but they don't have to intersect either. They should sort of blend in with the pencil lines.
- Now shade the darkest areas on top with a softer pencil.
- It turns out beautifully if you add a few straight or slightly wavy hair near the oval of the face. They seem to highlight it. But be careful and do not go to the face while it is not yet drawn.
- Highlight a few hairs all over the head.
- Let's start with the eyes, nose and mouth. Remember about the distance between the parts of the face and about the proportions. If a person has big eyes and a small nose, then the eyes in the portrait should be larger than the nose. It's the same with the mouth.
- Darken the corners of the eyes and lips. With a few dark lines, highlight a few eyelashes especially brightly. Do the same with your eyebrows.
- Blend the tip of the nose and its borders, the wings of the nose can be darkened.
- All borders must be shaded.
- Finish drawing the portrait by highlighting the cheekbones.
- It is more convenient to turn the sheet, rather than turn yourself.
Usually people who do not have a special art education do not dare to depict human faces. It is understandable, for this you need to know the anatomy, the structure of the skull, the types of facial muscles and much more. Such students are more interested in how to learn how to draw flowers, still lifes or landscapes, they seem to be more accessible ... However, in order for a drawing to look like a particular person, academic knowledge in the field of painting is not at all necessary. Let this sketch not become a masterpiece, but it will keep the memory of some meeting.
Artists who already know how to learn how to draw portraits recommend that all beginners pay more attention to the eyes: the similarity achieved depends to a large extent on them. With all the diversity of people living on earth, they are conditionally divided into a relatively small number of types. The most common type of eyes is almond-shaped, but there are others (it is important to understand what they are like in the person being portrayed). You should also decide on the slope of the outer and inner edges of the eyes.

Now the nose. It is narrower at the top and wider at the bottom. The line of the lower edge in the figure is already there, it remains only to convey the features of its shape. For beginners just learning how to learn how to draw portraits, it's best not to try to depict this facial feature in too much detail.
The mouth is represented by three main lines. The top edge resembles the letter "M" stretched on the sides. The lower line is an arc curved to the bottom. Between them, the mouth itself is a small winding line. Beginning artists unfamiliar with anatomy should not draw teeth.
Eyebrow and hair lines work out, as a rule, better than anything else. Outlining the shape of a hairstyle is a relatively simple matter.
The image of the ears also usually does not cause difficulties, unless, of course, one dwells in detail on their structure, which requires certain knowledge.

The neck and clothes remain (or rather, the collar or neckline). This is already quite simple, but such details give the whole sketch completeness.
After finishing work, it’s good to take a break, and then (for example, the next day) evaluate for yourself how much what happened successfully conveys the external resemblance and, possibly, the character of the drawn person. Small details (such as moles, for example) can also be important.
And finally, a few tips for those who are thinking about how to learn how to draw portraits:
- It is better to use a soft pencil.
- Do not be afraid to make a mistake, it can be corrected with an eraser.
- You need to draw what you see, not what you want.
- If you have the ability, keep learning hard.
And further! Any criticism should be treated with angelic patience, especially if the drawing is commented on by a professional artist.
The topic of this article is about how to draw a portrait with a pencil in stages for beginners. Each of us is looking for a convenient way to depict what he sees. That is why I want to offer an option on how to draw a portrait of a person, whether it is close or dear, or a person sitting in the train opposite, or it will be portraits of celebrities. In this option, there is only one rule - simplicity.
And today is a training lesson. We will draw a person’s face with a pencil in stages, a person you see every day, you are used to “working” a little on his appearance, trying on makeup or a smile, strictness or tenderness. We draw the face you know as your reflection in the mirror.
But first, let's get a mirror, and as for the first time, look at ourselves. All people are similar and at the same time different, and you are no exception. What makes us similar? Every healthy person has two eyes, a mouth, a nose, ears, eyebrows, hair styled in a hairstyle. And what makes us different? The shape, size and location of these "details" of human appearance. So, a portrait is a kind of collage or puzzles from several passages, which we will “break” into the plan of our work: Eyes; Mouth; Nose; Ears; Brows; Hair (hairstyle) and oval face.
And all this has its own shape, size and proportions of location on the face. This is what makes each of us "released in a single copy", and unlike anyone else. And, if we are learning to draw a portrait of a particular person, then it would be good to first pay attention to the shape and type of each element of the face in detail. And only after that our final goal, and this is a portrait in colored pencils, will become more accessible.
Eyes
We will first practice drawing all the details with a simple pencil. And also, pay attention, I draw myself and my eyes. You can practice drawing while mine, but this will be an intermediate step on the way to learning how to learn how to draw portraits in pencil.Step 1
Here we will draw an arc with a pencil. At the same time, pay attention to its shape. It is extended to the middle, and then “rolls” down.
Step 2
The bottom arc is almost perfect. It is smaller than the top.
Step 3
We connect the arcs and perform the upper eyelid.
Step 4
Cornea and lower eyelid.
Step 5
Eyelashes appear on the upper and lower eyelids and the pupil.
Step 6
We make small folds near the eyes and mark the places where the shadow falls, which makes the eye seem voluminous.
Lips
How to draw lips correctly? Only 5 steps and the lip drawing is ready.Step 1
We start with a wavy line.
Step 2
Above the wavy line we depict the upper sponge.
Step 3
The drawn mouth is supplemented with a lower sponge.
Step 4
We connect the edges of the lips and some of the folds of the lips.
Step 5
We create the effect of chiaroscuro and do not forget about the folds in the corners of the lips and on the chin.
Nose
How to draw a portrait of a person, if not learn how to depict one of the most difficult details, the nose. We do it step by step.Step 1
We draw parallel lines - this is the width of the nose.
Step 2
Two lines end with the original "capsule". This is an extension of the nose.
Step 3
We represent the nostrils.
Step 4
Stroke for the effect of chiaroscuro.
Step 5
To make the shadow look natural, we align it a little.
Ears
Another element that is sometimes forgotten, covering it with hair. But our pencil portrait in stages for beginners provides for it. What's this? Ears.Step 1
The shape of the ear is like an arc. We do it.
Step 2
We carry out the upper part of the auricle, a curl and a tragus.
Step 3
We do anti-inflammatory. A lobe appeared, which means I did not forget about my jewelry - an earring.
Step 4
I do the cheek, neck and hair.
Brows
Drawing a portrait also includes such a detail as eyebrows.Step 1
It is convenient for someone to do this first with an arc, and then each hair separately. And it is more interesting for someone to immediately draw the shape of the eyebrows, completing them with jerky lines.
Step 2
We correct the shape and density of the eyebrows.
Hair (hairstyle) and oval face
Having considered each individual detail, it is already easier for us to understand how to draw a portrait with a pencil. And yet, I will show you the image of a person’s face in stages.Action 1
My face is round. And that's what I'm trying to portray.
Action 2
I mark where the neck will be and the shape of my hair.
Action 3
I draw hair in more detail.
Well, we have learned to work on each detail separately. Time to put the puzzle together. Let's talk about the human pencil.
Angle
Before we get a portrait with colored pencils, we again draw a portrait from scratch. But what else is important to know about depicting people? The fact that a person’s face can be done in different ways. For example, if the model is sitting right in front of us, her body and head are straight, and her eyes are looking directly at the artist, then this angle is called full face.Profile - if the model is located sideways to us.
And how to draw a portrait of a person who sits half-turned towards us? And what is this work called? This is three quarters. This angle is very convenient for a romantic and informal image. It highlights the beauty of the eyes and lips. That's exactly what we will choose to complete the first portrait with a pencil from a photograph.
Working on an image from a photo
First, you should choose a photo of a suitable model in order to draw a portrait from a photo. And now let's do it step by step.To understand how to draw a person's face, let's distribute everything in stages.
Stage 1
We make an oval of the face with a pencil.
Stage 2
This pencil work for beginners suggests auxiliary lines that will help maintain the proportions of a person's face when drawing a portrait outline.
Stage 3
Thanks to the diagram, we mark where the eyes, nose and other organs will be. We carry out these details of the face in stages.
A little more detail:

Eyes and eyebrows

Nose

Stage 4
Now, in order to make our pencil portrait look more believable from the photo, we erase all the auxiliary lines and pay attention to the hair. Don't forget about the chiaroscuro effect.
Stage 5
It's time to make a portrait with colored pencils to "revive" it.
Test lesson
It's time to move on to testing what we have learned and continue to talk about how to paint your portrait. I hope that the portrait drawing lessons for me were not in vain, and I will be able to realistically draw myself as a real beauty!1) Oval of the face.

2) Auxiliary lines to maintain proportion.

3) Schematic representation of all elements.

4) We perform the portrait with colored pencils.


Lesson learned and fixed. As for me, the result is not bad. We can safely say that we understood how to draw a portrait with a pencil. And if necessary, we will use our new skills.


, poultry farming")


- Burns, Robert - short biography
- The concept of common vocabulary and vocabulary of limited use
- Nancy Drew: The Captive Curse Walkthrough Nancy Drew Curse of Blackmoore Manor Walkthrough
- Deadpool - Troubleshooting
- Won't start How to Survive?
- What to do if bioshock infinite won't start
- Walkthrough Nancy Drew: Alibi in Ashes
- Spec Ops: The Line - game review, review Spec ops the line crashes on missions
- Room escape level 1 walkthrough
- Processing tomatoes with boric acid How much will 2 grams of boric acid
- Cucumber Grass (Borago)
- Bioinsecticide Lepidocid: purpose, properties and application procedure Lepidocide waiting period
- How to change the language to Russian in steam
- Dendrobium noble: room care
- Morphology of plants general concepts - document
- Planting, propagation and care of bamboo at home, photo Growing bamboo from seeds
- How to strengthen the cellular signal for the Internet in the country
- Sanskrit reveals the forgotten meaning of Russian words (2 photos)
- The oldest language Sanskrit programming language of the future Dead language Sanskrit
- Who has dominion over all the earth?