Internet cable connectors. How to properly crimp a network cable when connecting two computers without a hub
When using a computer directly to access the Internet, many problems arise, but the biggest one is a technical breakdown that is locally located in the user’s home. Many people think that it is almost impossible to fix a cable break on their own due to the need to crimp its end with an RJ-45 connector (plug). Even if you need to create a new connection when organizing a workplace or buying a TV with an Ethernet port, it is very useful to have the skill of crimping yourself. The article will talk about how to correctly carry out the entire procedure with the simplest tools.
Existing crimping schemes
The most popular are two schemes for crimping the cable used to provide access to the Internet. When connecting, the so-called “twisted pair” is used and crimping is distinguished: straight cable and crossover cable.
- The first option is intended for connecting the following types of devices: computer - switch, Smart TV - router, switch - router, router - computer.
- The second option is intended for combining mainly devices of the same types: computer - computer, switch - switch, router - router, etc.
Most devices that appeared in the recent past and even those being developed today easily cope with identifying the connected cable, and their interface allows the use of both straight and crossover types. However, today's innovation in the production of digital devices is a connection standard such as Auto MDI-X, which is gradually replacing cross-testing. The following are screenshots of straight and cross (oblique) crimping patterns.
Instructions for crimping a cable with an RJ-45 connector
In fact, the crimping procedure is very simple.
- The first step is to clear enough of the cable from its outer sheath. Today, the production of twisted pair cables is carried out in such a way that inside the sheath, in addition to the cable, there is a special thread that can cut the sheath and allow it to be quickly removed to the desired length.

- Having pulled out the wires, you need to align them and position them so that each of them corresponds to the seat for the wire. Using the screenshots with the connection diagrams presented above, you can understand which wire is inserted where. It is also very important to strip the cable from the sheath to such a distance that after insertion into the plug, part of the sheath is under the lock, which will protect the cable from damage when frequently connected and disconnected from the device.
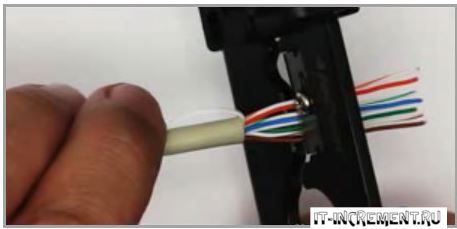
- You can always strip a little more cable, since after this you will have to trim all the wires evenly, as shown in the photo. Each wire must have absolutely the same length and perfect evenness, which will allow them to be placed clearly in the seats directly under the plug contacts.
- Next, we insert the cable, as already mentioned, directly into the seats, so that the ends of the wires are located under the contacts protruding from the plug, and the crimp is eventually fixed with the upper part. As soon as the twisted pair is inserted into the RJ-45, you can fix the entire structure by pressing the lock with a screwdriver (right circle in the photo).
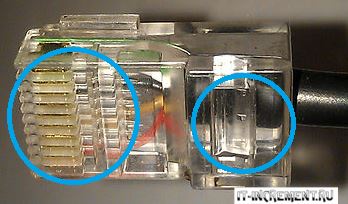
- The left circle in the photo indicates the RJ-45 pins, which should match perfectly with the pins inside your computer's Ethernet connector. After the twisted pair has been inserted into the plug and fixed, all that remains is to lower the contacts directly onto the wires, which is also done with a screwdriver. You should press firmly, but carefully position the surface of the working part of the tool so as not to damage the connecting part.
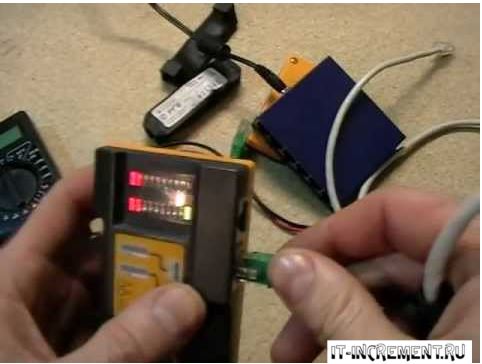
- Using a conventional tester, you can check the functionality of the cable (ring); if there is no resistance on it or there is no sound signal, then you just need to position the contacts correctly.
- The end result is a cable that will serve the owner for a long time if the basic rules are followed: do not bend, cut, pull, etc.
How to crimp a LAN cable with a screwdriver
If you don’t have special tools like a fixative, then you can do this whole thing using improvised means. To do this you will need the cable itself, a connector, a scissor and a screwdriver. The initial procedures are the same as described above, only after inserting the wires into the connector, you need to fix the wire with a clamp using a screwdriver, and then squeeze each wire with a screwdriver so that each individual wire fits into its groove. Watch the video that explains in detail how to do this.
Special crimping tools
If you have the means and want to quickly crimp twisted pair cables not only for yourself, but also to help your acquaintances, relatives and friends, then you can purchase a special tool that will greatly facilitate the procedure. It's called manual crimping pliers. They, like a stapler, secure the plug to the cable, which has been previously stripped to the required distance. It is worth saying that such a device has become a good help in the work of adjusters and installers from various companies providing access to the Internet. The purchase of such pliers pays for itself in a few calls, and in the future they only require the purchase of forks, which naturally does not require a lot of money.
Bottom line.
If your Internet cable suddenly breaks or the plug itself is damaged, then you should not be upset and wait until the company providing you with access to the Internet begins its work. The problem is especially familiar to those who received such a surprise on weekends. You just have to go to the nearest market and find RJ-45 there. How to secure it is described in detail in this article.
The Internet has very quickly and extremely firmly entered the life of modern man. It is now difficult to even imagine housing that is not equipped with a connection line to the World Wide Web, wired or optical. However, as a rule, the provider’s area of responsibility ends with the modem or router. That is, if the owners’ plans are not limited to installing one computer, but involve creating an entire home local network, including connecting IP television, then you will either have to deal with these issues yourself, or invite specialists for a separate fee.
When improving your home network, you almost never do without laying LAN cables. Purchasing a twisted-pair cable itself is not a problem - it comes in a wide variety, and its price is quite affordable. But turning it into a patch cord or a full-fledged line means mounting (more often they say, crimping) special contact tips and connectors at the ends. This is, in principle, the whole difficulty. But the complexity is not so great that it is mandatory to give money to the invited master for this. That is, this operation can be carried out on your own. And even using the simplest tools.
So, let's learn how to crimp an Internet cable yourself. Sooner or later such a skill will be in demand.
There are many cases when it is necessary to resort to the use of such a compound. And with the increasing saturation of family life, modern technology is becoming more and more common.

- The number of computers in the house has increased. A Wi-Fi connection is certainly convenient, but it has its vulnerabilities and disadvantages. It is more reliable and better to carry out switching using a LAN cable.
- More and more people are switching to IP-TV (SMART-TV). And again, to ensure a guaranteed stable signal supply, you can’t think of anything better than twisted pair.
- Other modern household appliances equipped with remote control functions sometimes require network connections.
- Even in one room there may be several devices that require such a connection. This means that a router or switch is installed, to which connecting patch cords are connected in the required quantity.
- Even a high-quality LAN cable can fail due to accidental damage or simple wear of the connector contact group. Another common reason is a broken lock on the connector body. It’s a small thing, and because of it, the connector doesn’t hold well in the socket of the router, network card, etc. This means it is better to replace it with a new one.
There may be other situations - you can’t foresee everything. In any case, the ability to crimp a network cable will definitely come in handy.
And in order to do everything correctly, with an understanding of the issue, you must first understand at least a little about the structure of the LAN cable.
First of all, about the cable itself. It is called twisted pair for a reason. Under the outer insulating sheath there are actually several pairs of spirally twisted wires that are color-coded. The number of pairs may vary. In the cases discussed in the article, a cable with four pairs is most often used. Often you can get by with two.

Such cables are divided into several standards according to the level of external interference protection.
- The UTP (Unshielded Twisted Pair) standard is the most inexpensive, since it does not provide any shielding. Just pairs of wires covered with an outer insulating and protective sheath. An example is shown in the figure above.
In terms of their transmission characteristics, such cables are no worse than others. But if they fall into an area of electromagnetic interference, the quality of signal transmission decreases sharply. That is, even closely located 220 volt wiring can cause problems.
- FTP (Foiled Twisted Pair) standard. Under the shell there is a continuous foil screen, which becomes a reliable protection against possible interference. The price is, of course, higher, but often you can’t do without it.

Such LAN cables can already be laid in close proximity to power cables, for example, in the cable channel of baseboards or in a common stub. Such proximity will not affect the quality of signal transmission.
- Finally, the STP (Shielded Twisted Pair) standard. Everything is “serious” here. That is, in addition to the external common screen, each twisted pair is also enclosed in an individual foil braid.

Such cables are most often used in large data centers, communication centers, industrial equipment, etc. Using them for the conditions of a house or apartment is a completely unnecessary precaution and an unnecessary waste of money.
Cat 5– operate with frequencies up to 100 MHz, allowing data transfer rates of up to 100 megabits per second.
Cat 5e– frequencies up to 125 MHz, speed up to 1 gigabit.
Higher categories (6, 6a, 7 and 7a) have even higher speeds. But for a home network, where not all providers provide 100 megabits yet, the fifth category is quite sufficient. Of course, if you think about the future, it’s still better cat 5e.
Thus, the best option for stationary installation seems to be FTP Withat 5e(so as not to worry about the tip). For patch cords that will not be adjacent to power cables, you can also use UTP withat 5e.
The basic data of a cable can always be found out by reading its markings, applied at regular intervals on the outer insulating sheath.

Cables may have other differences. For example, some have a steel string placed inside them - it enhances self-supporting capabilities, which can be important for outdoor areas and, even more so, for air laying. But this does not particularly affect the crimping technology.
How the connector works
It is clear that the cable itself does not solve the problem of connecting devices. A switching element, called a connector or Ethernet plug, must be correctly installed at its end. A common designation (somewhat incorrect, but well-established and therefore widely used) is RJ-45, or the more correct 8P8C (8 Position & 8 Contact). All this, in fact, is the same detail, and further on in the course of the presentation the term “connector” will simply be used.
Most connectors used in domestic conditions have a similar design.

As a rule, the connector has a transparent plastic case (item 1), which allows you to visually control the installation process. On the side opposite the contact group there is a latch (pos. 2) - for securely fixing the connector in the socket (port) of a network card, router, etc. As already mentioned, it is the failure of this latch that often becomes the motivating reason for repairs.
On the rear side there is an opening for the factory-prepared cable (item 3). Higher up on the body there is a slightly protruding fixing bar (item 4) in a rectangular window. During the crimping process, it will move down and tightly clamp the outer insulation of the installed cable. This ensures a reliable connection - it is almost impossible to pull the connector out of the cable after such fixation.
The internal cavity in the front part of the connector diverges into eight narrow cylindrical channels (item 5) - exactly the diameter of the twisted pair wires. That is, no matter how much you want to cram two wires under one contact, it won’t work. These channels continue all the way to the front end wall of the connector. And exactly coaxially with them, eight bronze or brass contacts were located on top (item 6). Each of them is placed in its own guide groove, that is, they are isolated from each other. Their initial position is raised up, that is, they do not yet interfere with the installation of cable wires through the channels until they stop at the front wall. Each of these contacts has two or three sharp knife protrusions at the bottom (item 7).
When crimping the connector, these contacts will move down, and the knife protrusions will pierce the insulation of the wires. This ensures the necessary electrical contact with the conductor. The metal contacts themselves are recessed flush with the plastic surface of the tip and, in fact, turn into contact pads, which is what is required for switching in the port (socket) of connected devices.
The yellow wide arrow shows the direction of contact numbering, from 1 to 8.
All connection mechanics are very simple and clear.
There are also slightly different connector models that include an additional insert. Such a detail, according to the plan, should facilitate the correct insertion of conductors into the required positions under the blade contacts.

I can’t judge for everyone how much this makes the work easier. Personally, I find it more convenient to work with standard connectors, without any additional operations.

When purchasing connectors, you can immediately purchase insulating caps. This element is not considered mandatory, but the difference in price is a pittance. And the cap well protects the LAN cable from dangerous bending in this rather vulnerable place, the latch from accidental breakage, and the connector itself and the connected port from dust. And the cable or patch cord looks much neater. In addition, the use of caps of different colors can simplify (make more visual) switching in complex network branch nodes.
What crimping schemes can be used
There are two main schemes for crimping an Internet cable. Their use depends on which devices communicate with each other.
Direct connection (Straight)
The most commonly used option in LAN (Local Area Network) or DSL (Digital Subscriber Line) networks. Allows you to switch different devices and devices in different combinations.
For example:
- PC – Router (computer – router);
- PC – Switch (computer – switch);
- Router – Switch (router – switch);
- Router – SMART TV (router – TV)
and other similar options.
A characteristic feature of this type of connection is the completely identical arrangement of wires in the contacts of both connectors.
The following color scheme for the arrangement of conductors has been adopted:

It is worth making one important note. By and large, at data transfer rates of up to 100 megabits per second, only four conductors are used - 1, 2, 3 and 6. The rest are not used. So, to reduce the overall cost of a local network, a cable with only two twisted pairs is often used. The connector, of course, remains the same, but only four conductors are inserted into it.

Knowing this nuance sometimes allows you to get by with “little loss” when it is necessary to repair a line. For example, a cable failed, and its test ring showed that there was a break in the orange-white-orange pair. It's OK. It is quite possible to change it, for example, to an unused pair “brown - white-brown”. But, of course, it’s the same on both ends of the cable. And the line's functionality will be restored.
Cross-Over
Such a connection sometimes has to be used to connect devices of the same type. For example, a computer with a computer, a router with a router, etc.
The difference is this. One end of the cable uses the same color "pinout" scheme as shown above. But on the opposite side, changes are being made. In principle, they only consist in the fact that the pairs “orange - white-orange” and “green - white-green” are swapped.

The remaining wires do not change their positions.
This somewhat complicated scheme, by the way, is gradually falling out of use. The fact is that more and more modern digital devices are equipped with an Auto MDI-X interface. The point is that the system itself automatically determines the type of connection and switches to the optimal switching mode. That is, all that remains is to crimp the Internet cables in a straight line, and not fool yourself. But it’s still often necessary...
So, we can say that the theory is finished. You can move on to a practical guide - how to crimp an Internet cable.
Internet cable crimping
Correct crimping of the Internet cable is done using a special tool. It is called a press tongs, a crimper, or, in common parlance, a crimper. If crimping work needs to be carried out urgently, there is no crimper and there is no opportunity to rent one from friends or rent from a store - you can get by with a simpler tool - a screwdriver. Let's consider both options.
How to do it correctly - using press pliers (crimper)
What you need for work
So, special pliers are needed for the job. It is clear that not everyone has them. But nowadays there doesn’t seem to be any particular problem getting them for rent - many stores offer similar services. And if, for example, in a large apartment or private house the local network is quite extensive, then it wouldn’t hurt to have such a tool in your “arsenal”.
How does the crimper work and what is its operating principle?
The illustration below shows perhaps its simplest model:

As befits any pliers, there are two lever handles (item 1) through which force is transmitted.
Actually, the pressing of the connector contacts itself is carried out in a special socket (item 2). Its configuration is such that the connector, when inserted all the way, fits “like a glove”, and it is almost impossible to make a mistake with its position. Most crimpers have two or even three sockets for different connectors. For example, you can crimp a cable for a wired telephone line (item 3).
The main working “organ” is a special metal comb (item 4). Its protrusions, after placing the connector in the socket, will be located exactly above the blade contacts. That is, when the handles are compressed, the protrusions of the comb will each press on its own contact, pushing them down until the insulation of the conductors is pierced.
Most press pliers are also equipped with special knives (item 5), which allow you to bite off the cable, remove the top insulating braid, evenly trim the edges of wires prepared for insertion into the connector, etc. The illustration shows the simplest “cutting section”, but it can also be more functional, including several different blades of different configurations and purposes.
As mentioned, the crimper shown is far from perfect. Professionals prefer to work with a tool in which the crimp sockets are placed at the top, perpendicular to the axis of the pliers. An example is shown in the illustration below.

The fact is that with this arrangement, the pressing force of the comb is strictly progressive, upward. This makes crimping more reliable, the contacts settle uniformly, and the comb itself wears out less. So if you plan to purchase a crimper, keep this in mind. But, in general, the choice of such a tool is a topic for a separate discussion, since it also has its own nuances.
However, the sequence of work does not change depending on the features of the tool.
In addition to crimping, for work you will need the cable itself of the required length, at least two connectors. It is advisable to have a couple more in stock - at first, due to inexperience, it is quite possible to make a mistake. And reusing a crimped connector is impossible.
It is necessary to prepare a workplace with good lighting - some operations require a certain amount of eye strain.
If a faulty Internet cable is repaired, the connector with a small section of the cable is bitten off. At the same time, there is no need to rush to immediately throw it in the trash bin - it will become a good “visual aid” for the location of wires. So you definitely can’t go wrong with the connection option.
Well, the work itself is not so difficult:
| Illustration | Brief description of the operation performed |
|---|---|
 | For example, a short patch cord will be produced. A section of UTP cat 5e LAN cable is being prepared for it. Again, for example, slightly different connectors will be crimped on both sides of the cable. One is normal, and the second has a guide insert. For crimping, it is supposed to use a crimper equipped with all the knives necessary for cutting and removing the outer insulation. That is, no other tools are required. |
 | If the end of the cable is “frayed”, then it would be better to trim it carefully. For this purpose, the crimper has a special knife that perfectly replaces wire cutters. The same knife can be used to cut off the connector that has come out and is inoperative if the Internet cable is being repaired and the connector is being replaced. |
 | The end of the cable is brought under the knife perpendicular to it. A little effort is... |
 | ... and you get a smooth cut edge. At this stage, you can immediately insert the protective cap of the connector onto the cable if you plan to use it. |
 | Now you need to clean the end of the cable - carefully remove a section of the upper braid from it. There is also a special device on the crimper for this. On one side there is a round groove into which the cable will be inserted, on the opposite side there is a knife blade. In a high-quality, well-adjusted tool, when squeezing the handles, the knife will only cut the top braid layer without affecting the insulation of the twisted pairs themselves. |
 | The outer braid is removed in an area of approximately 30 mm. It is not recommended to do less - it will be inconvenient to straighten the twisted pair conductors and fold them into a “package” according to the color scheme. The excess, one way or another, will have to be cut off as work progresses. The cable is inserted into a round groove, the crimping handles are brought together... |
 | ...and then the tool is rotated around the cable axis in a circle. The knife will cut the insulation around the entire circumference... |
 | ...and then it can be easily removed with a neat cylinder. |
 | Under the braid, in addition to twisted pairs, there is usually also a strong nylon thread. It is either cut off immediately, or some craftsmen prefer to simply take it to the side. This is not important. But if the cable has a metal string or a plastic core in the center, it must all be cut flush with the edge of the braid. |
 | The next task is to carefully unravel the twisted pairs with your fingers and try to align the wires as much as possible. |
 | It should look something like what is shown in the photo. |
 | Now it makes sense to put in front of you a printed color diagram of the location of the wires in the connector (or a cut connector taken as a sample). The formation of a “package” begins in accordance with the diagram - the wires are laid and held with fingers in the required sequence, from the first to the eighth. |
 | With such a distribution, you should immediately monitor so that the wires do not cross each other again at the exit from the braid. This is not difficult to achieve. This is what happened - the wires are laid out in strict sequence in accordance with the switching diagram. But they are still lying like a fan, and now we need to form the most dense flat “package” out of them. |
 | The wiring is compacted and further aligned to the maximum. |
 | The next step is to shorten this “package” - trim the edge. This is done in such a way that when inserted, the wires reach the edge of the connector and rest against its front wall, and at the same time, the cable braid also enters the connector by approximately 8 ÷ 10 mm. Experienced installers cut by eye, but you can also do a “fit-on” by attaching a connector. Typically, for most connectors, it is enough to leave the length of the “package” of wires at 15 mm. |
 | Trimming is done with a crimping knife. It is very important to position the package in this “guillotine” so that the cut is perpendicular to the cable axis. That is, when inserted into the connector, the cut ends of all wires will be in one line. |
 | After trimming, the “package” is no longer released from the fingers - it’s time to insert it into the connector. |
 | The wires are carefully inserted through the entrance opening of the connector. Please note that it is taken so that the contact group is at the top and the protruding latch is at the bottom. |
 | The internal configuration of the connector is such that after the flat “package” of wires is installed, it is unlikely to come apart or begin to bulge. The cable is carefully pushed forward. No haste or excessive effort is required, otherwise the wire may get stuck and begin to bend - you will have to repeat the operation. |
 | Separate channels for each wire begin approximately from the middle of the connector. Once the wires have entered them correctly, they will not go anywhere. |
 | The cable is pushed forward until it stops. |
 | Through the front transparent wall of the connector, the end sections of the wires resting against it are usually very clearly visible. That's it, the connector is on - you can proceed directly to crimping. |
 | Carefully, so as not to pull out the cable by accidental careless movement, the connector is placed in the crimp socket of the crimper. It's difficult to make a mistake here - the shape of the socket itself will prevent you from placing the connector incorrectly. |
 | And now all that remains is to apply a smooth, but quite strong compressive force on the crimping handles. |
 | The teeth of the comb will move the metal contacts down, and they will pierce the insulation with their knife-like protrusions and cut each into its own wire. |
 | That's it, the connector is crimped. |
 | Notice how deep the cable braid goes into the connector. And how, after crimping, the fixing bar moved - its protrusion tightly rested against the cable. |
 | Now, even if a fairly significant pulling force is applied, the connector will still remain motionless and the contacts will not be broken. After this, you can put on the protective cap that was previously inserted onto the cable - and the task is completed. |
 | At the other end of the cable, a connector with a guide insert will be used as an example. But all the preliminary operations for stripping the braid, straightening the wires and forming a “package” do not have any special features. |
 | And only after the “package” is assembled is it inserted into the insert holes. |
 | After all the wires have entered their holes, the insert is pushed as deep as possible towards the cable. |
 | All that remains is to trim the edge of the “package” to the required length. It’s convenient that you don’t have to worry about its integrity - the wires won’t move anywhere. |
 | After this, the cable with the insert on is inserted into the connector... |
 | ...push forward all the way. The insert should snap into place and lock there. The wires should be distributed along their channels and rest against the front wall of the connector. |
 | All that remains is to crimp the connector in the crimper. |
 | The patch cord is ready and can be used for its intended purpose. |
There may be other designs of crimp connectors with inserts. But the sequence of operations is approximately the same, and the assembly principle also does not change much.
As possible in case of emergency - using a screwdriver
But what to do if there is no special crimping tool, but you need to install the connector urgently, as they say, “here and now”? In this case, you can use the “folk” technology using a screwdriver.
| Illustration | Brief description of the operations performed |
|---|---|
 | So, there is no crimper. A flat blade screwdriver is available. It is desirable that the tip be thin, no more than 3-4 mm wide, but at the same time the screwdriver is powerful enough. Since there is no special insulation stripper either, you have to use a regular sharp knife. Some care should be taken to avoid accidentally damaging the insulation of the twisted pairs. |
 | All operations for unraveling and straightening wires, for assembling the “package” in accordance with the diagram are unchanged. Trimming the wires to the required length before inserting them into the connector can be done with ordinary side cutters. Do not forget about the obligatory smooth cut edge perpendicular to the cable axis. |
 | The wires are inserted into the connector - everything is as usual. |
 | You can proceed to crimping. And it is recommended to start with the fixing bar at the connector shank. If you fix it right away, you won’t have to worry that during the work an accidental movement will pull the cable out of the connector, and you’ll have to redo everything. |
 | The connector rests against a hard surface. Then the tip of the screwdriver is placed on this fixing bar and force is applied. By the way, both this operation and subsequent ones require good support of the connector on a rigid base. This is quite seriously hampered by the spring-loaded plastic latch located below. And sometimes it even breaks under great force. To avoid this and make the work more comfortable, you can come up with some kind of base on which there is a hole or groove (groove), where the latch will hide without experiencing any load. For example, when using this practice, the author of these lines performed crimping with the connector resting on a kitchen board, along the edge of which there was a recess along the perimeter. It turned out very convenient. |
 | Under the force of a screwdriver, the bar moves down and is fixed in the lower position. |
 | It is clearly visible that the latch has moved down and rested against the cable braid, denting it somewhat. Now you don’t have to worry about the cable accidentally falling out of the connector. |
 | You can proceed to crimping the contacts. The connector rests again on a secure base. Then they begin to sequentially push the contacts downwards using a screwdriver. The task is to move the metal contact down all the way so that it pierces the wire insulation with its knives and slightly cuts into it. There is no need to rush - everything should be done extremely carefully. First, you need to make sure that the tip of the screwdriver hits the contact and does not jump between them. Secondly, the force required is quite large, and if the tip of the screwdriver slips, you can easily puncture your finger. Sometimes it is advisable to wear glasses or use a magnifying glass to avoid mistakes. |
 | Having “drowned” one contact, they move on to the next. We must try to subtly feel that the contact actually fell into place and provided an electrical connection to the wire. |
 | This continues until all eight contacts are pushed down. |
 | After crimping the last contact, it is advisable to arm yourself with a magnifying glass and carefully examine the result of the work. It is unacceptable for any of the contacts (even those not involved in data transmission) to protrude upward - they all must be pushed all the way down and placed at the same level. If shortcomings are identified, they should be eliminated immediately, that is, the resulting contact pad should be made even. |
 | The connector on the opposite side of the patch cord is crimped in a similar way. After this, you can try it out at work. |
The method, of course, is more complex to implement. In addition, at first it may well turn out to be a marriage. Therefore, it is better to have several additional connectors in stock so that you can redo them if necessary, taking into account the mistakes made.
Using special self-crimping connectors
Yes, today you can find connectors on sale that require virtually no tools at all to connect to an Internet cable. Except, of course, for those needed to remove the top braid and trim the wires.
For example, this is what a professional-grade connector produced by NICOMAX looks like

The example may not be entirely indicative, since such NICOMAX connectors really belong to professional equipment. And the cost of each of them is estimated at several hundred rubles.
But there are more affordable solutions that work on the same principle. An example is self-crimping (or, as they are also called, tool-free) connectors produced by the Russian company SUPR LLC.

The connector body consists of two hinge-opening halves (item 1). On the back side of these covers there are special matrix projections (item 2), which will guide the laid wires onto the contacts. In the center there is a switching module (item 3) with special channels-grooves for laying the wires of the crimped cable. Each side of the module is designed to accommodate four wires. To make the task easier for the master, there is also a color “cheat sheet” for the placement of conductors - it’s hard to make a mistake. Finally, each of the flaps has an integrated half of the protective cap (item 4), and when assembled, the area where the cable enters the connector immediately receives excellent protection against fracture.
As you can see, the principle of crimping here is exactly the opposite. The contact blades are located motionless in the slots of the switching module. And the matrices on the covers will insert wires onto these knives to ensure insulation cutting and reliable electrical switching.
The procedure for assembling such a connector is simple.
- The cable is stripped of its braid.
- The twisted pairs are unraveled, the wires are straightened.
- Further, there is no need to create a “package”. The connector covers open (pos. 1a). The wires are not pushed through, but are inserted from above into their grooves in the switching unit, according to the available “cheat sheet”. Moreover, special clamps in each of these sockets will no longer allow the wire to jump back out on its own.
- After laying the wires, all that remains is to close both halves of the case and press them against each other until the latch is activated. The matrices will push the wires onto the fixed contact blades. And that’s it – the connector is ready for use.
Of course - very convenient. True, the price of such a connector, compared to a regular one, is also high - about 75 rubles. But on the other hand, no tools are required, and the likelihood of making a poor-quality connection is negligible. In addition, such a connector can be used repeatedly if necessary.
How to check the quality of an Internet cable crimp?
So, the connectors on the LAN cable are installed. How can you now verify the reliability of the connection being created?
There are several ways.
- The simplest one is to connect the LAN cable directly to its destination. That is, if after switching the devices everything began to work normally, then you can congratulate the technician on the successful completion of the installation.
- Professionals evaluate the quality of crimping and the condition of laid communication lines using special devices - LAN testers.
These devices usually consist of two blocks, that is, you can check a cable whose opposite connectors are located in different rooms. It’s even easier, of course, to check the patch cord with it.

Both the main unit and the additional remote unit have ports for connecting connectors. After connecting the cable, the power is turned on and the device begins to scan each wire, which is indicated by numbered light indicators. If there is a break in the line, then it is immediately noticeable which of the wires is faulty. Or, in our case, which contact of the connector is crimped poorly.
- A LAN tester is the privilege of professionals, but at home you can try using a regular multimeter. It is set to ringing (with sound indication) or to a minimum resistance, for example, 200 Ohms. And then they check each wire of the same color on two adjacent Internet cable connectors.

Such an audit will not take much time. True, the tester probes must be thin in order to accurately fall on specific connector contacts of the same name. This can be solved either by sharpening them, or by temporarily installing thin wire tips.
If some wire does not ring (among those that are significant for a particular connection), then you will have to redo it.
- How to test an Internet cable with a multimeter if the connectors are located far away from each other (for example, in different rooms). Nothing too complicated either.
If you look at the circuit diagram of the ports of switching devices, you will see an induction coil connecting the wires of one pair (for example, green - white-green). That is, there must be conductivity between them.

This means that you can insert one connector into the port of any of the devices (it is better to do this with the device turned off), and then check the line conductivity on the second connector. Typically, for home lines (up to 100 megabits), it is enough to test only two pairs. Check the resistance between orange and white-orange, green and white-green.
Of course, there will be resistance (calculated in units of Ohms), and it depends largely on the length of the cable. But what’s important is that it should be approximately the same for both couples. If the difference is large, or the resistance is very large, and even more so if the line does not ring at all, you should look for defects in the work performed and redo it again.
This verification is described in more detail in the video below:
Video: How to check an Internet cable using a tester
You may need to crimp the Internet cable yourself for various reasons.
In some cases, it is necessary to replace the broken tip on the provider wire because it is worn out.
Someone is trying to connect a PC to a router using a twisted pair cable. Some people look for this information when they want to create a local network at home.
In any case, before moving on to the process of building a network or repairing a wire, you need to understand some things.
For example:
- What types of twisted pair cables are there and what they are. Otherwise, how can you figure out which wire to buy?
- What is required for cable crimping? You need to understand what connectors and tools are currently in use.
- What types of crimping are there? The type of crimping depends on the purpose for which the cable needs to be crimped.
- How to crimp an Internet cable at home? Surely not all ordinary users store special equipment at home.
After reading this information, you can be sure that the twisted pair crimping process will become simple and understandable. You can easily restore your Internet connection or connect your home computers into a local network.
Definition
 Twisted pair is one of the types of communication cables. Most often used when creating computer and Internet networks.
Extremely cheap production and ease of installation ensure its widespread use: in offices, apartments, telephony, television.
There are single-pair cables (only two braided wires are used inside) and multi-pair cables - more than two pairs of conductors.
What to use at home
Standards for cable products and types of shielding
 In home and office environments, a (usually) 4-pin cable is used.
The cheapest type of all is UTP cable.
It does not have any shielding, is usually laid in walls, cable ducts and is very sensitive to any electromagnetic radiation.
A more advanced one is an FTP cable. Inside, a shielding winding of all twisted pair cores is used. Such a protection scheme makes the device resistant to electromagnetic radiation and can be used for internal external work, depending on the material of the outer shell. It can be laid both in the cable plinth and along the walls using fastenings.
The most secure standard is STP. It has a screen for each pair of wires separately and a common screen in the form of a grid. Very often used in industry and data centers.
Bandwidth Categories
 Twisted pair cable is also divided into categories depending on its bandwidth.
To create a home local network, just use cat 5 or 5e. In company offices, 5, 5e are usually used, less often 6, 6a, and 7 and 7a.
- Cat 5— pairs operate with a frequency of up to 100 MHz, transmitting up to 100 megabits per second;
- Cat 5e— pairs with an operating frequency of up to 125 MHz, transmitting up to 1 thousand megabits per second (1 gigabit per second);
- Cat 6 and Cat 6a— pairs operate at frequencies of 250 and 500 MHz, respectively, and can transmit up to 10 gigabits per second;
- Cat 7 and 7a— pairs operate at frequencies of 600 and 1200 MHz, respectively, and can transmit up to 100 gigabits per second.
The most popular of them at the time of writing is FTP Cat 5e twisted pair cable, because it can transmit data at speeds of up to 1 gigabit/sec and is quite cheap. This cable is worth purchasing to create a local computer network or connect a PC to a router.
What is twisted pair crimping
 Twisted pair crimping or crimping is a process during which the cable is stripped of its outer insulation, the wires are straightened and untwisted, and then installed into an 8P8C connector (aka RJ45 connector) and clamped.
This procedure may be needed in several cases, for example:
- the connector on your Internet cable is broken;
- you decide to connect two computers to a wired local network;
- you need to connect your computer to the router via a cable;
- it is necessary to extend the wire through;
- and in many others.
It is not difficult to crimp an Internet cable at home, however, for an ideal result you will need some tools and components, namely:
- twisted pair of the required length;
- press pliers (crimper);
- one or two connectors (it is better to buy several in reserve).
Currently, two types of cable crimping are used. One of them is called straight, and the other is cross crimp (or cross crimp). They differ in the pinout of the wires in the connector and in their practical application.
Direct straight crimp or “computer hub”
 This type is used to connect two different types of devices, that is, when connecting:
- computer to router;
- TV to router;
- computer to switch;
- router to switch;
- computer to modem.
It is called “straight” because on both wire plugs the wires in rzh 45 will be arranged in the same order:
This type of pinout is used for connections with data transfer rates up to 1 Gbit/s. At home, straight crimping is most often used to build a local network via fiber optic cable.
 Since most providers offer plans with speeds up to 100 Mbit/s, they use a different wiring, which only uses 1, 2, 3 and 6 cores.
If you are repairing an Internet cable carried out by installers, you will have to use this option:
Always carefully inspect the patch cord that the provider lays.
If they use two-pair crimping, provided that you can re-crimp on all 4 pairs, this will not increase your speed, but will provide the hassle of cramming all 8 wires.
Cross crimp or “computer-to-computer”
 Used to connect devices of the same type to each other, for example:
- computer - computer;
- router - router;
- TV - computer.
It is called so because of the cross arrangement of the wires in the connector. One end is crimped as in a direct connection, and the other in a modified sequence.
When cross-crimping, all 8 wires are always taken; the figure shows a method that allows speeds of up to 1 Gigabit/sec. If the equipment does not operate with such bandwidth, then the speed will be reduced.
Now that we have managed to decide which patch cord to use, have found out the necessary pinout and how many cores to use, we can move on to the process itself.
Using pliers
 The most correct option when crimping an RJ-45 plug and a twisted pair cable is to use special pliers.
In professional language they are called crimpers.
The name comes from the English word crimper - to squeeze.
Why is it worth crimping with crimping pliers:
- Convenience - they have a convenient shape and are so easy to use that anyone can use them.
- Time saving - all types of nippers are collected, which will allow you to carry out three procedures with one tool.
- Safety - it is impossible to harm yourself with them, only if you do not deliberately stick your finger into the cutting pliers.
Everything is prepared, now let's start pressing.
To do this you need:

- Bite off the old connector; it can be used as a sample for core pinout. If this is not the case, then you can move on to the next step.
- Strip the conductors from the outer sheath. The length of the stripped wires should be equal to the length of the connector or slightly less, but not more. You need to measure the length from the cut edge and insert the wire into the stripping area. Now you should bite the cable, remove it from the pliers and remove the outer sheath.
- The colored wires, as we already know, are twisted inside the cable. They must be carefully untangled and aligned. If their lengths differ, then be sure to shorten the ones that are too long.
- Without inserting into the connector, it is necessary to arrange the wires in the sequence in which the crimping will be carried out.
- Next, you need to insert the wires into the connector. It should be inserted so that part of the outer braid fits inside. In this case, the plug will be strong and the cable will not fly out during use.
- Next, you need to carefully place the cable with the connector in the area for crimping the network cable and firmly squeeze the crimper handles. During this movement, the knives of the pliers unclench the connector terminals, which cut through the insulation of the conductors and secure them in the connector.
- The last step is to check that the work is done well. Move the rzh 45 connector, if no wires jump out of their places and it does not fall off, then everything is fine.
Install the crimped cord into the port and check for connection. If the LAN or WAN port lights blink, the Internet appears or the desired device appears on the network, the cable is crimped correctly.
Screwdriver application
 Using a crimper for crimping is professional. However, not every person has it available.
In such a case, there are simple instructions on how to replace an RJ45 jack using a screwdriver at home.
The preparatory sequence is the same as in the previous version:
- cut off the connector, if any;
- remove external insulation, for example, with a knife and;
- align the length of the wires;
- arrange the wires in accordance with the required wiring;
- insert the wire into the RJ45 plug.
Next, you must definitely check how the conductors are installed. If the order is maintained and everyone is in their own path and touches the golden terminal, we proceed to crimping. You need to place the connector on the table so that the latch is on the bottom. Take a screwdriver and press on the fastener in the connector, which will secure the cable itself in the connector.
After this, using the same screwdriver, you need to press the terminals and connectors one by one. It must be done so that the terminal contact breaks through the core insulation and becomes one with the wire.
You need to perform this step especially carefully and calculate the force with each press so as not to pinch the terminal and break the connector.
 Once all 8 cores have been clamped, you need to check the operation.
This can be done in different ways, depending on the purpose for which the crimping was done.
If you made a wire to connect a computer to a router, then connect one plug to the WAN connector on the router, and the second to the Ethernet connector on the PC. If the results are positive, the lights will “blink” and you will be able to establish an Internet connection.
As practice shows, it is not difficult to repair an Internet cable yourself. This procedure does not require any special knowledge, the main thing is to figure out which wire layout will be used.
The rest is a matter of technique; you can crimp the Internet wire using a special crimper or limit yourself to a simple screwdriver. Of course, in the first option this can be done faster. But the main trick of the second one is not to buy a tool. The method is especially relevant for those who do not need to do this work constantly.
Watch the video in which a specialist explains in detail how to crimp an Internet cable with your own hands:
In contact with
See inaccuracies, incomplete or incorrect information? Do you know how to make an article better?
Would you like to suggest photos on the topic for publication?
Please help us make the site better! Leave a message and your contacts in the comments - we will contact you and together we will make the publication better!
Cutting a twisted pair network cable for crimping is the first and most critical step in crimping. The reliability of the connection between the conductors of the twisted pair cable and the RJ45 plug, and as a final result, the stability of access to the Internet, depends on the accuracy and correctness of its implementation.
The main thing when cutting is to avoid notching the twisted pair conductors and to prevent them from overlapping at the point where they are clamped by the clamp in the RJ-45 plug. Crimping pliers for RJ-11 and RJ-45 plugs, as a rule, have special knives for cutting the twisted pair cable to length and trimming its outer sheath. But I never use these functions of pliers, since I have repeatedly had to deal with the consequences of such pruning.
The fact is that a twisted pair cable is far from an ideal circle, since all the pairs are twisted around each other; when cutting in pliers, the copper strands of the conductors are often cut and a few bends are enough for them to break off. Reliability can only be guaranteed by manually preparing the cable end for crimping.
Cutting a network cable begins with removing the outer sheath. To do this, one jaw of the side cutters is inserted inside the cable. Care must be taken to ensure that no conductors come into contact with the cutting edge. Most cables have a split nylon thread running inside them. After opening a couple of centimeters of the shell, you can grab it and, pulling it away with tension, cut the shell by 4-5 cm. Next, the shell is bent to the side and cut off with side cutters. Many people recommend removing the sheath by 14 mm, but with such a length it is practically impossible to develop and align the twisted pair conductors well.

Next, the twisted pairs themselves develop counterclockwise; usually they are twisted clockwise when looking at the end of the cable. They must be developed in such a way that the pairs are in the same plane to a shell depth of up to 5-8 mm. This condition must be observed to prevent the conductors from being squeezed by the plug clamp when crimping with pliers. In this case, it is necessary to immediately orient the pairs by color, taking into account the color markings for crimping.

Color scheme for twisted pair crimping according to option B, the most common option.
The twisted pair conductors are developed and straightened until they are in the same plane at the point where the RJ plug clamp is clamped. The twisted pair conductors are shortened to a length of 14 mm and inserted into an RJ-11, RJ-45 plug. It is imperative to check that all conductors are under the contact teeth and their alternation corresponds to the color marking. Sometimes, when threading the reins into the fork, they change places. The conductors in color scheme B are arranged one after another, white with colored stripes - colored. This allows you to quickly check at a glance that the wires are routed correctly.
How to crimp RJ-11, RJ-45 with pliers (crimper)
Crimping of UTP computer twisted pair cables into an RJ-11, RJ-45 plug is performed with a special crimping tool - plug crimping pliers. Professionals call such pliers Crimper. By design, they come in two types: lever and press. Lever pliers (pictured left) are not expensive and work accordingly. A lot of force is required and the compression is skewed. The best are the HT-500, in the right photo, they are devoid of the noted disadvantages. Their design is such that when twisted pairs are compressed, the comb that recesses the contacts in the plug moves strictly perpendicular to the plug.

To crimp a network cable with pliers, you need to cut and thread the twisted pairs into the plug, insert the RJ-11 or RJ-45 plug into the required cell of the pliers and press their handles together with your hands until they stop.

Press the latch of the RJ-11, RJ-45 plug to its body and remove the twisted pair cable, ready for use, crimped with the RJ-45 plug, from the pliers.
How to crimp RJ-11, RJ-45 without pliers
Sometimes you urgently need to crimp a cable with an RJ-11 or RJ-45 plug, but you don’t have pliers at hand. In this case, you can do the crimping manually without a specialized tool. Insert the cut conductors of the twisted pairs into the plug, in accordance with the required color scheme, clamp the RJ in a vice by the latch, and using a screwdriver bit with a small hammer, tapping the bit, deepen the lamellas to the desired depth. Snap the cable clamp onto the plug body.

The thickness of the bit blade should not exceed 0.55 mm, since the thickness of the lamella in RJ forks is 0.56 mm. Otherwise, you can flatten the insulating sides. The spring-loaded contacts of the socket will cling to these places and there will be no contact. If the sides are damaged, you need to use a sharp knife to cut off the overhanging edges at the points of damage.
How to re-crimp RJ-11, RJ-45
There are, at first glance, more dead-end situations. You urgently need to crimp an RJ-11 or RJ-45 plug onto the network cable, but you don’t have a new plug at hand. There is also a simple solution for this problem. It is necessary to hold the fork body in a vice by the latch and pull the lamellas out of their seats by 1 mm, prying them alternately from the ends with an awl.

Use a knife to cut the latch on the near side to the cable, remove it and remove the old twisted pairs. I completely disassembled the RJ-45 plug to demonstrate its components.

Crimp new twisted pairs into an RJ-11 or RJ-45 plug using the technology described above.

Since the UTP cable retainer was removed when disassembling the plug, it is necessary to fix the cable in the plug by dropping a few drops of silicone, glue or sealant into the resulting window from the removed latch. If there is a need to extend or repair damaged twisted pair cables, this can be done by soldering or twisting. The reliability of a soldered connection exceeds any mechanical methods.
Good afternoon, dear readers of the blog site. If your Internet cable (twisted pair) was chewed by a dog or cat, it was crushed by furniture or was damaged in another mechanical way, then it can be restored without losing its aesthetic appearance and functional characteristics. Many, remembering their grandfather’s method, resort to twisting the wires in the old fashioned way and then wrapping them with electrical tape. However, it is not permissible to repair the Internet cable in this way.
This method is well suited when the power cable of devices and devices is broken. Any twisting of twisted pair cores means additional interference, loss of data packets which you can then feel during work (reduced speed, connection breaks, etc.). By resorting to twisting, you lose data transfer speed by an order of magnitude.
This article will describe a method for repairing an Internet cable if it breaks in the area from the entrance to the apartment to connecting the device. If you damage or break the connector, then you can read about repairing it in a separate section.
This situation can also arise with the cable from the antenna. Therefore, I recommend that you read the article dedicated to it.
Necessary tool
To repair a damaged twisted pair, we need several tools:

Tool for stripping and cutting cables (stripper)
A stripper is needed to remove a certain piece of outer insulation, as well as cut off the excess length of the cores. A knife can also be used to remove the insulation. However, be extremely careful not to damage the integrity of the cores.


Wire connector (tape lock)
You need as many Scotchlocks as the number of cores that need to be spliced.

Connector Crimping Tool
If you don’t have such a tool, you can get by with simple pliers. However, just like with a knife, you need to be careful, otherwise you can damage or crush the connector.
Internet cable repair (step by step steps)
First, using a stripper, remove excess insulation to free the cores from it (about 2 centimeters). We unravel the twisted pairs for further ease of installation in the connector.

Now, one by one, we take cores of the same colors from different pieces of cable and insert them all the way into the holes of the connector. Then secure the tape with two fingers. Using a tool for crimping connectors, tighten the tape completely and then the wires will definitely not fall out. This operation must be carried out in turn with all the cores.
As a result of repairing the Internet wire, you will get a small bundle (you can see how it looks in the figure below).

It is recommended to wrap this area with electrical tape for additional protection. But before finishing, I advise you to check your work and make sure that the Internet is working. To do this, you need to insert a crimped twisted pair into the connector of the device through which the network is organized (desktop computer, laptop or router). If everything works without failures, then you can safely protect the Internet cable repair site.
I advise you to read the article about. Such a need may arise if you are planning to remodel the premises and the equipment will be moved to another location.
If you liked this article, then subscribe to new ones and please use the buttons.


- Is it possible to wash on Palm Sunday?
- Gifts for the New Year - what to give to relatives, friends, colleagues and children
- Gifts for the New Year - what to give to relatives, friends, colleagues and children
- Annunciation: history and traditions of the holiday Orthodox holiday of the Annunciation of the Blessed Virgin Mary
- The Best Crime Games of All Time
- Game "Uncle Grandfather for two"
- Mexican party scenario National games of Mexico
- Is it possible to eat grapes at night?
- The right approach to getting rid of body swelling To relieve swelling
- How to apply a mask to your face correctly: tips and tricks
- Soybean Oil and Its Amazing Benefits
- Vacuum breast massage at home and in the salon: photo, video
- Foot massager US Medica Acupuncture
- i-water alkaline water bottle
- How to choose stockings for varicose veins for pregnant women - help in choosing tights Compression panties for pregnant women
- Belly slimming belt: review of the best models
- Massage chair YAMAGUCHI MERCURY comfortable modes for massage
- New Year New Year's games and entertainment
- New Year's competitions and entertainment Games for the New Year at home
- Signs for Maslenitsa week for girls and more!